

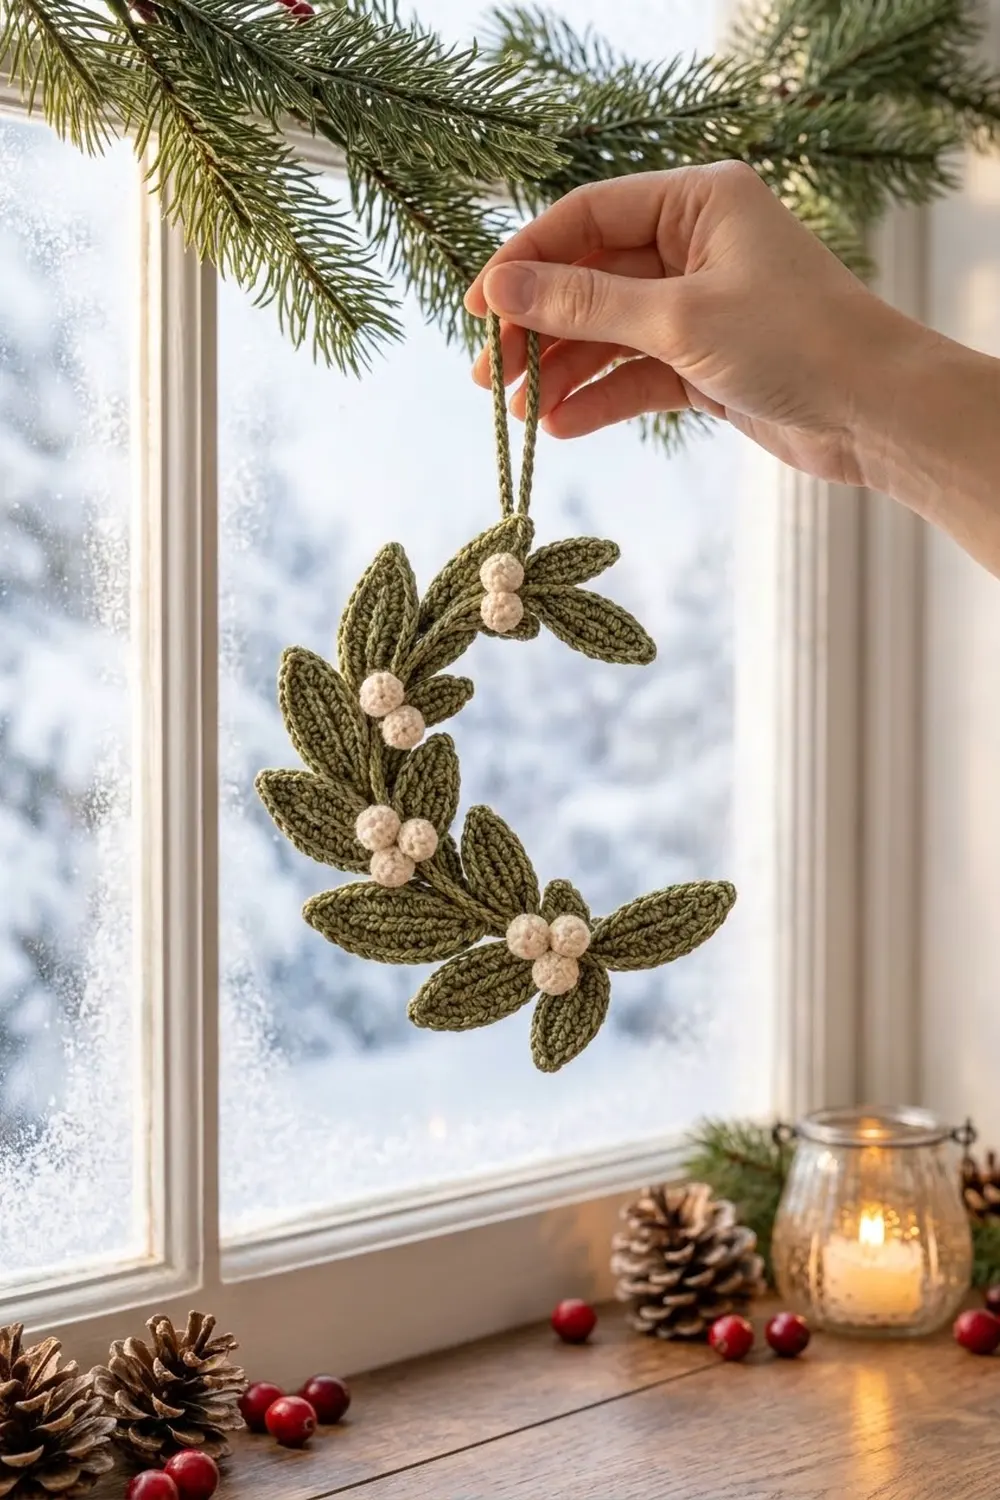
The Winter Kiss Mistletoe Sprig is a hanging holiday ornament shaped like a soft crescent of mistletoe. Fourteen pointed olive-green leaves fan out from a curved stem, with four clusters of round cream berries tucked between them. A slender green cord loop at the top lets it hang from a tree branch, a garland or a window latch.
The colors are kept simple on purpose. One muted olive or sage green is used for the leaves, stem and loop, and one warm cream for the berries. Short tall stitches on both sides of a center chain give each leaf a ribbed, chevron-like surface. A neat sc edge finishes each leaf with a sharp point. The look is natural and cozy rather than bright and glossy.
This pattern uses US crochet terms. Without the hanging loop, the finished ornament measures about 5 in wide by 6 in tall (12.7 cm by 15.2 cm). With the loop, it hangs about 8.5 in (21.6 cm) tall.
The ornament is made in parts and then assembled. Each leaf is worked in two rounds around a foundation chain. The berries are small, stuffed and worked in the round. The stem and the loop are each one slip-stitch cord. You then sew everything onto the stem following a placement map, which gives you one finished ornament.
Finished Size and Construction
- Finished size: 5 in wide x 6 in tall (12.7 cm x 15.2 cm), plus a 2.5 in (6.4 cm) hanging loop
- Skill level: Easy-intermediate
- Terminology: US crochet terms
- Yarn weight: DK / light (3)
- Hook: 3.0 mm (US C/2 or D/3)
- Number of pieces: 1 finished ornament, assembled from 28 parts (10 large leaves, 4 small leaves, 12 berries, 1 stem, 1 loop)
- Layout: Crescent-shaped sprig with 4 leaf-and-berry groups along a curved stem
- Large leaf size: 2 in x 0.9 in (5.1 cm x 2.3 cm)
- Small leaf size: 1.5 in x 0.8 in (3.8 cm x 2.0 cm)
- Leaf size before edging: large 1.8 in x 0.7 in (4.6 cm x 1.8 cm); small 1.3 in x 0.6 in (3.3 cm x 1.5 cm)
- Edging depth: about 0.1 in (0.3 cm) on each long side
Materials
Choose a smooth DK-weight yarn that shows stitches clearly. Mercerized cotton or a cotton blend gives the crispest leaf texture and the cleanest berries. Soft acrylic also works, but the leaves will be a little puffier and the tips less sharp.
- Color A, olive or sage green: 25 g, about 58 m (63 yd)
- Color B, cream or ivory: 8 g, about 18 m (20 yd)
These amounts assume a DK yarn of about 115 m per 50 g. They include a margin of roughly 40 percent, so you have enough for a test leaf and a little practice.
Tools:
- 3.0 mm crochet hook
- Tapestry needle with a sharp or semi-sharp tip
- A small pinch of polyester fiberfill, or yarn scraps, for the berries
- Scissors
- Stitch marker
- Rustproof pins and a foam blocking mat
- Spray bottle with water
Abbreviations (US Terms)
- ch – chain
- sl st – slip stitch
- sc – single crochet
- hdc – half double crochet
- dc – double crochet
- sc2tog – single crochet 2 together
- st(s) – stitch(es)
- rnd – round
- BB – back bump of the chain
- MR – magic ring
Special technique – slip-stitch cord: Chain the stated number. Then sl st into the back bump of the 2nd ch from the hook, and into the back bump of each ch across. This makes a firm, slightly twisted cord that does not stretch. You always end with one fewer sl st than the number of chains.
Gauge and Checkpoints
Gauge isn’t critical for an ornament, but it decides whether the leaves look slim and pointed or wide and floppy. Target gauge is 22 sc and 24 rows = 4 in (10.2 cm) with a 3.0 mm hook.
Test one piece first. Make one large leaf before anything else, and measure it at each stage:
- Foundation chain of 11: about 1.8 in (4.6 cm) long
- Large leaf after Rnd 1: 1.8 in x 0.7 in (4.6 cm x 1.8 cm)
- Large leaf after Rnd 2: 2 in x 0.9 in (5.1 cm x 2.3 cm)
- Berry after Rnd 4: about 0.5 in (1.3 cm) across
- Stem cord, 35 sl sts: about 6.3 in (16.0 cm) before curving
If the leaf is too big: Go down to a 2.75 mm hook, or tighten your chains. Loose chains are the most common cause of long, thin leaves.
If the leaf is too small or stiff: Go up to a 3.25 mm or 3.5 mm hook. The leaf should still bend slightly without gaps opening between stitches.
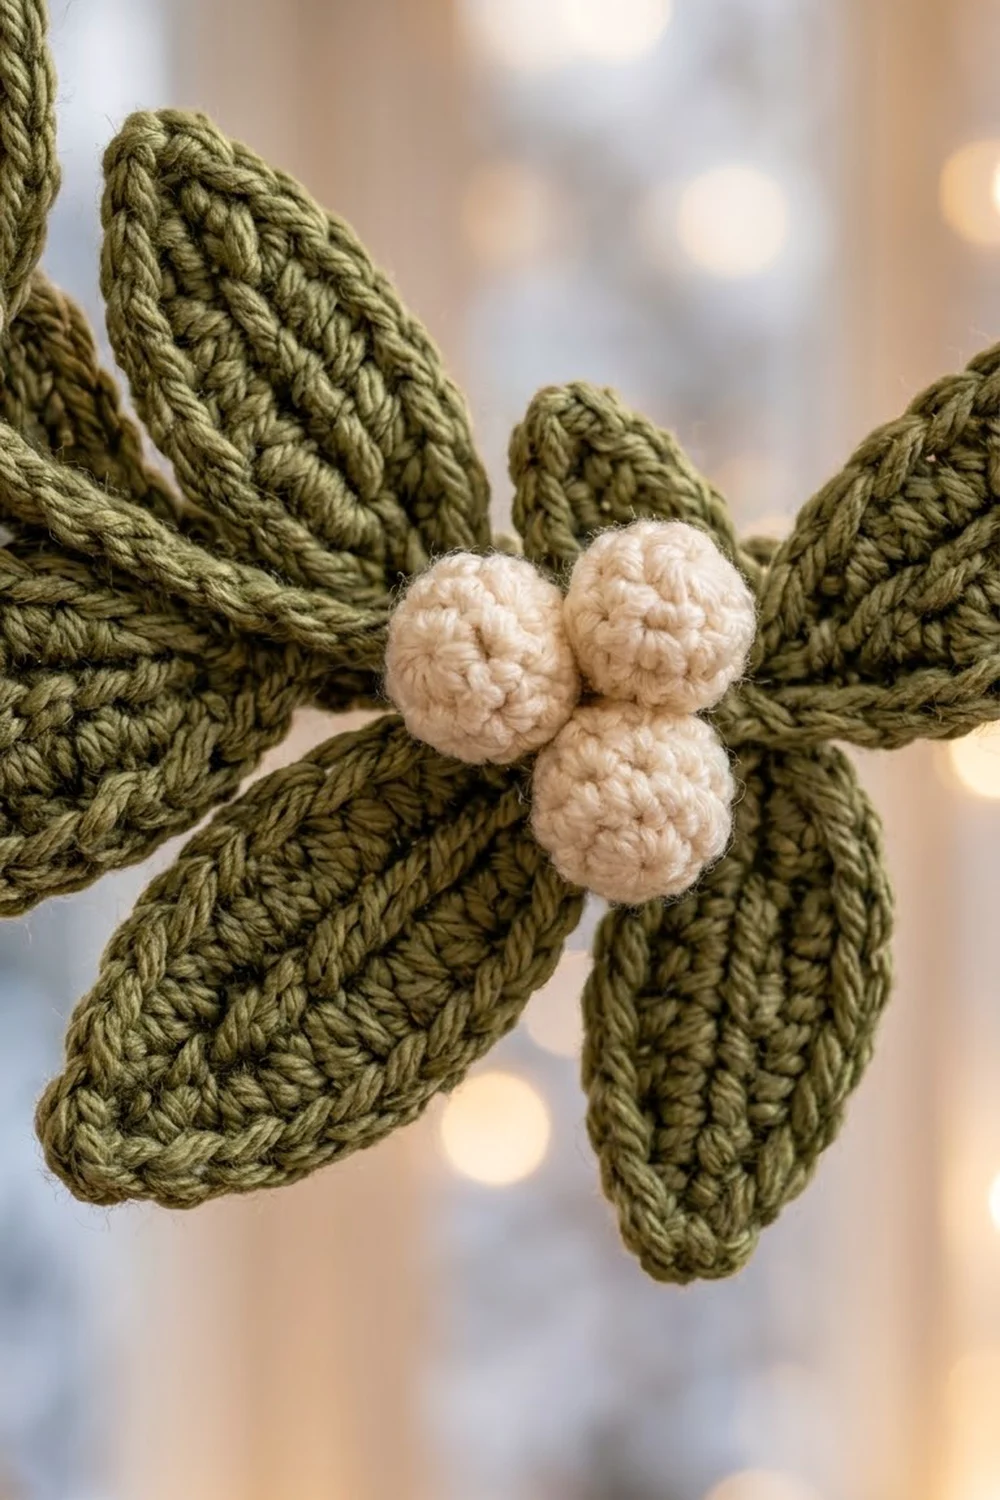
Large Leaf (Make 10)
With Color A, ch 11.
Rnd 1 (first side): Work into the back bumps, starting in the 2nd ch from the hook: sl st in the next ch, sc in the next ch, hdc in the next ch, dc in each of the next 4 ch, hdc in the next ch, sc in the next ch. (9 sts on the first side)
Rnd 1 (tip): 3 sc in the last ch. (3 tip sts)
Rnd 1 (second side): Rotate the work and continue along the other side of the foundation chain, working into the free front loops. Sc in the next ch, hdc in the next ch, dc in each of the next 4 ch, hdc in the next ch, sc in the next ch, sl st in the last ch. (9 sts on the second side)
Join with a sl st to the first sl st. Rnd 1 total: 21 sts (9 + 3 + 9).
The stitch heights rise and fall (sl st, sc, hdc, dc, then back down), which narrows the leaf at both ends. The dc on each side of the center chain lean toward the middle and create the ribbed chevron look. The foundation chain shows as a center vein.
Work Rnd 2, the leaf edging, now. It is written in the Border section below.
Small Leaf (Make 4)
With Color A, ch 9.
Rnd 1 (first side): Work into the back bumps, starting in the 2nd ch from the hook: sl st in the next ch, sc in the next ch, hdc in the next ch, dc in each of the next 2 ch, hdc in the next ch, sc in the next ch. (7 sts)
Rnd 1 (tip): 3 sc in the last ch. (3 sts)
Rnd 1 (second side): Working into the free loops on the other side, sc in the next ch, hdc in the next ch, dc in each of the next 2 ch, hdc in the next ch, sc in the next ch, sl st in the last ch. (7 sts)
Join with a sl st to the first sl st. Rnd 1 total: 17 sts (7 + 3 + 7).
Then work Rnd 2 from the Border section.
Berry (Make 12)
With Color B:
Rnd 1: MR, 6 sc in the ring. Pull the ring closed. (6 sts)
Rnd 2: 2 sc in each st around. (12 sts)
Rnd 3: Sc in each st around. (12 sts)
Rnd 4: Stuff the berry firmly with a tiny pinch of fiberfill or yarn scraps. Sc2tog 6 times. (6 sts)
Fasten off, leaving a 6 in (15.2 cm) tail. Thread the tail through the front loops of the last 6 sts and pull tight to close. Keep the tail for sewing. Work the berries in continuous spirals, with a marker in the first st of each rnd if you like.
Stem (Make 1)
With Color A, ch 36. Work a slip-stitch cord: sl st in the BB of the 2nd ch from the hook and in the BB of each ch across. (35 sl sts)
Fasten off, leaving a 12 in (30.5 cm) tail. Laid straight, the stem measures about 6.3 in (16.0 cm). Number the stitches from st 1 at the top end to st 35 at the bottom end. The placement map uses these numbers.
Hanging Loop (Make 1)
With Color A, ch 31. Work a slip-stitch cord across. (30 sl sts)
Fasten off, leaving an 8 in (20.3 cm) tail. The cord is about 5.5 in (14.0 cm) long and folds into a 2.75 in (7.0 cm) loop.
Make All Pieces
Before you assemble, check that you have every part:
| Part | Color | Quantity |
|---|---|---|
| Large leaf | A | 10 |
| Small leaf | A | 4 |
| Berry | B | 12 |
| Stem | A | 1 |
| Hanging loop | A | 1 |
Placement map. The stem curves gently into a crescent that bows to the left in the middle. Each group has one berry cluster (3 berries in a triangle) plus its leaves.
        [ LOOP ]
           |
  st 1  ---+---  top end of stem
  st 6     A   = 3 berries + 2 large + 1 small
           (
  st 14   B    = 3 berries + 2 large + 1 small
          (
  st 22    C   = 3 berries + 3 large + 1 small
            \
  st 32      D = 3 berries + 3 large + 1 small
  st 35  ---  bottom end of stem
Leaf totals: 2 + 2 + 3 + 3 = 10 large and 1 + 1 + 1 + 1 = 4 small, matching the 14 leaves you made. Berry total: 4 groups x 3 = 12.
Joining
Sew every part to the stem with a tapestry needle and the leaf tails, using small whip stitches through matching stitches.
Shape the stem. Pin the stem to your blocking mat in a crescent about 6 in (15.2 cm) tall from st 1 to st 35. Bow the middle about 1 in (2.5 cm) to the left of a straight line. Leave it pinned while you sew so the curve stays even.
Attach the leaves. Each leaf’s base point is its starting sl st. Sew each base point to the stem stitch named in the map, one leaf sl st to one stem sl st. Then tack the leaf to the stem for about 0.25 in (0.6 cm) up its back. Use 2 or 3 whip stitches through the back loops of the Rnd 2 edging only, so nothing shows on the front.
Fan out the leaves in each group. One large leaf points out to the right, one points out to the left, and the small leaf points up along the stem. In groups C and D, the third large leaf points down and outward. Group D sits at the bottom end of the stem, so its leaves spread out like a star.
Attach the berries. At each group’s stitch number, sew three berries in a tight triangle over the stem, covering the leaf bases. Use each berry’s closing tail to stitch through the stem and through the next berry, so the three sit snugly together.
Attach the loop. Fold the loop cord in half and sew both ends to the back of stem sts 1 and 2. Weave all tails into the stem cord, where they hide easily.
Tension advice: Pull each whip stitch just snug. Too tight and the stem puckers and loses its curve. Too loose and the leaves flop forward when the ornament hangs.
Size checkpoint: The assembled sprig should measure about 5 in x 6 in (12.7 cm x 15.2 cm), with the loop adding 2.5 in (6.4 cm) above the top.
Border
On this ornament, the “border” is Rnd 2 of each leaf. This single crochet edging gives each leaf a crisp, raised outline and a sharp point. Work 1 sc into each Rnd 1 stitch, which adds about 0.1 in (0.3 cm) to each long side. The center tip stitch gets an extra sc and a ch-2 space.
Large leaf, Rnd 2: Ch 1. Sc in each of the 9 sts of the first side. At the tip, sc in the first tip st, (sc, ch 2, sc) in the center tip st, then sc in the third tip st. Sc in each of the 9 sts of the second side. Sl st into the first sc to join. Fasten off, leaving a 10 in (25.4 cm) tail for sewing.
Count: 21 sc worked one per existing st + 1 extra sc at the center tip = 22 sc, plus one ch-2 point. Each side has 11 sc: 9 side sts + 1 outer tip st + 1 sc of the point pair. 11 + 11 = 22.
Small leaf, Rnd 2: Ch 1. Sc in each of the 7 sts of the first side. At the tip, sc in the first tip st, (sc, ch 2, sc) in the center tip st, then sc in the third tip st. Sc in each of the 7 sts of the second side. Sl st to the first sc. Fasten off, leaving an 8 in (20.3 cm) tail.
Count: 17 sc worked one per existing st + 1 extra sc at the center tip = 18 sc, plus one ch-2 point. Each side has 9 sc: 7 side sts + 1 outer tip st + 1 sc of the point pair. 9 + 9 = 18.
Why the math works: Along the sides, 1 sc goes into each Rnd 1 stitch, so the sides stay flat with no ruffling or cupping. The only extra stitches sit at the tip: one sc and the ch-2 space. That extra fullness at the tip gives the leaf a sharp point instead of a rounded end. At the base, the edging closes neatly at the starting sl st, which keeps a slim point for sewing to the stem.
Final Blocking
- Lay the finished ornament face down on the foam mat.
- Mist it lightly with water until damp, not soaked.
- Turn it face up and pin the stem back into its 6 in (15.2 cm) crescent.
- Pin each leaf tip through its ch-2 space to sharpen the point. Pin each base close to the stem.
- Smooth each leaf flat with your fingertips, pushing the center vein into a straight line.
- Don’t pin or flatten the berries. Roll them gently between your fingers so they stay round.
- Let it dry completely, usually 6 to 8 hours, before taking out the pins.
- Check the size again: 5 in x 6 in (12.7 cm x 15.2 cm).
Final Quality-Control Checklist
- 10 large leaves at 2 in x 0.9 in (5.1 cm x 2.3 cm), each with 22 sc in Rnd 2
- 4 small leaves at 1.5 in x 0.8 in (3.8 cm x 2.0 cm), each with 18 sc in Rnd 2
- 12 berries, firm and round, about 0.5 in (1.3 cm) across
- Stem curves smoothly with no puckers
- Leaf groups at stem sts 6, 14, 22 and 32
- No sewing stitches visible from the front
- Loop sits centered and holds the ornament upright
- All tails woven in and trimmed
Troubleshooting
Leaves curl or cup. Your Rnd 2 is too tight, or you added stitches at the base. Redo the edging with a slightly looser hand, or go up a hook size for Rnd 2 only.
Leaf tips are rounded. Make sure you worked (sc, ch 2, sc) into the center tip st, and pin the ch-2 space when blocking.
Berries look flat or lumpy. Stuff them more firmly before Rnd 4, and pull the closing tail tight.
Ornament tilts when hanging. Move the loop one stitch toward the heavier side, or add a tacking stitch to the back of group C.
Stem shows gaps between groups. Rotate the small leaves to lie along the stem, or tack the leaf bases a little higher.
Care
Spot clean with cool water and mild soap, then reshape and lay flat to dry. Store the ornament flat in tissue paper so the leaves stay crisp.
Final Notes
The measurements build on each other. A 22-sc gauge gives a 1.8 in (4.6 cm) foundation chain, which becomes a 21-stitch Rnd 1 at 1.8 in x 0.7 in (4.6 cm x 1.8 cm). The 22-sc edging brings each large leaf to 2 in x 0.9 in (5.1 cm x 2.3 cm). Fourteen leaves and twelve berries on a 35-stitch, 6.3 in (16.0 cm) stem then make one 5 in x 6 in (12.7 cm x 15.2 cm) sprig, with a 2.5 in (6.4 cm) loop on top. If you check each step as you go, the finished ornament will come out the right size.
Happy crocheting!