

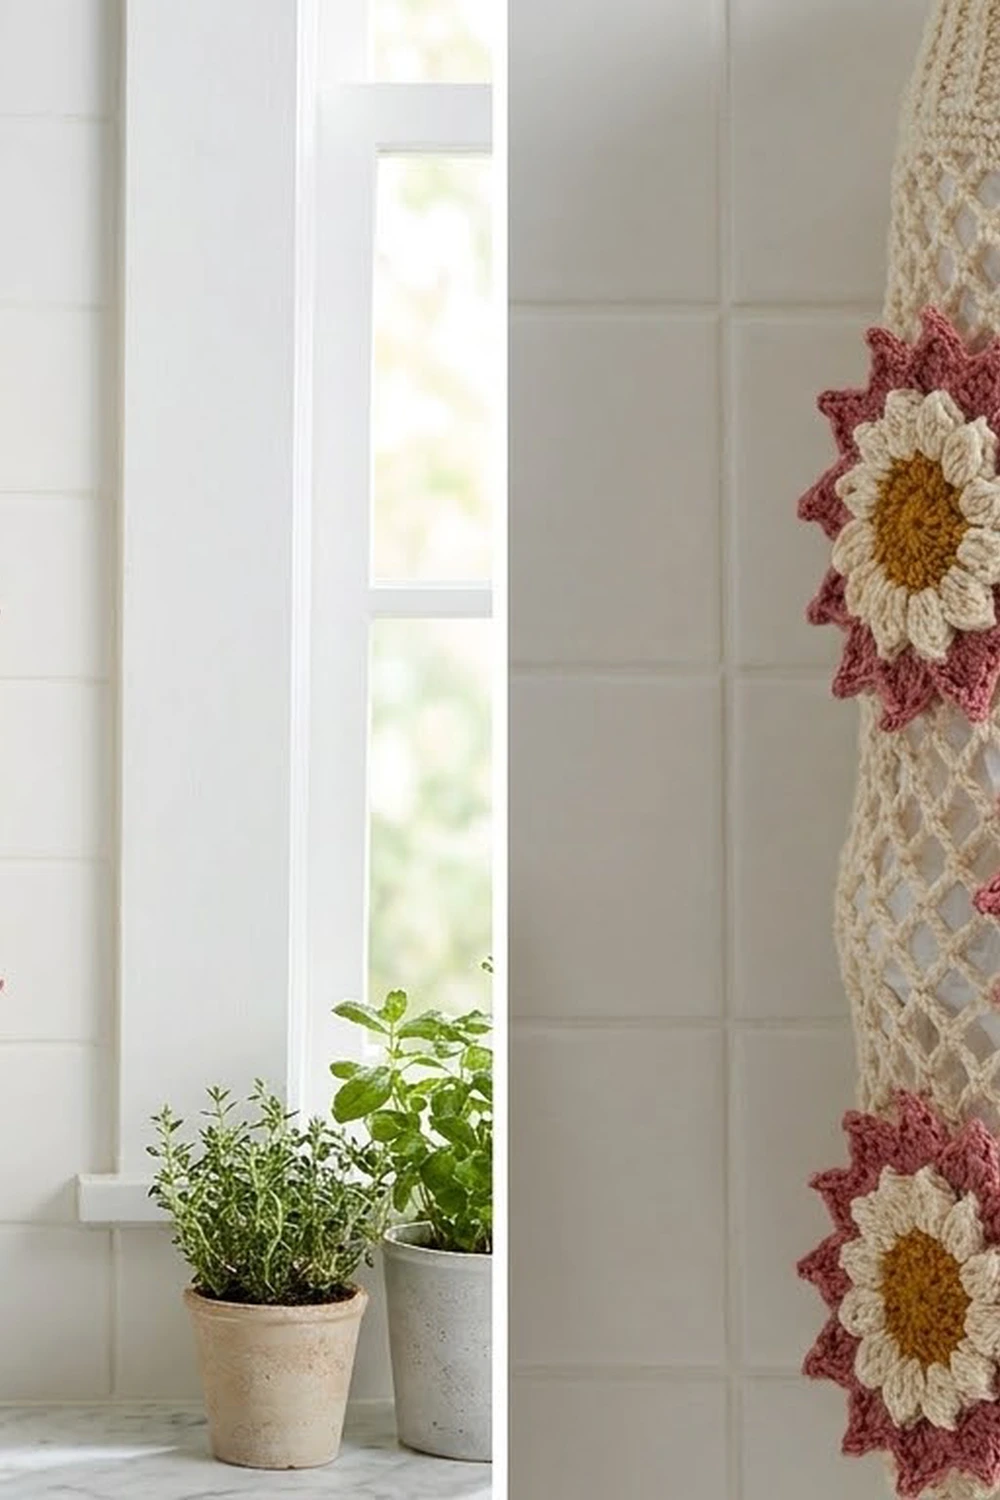
The Blushing Dahlia bag holder is a cream mesh tube with layered flowers in dusty rose and mustard gold. It hangs from a short strap on a hook or cabinet knob. You stuff bags in at the top and pull them out one at a time through the ribbed opening at the bottom.
The look is soft cottage kitchen. Each flower has a solid golden center, a ring of small cream petals, and eight sharp rose petals behind them. The open mesh lets you see how many bags are left, and the ribbed bands keep both ends neat.
This pattern uses US crochet terms. The finished holder is 6 in (15.2 cm) wide laid flat, 12 in (30.5 cm) around, and 18 in (45.7 cm) long, not counting the strap. Each flower is 4.5 in (11.4 cm) from point to point.
You make the body in one piece from the bottom up: ribbed bottom band, mesh, then the top band and strap. Next you make six flowers and sew them onto the mesh in three staggered tiers.
Finished Size and Construction
- Finished size: 6 in (15.2 cm) wide flat × 18 in (45.7 cm) long; 12 in (30.5 cm) around
- Skill level: Intermediate (uses post stitches)
- Terminology: US
- Yarn weight: DK (#3) cotton
- Hook: 4.0 mm (G-6)
- Number of pieces: 1 body + 6 flower appliqués
- Layout: 3 tiers of 2 flowers, each tier turned a quarter turn from the one before
- Piece size: each flower is 4.5 in (11.4 cm) point to point
- Size before border: 6 in (15.2 cm) wide flat × 16.5 in (41.9 cm) long
- Border depth: the top band is 1.5 in (3.8 cm)
Materials
Use a smooth mercerized or matte cotton in DK weight. Cotton holds its shape when the holder is full of bags, and the stitch definition shows off the petal points. The amounts below assume about 115 m per 50 g.
- Cream (body, petals, strap): 100 g / 230 m
- Dusty rose (outer petals): 40 g / 92 m
- Mustard gold (centers): 10 g / 23 m
These amounts include a safety margin of roughly 15%.
Tools:
– 4.0 mm (G-6) crochet hook
– Tapestry needle
– 4 locking stitch markers
– Rust-proof pins
– Measuring tape
– Scissors
– A rolled towel or a 4 in (10.2 cm) wide cardboard tube for blocking and sewing
Abbreviations (US Terms)
- ch – chain
- sl st – slip stitch
- sc – single crochet
- sc2tog – single crochet 2 together
- hdc – half double crochet
- dc – double crochet
- tr – treble crochet
- sk – skip
- sp – space
- st(s) – stitch(es)
- rnd(s) – round(s)
- FPdc – front post double crochet: yarn over, insert the hook from front to back to front around the post of the stitch below, and complete a dc.
- BPdc – back post double crochet: yarn over, insert the hook from back to front to back around the post, and complete a dc.
Special stitch: ribbing pair. One ribbing pair is (FPdc, BPdc) and uses 2 stitches.
Gauge and Checkpoints
- Solid sc gauge: 18 sc and 20 rows = 4 in (10.2 cm).
- Mesh gauge: 6 ch-5 loops wide × 6 mesh rounds tall = 4 in × 4 in (10.2 cm × 10.2 cm), lightly stretched. Each mesh round adds about 2/3 in (1.7 cm).
Make one flower before you start the body. It is a quick check of your tension.
Flower checkpoints:
– After Rnd 1: 1.25 in (3.2 cm) across
– After Rnd 2: 2.5 in (6.4 cm) across
– After Rnd 4: 4 in (10.2 cm) point to point
– After Rnd 5: 4.5 in (11.4 cm) point to point
Body checkpoints:
– After Rnd 6: the bottom band is 2.5 in (6.4 cm) tall.
– After the first 6 mesh rnds: the piece is 12 in (30.5 cm) around.
– After Rnd 27: 16.5 in (41.9 cm) long.
If your work is too big, go down 0.5 mm in hook size. If it is too small, go up 0.5 mm. Don’t change the stitch counts, because the band, mesh, and border counts depend on each other.
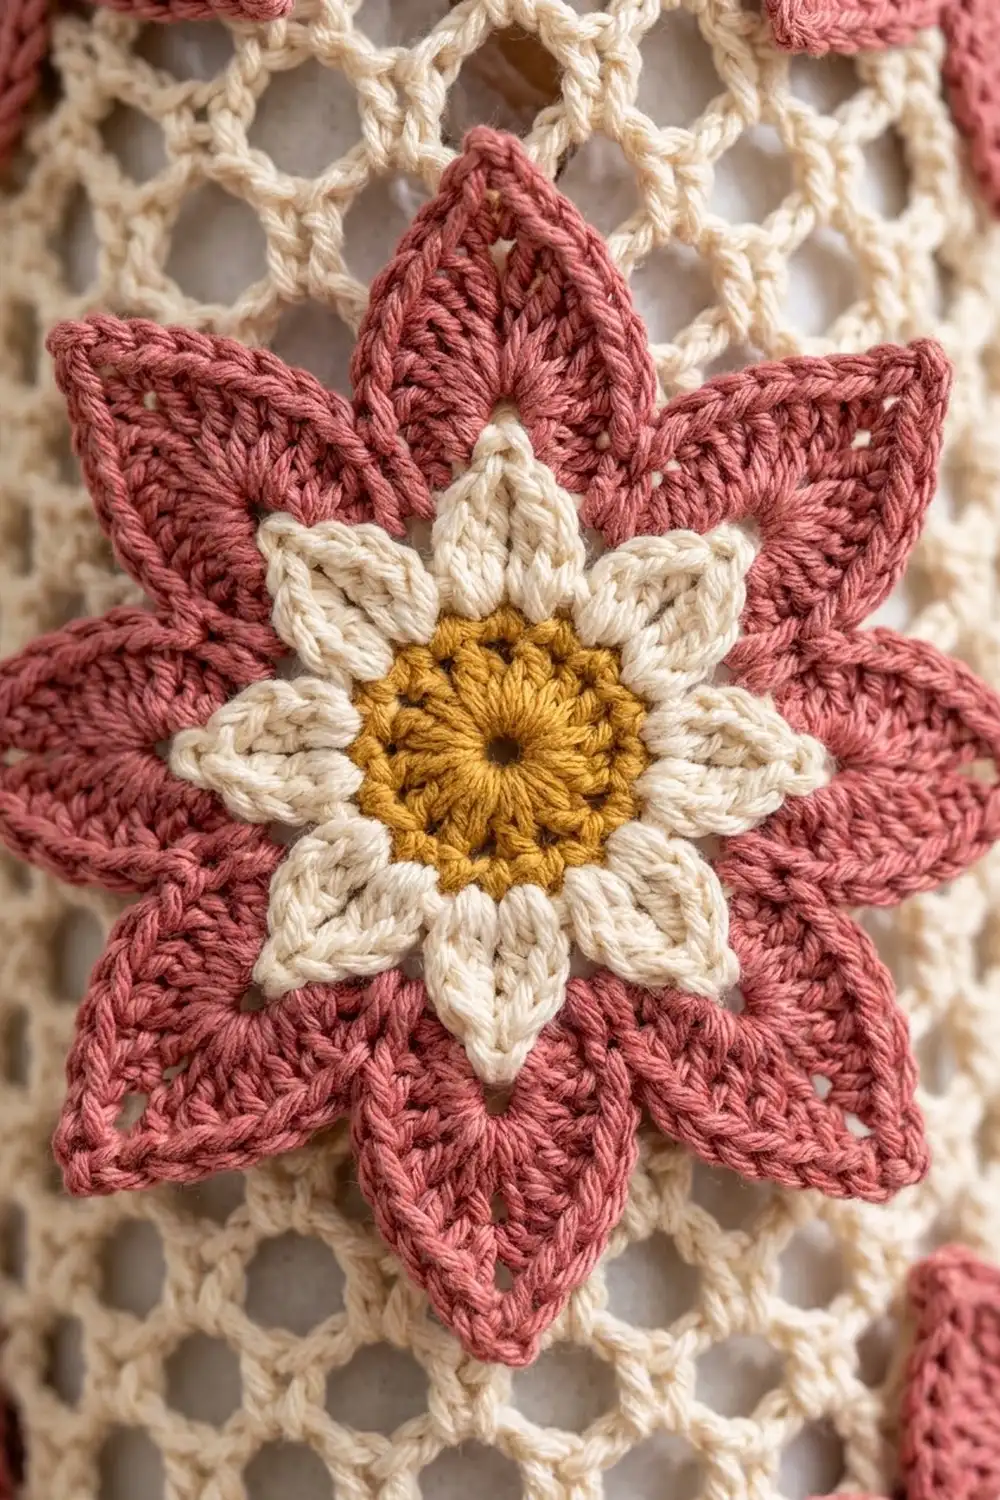
Flower Appliqué (Make 6)
Rnd 1 (mustard): Make a magic ring. Ch 3 (counts as dc), work 15 dc in the ring, then sl st to the top of the ch-3. (16 dc) Pull the ring closed and fasten off.
Rnd 2 (cream): Join cream in any st. Ch 1, sc in this st, (hdc, dc, ch 2, dc, hdc) in the next st. Repeat from * 7 more times, then sl st to the first sc. (8 sc, 8 petals of 4 sts each, 8 ch-2 tips) Fasten off.
This round makes eight small pointed cream petals. Each petal sits over every other mustard stitch.
Rnd 3 (rose): Join rose with a sl st in any sc of Rnd 2. Ch 6, then, working behind the next cream petal, sc in the next sc. Repeat from * 7 more times. On the last repeat, sl st to the first sl st instead of working the sc. (8 ch-6 loops)
The loops lie behind the cream petals. This is what stacks the rose layer behind the cream one.
Rnd 4 (rose): Sl st into the first loop. In each ch-6 loop, work (sc, hdc, dc, 2 tr, ch 3, 2 tr, dc, hdc, sc). Sl st to the first sc. (8 petals of 10 sts + a ch-3 tip each = 80 sts)
Rnd 5 (rose outline): Work this round on every petal: sl st in the first sc, sc in each of the next 4 sts (hdc, dc, tr, tr), (sc, ch 2, sc) in the ch-3 tip, sc in each of the next 4 sts (tr, tr, dc, hdc), then sl st in the last sc. Sl st to the first sl st to finish. (80 sc + 16 sl st + 8 ch-2 tips)
The sl sts pull the dip between petals in tight. The ch-2 tip at the top sharpens each point, and the sc outline gives the raised edge.
Fasten off and leave a 20 in (50.8 cm) rose tail for sewing. Weave in all the other ends.
Body
Work in joined rounds and don’t turn. Place a marker in the first stitch of each round. This beginning-of-round line is called the 0° line.
Bottom Band
Rnd 1: With cream, ch 36 and sl st to the first ch to form a ring, making sure the chain isn’t twisted. Ch 1, sc in each ch, then sl st to the first sc. (36 sc)
Rnd 2: Ch 2 (does not count as a st), dc in each st, sl st to the first dc. (36 dc)
Rnds 3–5: Ch 2, work 18 ribbing pairs around, then sl st to the first st. (36 sts each round)
Rnd 6 (conversion round): Ch 1, sc in the next st, 2 sc in the next st. Repeat from * 17 more times, then sl st to the first sc. (36 + 18 = 54 sc)
Checkpoint: The band is 2.5 in (6.4 cm) tall. The ribbed opening is about 2.5 in (6.4 cm) across, and Rnd 6 flares out to 12 in (30.5 cm) around.
Mesh
Rnd 7 (setup): Ch 1, sc in the first st, ch 5, sk 2 sts, sc in the next st. Repeat from * 16 more times, for 17 repeats in total. Then ch 2, sk 2 sts, and dc in the first sc. (18 loops)
How the setup works out: the first sc uses 1 st, and the 17 repeats use 3 sts each, which is 51 sts. The final skip uses 2 sts. That adds up to 54 sts, so no stitches are left over.
The ch-2 and dc together make the last loop and leave your hook at the center of that loop.
Rnds 8–26: Ch 1, sc around the post of the joining dc, ch 5, sc in the next ch-5 loop. Repeat from * 16 more times, then ch 2 and dc in the first sc. (18 loops each round)
Rnd 27: Ch 1, sc around the post of the joining dc, ch 5, sc in the next ch-5 loop. Repeat from * 16 more times, then ch 5 and sl st to the first sc. (18 full ch-5 loops)
Ending this round with a full ch-5 loop gives the border 18 matching loops to work into.
The mesh is Rnds 7–27, which is 21 rounds and measures 14 in (35.6 cm).
Checkpoint: The body measures 2.5 in (6.4 cm) for the band plus 14 in (35.6 cm) of mesh, for 16.5 in (41.9 cm) long. It is 6 in (15.2 cm) wide laid flat.
Make All Pieces
- Cream: 1 body, plus Rnd 2 of all 6 flowers
- Rose: Rnds 3–5 of all 6 flowers
- Mustard: Rnd 1 of all 6 flowers
The measurements below show where each flower’s center goes, measured down from the top rim. The angles are measured around the tube from the 0° line, which is the marker line.
                 0°      90°     180°    270°
Tier 1 (4 in)    F1      –       F2      –
Tier 2 (8 in)    –       F3      –       F4
Tier 3 (12 in)   F5      –       F6      –
- Tier center positions: 4 in (10.2 cm), 8 in (20.3 cm), and 12 in (30.5 cm) below the top rim.
- Angles in mesh loops: 0° is loop 1. 90° is between loops 5 and 6. 180° is loop 10. 270° is between loops 14 and 15.
Flowers F1 and F5 cover the beginning-of-round line.
Joining the Flowers (Appliqué)
The flowers are sewn on top of the finished mesh after the border is done. Don’t sew them on yet. They don’t add any stitches to the body or border.
Method:
1. Slide the rolled towel or cardboard tube into the body so the mesh sits at its natural width of 6 in (15.2 cm) flat.
2. Pin each flower center at its tier height and angle.
3. Using the rose tail, tack each ch-2 petal tip to the nearest mesh strand with 2 small stitches.
4. Tack each of the 8 valley sl sts the same way. That gives 16 anchor points per flower.
5. Finish with 8 tacks around the outside of the mustard center, one under each cream petal. This stops the center from lifting away.
Tension: Sew loosely enough that the mesh doesn’t pucker. If a diamond in the mesh squeezes shut next to a tack, take that tack out and redo it with more slack.
Size checkpoint: With all six flowers on, the holder still measures 6 in (15.2 cm) wide flat. The flowers in neighboring tiers sit about 5 in (12.7 cm) apart, measured diagonally center to center, so their 2.25 in (5.7 cm) radii don’t overlap.
Border (Top Band and Strap)
Border gauge: 18 sc = 4 in (10.2 cm). That means 54 sts gives a 12 in (30.5 cm) rim.
Rnd 28 (conversion round): Ch 1, work 3 sc in each ch-5 loop around, then sl st to the first sc. (18 loops × 3 = 54 sc)
Rnd 29: Ch 2 (does not count as a st), dc in each st, sl st to the first dc. (54 dc)
Rnd 30: Ch 2, work 27 ribbing pairs, sl st to the first st. (54 sts)
Rnd 31: Ch 1, sc in each st, sl st to the first sc. (54 sc) Don’t fasten off.
Counts per side: Laid flat, the tube has two sides of 27 sts each, front and back. The top band has no corners, so you don’t add any corner stitches.
Why the math works: The mesh has 18 loops, and each loop measures 2/3 in (1.7 cm) across, so the mesh is 12 in (30.5 cm) around. Working 3 sc per loop at 4.5 sc per inch also covers exactly 2/3 in (1.7 cm) per loop. Because of that, the band neither ruffles nor pulls in. The finished band is 1.5 in (3.8 cm) tall.
Strap: Ch 40, sk the next 26 sts, and sl st in the next st (the 27th). This anchors the strap directly opposite where it started. Turn, sc in each ch, and sl st into the starting st. (40 sc) Fasten off.
The strap is 8 in (20.3 cm) long and makes a loop that rises about 3.5 in (8.9 cm) above the rim.
Final body length: 2.5 in (6.4 cm) bottom band + 14 in (35.6 cm) mesh + 1.5 in (3.8 cm) top band = 18 in (45.7 cm).
Now sew on the flowers as described in Joining the Flowers.
Final Blocking
- Wet-block or lightly steam the flowers before you sew them on. Pin each of the 8 rose tips out to a 4.5 in (11.4 cm) circle and let them dry.
- After the flowers are attached, slide the towel roll back into the body.
- Mist the mesh and gently pull it lengthwise until it measures 18 in (45.7 cm).
- Shape the bottom ribbing by hand so the opening is round and about 2.5 in (6.4 cm) across.
- Smooth the top band flat and let everything dry completely before you remove the towel.
Final Quality-Control Checklist
- [ ] The body is 6 in (15.2 cm) wide flat and 18 in (45.7 cm) long.
- [ ] Every mesh round has 18 loops, with no skipped or doubled loops.
- [ ] The top band has 54 sts and lies flat.
- [ ] The bottom opening is about 2.5 in (6.4 cm) across.
- [ ] All 6 flowers are 4.5 in (11.4 cm) point to point, with 8 cream and 8 rose petals each.
- [ ] Each flower is tacked at 16 edge points plus 8 center points.
- [ ] The strap is anchored at opposite sides of the rim, 27 sts apart.
- [ ] All ends are woven in securely.
Troubleshooting
- The mesh is twisting into a spiral. Make sure you end each round with ch 2 and dc into the first sc, then start the next round around that dc.
- The top band ruffles. You probably worked 4 sc in some loops. Recount so you have exactly 54 sts.
- The rose petals are cupping. The Rnd 3 loops are too tight. Try ch 7 instead and check that the flower still blocks flat to 4.5 in (11.4 cm).
- The petal points are blunt. Pull the ch-2 tip snug in Rnd 5, and pin the tips out sharply when you block.
- Bags fall out on their own. Weave a strand of cream through Rnd 1 and pull it in slightly.
Care
Hand wash in cool water and lay flat to dry. Reshape the petal points while the flowers are still damp.
Final Notes
Here is the full measurement chain. Your flower should block to 4.5 in (11.4 cm). The ribbed bottom band is 36 sts and 2.5 in (6.4 cm) tall, and it widens to 54 sts and 12 in (30.5 cm) around. The 18-loop mesh adds 14 in (35.6 cm). The 54-st top band adds 1.5 in (3.8 cm), for a total of 18 in (45.7 cm), and the strap is an 8 in (20.3 cm) loop. If you check each stage as you go, the six flowers will sit neatly in their staggered tiers.
Happy crocheting!