

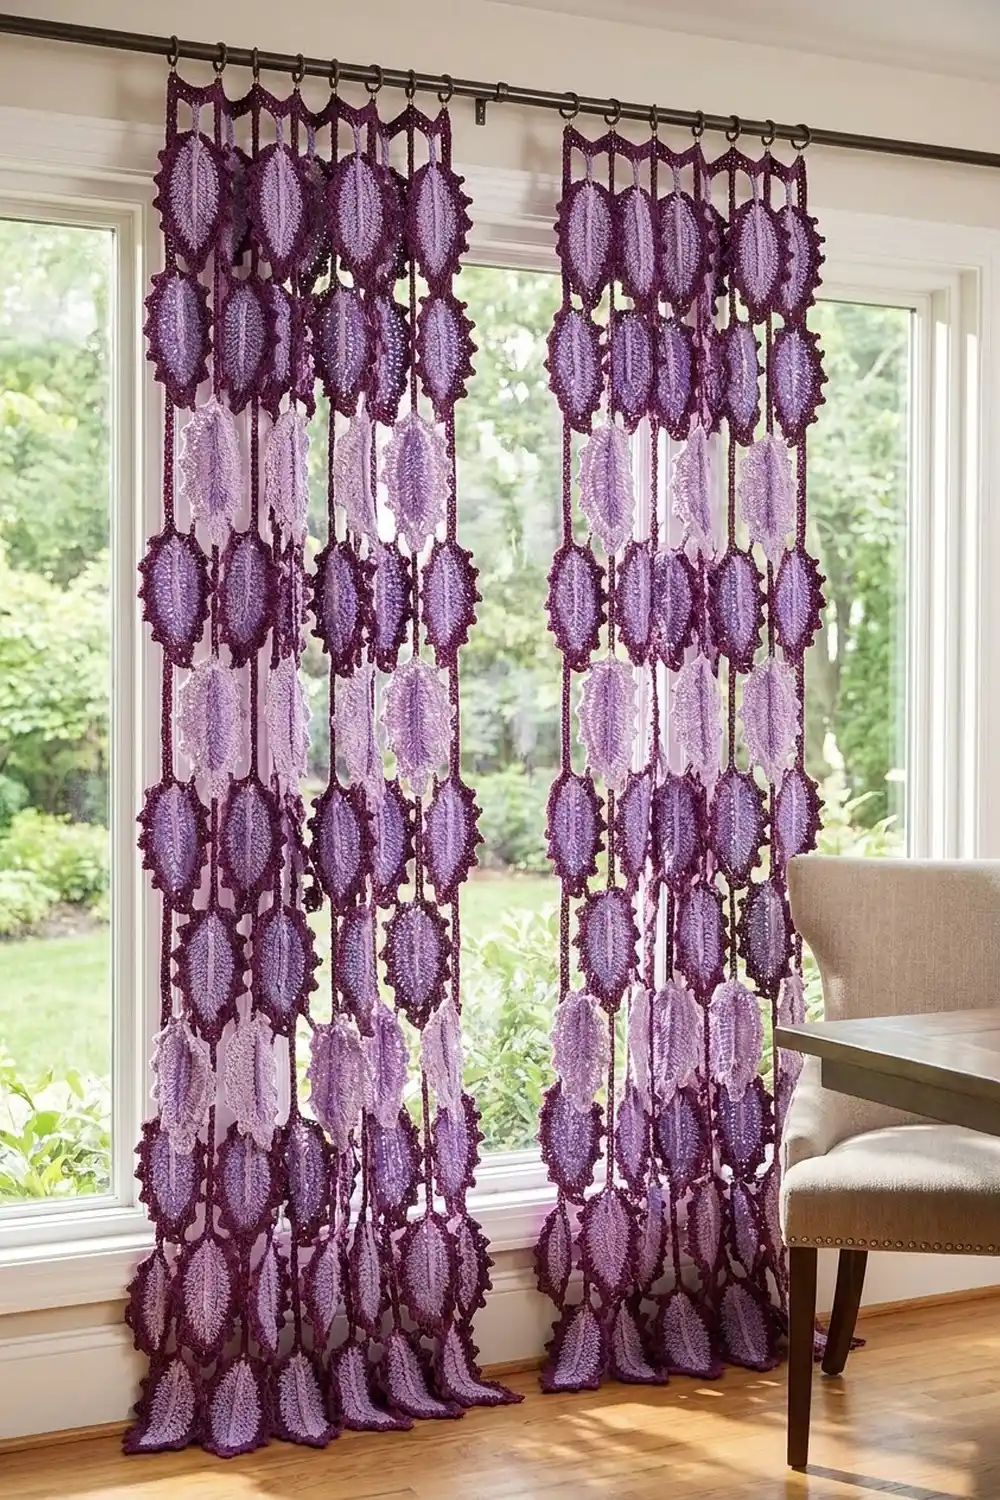
This curtain is a cascade of small purple leaves. Each leaf shades from a pale lavender center through medium violet lobes to a deep plum picot edge. The leaves hang tip-down from slim plum cords and alternate left and right, so light filters through the gaps like sun through a hedge.
The pattern makes a pair of panels. Each finished panel measures about 19.6 in (49.8 cm) wide and 47.4 in (120.4 cm) long from the top of the header to the lowest leaf tip, not counting the rod loops. The style is airy and botanical, and it works well in a bedroom or reading-nook window.
All instructions use US crochet terms.
Construction is modular. You crochet 96 identical three-color leaves in rounds, worked around a foundation chain. You then chain 8 cords and join 12 leaves to each cord as you go. Finally, you work a narrow single crochet header across the top of each panel that holds 4 cords and ends in 8 rod loops.
Finished Size and Construction
- Finished panel size: 19.6 in x 47.4 in (49.8 cm x 120.4 cm), excluding rod loops
- Skill level: Intermediate
- Terminology: US
- Yarn weight: Sport (CYC 2), cotton or cotton blend
- Hook: 3.5 mm (E-4)
- Number of pieces: 96 leaves, 8 cords, 2 headers
- Layout: 2 panels; each panel has 4 cords with 12 leaves per cord
- Leaf size: 5 in long x 3 in wide (12.7 cm x 7.6 cm), plus a 1 in (2.5 cm) stem
- Strand length before border: 46.6 in (118.4 cm), from the top of the cord to the tip of the lowest leaf
- Border (header) depth: 0.8 in (2.0 cm), plus rod loops
Materials
Choose a smooth, mercerized sport-weight cotton with crisp stitch definition. The yarn amounts below assume 300 m (328 yd) per 100 g. If you use a variegated or gradient yarn, keep Color C solid so the edges and cords stay sharp.
- Color A, pale lavender (leaf centers): 135 g / 405 m (443 yd)
- Color B, medium violet (leaf lobes): 170 g / 510 m (558 yd)
- Color C, deep plum (leaf edges, cords, headers): 210 g / 630 m (689 yd)
These quantities include a margin of about 15% for gauge swatches and tails.
Tools:
- 3.5 mm (E-4) crochet hook
- Tapestry needle
- Stitch markers (at least 12)
- Scissors
- Measuring tape
- Blocking mats, rust-proof pins and a spray bottle
- Curtain rod no thicker than 1 in (2.5 cm)
Abbreviations (US Terms)
- ch = chain
- sl st = slip stitch
- sc = single crochet
- hdc = half double crochet
- dc = double crochet
- sk = skip
- st(s) = stitch(es)
- sp = space
- RS = right side
Picot: Ch 3, then sl st in the 3rd ch from the hook.
Tip picot: Ch 4, then sl st in the 4th ch from the hook.
Lobe (rising side): Sc in next st, hdc in next st, (dc, ch 2, dc) in next st, hdc in next st. This uses 4 sts and makes 5 sts plus 1 ch-2 sp.
Lobe (falling side): Hdc in next st, (dc, ch 2, dc) in next st, hdc in next st, sc in next st. This uses 4 sts and makes 5 sts plus 1 ch-2 sp.
Gauge and Checkpoints
Make one complete leaf before anything else, block it, and measure it.
- Chain gauge: 20 ch = 4 in (10.2 cm), so 5 ch per inch
- Header gauge: 18 sc x 20 rows = 4 in (10.2 cm) square
Leaf checkpoints:
- After Rnd 1: 4.25 in x 1.25 in (10.8 cm x 3.2 cm)
- After Rnd 2: 4.75 in x 2.25 in (12.1 cm x 5.7 cm)
- After Rnd 3: 5 in x 3 in (12.7 cm x 7.6 cm), plus a 1 in (2.5 cm) stem
If your leaf is too big, go down one hook size (to 3.25 mm). If it is too small, go up one size (to 3.75 mm). Check your chain gauge separately. Many crocheters chain tighter than they stitch, and cord length decides where the leaves sit.
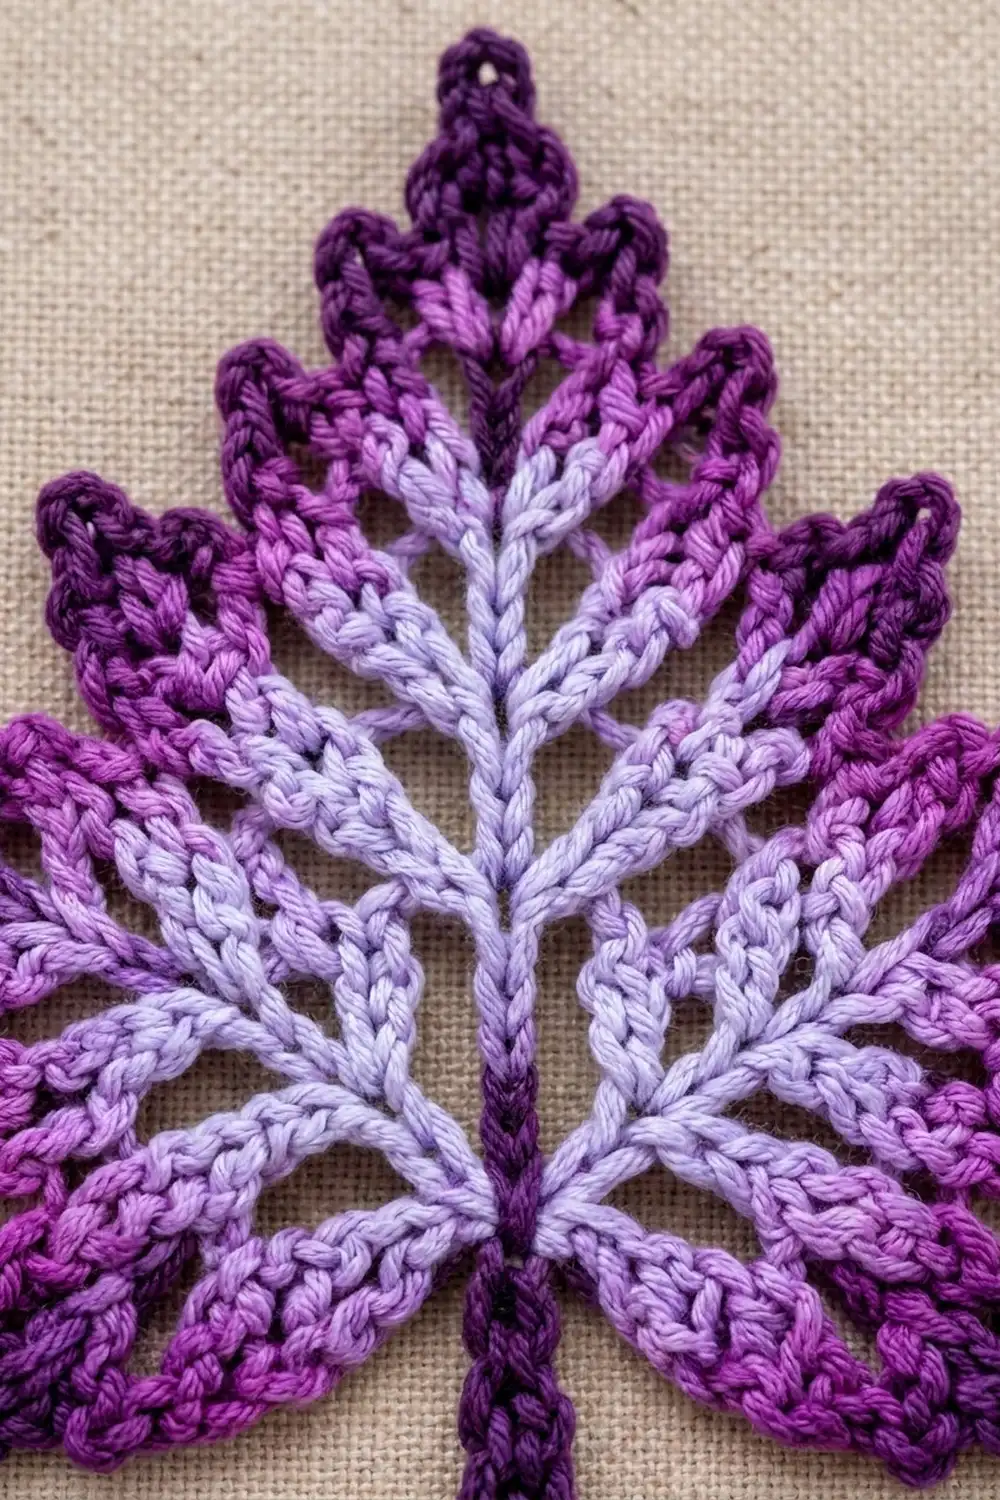
Leaf (Make 96)
Rnd 1 (Color A)
With A, ch 21. Treat the first chain you made (the one at the slipknot end) as the base of the leaf. The chain next to the hook is the tip.
Side 1: Sc in 2nd ch from hook, hdc in next 2 ch, dc in next 12 ch, hdc in next 3 ch, sc in next ch, 3 sc in last ch (base).
Side 2: Rotate the piece and work along the opposite side of the foundation chain. Sc in next ch, hdc in next 3 ch, dc in next 12 ch, hdc in next 2 ch, sc in the same ch as the first sc of the round.
Tip: Ch 3, then sl st in the first sc of the round.
Count: 19 sts on Side 1, 3 sc at the base and 19 sts on Side 2, for 41 sts plus 1 ch-3 tip sp. Fasten off A.
The taller dc in the middle of the chain make the leaf widest just above the center. The paired loops of the foundation chain form the raised midrib.
Rnd 2 (Color B)
With RS facing, join B with a sl st in the center sc of the 3 base sc. Ch 1 and sc in the same st.
- Work 5 rising-side lobes. This covers the next 20 sts (1 base sc plus the 19 sts of Side 2).
- In the ch-3 tip sp, work (sc, hdc, dc, ch 3, dc, hdc, sc).
- Work 5 falling-side lobes. This covers the next 20 sts (the 19 sts of Side 1 plus 1 base sc).
- Sl st in the first sc to join.
Count: 1 sc + 25 sts + 6 tip sts + 25 sts = 57 sts, plus 10 ch-2 lobe sps and 1 ch-3 tip sp. Fasten off B.
Check: 1 + 20 + 20 = 41 sts used, plus the tip sp. This matches Rnd 1 exactly.
Rnd 3 (Color C)
Join C with a sl st in the first sc of Rnd 2. Ch 1 and sc in the same st.
Sc in each st around. Work (sc, picot, sc) in each ch-2 lobe sp. Work (2 sc, tip picot, 2 sc) in the ch-3 tip sp. Sl st in the first sc to join.
This round is an edging round. Its count is 57 sc (1 per existing st) + 20 sc (2 in each lobe sp) + 4 sc (in the tip sp) = 81 sc, plus 11 picots. Do not fasten off.
Stem and Hanging Ring
Continuing with C, ch 9 and sl st in the 4th ch from the hook to form a small ring. Sl st in each of the next 5 ch and sl st in the base sc. Fasten off and weave in all ends.
The stem is 5 sl sts long, about 1 in (2.5 cm), and ends in a ch-3 ring.
Make All Pieces
- Leaves: 96 in total (48 per panel). Each leaf uses A, B and C.
- Cords: 8, in C (4 per panel)
- Headers: 2, in C
Block the leaves in batches of 12 before joining (see Final Blocking). Bag each batch of 12, since every cord takes exactly 12 leaves.
Layout of one panel (S = cord; L = leaf hanging left of the cord, R = leaf hanging right; each line is one join level, 3.6 in / 9.1 cm apart):
        S1   S2   S3   S4
Join 1   L    L    L    L
Join 2   R    R    R    R
Join 3   L    L    L    L
Join 4   R    R    R    R
Join 5   L    L    L    L
Join 6   R    R    R    R
Join 7   L    L    L    L
Join 8   R    R    R    R
Join 9   L    L    L    L
Join 10  R    R    R    R
Join 11  L    L    L    L
Join 12  R    R    R    R
Joining: Leaves to Cords (Make 8 Cords)
The cords are joined as you go. A chain-and-slip-stitch return gives each cord a firm, non-stretch core.
Chain pass: With C, ch 10. Insert the hook from front to back through the stem ring of the next leaf, yarn over and pull through the ring and the loop on the hook (join made). Ch 18. Repeat from * to * 10 more times, then join the 12th leaf. Ch 8.
Count: 10 + (11 x 18) + 8 = 216 ch, plus 12 join sts.
Return pass (sl st up the cord): Turn. Sl st in the back bump of the 2nd ch from the hook and in each ch and each join st all the way back to the top. That is 7 + 198 + 12 + 10 = 227 sl sts.
Tacks: On the return pass, when you reach the 6th ch below each join, sl st into that ch while also inserting the hook through the first lobe picot (the one nearest the stem) on the side of the leaf that faces the cord. The leaf is now held at two points: its stem and its upper lobe. This tilts the tip outward to the side shown in the layout. Hold odd-numbered leaves to the left and even-numbered leaves to the right before tacking.
Fasten off, leaving an 8 in (20.3 cm) tail at the top.
Tension advice: Keep each chain the same size as your gauge chain. If chains are tight, the leaves crowd together; if they are loose, gaps open up. Count every 18-ch segment and place a marker at each join.
Size checkpoint: Lay the cord flat. Join 1 should sit 2 in (5.1 cm) below the top. Joins should be 3.6 in (9.1 cm) apart, and Join 12 should sit 41.6 in (105.7 cm) from the top. The tail ends at 43.2 in (109.7 cm). The tip of leaf 12 should fall about 5 in (12.7 cm) below its join, so the strand measures 46.6 in (118.4 cm).
Border: Header (Make 2)
The curtain hangs free at the sides and bottom, so the only border is a header across the top edge.
Border gauge: 18 sc = 4 in (10.2 cm), or 4.5 sc per inch.
Header math: Each cord has its own 22-st section of header, which is 4.9 in (12.4 cm) wide. The starting count is 4 cords x 22 sts = 88 sts, no extra stitches between sections. 88 sc at 4.5 sc per inch gives 19.6 in (49.8 cm).
Row 1: With C, ch 89. Sc in 2nd ch from hook and in each ch across. Turn. (88 sc)
Row 2: Ch 1, sc in each st across. Turn. (88 sc)
Row 3 (joining row): Ch 1. Sc in next 10 sts. For the 11th sc, insert the hook through the next st and through the first ch at the top of a cord, then complete the sc. Sc in next 11 sts. Repeat from * to * 3 more times. Turn. (88 sc; 4 sections of 22 sts; 4 cords attached)
Each cord hangs from the center of its section, so the cords are 22 sts (4.9 in / 12.4 cm) apart. The outer cords sit 10 sts (2.2 in / 5.6 cm) in from the edges.
Row 4 (rod loops): Ch 1. Sc in next 5 sts, ch 16, sl st in the last sc made, sc in next 6 sts. Repeat from * to * 7 more times. (88 sc; 8 loops)
Each repeat uses 11 sts (8 x 11 = 88). Each loop is 16 ch, about 3.2 in (8.1 cm) around.
Fasten off. Use the cord tails to stitch each cord top firmly to the back of Rows 1–3.
Why the math works: Each header section matches one cord’s share of the panel width, and the loops repeat evenly every 11 sts. Four rows at 5 rows per inch give a depth of 0.8 in (2.0 cm). So the panel is 0.8 in + 46.6 in = 47.4 in (120.4 cm) long.
Final Blocking
- Before joining, mist each leaf until damp and pin it to 5 in x 3 in (12.7 cm x 7.6 cm). Put one pin through every lobe picot and the tip picot.
- Let the leaves dry completely before you unpin them.
- After you work the header, hang the finished panel on the rod.
- Mist the cords lightly and let gravity straighten them overnight.
- Gently steam any leaf that has twisted, and nudge it back to its L or R angle.
- Check that every panel measures 19.6 in x 47.4 in (49.8 cm x 120.4 cm).
Final Quality-Control Checklist
- Every leaf has 81 sc and 11 picots in Rnd 3.
- Every leaf has exactly 5 lobes on each side.
- Every cord has 12 leaves, joined 3.6 in (9.1 cm) apart.
- Every leaf is tacked, alternating L and R.
- Each header has 88 sc, 4 cords and 8 loops.
- Both panels are the same length, within 0.5 in (1.3 cm).
- All ends are woven in and none show on the RS.
Troubleshooting
- Leaf curls lengthwise: The Rnd 1 foundation chain is too tight. Chain with a hook one size larger.
- Lobes are uneven: Recount Rnd 2. Each side must use exactly 20 sts.
- Edge ruffles: Rnd 3 is too loose. Try a 3.25 mm hook for that round only.
- Leaves hang straight down: A tack was missed. Add a sl st through the lobe picot with a C tail.
- Cords differ in length: Recount the 18-ch segments, then re-block the cords by hanging them.
- Header is too narrow for the rod: Lengthen the loops to ch 20, which is about 4 in (10.2 cm) around.
Care
Hand wash in cool water with mild soap and roll in a towel to remove water. Pin each leaf flat to dry, then rehang the panel and let it settle.
Final Notes
The measurement chain is simple to follow. A blocked 5 in x 3 in (12.7 cm x 7.6 cm) leaf sets the look. Joins every 18 ch, or 3.6 in (9.1 cm), set the rhythm of each 46.6 in (118.4 cm) strand. Four 22-st sections build an 88-st, 19.6 in (49.8 cm) header. If you check the chain and stitch gauges at each stage, both panels will hang evenly at 47.4 in (120.4 cm).
Happy crocheting!