

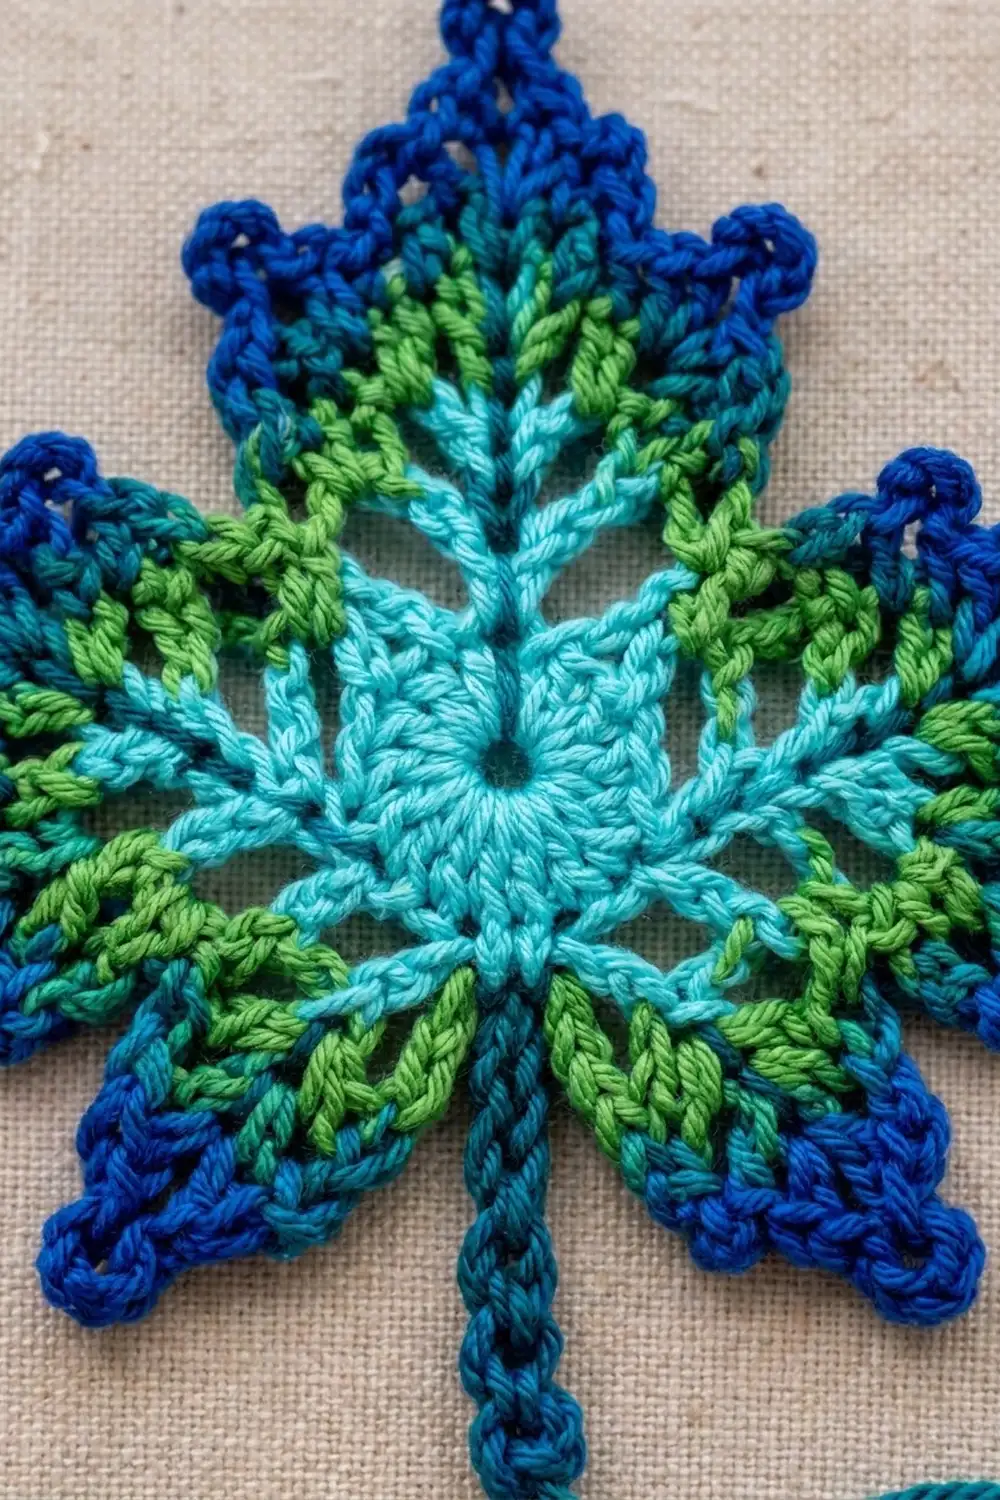
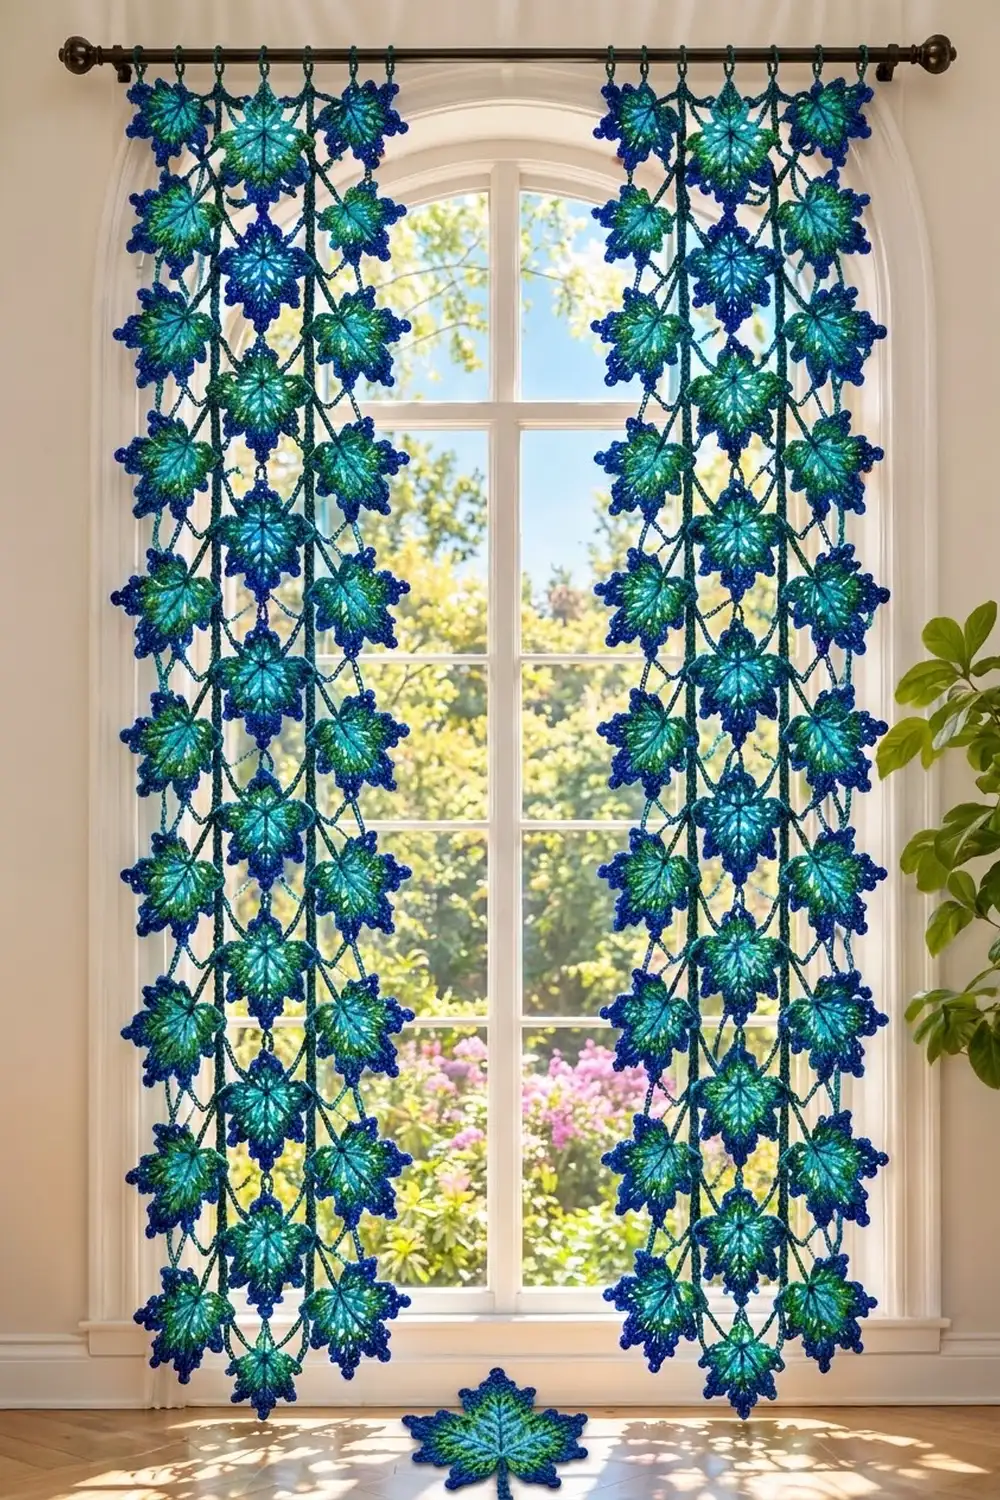
The Peacock Maple Curtain is a pair of airy window panels. It’s made from crocheted maple leaves hung in a dark teal chain lattice. Each leaf has turquoise veins radiating from the center, a band of fresh green, and a royal blue edge covered in small picots. Against a bright window, the open lattice lets the light through and the leaves seem to float.
The style is botanical and a little bohemian. The four colors run from light at the center to dark at the edge, from turquoise out to royal blue, which gives every leaf a jewel-toned glow. The pattern uses US crochet terms throughout.
Each finished panel measures 17 in (43.2 cm) wide and 76.75 in (194.9 cm) long, including the top band. Together, the two panels cover 34 in (86.4 cm) of rod.
Construction is simple and repetitive. First you crochet 48 identical leaves in the round. Then you connect them into staggered columns with short vertical chain cords and diagonal chains. Finally, you add a solid single crochet band at the top with chain loops for the rod.
Finished Size and Construction
- Finished panel size: 17 in x 76.75 in (43.2 cm x 194.9 cm), plus rod loops
- Skill level: Intermediate
- Terminology: US
- Yarn weight: DK (light, 3) cotton
- Hook: 4.0 mm (G-6)
- Number of pieces: 48 leaves (24 per panel), plus 2 top bands
- Layout: each panel has 3 columns of 8 leaves; the center column sits 4.5 in (11.4 cm) lower than the outer columns
- Leaf size: 5 in x 5 in (12.7 cm x 12.7 cm), plus a 1.25 in (3.2 cm) stem
- Panel size before border: 17 in x 75.75 in (43.2 cm x 192.4 cm)
- Border (top band) depth: 1 in (2.5 cm), plus rod loops
Materials
Use a smooth, mercerized DK cotton or cotton blend. Cotton gives crisp stitches and sharp picots, and the leaves hang flat without stretching over time. The quantities below assume about 115 m per 50 g, which is 2.3 m per gram.
- Color A, turquoise (veins): 70 g / 161 m
- Color B, leaf green (middle band): 170 g / 391 m
- Color C, royal blue (picot edge): 125 g / 288 m
- Color D, dark teal (stems, lattice, top band): 70 g / 161 m
All quantities include a margin of about 15% to cover swatching and the many yarn tails from joining.
Tools:
- 4.0 mm (G-6) crochet hook
- Locking stitch markers
- Tapestry needle
- Scissors
- Blocking mats, rustproof pins and a spray bottle
- Measuring tape
- Curtain rod up to 1 in (2.5 cm) in diameter
Abbreviations (US Terms)
- ch: chain
- sl st: slip stitch
- sc: single crochet
- hdc: half double crochet
- dc: double crochet
- tr: treble crochet (yarn over twice)
- dtr: double treble crochet (yarn over 3 times)
- sp(s): space(s)
- st(s): stitch(es)
- rnd: round
Special stitch:
- Picot: ch 3, then sl st in the 3rd ch from the hook.
Gauge and Checkpoints
Make one complete leaf and measure it before you start the batch. Gauge matters here because small errors repeat 24 times down each panel.
- Leaf gauge: Rnds 1–3 = 3 in (7.6 cm) across.
- Finished leaf: 5 in (12.7 cm) from the top tip to the stem base, and 5 in (12.7 cm) from one side tip to the other.
- Band gauge: 18 sc and 16 rows = 4 in (10.2 cm).
- Chain gauge: 4 ch = 1 in (2.5 cm), measured relaxed, not stretched.
If your leaf comes out too big, go down 0.5 mm in hook size. If it’s too small, go up 0.5 mm. Check your chain gauge separately: chain 20 and measure it. You want 5 in (12.7 cm). Many crocheters chain more tightly than they stitch, so you may need a larger hook for the lattice only.
Leaf Motif (Make 48)
Each leaf has 5 pointed lobes: a tall top lobe, 2 upper side lobes and 2 smaller lower lobes. The stem sits at the bottom between the 2 lower lobes, and deep notches (called valleys here) separate the lobes.
Rnd 1 (A): Make a magic ring. Ch 1 and work 12 sc in the ring. Join with a sl st to the first sc. (12 sc)
Rnd 2 (A): Ch 5 (counts as dc + ch 2). Dc in the next sc, ch 2; repeat from * to * 10 more times. Join with a sl st to the 3rd ch of the beginning ch-5. (12 dc, 12 ch-2 sps) Fasten off A. These dc posts form the turquoise vein spokes.
Rnd 3 (B): Join B in any ch-2 sp. Ch 3 (counts as dc) and work 2 dc in the same sp. Work 3 dc in each remaining ch-2 sp around. Join to the top of the beginning ch-3. (36 dc)
Checkpoint: The circle should measure 3 in (7.6 cm) across and lie flat.
Rnd 4 (B), lobe shaping: Ch 1. Sl st in the same st and place a marker in it. This is the stem st. Then work the following in order, using the next sts:
- Lower lobe: sc, hdc, (dc, ch 2, dc) in the next st, hdc, sc. (5 sts used)
- Valley: sl st in the next st.
- Upper side lobe: sc, hdc, dc, (tr, ch 3, tr) in the next st, dc, hdc, sc. (7 sts used)
- Valley: sl st in the next st.
- Top lobe: hdc, dc, tr, (dtr, ch 3, dtr) in the next st, tr, dc, hdc. (7 sts used)
- Valley: sl st in the next st.
- Upper side lobe: repeat as above. (7 sts used)
- Valley: sl st in the next st.
- Lower lobe: repeat as above. (5 sts used)
Join with a sl st to the marked stem st. Fasten off B.
Count check: Stitches used from Rnd 3 are 1 + 5 + 1 + 7 + 1 + 7 + 1 + 7 + 1 + 5 = 36. The round produces 36 lobe sts (6 + 8 + 8 + 8 + 6), 5 sl sts (the stem st plus 4 valleys) and 5 tip spaces.
Rnd 5 (C), picot edge: Join C with a sl st in the stem sl st. To keep the instructions short, the lobe sts before the tip are called a, b, c (plus d on the larger lobes), and the matching sts after the tip are c’, b’, a’ (plus d’).
- Lower lobe (6 sts + ch-2 tip): sc in a, sc in b, picot, sc in c, (sc, picot, sc) in the tip sp, sc in c’, picot, sc in b’, sc in a’. (8 sc, 3 picots)
- Valley: sl st in the valley sl st.
- Upper side lobe or top lobe (8 sts + ch-3 tip): sc in a, sc in b, picot, sc in c, sc in d, (2 sc, picot, 2 sc) in the tip sp, sc in d’, sc in c’, picot, sc in b’, sc in a’. (12 sc, 3 picots)
Work around in this order: lower lobe, valley, upper side lobe, valley, top lobe, valley, upper side lobe, valley, lower lobe. Join with a sl st to the first sl st. (52 sc, 15 picots, 5 sl sts) Fasten off C.
Stem (D): Join D in the stem sl st. Ch 6. Sl st in the 2nd ch from the hook and in each of the next 4 ch, then sl st in the stem sl st. (5 sl sts; the stem is 1.25 in / 3.2 cm long) Fasten off, leaving a 6 in (15.2 cm) tail.
Checkpoint: The leaf measures 5 in x 5 in (12.7 cm x 12.7 cm), not counting the stem.
Make All Pieces
Make 48 leaves in total, 24 for each panel. Every leaf uses the colors the same way: Rnds 1–2 in A, Rnds 3–4 in B, Rnd 5 in C and the stem in D.
Lay out each panel face up as shown below. L, C and R are the left, center and right columns. Each line of the grid is 4.5 in (11.4 cm) of drop.
[ Top band: 77 sc ]
L1          R1
      C1
L2          R2
      C2
L3          R3
      C3
  ... continue to ...
L8          R8
      C8
Column centers are 6 in (15.2 cm) apart. Within each column, leaves sit 9 in (22.9 cm) apart, center to center.
Joining
Join everything with D. Work each connection as one separate chain: sl st into the starting point, chain the stated number, sl st into the target picot, and fasten off. Each chain starts in a single st and ends in a single st, so it adds no width to any leaf.
1. Vertical cords: Sl st in the tip of the stem of leaf 1. Ch 11 (2.75 in / 7.0 cm), then sl st in the top-lobe tip picot of leaf 2. Repeat down each column. That’s 7 cords per column and 21 per panel. The column pitch works out as 5 in + 1.25 in + 2.75 in = 9 in (22.9 cm).
2. Diagonals: Each diagonal is 10 ch.
- Join each upper side lobe tip picot of C1–C8 to the lower lobe tip picot of the outer leaf above it on the same side (L1–L8 or R1–R8). That’s 16 diagonals.
- Join each lower lobe tip picot of C1–C7 to the upper side lobe tip picot of the outer leaf below it on the same side (L2–L8 or R2–R8). That’s 14 diagonals.
That makes 30 diagonals per panel.
Tension: Keep your chains relaxed and even. A tight lattice pulls on the lobe tips and makes the leaves cup. Keep the panel flat on a table or floor while you work, so you can see each chain lie straight without sagging.
Checkpoint: The panel should measure 17 in (43.2 cm) from outer tip to outer tip. Each outer column should measure 69.25 in (175.9 cm) from the top tip of leaf 1 to the stem end of leaf 8. Weave each end back through its own chain.
Border: Top Band and Rod Loops
The top band is the only border. The sides and bottom stay open on purpose, so the leaves hang free in the lattice.
Border gauge: 18 sc = 4 in (10.2 cm), and 4 rows = 1 in (2.5 cm).
Row 1 (D): Ch 78. Sc in the 2nd ch from the hook and in each ch across. (77 sc) Turn.
Rows 2–4: Ch 1, sc in each st across. (77 sc) Turn.
Row 5, rod loops: Ch 1. Sc in the first st, ch 15, then sl st in the same st. Sc in each of the next 19 sts. After the last of these sc, ch 15 and sl st in the same st; repeat from * to * 3 more times. (77 sc, 5 loops) Fasten off.
Counts per side: The top edge has 77 sts and the foundation edge has 77 sts. Each short end is 4 rows. The rod loops sit at sts 1, 20, 39, 58 and 77, which puts them 19 sts (4.2 in / 10.7 cm) apart.
Hanging cords: Work these in the free loops of the foundation chain.
- Sl st in st 12, ch 8, then sl st in the top tip picot of L1.
- Sl st in st 39, ch 26, then sl st in the top tip picot of C1.
- Sl st in st 66, ch 8, then sl st in the top tip picot of R1.
Why the math works: At 4.5 sc per inch, 77 sc = 17.1 in (43.4 cm). That matches the leaf spread of 6 in + 6 in + 5 in = 17 in (43.2 cm). St 39 is the exact center. Sts 12 and 66 are each 27 sts (6 in / 15.2 cm) from the center, so they line up with the outer column centers. The 8-ch outer cords drop 2 in (5.1 cm). The 26-ch center cord drops 6.5 in (16.5 cm), which is the same 2 in plus the 4.5 in (11.4 cm) stagger.
C8 ends at 1 in + 6.5 in + 69.25 in = 76.75 in (194.9 cm) below the top of the band. The outer columns end at 72.25 in (183.5 cm).
Final Blocking
- Lay one section of the panel on blocking mats.
- Spray it lightly until it’s evenly damp, not soaked.
- Pin each leaf to 5 in x 5 in (12.7 cm x 12.7 cm), with one pin at every lobe tip.
- Push each valley inward with a pin so the notches look sharp.
- Open up each picot with the tip of a pin.
- Straighten the chains without stretching them.
- Let that section dry completely, then move on to the next.
- Hang the finished panel for 24 hours so the lattice can settle under its own weight.
Final Quality-Control Checklist
- 24 leaves per panel, each 5 in (12.7 cm)
- 15 picots and 4 crisp valleys on every leaf
- All stems point downward
- 21 vertical cords and 30 diagonals per panel
- Center column sits 4.5 in (11.4 cm) below the outer columns
- Band has 77 sc and 5 rod loops
- Panel is 17 in (43.2 cm) wide
- All ends woven in securely
Troubleshooting
- Leaf cups: Rnd 3 is too tight. Go up a hook size for Rnds 3–4.
- Leaf ruffles: Your stitches are too loose. Go down a hook size.
- Floppy lobe tips: Keep your yarn-overs firm on the tr and dtr, and pin the tips firmly when you block.
- Picots disappear: Make sure each picot sl st goes into the 3rd ch, not the 2nd.
- Columns lean or drift: Recount the cords. Every vertical cord must be exactly 11 ch.
- Band pulls the top in: Rework the band with a hook one size larger.
- Lattice sags: Your chains are too loose. Rework them with a smaller hook.
Care
Hand wash in cool water with mild soap. Roll the panel in a towel to remove the water, then dry it flat and re-pin the leaf tips.
Final Notes
Each measurement builds on the one before. Rnds 1–3 measure 3 in (7.6 cm), and the finished leaf measures 5 in (12.7 cm). Leaves repeat every 9 in (22.9 cm) down each column, and the columns are 6 in (15.2 cm) apart, which makes the panel 17 in (43.2 cm) wide. The finished panel is 76.75 in (194.9 cm) long. If every checkpoint matches, the curtain will hang straight and even.
Happy crocheting!