

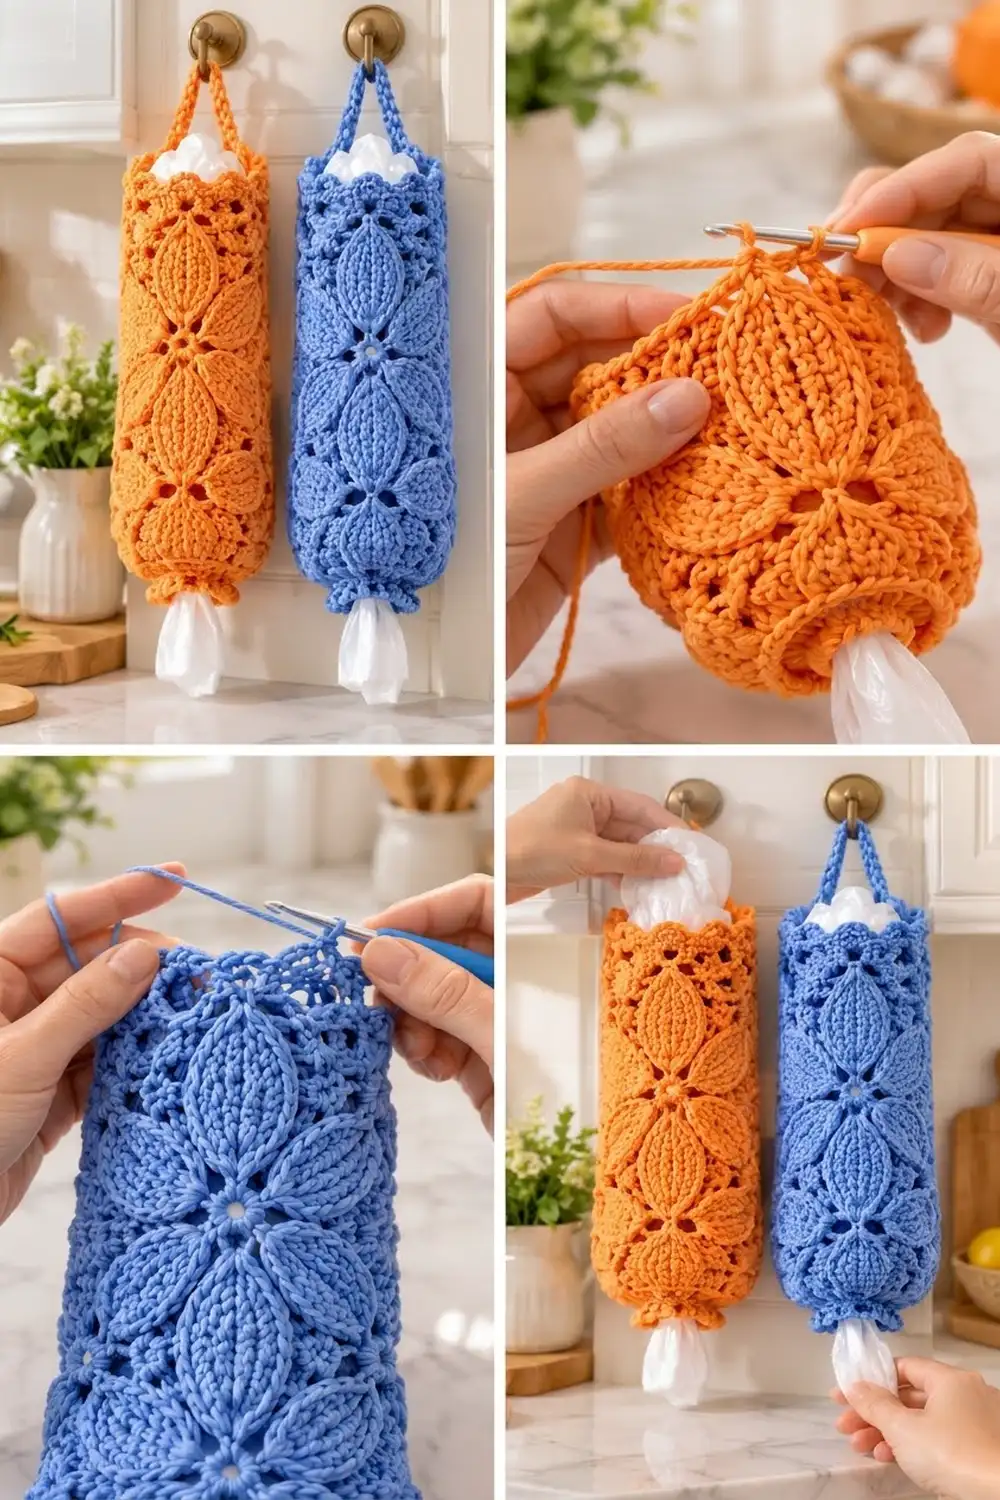
Plastic bags take over kitchen drawers fast. The Leaf Lattice Plastic Bag Holder gives them a tidy home. You push bags in at the scalloped top and pull them out one at a time through the ruffled bottom cuff.
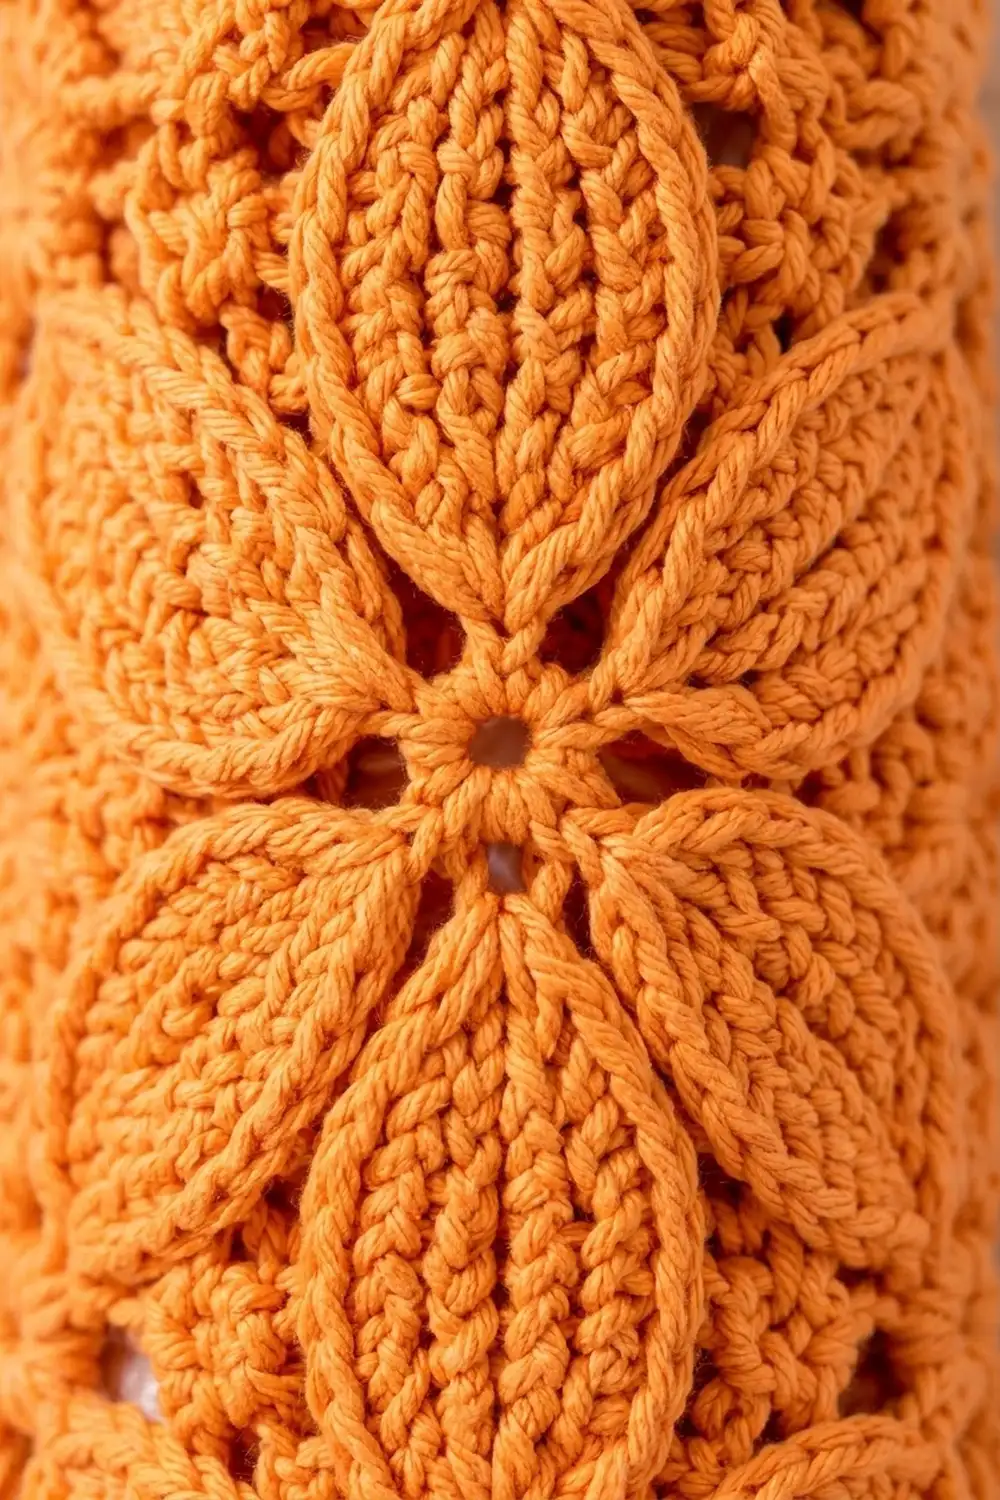
The surface is covered in raised, ridged leaves set in a half-drop lattice. Small eyelets at each leaf tip make the leaves look like four-petal flowers. It works well in a single bold color, and tangerine orange and cornflower blue are both shown here. Make one, or make two in different colors for a cheerful pair by the door.
The pattern uses US crochet terms. The finished holder is 6 in (15.2 cm) wide laid flat (12 in / 30.5 cm around) and 18 in (45.7 cm) long from the foundation ring to the scallop tips. The bottom ruffle hangs about 0.75 in (1.9 cm) below that, and the strap arches above the top.
You work the holder bottom-up as one tube. Start with a single crochet cuff, increase into the half double crochet body, and work four leaf tiers. Finish with a scalloped rim and an attached strap. Last, add the ruffle to the foundation ring. There is no sewing and no seaming.
Finished Size and Construction
- Finished size: 6 in (15.2 cm) wide flat × 18 in (45.7 cm) long, plus a 0.75 in (1.9 cm) ruffle
- Skill level: Intermediate
- Terminology: US crochet terms
- Yarn weight: Worsted (#4), cotton
- Hook: US H-8 (5 mm)
- Number of pieces: 1 (a seamless tube)
- Layout: worked in joined rounds, bottom-up, without turning
- Piece size: 48 sts around = 12 in (30.5 cm) around
- Size before border: 17 in (43.2 cm) long after Rnd 52
- Border depth: top rim 1 in (2.5 cm); bottom ruffle 0.75 in (1.9 cm)
Materials
Yarn: Use a smooth, mercerized or matte worsted-weight cotton. Cotton holds the leaf texture crisply, doesn’t stretch out much under the weight of the bags, and can be machine-washed. Avoid fuzzy or very soft acrylic, because the ridges on the leaves will blur.
- Main color (choose one): Tangerine Orange, 170 g (about 265 m / 290 yd), or Cornflower Blue, 170 g (about 265 m / 290 yd)
One holder uses one color throughout. These amounts include a margin of about 15% for your gauge swatch and tension differences.
Tools:
– US H-8 (5 mm) crochet hook
– 2 locking stitch markers
– Tapestry needle
– Scissors
– Measuring tape
– Rolled towel or a 4 in (10.2 cm) diameter cardboard tube for blocking
– Spray bottle
Abbreviations (US Terms)
- ch – chain
- sl st – slip stitch
- sc – single crochet
- hdc – half double crochet
- dc – double crochet
- BLO – back loop only
- sk – skip
- sp – space
- st(s) – stitch(es)
- Rnd – round
Special stitch: Leaf stitch (Lf). Work an hdc in the back loop only of the next st. Stacked rounds of Lf leave the front loops as horizontal ridges on the right side, which gives each leaf its ribbed look. If an Lf falls on a ch-1 sp, work a regular hdc into the space.
Joining rounds: Every hdc round starts with ch 2, which does not count as a stitch. Work the first hdc into the same st as the join, and end the round with a sl st to the first hdc. Never turn. The right side always faces out.
Gauge and Checkpoints
Gauge: 16 hdc and 12 rounds = 4 in (10.2 cm). Measure on a swatch of 20 hdc worked in rows.
The holder is a single piece, so the first few rounds act as your test. Work through Rnd 7 and check the circumference before you start the leaves.
Checkpoints:
– After Rnd 4 (cuff): 30 sc around = 7.5 in (19.1 cm) around, 3.75 in (9.5 cm) flat. The cuff is 1 in (2.5 cm) tall.
– After Rnd 7: 48 hdc = 12 in (30.5 cm) around, 6 in (15.2 cm) flat. Total length is 2 in (5.1 cm).
– After Rnd 19: 6 in (15.2 cm) long. Each leaf is 9 sts = 2.25 in (5.7 cm) at its widest.
– After Rnd 40: 13 in (33.0 cm) long.
– After Rnd 52: 17 in (43.2 cm) long.
If your tube is too big (wider than 6.25 in / 15.9 cm flat at Rnd 7), go down one hook size and restart. If it is too small (narrower than 5.75 in / 14.6 cm flat), go up one hook size. Don’t change the stitch counts, because the leaf repeat needs exactly 48 sts.
Pattern
Bottom Cuff
Foundation: Ch 30 and sl st to the first ch to form a ring, taking care not to twist the chain.
Rnd 1: Ch 1. Sc in each ch around and sl st to the first sc. (30 sc)
Rnds 2–4: Ch 1. Sc in each st around and sl st to the first sc. (30 sc)
Body Shaping
Rnd 5 (conversion round): Ch 2. Hdc in next 2 sts, 2 hdc in next st, repeat from * 9 more times, and join. (30 sts worked 1-per-stitch + 10 increases = 40 hdc)
Rnd 6: Ch 2. Hdc in next 4 sts, 2 hdc in next st, repeat from * 7 more times, and join. (40 sts worked 1-per-stitch + 8 increases = 48 hdc)
Rnd 7: Ch 2. Hdc in each st around and join. (48 hdc)
Place a marker in the first st of the round. The round is now 4 repeats of 12 sts, and every repeat begins at the marker.
Eyelet Round (E)
Repeat this round between all the leaf tiers.
E: Ch 2. Hdc in next 5 sts, ch 1, sk 1, hdc in next 5 sts, ch 1, sk 1, repeat from * 3 more times, and join. (40 hdc + 8 ch-1 sps = 48 sts)
The eyelets land on stitch 6 and stitch 12 of each repeat. These are exactly where the leaf tips start and end.
Tier A: Leaves Centered on Stitch 6
Work each round as: ch 2, repeat the bracketed sequence 4 times, then join. Every round has 12 sts per repeat and 48 sts in total.
- A1: [hdc 5, Lf 1, hdc 6]
- A2: [hdc 4, Lf 3, hdc 5]
- A3: [hdc 3, Lf 5, hdc 4]
- A4: [hdc 2, Lf 7, hdc 3]
- A5: [hdc 1, Lf 9, hdc 2]
- A6: [hdc 1, Lf 9, hdc 2]
- A7: [hdc 2, Lf 7, hdc 3]
- A8: [hdc 3, Lf 5, hdc 4]
- A9: [hdc 4, Lf 3, hdc 5]
- A10: [hdc 5, Lf 1, hdc 6]
Check: In each row, the hdc before + Lf + hdc after always adds up to 12. The center of each leaf stays on stitch 6, and each leaf grows by 2 sts per round up to its 9-st width, then shrinks back to a single-stitch tip.
Tier B: Leaves Centered on Stitch 12
This tier is offset by half a repeat. Each leaf straddles the boundary between two repeats.
- B1: [hdc 11, Lf 1]
- B2: [Lf 1, hdc 9, Lf 2]
- B3: [Lf 2, hdc 7, Lf 3]
- B4: [Lf 3, hdc 5, Lf 4]
- B5: [Lf 4, hdc 3, Lf 5]
- B6: [Lf 4, hdc 3, Lf 5]
- B7: [Lf 3, hdc 5, Lf 4]
- B8: [Lf 2, hdc 7, Lf 3]
- B9: [Lf 1, hdc 9, Lf 2]
- B10: [hdc 11, Lf 1]
Check: Every row adds up to 12. Each leaf’s stitches at the end of one repeat continue into the start of the next one. For example, in B5 the 5 Lf at the end of a repeat plus the 4 Lf at the start of the next make one 9-st leaf centered on stitch 12.
Body Sequence
- Rnd 8: E
- Rnds 9–18: Tier A
- Rnd 19: E
- Rnds 20–29: Tier B
- Rnd 30: E
- Rnds 31–40: Tier A
- Rnd 41: E
- Rnds 42–51: Tier B
- Rnd 52: E
Every leaf tip touches an eyelet. Diagonal leaves from the next tier open out on either side of each eyelet, which creates the flower effect. Rnds 5–52 are 48 hdc rounds, which comes to 16 in (40.6 cm). With the 1 in (2.5 cm) cuff, the piece is 17 in (43.2 cm) long.
Border
The holder has three finishing elements: the top rim, the strap, and the bottom ruffle.
Border gauge: Each scallop uses 4 sts, which is 1 in (2.5 cm) at body gauge. The tube is 48 sts around, giving 12 scallops in total. Flattened, each side has 24 sts, so each side has 6 scallops.
Top Rim
Rnd 53: Ch 1. Sc in each st and ch-1 sp around, then join. (48 sc; 24 per flat side)
Rnd 54 (scallops): Ch 1. Sc in next st, sk 1, 5 dc in next st, sk 1, repeat from * 11 more times, and sl st to the first sc. (12 scallops; 6 per side)
Why the math works: 12 repeats × 4 sts = 48, so the scallops use every stitch exactly once. The scallop sc’s sit on sts 1, 5, 9 and so on, up to st 45. Stitch 25 is the 7th scallop’s sc, directly opposite stitch 1. The strap anchors at those two points.
Strap
Row 1: Don’t fasten off. Ch 56, and sl st into the sc at st 25, the base of the 7th scallop. (56 ch = 14 in / 35.6 cm)
Row 2: Ch 1 and turn. Sc in each ch across, then sl st into the sc at st 1. (56 sc)
Row 3: Ch 1 and turn. Sc in each sc across, then sl st into the sc at st 25. (56 sc)
Fasten off. The strap is about 0.5 in (1.3 cm) wide, and when hung it arches about 6 in (15.2 cm) above the rim.
Bottom Ruffle
Turn the tube upside down. Join yarn in any loop on the underside of the foundation chain.
Rnd R1: Ch 3 (counts as dc), and work 1 dc in the same loop. Work 2 dc in each remaining foundation loop around, then join to the top of the ch-3. (30 loops × 2 = 60 dc)
Rnd R2: Ch 1. Sc in next 2 sts, ch 3, sl st in 3rd ch from hook, repeat from * 29 more times, then join. (60 sc + 30 picots)
Why the math works: The ruffle holds 60 sts on a 30-st ring, twice what the ring can lie flat with. The extra stitches have to fold into soft gathers, which gives the rolled, ruffled edge. The cuff opening stays 7.5 in (19.1 cm) around, which is small enough to hold the bags in and large enough for your fingers.
Weave in all ends on the inside of the tube.
Final Blocking
- Wet the holder with the spray bottle until it is damp but not dripping.
- Slide a rolled towel or a 4 in (10.2 cm) cardboard tube inside the body.
- Smooth the tube to 6 in (15.2 cm) wide flat and 17 in (43.2 cm) long from the foundation to Rnd 52.
- Pinch each leaf tip gently into a point, and line the eyelets up vertically.
- Shape each top scallop into a rounded arc with your fingers.
- Fluff the bottom ruffle outward. Don’t flatten it.
- Lay the strap flat and straight.
- Let everything dry completely before you remove the form.
Final Quality-Control Checklist
- 48 sts in every body round, made of 4 repeats of 12
- Leaves are 9 sts (2.25 in / 5.7 cm) at their widest and centered consistently
- Every leaf tip touches an eyelet
- 6 in (15.2 cm) wide flat throughout the body
- 18 in (45.7 cm) long from the foundation to the scallop tips
- 12 scallops, with 6 on each side
- Strap anchored at sts 1 and 25, directly opposite each other
- 60-st ruffle with 30 picots
- All ends secured on the inside
Troubleshooting
Leaves lean to one side. Count each repeat against the table. One missing hdc shifts every leaf after it.
The seam drifts diagonally. Joined hdc rounds tend to drift. Always work the first hdc into the same st as the join, and keep the marker in st 1.
Leaves look flat. Make sure you are working into the back loop only. Working through both loops removes the ridges.
The eyelets close up. Work a loose ch 1, and in the next round put the hdc into the space, not into the chain.
The top flares. Your Rnd 53 sc may be too loose. Go down half a hook size for the rim.
The ruffle won’t gather. Count to confirm you have 60 dc. A short count lies flat.
The strap stretches. Cotton holds up better than acrylic. You can also add a fourth row of sc.
Care
Machine-wash cold on a gentle cycle in a mesh bag, or hand-wash. Reshape the holder while damp and lay it flat to dry.
Final Notes
The measurement chain is simple. The 30-st cuff measures 7.5 in (19.1 cm) around. It increases to 48 sts, or 12 in (30.5 cm) around. Four 10-round leaf tiers with five eyelet rounds bring the length to 17 in (43.2 cm), and the scalloped rim finishes the holder at 18 in (45.7 cm). If you check your circumference at Rnd 7 and count 12 per repeat, every leaf will land where it should. Hang the holder on a hook, fill it with bags, and enjoy a tidier kitchen.
Happy crocheting!