

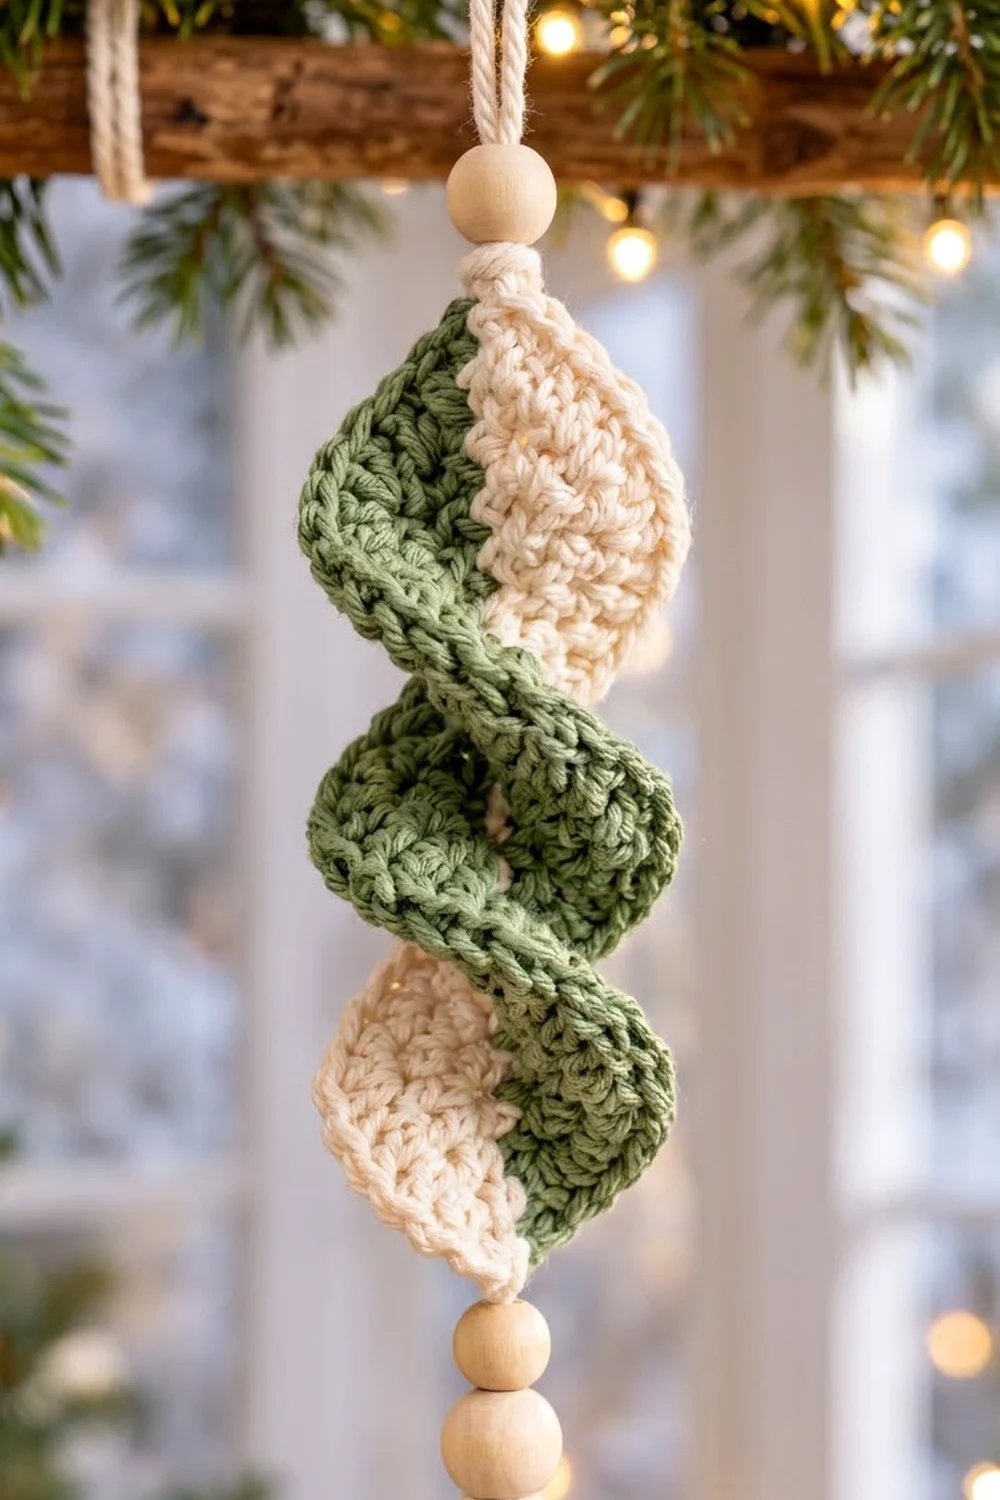
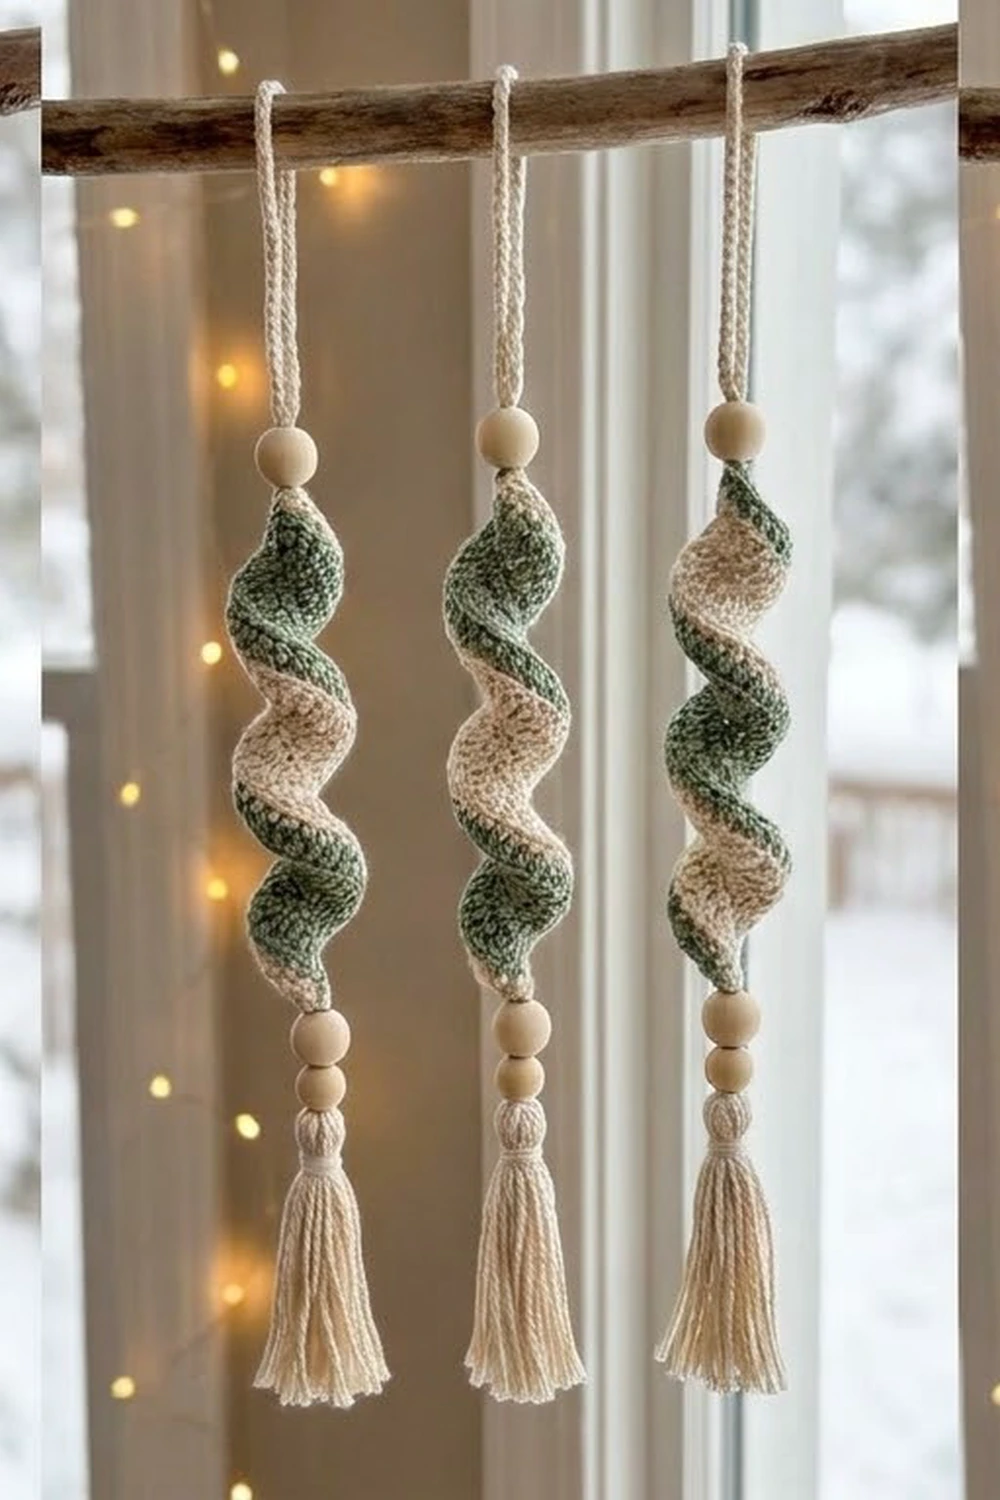
The Evergreen Twist is a small spiral ornament that twists itself into a corkscrew as you work it. One edge is sage green and the other is cream, so the two colors take turns as the spiral turns. A wooden bead sits above it, two more hang below, and a soft cream tassel finishes the bottom. The look is calm and Scandinavian, and it suits natural garlands and neutral holiday decor.
All instructions use US crochet terms. The crocheted spiral is about 5 in (12.7 cm) long and 1.5 in (3.8 cm) wide after twisting. With the hanging loop, beads and tassel, the whole ornament is about 12 in (30.5 cm) long.
The construction is simple. You make one foundation chain, then work three rows in cream along one side of it and three rows in green along the other side. The second row of each half doubles the stitch count, so the outer edges become too long to lie flat and the strip twists on its own. A twisted cord, beads and a tassel finish the ornament.
This is a quick project, about 45 minutes once you have the rhythm. It is a good way to use up leftover cotton.
Finished Size and Construction
- Finished spiral size: 5 in (12.7 cm) long x 1.5 in (3.8 cm) wide, twisted
- Overall length with cord, beads and tassel: about 12 in (30.5 cm)
- Skill level: Easy
- Terminology: US crochet terms
- Yarn weight: DK / light worsted (#3) cotton
- Hook: 3.5 mm (E-4)
- Number of pieces: 1 spiral, plus 1 tassel and 1 cord for finishing
- Layout: One strip worked out from both sides of a central foundation chain
- Flat strip size before twisting: 6 in (15.2 cm) long
- Flat width before border rows: 1.3 in (3.3 cm)
- Border depth: 0.2 in (0.5 cm) on each long edge, for a flat width of 1.7 in (4.3 cm)
Materials
Use a smooth, matte DK cotton or cotton blend. Cotton shows the stitches clearly and holds the spiral shape well. Acrylic works too, but the twist will be softer and looser.
- Color A, cream: 15 g / about 33 m (36 yd), for the spiral half, cord and tassel
- Color B, sage green: 6 g / about 13 m (14 yd), for the spiral half
These quantities assume a yarn of about 110 m per 50 g and already include a margin for swatching and tails.
Tools:
- 3.5 mm (E-4) crochet hook
- Tapestry needle with an eye large enough for doubled yarn
- 3 wooden beads, 12 mm, with holes at least 5 mm wide
- Scissors
- A stiff card 3.5 in (8.9 cm) tall for the tassel
- Spray bottle with water
- Stitch marker
Abbreviations (US Terms)
- ch = chain
- sc = single crochet
- dc = double crochet
- sl st = slip stitch
- st(s) = stitch(es)
- FO = fasten off
- free loops = the unused loops on the underside of the foundation chain
Special technique, working into free loops: Turn the work so the foundation chain is at the top. Each chain has one unused loop on its underside. Insert your hook under that single loop to work a stitch.
Gauge and Checkpoints
Gauge: 20 sc and 22 rows = 4 in (10.2 cm), which is 5 sc per 1 in (2.5 cm).
Make one complete test spiral before you make a whole set. Gauge controls both the length and how tightly the spiral twists.
Checkpoints:
- Foundation and Row 1, cream: 30 sc should measure 6 in (15.2 cm) laid flat.
- Row 2, cream: The strip already starts to ripple and curl. Flat width of the cream half so far is about 0.65 in (1.7 cm).
- Row 3, cream: The cream half is about 0.85 in (2.2 cm) wide from the foundation chain to the edge.
- After the green half: Flat width is 1.7 in (4.3 cm). Let it hang and it twists to about 5 in (12.7 cm) long and 1.5 in (3.8 cm) across.
If it’s too big: Row 1 longer than 6.25 in (15.9 cm) means your gauge is loose. Go down to a 3.25 mm hook.
If it’s too small: Row 1 shorter than 5.75 in (14.6 cm) means your gauge is tight. Go up to a 3.75 mm hook.
A spiral that twists too tightly into a stiff coil usually means tight double crochets. A spiral that barely twists means loose ones. Adjust the hook before blaming the pattern.
Pattern
Foundation (Color A, cream)
Ch 31.
Side A (Color A, cream)
Row 1: Sc in the 2nd ch from hook and in each ch across. Turn. (30 sc)
Work these stitches through the top of each chain only, so the free loops stay neat for Side B. Mark the free loop of the first chain worked if you find that helpful.
Row 2 (growth row): Ch 2 (does not count as a st), 2 dc in each sc across. Turn. (60 dc)
This row makes the spiral. Each sc gets exactly 2 dc, so the row has twice as many stitches as Row 1. The strip starts to ruffle and turn as you go, which is correct. Don’t stretch it flat.
Row 3: This is the cream border row and is written out in the Border section below. Work it now, then FO and weave in the tail later.
Side B (Color B, sage green)
Turn the strip so the free loops of the foundation chain face up. Begin at the end where Side A Row 1 finished, so the green rows run the same direction as the cream rows.
Row 1: Join Color B with a sl st in the first free loop. Ch 1 (does not count as a st), sc in the same loop and in each free loop across. Turn. (30 sc)
There are 30 free loops under the 30 Side A stitches. The 31st chain, which you skipped at the start of Side A, is not worked again.
Row 2 (growth row): Ch 2 (does not count as a st), 2 dc in each sc across. Turn. (60 dc)
Now both long edges carry the same 2-to-1 growth, and the strip twists into a balanced helix. The green half turns around the cream half instead of pulling it to one side.
Row 3: This is the green border row, given in the Border section below.
Border
The border is one row of sc along each long edge, cream on Side A and green on Side B. It firms up the double crochet edge and gives the spiral its crisp outline.
Border gauge: 5 sc = 1 in (2.5 cm). Border depth is 0.2 in (0.5 cm) per edge.
Side A, Row 3 (cream border, conversion row): Ch 1 (does not count as a st), sc in each dc across. FO, leaving a 6 in (15.2 cm) tail. (60 sc = 60 worked 1 per existing st + 0 extra)
Side B, Row 3 (green border, conversion row): Ch 1 (does not count as a st), sc in each dc across. FO, leaving a 6 in (15.2 cm) tail. (60 sc = 60 worked 1 per existing st + 0 extra)
Count by edge:
- Cream long edge: 60 sc
- Green long edge: 60 sc
- Short ends: no stitches added. The row ends of the three rows on each half form the rounded tips.
Why the math works: The center line is 30 sc, about 6 in (15.2 cm) long. Each outer edge is 60 sc, about 12 in (30.5 cm) at 5 sc per inch. The border works 1 sc into each of the 60 dc, so it adds no further growth. It keeps exactly the 2-to-1 ratio set in Row 2. An outer edge twice as long as the center can’t lie flat, so the fabric turns into a corkscrew. Both edges are equal, so the twist is even, with about two and a half full turns along the ornament.
If you add stitches in the border, the edges will ruffle instead of spiral. If you skip stitches, the spiral loosens and flattens.
Finishing: Tassel, Cord and Beads
Tassel (Color A)
- Wrap cream yarn 30 times around the 3.5 in (8.9 cm) card.
- Slide a 10 in (25.4 cm) strand under the wraps at the top edge and tie it tightly. Leave both ends of this tie long, because they attach the tassel later.
- Cut through all the wraps at the bottom edge. Each strand is now 7 in (17.8 cm), folded in half.
- Wrap another strand of cream 6 times around the tassel, 0.5 in (1.3 cm) below the top, and knot it. Bury its ends inside the tassel.
- Trim the bottom evenly to 3 in (7.6 cm) from the top fold.
Twisted Cord (Color A)
- Cut 1 strand of cream 48 in (121.9 cm) long.
- Fold it in half and anchor the folded end on a hook or doorknob.
- Twist the two loose ends together in one direction until the strand kinks back on itself.
- Bring the loose ends up to the folded end and let the cord twist on itself. Knot the loose ends together.
- The finished cord is about 11 in (27.9 cm) long. The folded end becomes the hanging loop.
Assembly
- Thread the knotted end of the cord onto the tapestry needle.
- Measure 4 in (10.2 cm) down from the folded end and slide on 1 bead, stopping it at that point so a 4 in (10.2 cm) loop stays above.
- Insert the needle into the top tip of the spiral, at the end of the foundation chain. Weave it down through the center of the spiral, catching the foundation chain every 1 in (2.5 cm) or so, and bring it out at the bottom tip.
- Slide on the remaining 2 beads.
- Tie the cord securely to the tassel’s top tie with a square knot. Pull the knot up into the bead hole, trim the excess, and hide any ends inside the tassel.
Weave the cream and green tails from the border rows into their own colors along the tips so they don’t show on the other color.
Final Blocking
- Let the ornament hang from its loop so the spiral turns freely.
- Mist the spiral with water until it’s damp but not dripping.
- Gently arrange the twists so the cream and green bands are evenly spaced. Each full turn should be about 2 in (5.1 cm) long.
- Check that the beads sit snugly against the top and bottom tips.
- Comb the tassel with your fingers and mist it so the strands hang straight.
- Let everything dry completely while hanging, overnight if you can. The tassel’s weight helps set the spiral.
- After drying, re-trim any uneven tassel strands.
Final Quality-Control Checklist
- Foundation chain worked across 30 stitches on both sides
- Row 2 on each side has exactly 60 dc
- Border rows have exactly 60 sc each, with no extra stitches
- Cream stays fully on one edge and green fully on the other
- Spiral is about 5 in (12.7 cm) long and 1.5 in (3.8 cm) across
- Hanging loop is 4 in (10.2 cm) above the top bead
- Two beads sit snugly between the spiral and the tassel
- Tassel is trimmed evenly to 3 in (7.6 cm)
- All tails are woven into matching colors and hidden
- Ornament hangs straight without leaning to one side
Troubleshooting
The strip ruffles instead of spiraling. Too many stitches crept into Row 2 or the border. Count to 60 and frog back if needed.
It spirals to one side like a curl. One half has fewer stitches or tighter tension than the other. Check that both Row 2s have 60 dc and use the same hook throughout.
The spiral is too tight and stiff. The dc are very tight. Go up half a hook size for Row 2 only.
The spiral is too loose and flat. The dc are loose, or the yarn is very soft. Go down half a hook size for Row 2, or switch to firmer cotton.
The green row 1 looks uneven. You probably went into two loops in some places and one in others. Work into the single free loop every time.
The beads slide. The holes are too large for the cord. Add a small knot under each bead.
The tassel looks thin. Increase the wraps to 36 next time, or use slightly thicker yarn.
Care
Spot clean with cool water and mild soap, then let it hang to dry so the twist re-sets. Store flat or loosely coiled in tissue paper, not crushed in a box.
Final Notes
Each measurement leads to the next. A foundation of 30 sc at 6 in (15.2 cm) sets the core. Row 2 doubles each half to 60 dc, which forces the twist. The 60-stitch border keeps the 2-to-1 ratio and brings the flat width to 1.7 in (4.3 cm). Hanging and blocking set the spiral at 5 in (12.7 cm) long and 1.5 in (3.8 cm) wide. Add the 4 in (10.2 cm) loop, the beads and the 3 in (7.6 cm) tassel, and the ornament is about 12 in (30.5 cm) long. Once your test spiral meets these checkpoints, you can make a full set to match.
Happy crocheting!