

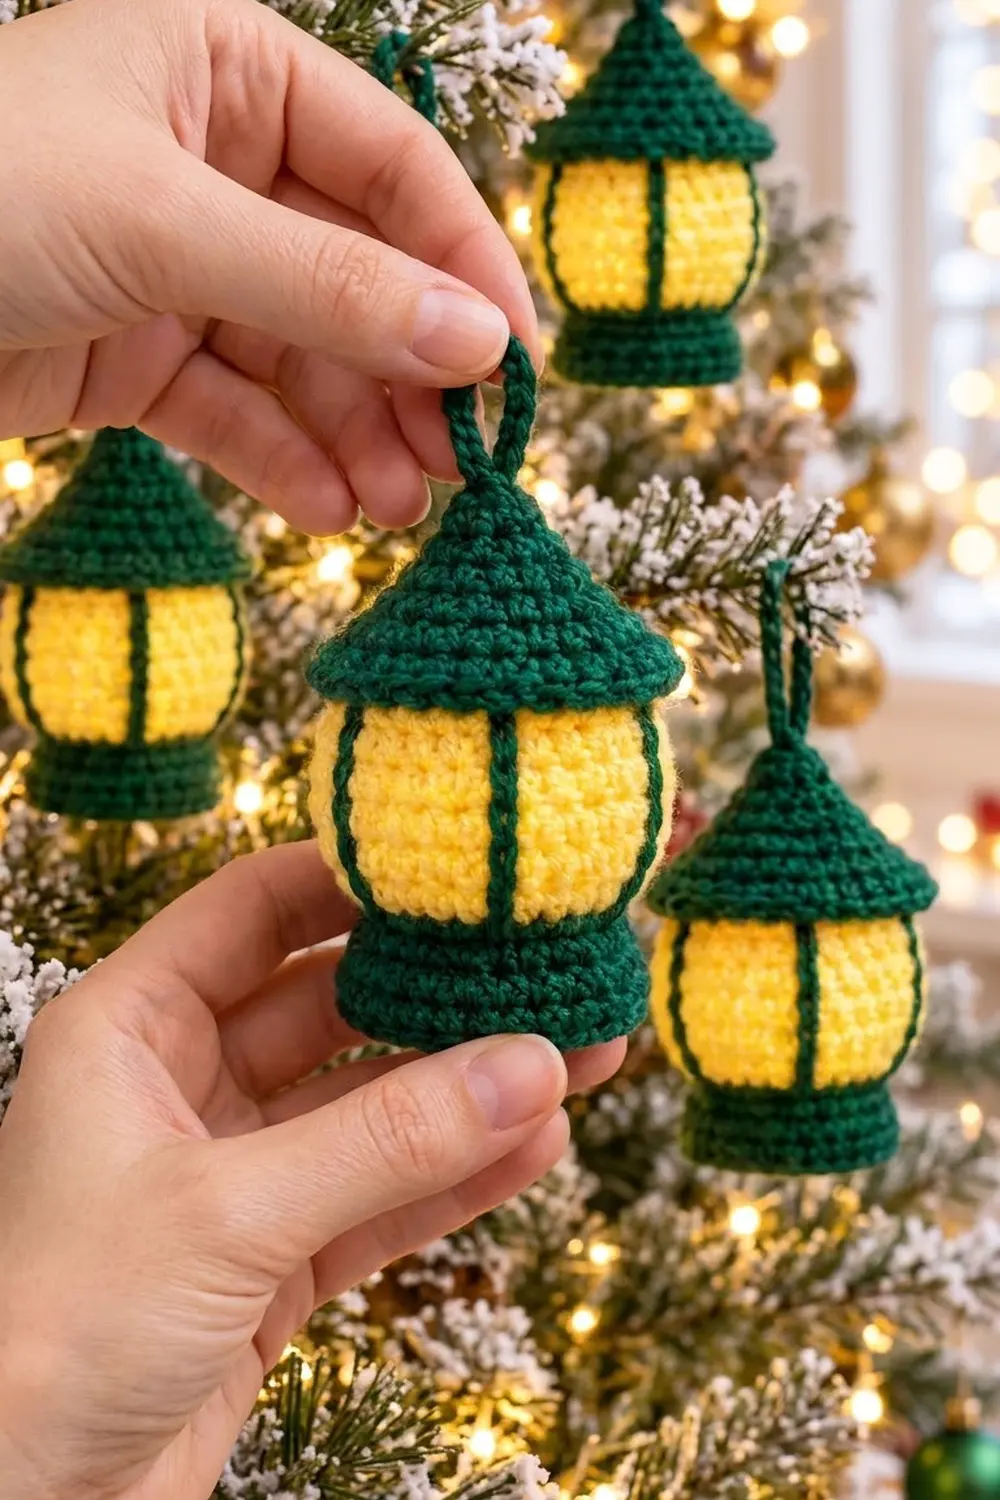
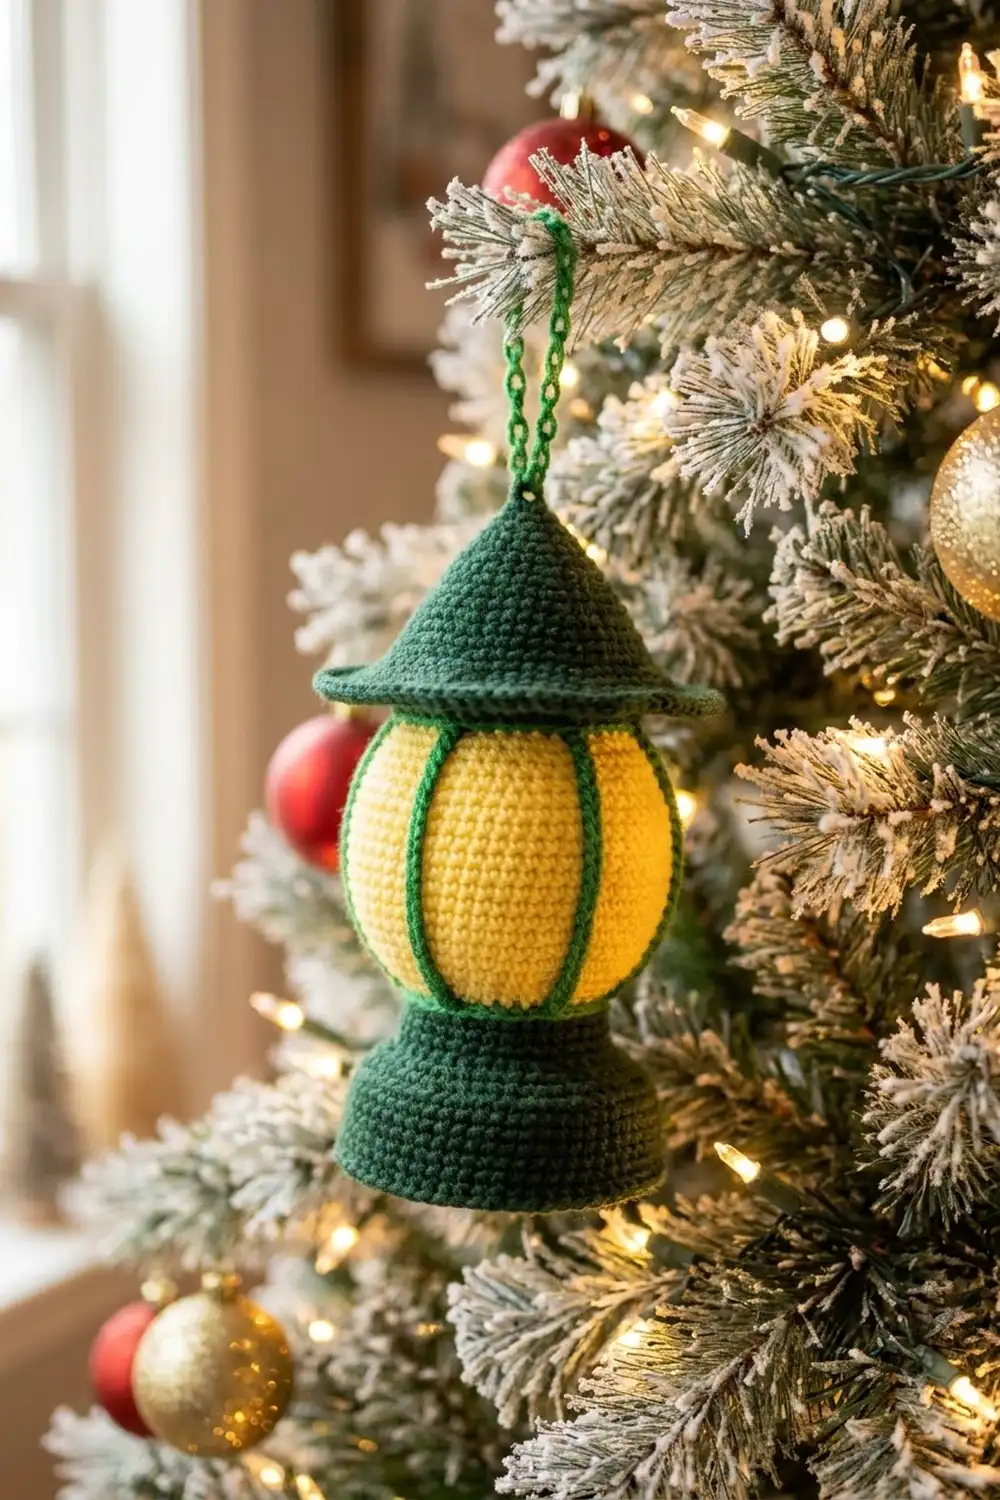
This little lantern looks like it is lit from inside. A buttery-yellow “glass” body sits between a deep forest-green base and a pointed green roof. Thin green window bars run up the yellow body, so it reads as an old-fashioned street lantern even from across the room.
The design uses two colors, dark green and bright yellow, worked in tight amigurumi single crochet. The style is classic and slightly vintage, and it looks good on a real tree, a garland or a gift tag. All terms are US crochet terms.
The finished ornament is about 4 in (10.2 cm) tall without the loop and 2.75 in (7.0 cm) wide at the roof eave. The yellow body is about 2.4 in (6.1 cm) across when stuffed.
The body is one continuous piece, worked bottom-up in spiral rounds: green base, yellow window section, green top rim. Next you add the window bars with surface slip stitch. The roof is a separate cone worked from the tip down, finished with a two-round eave border, then sewn on. The last step is a chain hanging loop.
Finished Size and Construction
- Finished size: 4 in (10.2 cm) tall without the loop; 2.75 in (7.0 cm) wide at the eave
- Skill level: Easy / advanced beginner
- Terminology: US crochet terms
- Yarn weight: Worsted (#4)
- Hook: 3.5 mm (E/4)
- Number of pieces: One ornament, made from 2 crocheted parts (body and roof) sewn together, plus a chain loop
- Layout: Single 3D ornament with no grid or layout
- Body size: 2.4 in (6.1 cm) wide stuffed; base 1.9 in (4.8 cm) wide
- Roof size before border: 2.3 in (5.8 cm) across at Round 10
- Border depth: 0.25 in (0.6 cm) eave flare
Materials
Use a smooth worsted yarn with good stitch definition. Acrylic or a cotton blend both work. Avoid fuzzy or brushed yarns, because the window bars need a crisp surface. Pick a deep green with plenty of contrast against a clear, warm yellow.
- Dark green: 15 g / 30 m (base, rims, window bars, roof, loop)
- Bright yellow: 8 g / 16 m (window body)
- Polyester fiberfill, about 5 g
- 3.5 mm (E/4) crochet hook
- Stitch marker
- Tapestry needle
- Scissors
These quantities include a margin of about 20% for gauge differences and tails.
Abbreviations (US Terms)
- MR: magic ring
- ch: chain
- sc: single crochet
- inc: 2 sc in the same stitch
- dec: single crochet decrease (invisible decrease recommended)
- sl st: slip stitch
- BLO / FLO: back loop only / front loop only
- st(s): stitch(es)
- ( ) x6: repeat the sequence in parentheses 6 times
Surface slip stitch: Hold the yarn inside the piece. Insert the hook from the front between two stitches, pull up a loop, then insert the hook one round higher in the same column. Pull up a loop and draw it through the loop on your hook. Repeat. Each stitch covers one round.
Gauge and Checkpoints
Gauge: 10 sc x 11 rounds = 2 in (5.1 cm) in tight spiral sc, which is 5 sc and 5.5 rounds per 1 in (2.5 cm).
Don’t make a separate swatch. Treat the base as your test piece, because it is the first thing you crochet.
- Checkpoint 1 (base Round 5, 30 sts): the flat circle measures 1.8 in (4.6 cm) across.
- Checkpoint 2 (end of Round 9): the base cup stands about 0.75 in (1.9 cm) tall.
- Checkpoint 3 (Round 16, 36 sts): the body measures about 2.3 in (5.8 cm) across unstuffed.
- Checkpoint 4 (roof Round 10, 36 sts): the roof opening measures 2.3 in (5.8 cm) across.
If your circle is too big, or you can see stuffing through the stitches, go down to a 3.25 mm hook. If it is too small and stiff, try a 3.75 mm hook. Body and roof must use the same hook so the roof fits.
Body
Work in continuous spiral rounds and do not join. Place a marker in the first stitch of each round and move it up as you go.
Base (Dark Green)
Round 1: In MR, 6 sc. (6)
Round 2: Inc in each st around. (12)
Round 3: (sc, inc) x6. (18)
Round 4: (2 sc, inc) x6. (24)
Round 5: (3 sc, inc) x6. (30)
Check Checkpoint 1 now.
Round 6: BLO sc in each st around. (30) This turns the edge and makes the flat bottom with a crisp ridge.
Rounds 7–9: Sc in each st around. (30)
On the last stitch of Round 9, change to yellow on the final yarn-over. Leave the green attached inside if you like, or cut it with a 6 in (15.2 cm) tail.
Window Body (Yellow)
Round 10: BLO sc in each st around. (30) The unused green front loops of Round 9 make a raised ledge that frames the bottom of the window.
Round 11: (4 sc, inc) x6. (36)
Rounds 12–16: Sc in each st around, 5 rounds. (36)
Check Checkpoint 3.
Round 17: (4 sc, dec) x6. (30)
Round 18: Sc in each st around. (30)
Change to dark green on the last yarn-over of Round 18. Cut the yellow and weave it in on the inside.
Top Rim (Dark Green)
Rounds 19–20: Sc in each st around. (30)
Sl st into the next stitch. Fasten off with a 12 in (30.5 cm) tail for sewing on the roof. Do not stuff yet.
The yellow section is 9 rounds (Rounds 10–18), about 1.65 in (4.2 cm) tall. The rim adds about 0.35 in (0.9 cm).
Window Bars (Surface Slip Stitch)
Make 6 vertical bars, spaced evenly around the yellow body.
- Find Round 11 (36 sts) and mark every 6th stitch: 6 markers, 6 sts apart.
- Hold dark green inside the body. Starting at the first marker, insert the hook between Round 9 and Round 10 and pull up a loop.
- Work 9 surface sl sts straight up the column, one into each yellow round from Round 10 to Round 18. Your last stitch lands just under the green rim.
- Pull the yarn to the inside, then fasten off and knot it to the next bar’s tail or weave it in.
- Repeat at each marker.
Keep each bar in a straight vertical line. The stitch count shrinks from 36 to 30 above Round 16, so the bars sit about 5 sts apart at Round 18, which is correct. Keep the slip stitches loose enough that the yellow does not pucker. Each bar should lie flat, about 1.65 in (4.2 cm) long.
Roof (Dark Green)
Work from the tip down in continuous rounds.
Round 1: In MR, 6 sc. (6)
Round 2: Sc in each st around. (6) This keeps the tip pointed.
Round 3: (sc, inc) x3. (9)
Round 4: (2 sc, inc) x3. (12)
Round 5: (3 sc, inc) x3. (15)
Round 6: (4 sc, inc) x3. (18)
Round 7: (2 sc, inc) x6. (24)
Round 8: (3 sc, inc) x6. (30)
Round 9: Sc in each st around. (30) This even round sets the roof’s lower edge, and its back loops will be the sewing line.
Round 10: FLO (4 sc, inc) x6. (36) Working in front loops tilts the fabric outward to start the eave, and leaves the 30 back loops of Round 9 free on the inside.
Check Checkpoint 4. The cone should be about 1.25 in (3.2 cm) tall from tip to Round 9 and 2.3 in (5.8 cm) across at Round 10.
Keep the yarn attached and go straight into the border.
Border (Roof Eave Edge)
Border gauge: the same as the main gauge, 5 sc per 1 in (2.5 cm). The slip stitch round should be relaxed, at roughly the same tension as your sc.
Border Round 1: (5 sc, inc) x6 = 36 sts worked 1 per existing stitch + 6 extra stitches = 42 sts.
Border Round 2: Sl st loosely in each st around = 42 sts worked 1 per existing stitch + 0 extra = 42 sts.
Fasten off invisibly and weave in the end.
Why the math works: A flat circle in sc needs about 6 extra stitches per round. Round 10 and Border Round 1 each add exactly 6, so the eave flares out flat instead of continuing down as a cone. Round 9 added nothing, which is what makes the clean “corner” between roof and eave. Border Round 2 adds no stitches, so it doesn’t ruffle. It just firms and slightly rolls the edge for the smooth rim in the photo. The finished eave is 42 sts around, about 2.75 in (7.0 cm) across, and sticks out about 0.25 in (0.6 cm) past the roof’s sewing line.
Assembly and Hanging Loop
- Stuff the body. Stuff the base and window body firmly so the yellow section bulges evenly. Shape it with your fingers as you go.
- Line up the roof. Set the roof on the body so the 30 free back loops of roof Round 9 meet the 30 sts of body Round 20, one to one.
- Sew. Using the body’s long tail, whipstitch each Round 20 stitch to its matching back loop. Add a little stuffing to the cone before closing the last 1.2 in (3.0 cm). Knot the tail and hide it inside.
- Hanging loop. Join dark green at the roof’s magic ring, ch 16 (about 3 in / 7.6 cm), and sl st back into the tip. You get a loop that stands about 1.5 in (3.8 cm) tall. Weave both ends down into the roof and knot them inside.
Final Blocking
- Lightly mist the roof eave with water, or hold a steam iron 1 in (2.5 cm) above it. Never press the iron onto acrylic.
- Smooth the eave flat and even with your fingers, so it sticks out 0.25 in (0.6 cm) all the way around.
- Roll the body gently between your palms to even out the stuffing.
- Straighten each window bar with a fingertip.
- Stand the lantern on its base and let it dry completely, about 1–2 hours.
- Measure: 4 in (10.2 cm) tall without the loop and 2.75 in (7.0 cm) at the eave.
Final Quality-Control Checklist
- Base is 1.9 in (4.8 cm) across and sits flat without rocking.
- The green ledge from Round 10 shows evenly all the way around.
- Yellow body is firm, bulges evenly, and no stuffing shows through.
- All 6 window bars are vertical, evenly spaced and 9 sl sts long.
- Roof is centered and the seam can’t be seen from the side.
- Eave lies flat with no ripples and measures 2.75 in (7.0 cm).
- Hanging loop is centered and securely anchored.
- No yarn tails show.
Troubleshooting
The eave ripples. Your Border Round 2 slip stitches are too loose, or you added extra increases. Re-count to 42 sts and redo the slip stitches a little tighter.
The eave curls downward. Your slip stitches are too tight. Redo Border Round 2 more loosely, or use a hook one size larger for that round only.
The roof doesn’t match the body. Count both edges. Each must be 30 sts. If one edge has an extra stitch, ease it in across two seam stitches.
The window bars pucker the yellow. Pull up taller loops, and keep the working yarn slack inside the body.
The bars drift sideways. Count stitches per round when placing each marker. Look at the bar from straight in front as you work.
The base wobbles. Make sure Round 6 is in BLO. Press the bottom flat from inside before stuffing.
Gaps between stitches. Use a smaller hook, or yarn under instead of yarn over for tighter sc.
Care
Spot clean with mild soap and cool water, then air dry standing upright. Don’t machine wash or tumble dry, because both can flatten the stuffing and warp the eave.
Final Notes
Every measurement in this lantern builds on one gauge: 5 sc and 5.5 rounds per 1 in (2.5 cm). That gives a 1.8 in (4.6 cm) base circle, a 1.9 in (4.8 cm) base cup and a 2.4 in (6.1 cm) stuffed window body. The roof opening is 2.3 in (5.8 cm) at 36 sts, and the 42-st eave border takes it to 2.75 in (7.0 cm). The total is 4 in (10.2 cm) tall without the loop. If you check your base circle first, everything after it fits together. Make one lantern, or make a dozen and hang them all over the tree.
Happy crocheting!