

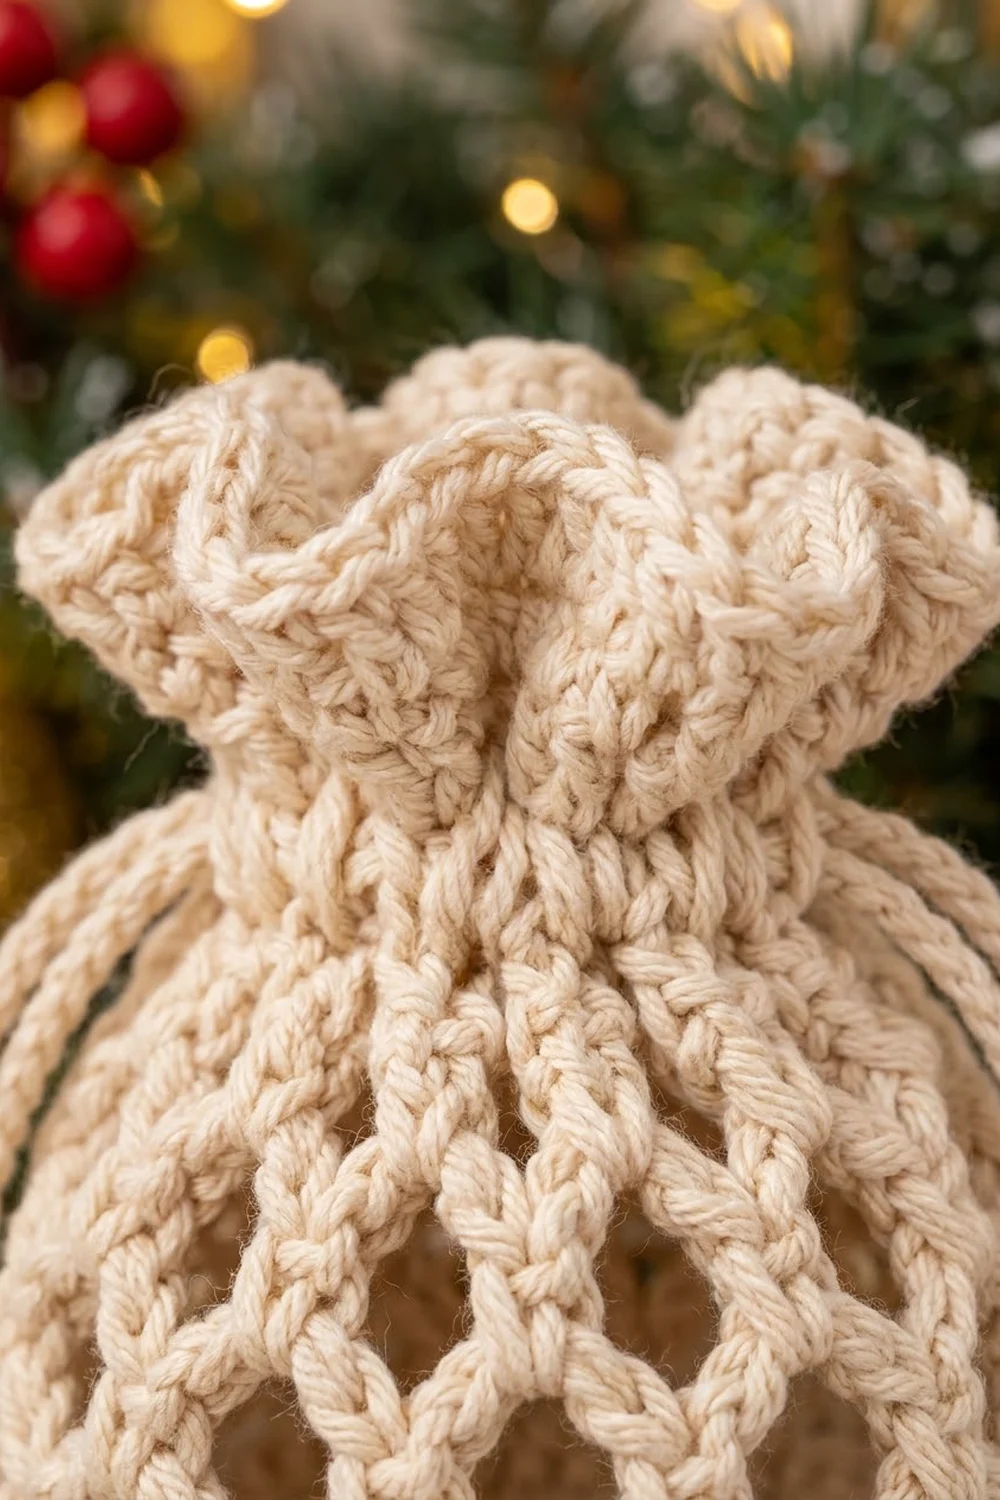
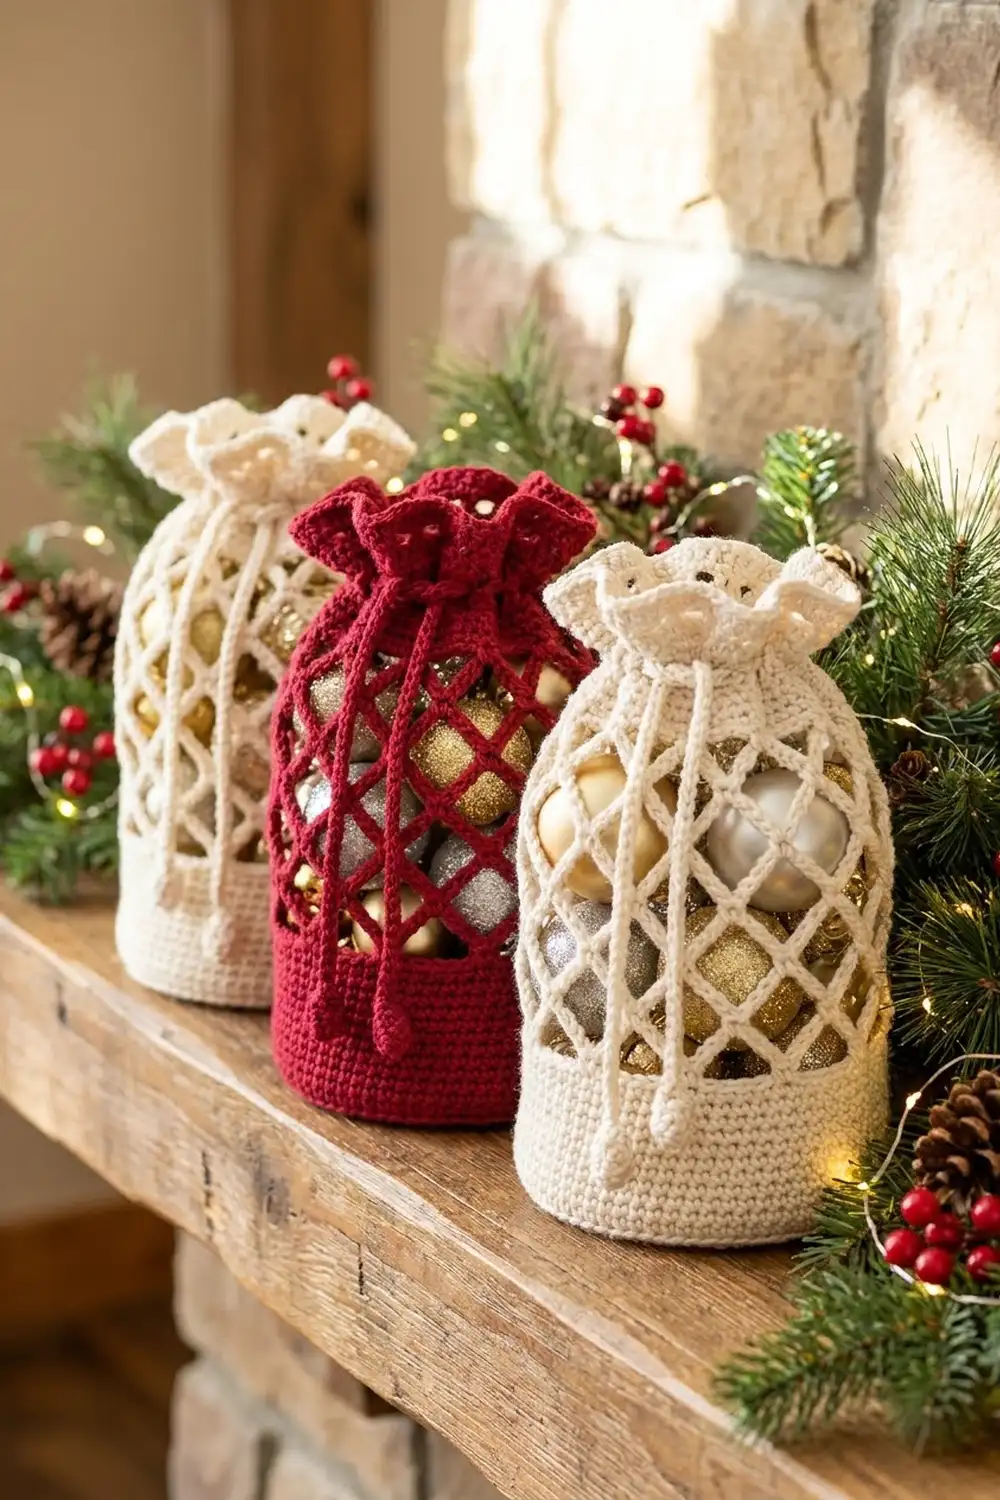
This little drawstring bag has a firm oval base, a solid band of single crochet and an open diamond lattice body, so whatever you put inside shows through. A ruffled shell edge finishes the top, and it gathers into soft folds when you pull the cords.
Make it in cranberry red or warm cream. Red bags look bright with gold ornaments inside, and cream bags show off red ones. One bag uses a single color. The pattern uses US crochet terms.
The finished bag measures 4 in (10.2 cm) wide laid flat and 4.5 in (11.4 cm) tall, ruffle included. It holds three or four small baubles, wrapped chocolates or a small gift.
You work the bag in joined rounds from the bottom up. First comes the oval base, then the solid wall and five rounds of lattice. A solid round and an eyelet round follow, and two ruffle rounds finish the top. You make the two slip-stitch drawstrings separately and thread them through last.
Finished Size and Construction
- Finished size: 4 in (10.2 cm) wide flat × 4.5 in (11.4 cm) tall
- Skill level: Easy-intermediate
- Terminology: US
- Yarn weight: DK (#3), cotton or cotton blend
- Hook: 3.5 mm (E-4)
- Number of pieces: 1 bag + 2 drawstring cords
- Layout: Single seamless piece worked in joined rounds, not turned
- Base size: 3.1 in (7.9 cm) × 1.5 in (3.8 cm)
- Size before ruffle: 4 in (10.2 cm) wide × 3.75 in (9.5 cm) tall
- Ruffle depth: 0.75 in (1.9 cm)
Materials
Choose a smooth, mercerized DK cotton. It shows the stitches clearly, and the lattice and ruffle keep their shape. Acrylic will also work, but the ruffle won’t be as crisp.
- Cranberry red: 20 g (about 50 m) per red bag
- Cream: 20 g (about 50 m) per cream bag
- 3.5 mm (E-4) crochet hook
- Tapestry needle
- Scissors
- Stitch marker
- Rustproof pins and a small ball or tissue paper for blocking
These quantities include a margin. One bag uses about 15 g, cords included.
Abbreviations (US Terms)
- ch – chain
- sl st – slip stitch
- sc – single crochet
- dc – double crochet
- sk – skip
- sp – space
- st(s) – stitch(es)
- BLO – back loop only
- rnd – round
Special stitch – Shell: 5 dc in the same stitch.
Join-loop technique: In the lattice rounds, you finish with “ch 2, dc in first sc” instead of a final ch 5. This makes a loop the same size as a ch-5 loop and leaves your hook at the middle of that loop, ready for the next round.
Gauge and Checkpoints
Gauge: 20 sc × 24 rnds = 4 in (10.2 cm) in sc worked in rounds.
Make one test bag before you make a set. Check it at each of these points:
- After Rnd 4 (base): the oval measures 3.1 in (7.9 cm) × 1.5 in (3.8 cm).
- After Rnd 10 (wall): the wall is 1 in (2.5 cm) tall, and the bag measures 4 in (10.2 cm) across when flattened.
- After Rnd 15 (lattice): the lattice section is 2.25 in (5.7 cm) tall, about 0.45 in (1.1 cm) per round.
- After Rnd 17 (eyelets): the bag is 3.75 in (9.5 cm) tall in total.
- After Rnd 19 (ruffle): the bag is 4.5 in (11.4 cm) tall in total.
Too big? Go down one hook size to 3.25 mm (D-3).
Too small? Go up one hook size to 3.75 mm (F-5).
Width matters more than height. If the base is right, the stitch counts will keep the rest of the bag in proportion.
Base
The base is a standard oval. It has two straight sides of 8 sts each and two curved ends where all the increases go.
Rnd 1: Ch 11. Sc in 2nd ch from hook and in next 8 ch, 3 sc in last ch. Rotate and work along the other side of the foundation chain: sc in next 8 ch, 2 sc in the same ch as the first sc. Join with sl st to first sc. (22 sc)
Layout: end A 3 sts, side 8 sts, end B 3 sts, side 8 sts.
Rnd 2: Ch 1. Work 2 sc in each of the 3 end sts, sc in each of the next 8 sts. Repeat once for the other end and side. Join. (28 sc: ends 6 + 6, sides 8 + 8)
Rnd 3: Ch 1. (Sc in next st, 2 sc in next st) 3 times, sc in next 8 sts. Repeat once more. Join. (34 sc: ends 9 + 9, sides 8 + 8)
Rnd 4: Ch 1. (Sc in next 2 sts, 2 sc in next st) 3 times, sc in next 8 sts. Repeat once more. Join. (40 sc: ends 12 + 12, sides 8 + 8)
Checkpoint: The base is flat and measures 3.1 in (7.9 cm) × 1.5 in (3.8 cm). If the ends ripple, your increases are too tight to the edge. If they cup, check that you made the increases at the ends and not along the sides.
Wall
Rnd 5: Ch 1, sc in BLO of each st around. Join. (40 sc)
Working into the back loops makes a clean fold line, so the base sits flat and the bag stands up.
Rnds 6–10: Ch 1, sc in each st around. Join. (40 sc each round)
Checkpoint: The wall is 1 in (2.5 cm) tall, and the bag measures 4 in (10.2 cm) across when flattened. 40 sts at 5 sts per inch is an 8 in (20.3 cm) circumference, which folds flat to 4 in (10.2 cm).
Lattice Body
The lattice uses a 4-stitch repeat: 1 sc, then skip 3. 40 sts ÷ 4 = exactly 10 loops. Each later round puts its sc into the middle of a loop from the round below, which shifts the anchors by half a loop and makes the diamonds.
Rnd 11: Ch 1, sc in first st. Ch 5, sk 3 sts, sc in next st. Repeat 8 more times. Ch 2, sk last 3 sts, dc in first sc. (10 ch-5 loops; the last is the ch-2 + dc loop)
Rnds 12–14: Ch 1, sc around the post of the joining dc. Ch 5, sc in next ch-5 loop. Repeat 8 more times. Ch 2, dc in first sc. (10 loops each round)
Rnd 15: Ch 1, sc around the post of the joining dc. Ch 5, sc in next ch-5 loop. Repeat 8 more times. Ch 5, sl st in first sc. (10 ch-5 loops)
This round closes with a full ch 5, so you’re ready for the solid round.
Checkpoint: The lattice is 2.25 in (5.7 cm) tall, and you can count five rows of diamonds. Stretch it gently. The loops should spring back and not sag.
Drawstring Cords (Make 2)
Ch 66. Sl st in the back bump of 2nd ch from hook and in each ch across. (65 sl st) Fasten off and leave 2 in (5.1 cm) tails.
Checkpoint: Each cord measures 13 in (33.0 cm). That covers the 8 in (20.3 cm) circumference plus a hanging length of about 2.5 in (6.4 cm) on each end. Working into the back bumps makes a firm cord that doesn’t stretch.
Top Band and Ruffle
On this bag, the “border” is the top band plus the ruffle. Its gauge is the same as the body: 5 sc per inch. Flattened, each side of the bag (front and back) has 20 of the 40 sts.
Rnd 16 (conversion round): Ch 1. Sc in next sc, 3 sc in next ch-5 loop. Repeat around. Join.
Count: 10 sc (worked 1 per existing sc) + 30 sc (worked 3 per loop) = 40 sc (20 per side)
Rnd 17 (eyelet round): Ch 4 (counts as dc + ch 1). Sk 1 st. Dc in next st, ch 1, sk 1 st. Repeat 18 more times. Join with sl st to 3rd ch of beginning ch-4.
Count: 20 dc and 20 ch-1 spaces (10 dc + 10 spaces per side)
Checkpoint: The bag is 3.75 in (9.5 cm) tall in total.
Rnd 18 (trim round): Ch 3 (counts as dc), dc in the same st. Work 2 dc in each ch-1 sp and 2 dc in each dc around. Join to top of ch-3.
Count: 40 dc (1 per existing st and space) + 40 extra dc = 80 dc (40 per side)
Rnd 19 (shell round): Ch 1, sc in first st. Sk 1 st, shell in next st, sk 1 st, sc in next st. Repeat 19 more times, but leave out the final sc on the last repeat. Join to first sc. Fasten off.
Count: 20 shells and 20 sc (10 shells per side)
Why the math works: Each shell repeat uses 4 sts (sc, skip, shell, skip), and 80 ÷ 4 = 20 shells with nothing left over. Doubling the count in Rnd 18 makes the edge flare, and 5 dc in each shell ruffles it. When you cinch the eyelets below, the edge gathers into the deep folds you see on the finished bags.
Checkpoint: The ruffle is 0.75 in (1.9 cm) deep, and the bag is 4.5 in (11.4 cm) tall in total.
Thread the Drawstrings
Number the eyelet spaces 1 to 20, starting just after the join.
- Cord 1: Start at space 1 and weave in and out through all 20 spaces. Bring it back out at space 1.
- Cord 2: Start at space 11, on the opposite side of the bag, and weave in and out all the way around. Bring it back out at space 11.
Tie the two ends of each cord together with a double overhand knot 0.25 in (0.6 cm) from the tips. Then tie a second double knot on each tail to make the small nubs. Trim the tails close.
Final Blocking
- Weave in all the ends along the solid wall. Don’t weave them through the lattice, where they would show.
- Lightly mist the bag with water, or hold a steam iron 1 in (2.5 cm) above it without touching.
- Fill the bag with a small ball or with tissue paper rolled to about 3.5 in (8.9 cm) across.
- Press the base flat on the table so the bag stands upright.
- Pull each lattice diamond so it’s even in size.
- Open the cords fully and pin the shells outward around the rim.
- Let it dry completely, then remove the pins and stuffing. Cinch the top.
Final Quality-Control Checklist
- [ ] Base is flat and measures 3.1 in (7.9 cm) × 1.5 in (3.8 cm)
- [ ] 40 sts in Rnds 4–10 and 16
- [ ] 10 even loops in each lattice round
- [ ] 20 eyelets, evenly spaced
- [ ] 20 shells with no gaps at the join
- [ ] Bag is 4 in (10.2 cm) wide and 4.5 in (11.4 cm) tall
- [ ] Both cords are 13 in (33.0 cm) and slide freely
- [ ] Bag stands upright with no ends showing
Troubleshooting
The base curls up like a bowl. You missed some increases. Count each round against the end and side totals.
The base ripples. Your increases are too tight. Go up a hook size for Rnds 1–4 only.
The diamonds slant in a spiral. You worked into the loop next to the joining dc instead of around the dc itself. Begin each round around the post of the joining dc.
The lattice sags. Your chains are too loose. Make each ch-5 the same height as about 3 sc rounds.
The ruffle is flat. Check that Rnd 18 has 80 dc.
The ruffle twists. You probably skipped 2 sts instead of 1 somewhere. Count your shells.
The cords stick. Your eyelets are too tight. Make the ch-1 spaces in Rnd 17 a little looser.
Care
Hand wash in cool water, press out the water in a towel, and dry flat with tissue inside to keep the shape. Don’t tumble dry, because it flattens the ruffle.
Final Notes
Here is how the measurements fit together. At a gauge of 20 sc per 4 in (10.2 cm), the 40-stitch base is 3.1 in (7.9 cm) × 1.5 in (3.8 cm). That base makes a wall 4 in (10.2 cm) wide flat and 1 in (2.5 cm) tall. Ten lattice loops add 2.25 in (5.7 cm), and the 40-stitch band and 20 eyelets take the bag to 3.75 in (9.5 cm). The 80-stitch, 20-shell ruffle brings the total to 4.5 in (11.4 cm). If your base is right, the rest of the bag will come out right too.
Happy crocheting!