

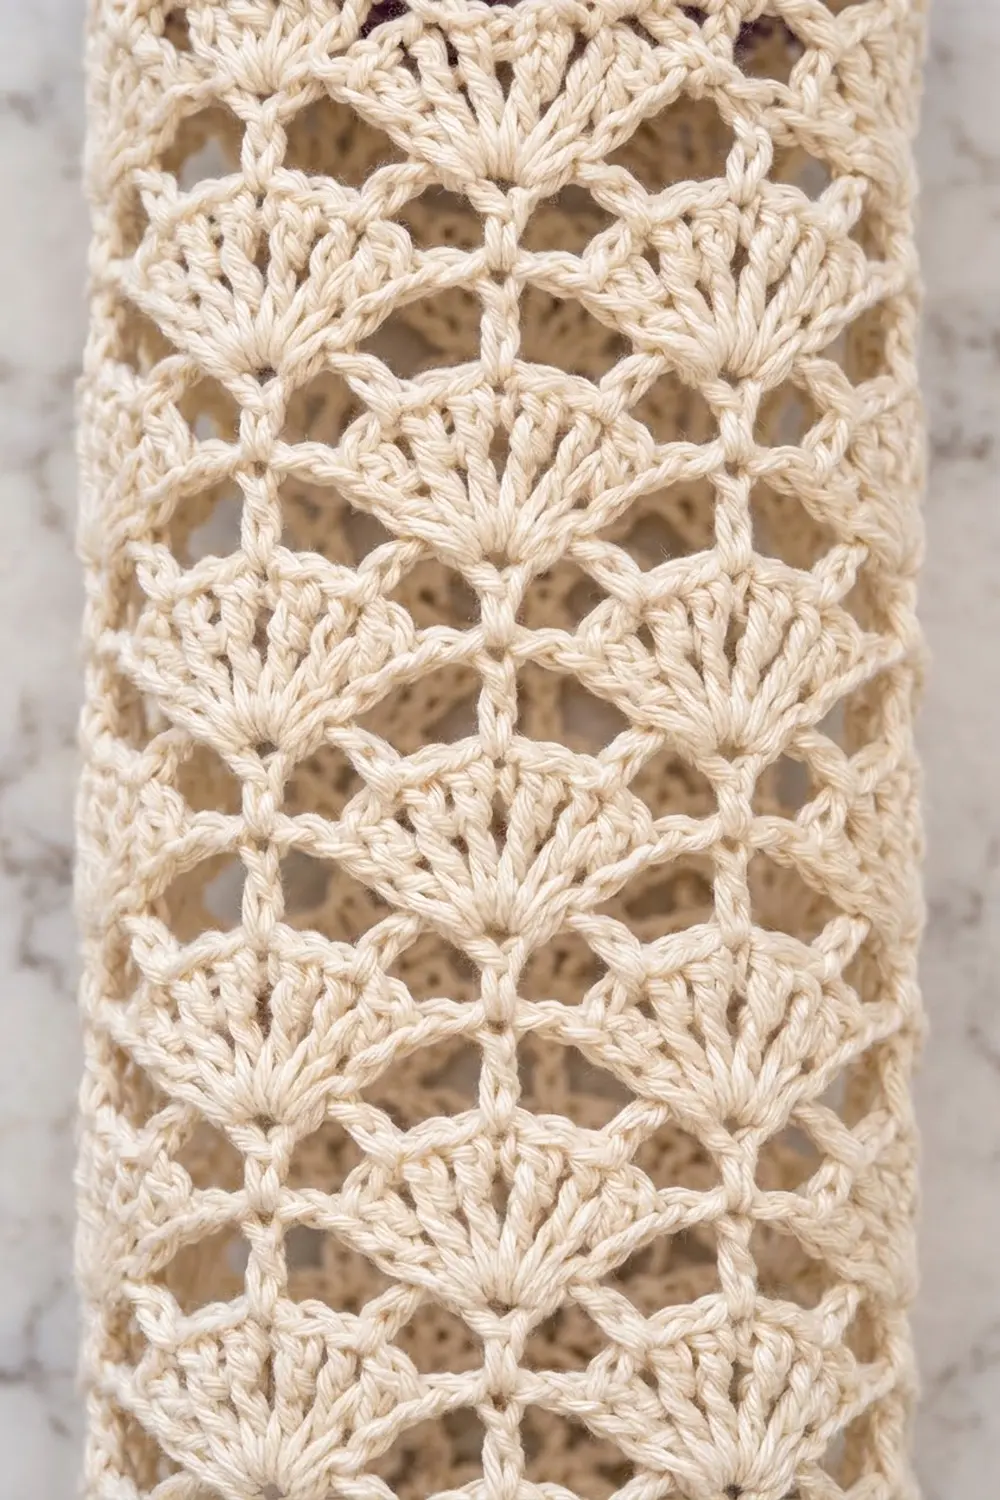
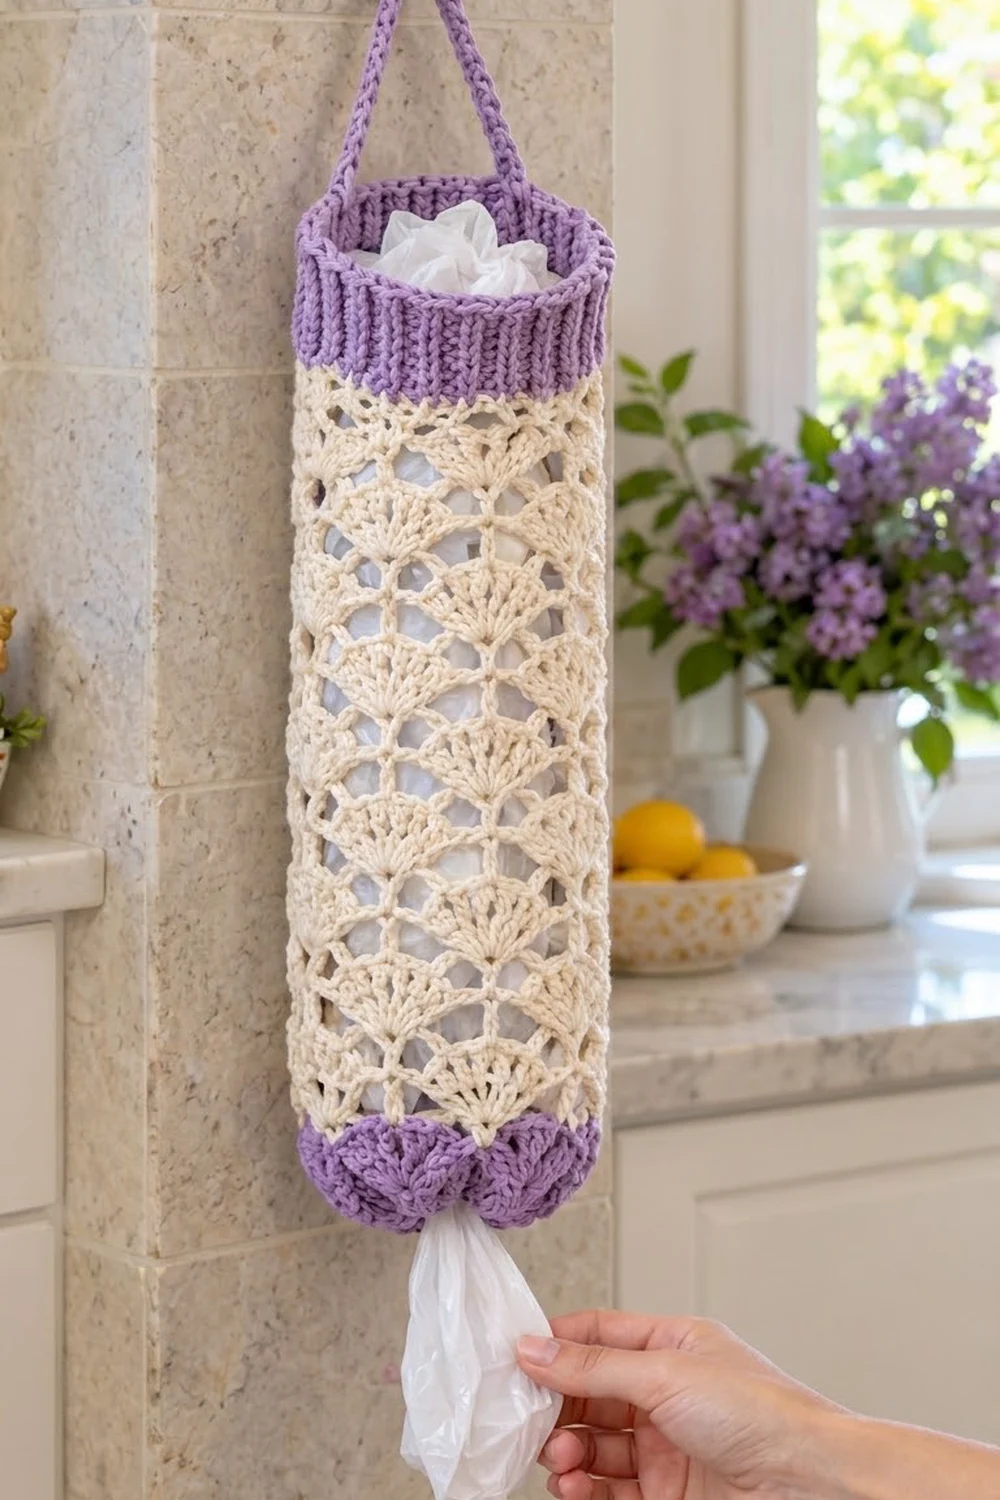
This bag holder is a tall, slim tube of cream fan lace with lavender trim at both ends. Fans in alternating rounds build a diamond-and-arch texture. It looks delicate, but it is still sturdy enough to hold a full load of plastic grocery bags.
The color scheme is quiet and fresh. The body is creamy off-white. The lavender appears in a ribbed band at the top opening, a narrow tapered edge with scallops at the bottom, and a slim hanging strap. Hang it on a hook beside the sink or inside a pantry door.
All instructions use US crochet terms. The finished holder is about 18.75 in (47.6 cm) long, not counting the strap, and 16 in (40.6 cm) around. That is roughly 8 in (20.3 cm) wide when flattened and about 5 in (12.7 cm) across when filled. The strap loop rises about 5.5 in (14.0 cm) above the rim.
Everything is one seamless piece. You start at the top edge and work the cream lace body down in joined rounds. Next, you decrease into the lavender scalloped bottom opening. Last, you go back to the foundation chain to add the ribbed top band and work the strap straight off it. There are no seams and nothing to sew on.
Finished Size and Construction
- Finished size: 18.75 in (47.6 cm) long × 16 in (40.6 cm) circumference
- Flattened width: 8 in (20.3 cm)
- Skill level: Easy intermediate
- Terminology: US crochet terms
- Yarn weight: Worsted (#4), cotton
- Hook: 5.0 mm (US H-8)
- Number of pieces: 1. The strap is worked directly onto the band.
- Layout: Vertical tube, worked in joined rounds
- Body size (before border): 15.5 in (39.4 cm) long × 16 in (40.6 cm) around
- Border depth: Top band 2 in (5.1 cm); bottom edging 1.25 in (3.2 cm)
- Bottom opening: about 9 in (22.9 cm) around at the base of the scallops
Materials
Pick a smooth worsted-weight cotton or a cotton blend. Cotton keeps the fans crisp, holds its shape under the weight of bags, and washes well. Acrylic will work too, but the lace will stretch more lengthwise.
- Cream (Color A): 130 g, about 221 m (242 yd)
- Lavender (Color B): 55 g, about 94 m (103 yd)
Tools:
- 5.0 mm (US H-8) crochet hook
- 4 locking stitch markers
- Tapestry needle
- Scissors
- Tape measure
- Rolled towel or a tall cylindrical object about 5 in (12.7 cm) across, for blocking
- Spray bottle
The yarn amounts include a margin of about 15% for your gauge swatch and for small differences in tension.
Abbreviations (US Terms)
- ch – chain
- sl st – slip stitch
- sc – single crochet
- sc2tog – single crochet 2 together
- dc – double crochet
- FPdc – front post double crochet
- BPdc – back post double crochet
- st(s) – stitch(es)
- beg – beginning
- rnd(s) – round(s)
Special stitches:
- Fan: 7 dc in the same stitch. The center of a fan is its 4th dc.
- Half fan: At the start of a round, work ch 3 (counts as dc) and 3 dc in one stitch. At the end of the round, work 3 more dc in that same stitch. Read around the tube, these 7 stitches make one full fan, and the beg ch-3 is its center.
- Scallop: 5 dc in the same stitch.
Gauge and Checkpoints
Gauge:
- 16 sc = 4 in (10.2 cm)
- 4 fan rnds = 2.5 in (6.4 cm) tall, after blocking
- 8 rnds of dc ribbing = 4 in (10.2 cm) tall
Test first: Work the foundation and Rnds 1–5 of the body, then check your gauge before going on. Flatten the tube without stretching it. It should measure 8 in (20.3 cm) across and 2.75 in (7.0 cm) from the foundation chain to the tops of the Rnd 5 fans.
Checkpoints:
- After Rnd 1: 8 in (20.3 cm) flattened width
- After Rnd 5: 2.75 in (7.0 cm) tall
- After Rnd 13: 7.75 in (19.7 cm) tall
- After Rnd 25: 15.25 in (38.7 cm) tall
- After Rnd 26: 15.5 in (39.4 cm) tall
- After the bottom edging: 16.75 in (42.5 cm) tall
- After the top band: 18.75 in (47.6 cm) total length
If the tube is too wide (over 8.25 in / 21.0 cm flattened), go down to a 4.5 mm hook. If it is too narrow (under 7.75 in / 19.7 cm), go up to a 5.5 mm hook. Do not change the stitch count. The fan pattern only works on a multiple of 8.
If your rounds are too tall or too short, you can still keep your width gauge. Just adjust the number of fan rounds, and always add or remove them in pairs (one A round plus one B round). That way the body still ends on a B round before the leveling round.
Body
Use Color A (cream). The body is worked top down in joined rounds with the right side facing you, and you never turn. Put a marker in the first stitch of each round.
Foundation: Ch 64. Join with a sl st to the first ch to make a ring, taking care not to twist the chain.
Rnd 1: Ch 1, sc in each ch around. Join with a sl st to the first sc. (64 sc)
Rnd 2 (Fan Rnd A, setup): Ch 1, sc in first st. [Skip 3 sts, Fan in next st, skip 3 sts, sc in next st] 7 times. Skip 3 sts, Fan in next st, skip 3 sts, join with a sl st to the first sc. (64 sts: 8 Fans + 8 sc)
Rnd 3 (Fan Rnd B): Ch 3 (counts as dc), 3 dc in the same sc as the join (first half fan). [Sc in center dc of next Fan, Fan in next sc] 7 times. Sc in center dc of last Fan, 3 dc in the same sc as the beg ch-3 (half fan completed). Join with a sl st to the top of the beg ch-3. (64 sts: 8 Fans + 8 sc)
Rnd 4 (Fan Rnd A): Ch 1, sc in the top of the beg ch-3 (center of the split fan). [Fan in next sc, sc in center dc of next Fan] 7 times. Fan in the last sc, join with a sl st to the first sc. (64 sts: 8 Fans + 8 sc)
Every round offsets the fans by half a repeat. Each Fan sits on the sc at the center of the Fan below it, and that is what forms the stacked arches.
Rnds 5–25: Work Fan Rnd B on odd rounds and Fan Rnd A (as in Rnd 4) on even rounds. You will finish with Rnd 25, a B round. (64 sts in every round)
That gives 24 fan rounds (Rnds 2–25), which measure 15 in (38.1 cm). Add the 0.25 in (0.6 cm) of Rnd 1 and the body reaches 15.25 in (38.7 cm).
Rnd 26 (leveling rnd, conversion): This round fills the dips between fans so the bottom edge is straight. Ch 1. Sc in the top of the beg ch-3 and in the next 3 dc. [Dc in next sc, sc in each of next 7 dc] 7 times. Dc in next sc, sc in each of the last 3 dc. Join with a sl st to the first sc.
Count: 64 sts worked 1 per existing stitch + 0 extra = 64 sts (56 sc + 8 dc).
The body now measures 15.5 in (39.4 cm). Fasten off Color A.
Border
There are two border sections: the gathered bottom edging and the ribbed top band, which carries the strap. Both use Color B (lavender).
Border gauge: 16 sc = 4 in (10.2 cm); 8 rnds of FPdc/BPdc ribbing = 4 in (10.2 cm).
The tube has no corners. To check symmetry, flatten it and count each half as one “side,” so each side holds half the round. A 64-stitch round has 32 stitches on each side.
Bottom Edging
Rnd 1 (decrease): Join Color B in any st of Rnd 26 (the first dc is easiest to spot). Ch 1, [sc in each of next 2 sts, sc2tog] 16 times. Join. (48 sc; 24 per side)
Rnd 2 (decrease): Ch 1, [sc in each of next 2 sts, sc2tog] 12 times. Join. (36 sc; 18 per side)
Rnd 3 (scallops): Ch 1, sc in first st. [Skip 1 st, Scallop in next st, skip 1 st, sc in next st] 8 times. Skip 1 st, Scallop in next st, skip 1 st, join with a sl st to the first sc. (9 Scallops + 9 sc = 54 sts)
Why the math works: Each scallop repeat uses 4 stitches (sc, skip, Scallop, skip), and 36 ÷ 4 = 9 repeats exactly. Rnd 1 removes one stitch in every 4 (64 → 48). Rnd 2 does the same again (48 → 36), so the opening shrinks to 9 in (22.9 cm) around, about 2.9 in (7.4 cm) across. That is small enough to hold the bags in and big enough to pull one out. The 5-dc scallops flare out, so the edge stays soft.
Fasten off. The edging is 1.25 in (3.2 cm) deep, and the piece should now measure 16.75 in (42.5 cm).
Top Band and Strap
Turn the tube so the foundation chain is at the top, right side still facing out.
Rnd 1: Join Color B in any free loop of the foundation chain. Ch 2 (does not count as a st). Dc in each free loop around. Join with a sl st to the first dc. (64 dc; 32 per side)
Rnds 2–4 (ribbing): Ch 2 (does not count). [FPdc around next st, BPdc around next st] 32 times. Join with a sl st to the first FPdc. (64 sts; 32 per side, 16 ribs per side)
Why the math works: The band works 1 stitch into each of the 64 foundation loops, so it is exactly as wide as the body. FPdc/BPdc ribbing needs an even count, and 64 ÷ 2 = 32 pairs. The 4 rounds at 0.5 in (1.3 cm) each make a 2 in (5.1 cm) band. Each ribbing stitch is worked around the matching stitch below it, so the column of raised ribs stays straight.
Place markers in st 1 and st 33. These two points sit directly opposite each other, 32 sts apart, so the strap hangs centered.
Strap: Do not fasten off after Rnd 4. Ch 50, then sl st into st 33. Ch 1, turn, and sc in each of the 50 ch. Sl st into st 1 to finish. (50 sc)
At gauge, the strap is 12.5 in (31.8 cm) long and about 0.4 in (1.0 cm) wide. It makes a loop that rises roughly 5.5 in (14.0 cm) above the rim. Fasten off and weave in all ends.
The total length is now 18.75 in (47.6 cm): 2 in band + 15.5 in body + 1.25 in edging.
Final Blocking
- Weave in every end along stitch posts of the same color before you block.
- Fill a spray bottle with cool water.
- Roll up a towel until it is about 5 in (12.7 cm) across, or use a tall jar or vase of similar size.
- Slide the holder over the form. Line up the fans in vertical columns and make sure the 8 arches in each round are evenly spaced.
- Spray until damp but not soaking.
- Smooth the body to 15.5 in (39.4 cm) long without pulling it tight. Lace stretches, and an overstretched tube will sag when filled.
- Press the ribbing flat with your fingers and fan out each scallop.
- Let it air-dry completely on the form. Lay the strap flat beside it so it dries straight.
Final Quality-Control Checklist
- Every body round has 64 stitches, with 8 Fans per fan round
- The fans form straight vertical columns with no spiral
- Rnd 26 makes a level edge with no dips
- Bottom Rnd 1 has 48 sc, Rnd 2 has 36 sc, and Rnd 3 has 9 Scallops
- The top band has 64 sts, and the ribs run in straight columns
- The strap ends sit at st 1 and st 33, directly opposite each other
- Flattened width is 8 in (20.3 cm)
- Total length is 18.75 in (47.6 cm), not counting the strap
- All ends are woven in and trimmed
Troubleshooting
Fans are drifting into a spiral. Make sure you join every round with a sl st and start each new round exactly where the instructions say. Never skip the ch 1 or ch 3 at the start of a round.
Fan count is off. Check that you skipped exactly 3 sts on each side of every Fan in Rnd 2. Count 8 sc anchors before you go on.
The tube flares at the bottom. The leveling round is too loose. Rework it with tighter tension, or use a hook one size smaller for that round.
The bottom opening is too tight. Skip bottom Rnd 2 and work the scallops over the 48 sts of Rnd 1, which gives 12 Scallops. That makes the opening 12 in (30.5 cm) around.
The ribbing flares or ruffles. Post stitches eat yarn. Go down half a hook size for Rnds 2–4 of the band.
The strap stretches too long. Use a firmer sc row, or work a second row of sl sts along the strap to stiffen it.
Bags fall out. Weave a strand of Color B through bottom Rnd 2 and pull it slightly snug.
Care
Hand-wash or machine-wash on a gentle cycle in cool water, then lay flat or reshape over a rolled towel to dry. Avoid hot dryers, which can shrink cotton unevenly.
Final Notes
The measurements build on each other. Your gauge of 16 sc = 4 in (10.2 cm) gives a 64-stitch round that is 16 in (40.6 cm) around. Twenty-four fan rounds plus the sc rounds make a body 15.5 in (39.4 cm) long. The bottom edging decreases 64 → 48 → 36 and ends in 9 scallops, adding 1.25 in (3.2 cm). The ribbed band keeps all 64 stitches and adds 2 in (5.1 cm), for a finished length of 18.75 in (47.6 cm) with a 12.5 in (31.8 cm) strap on top. If you hit the checkpoints along the way, the finished holder will hang straight and dispense one bag at a time.
Happy crocheting!