

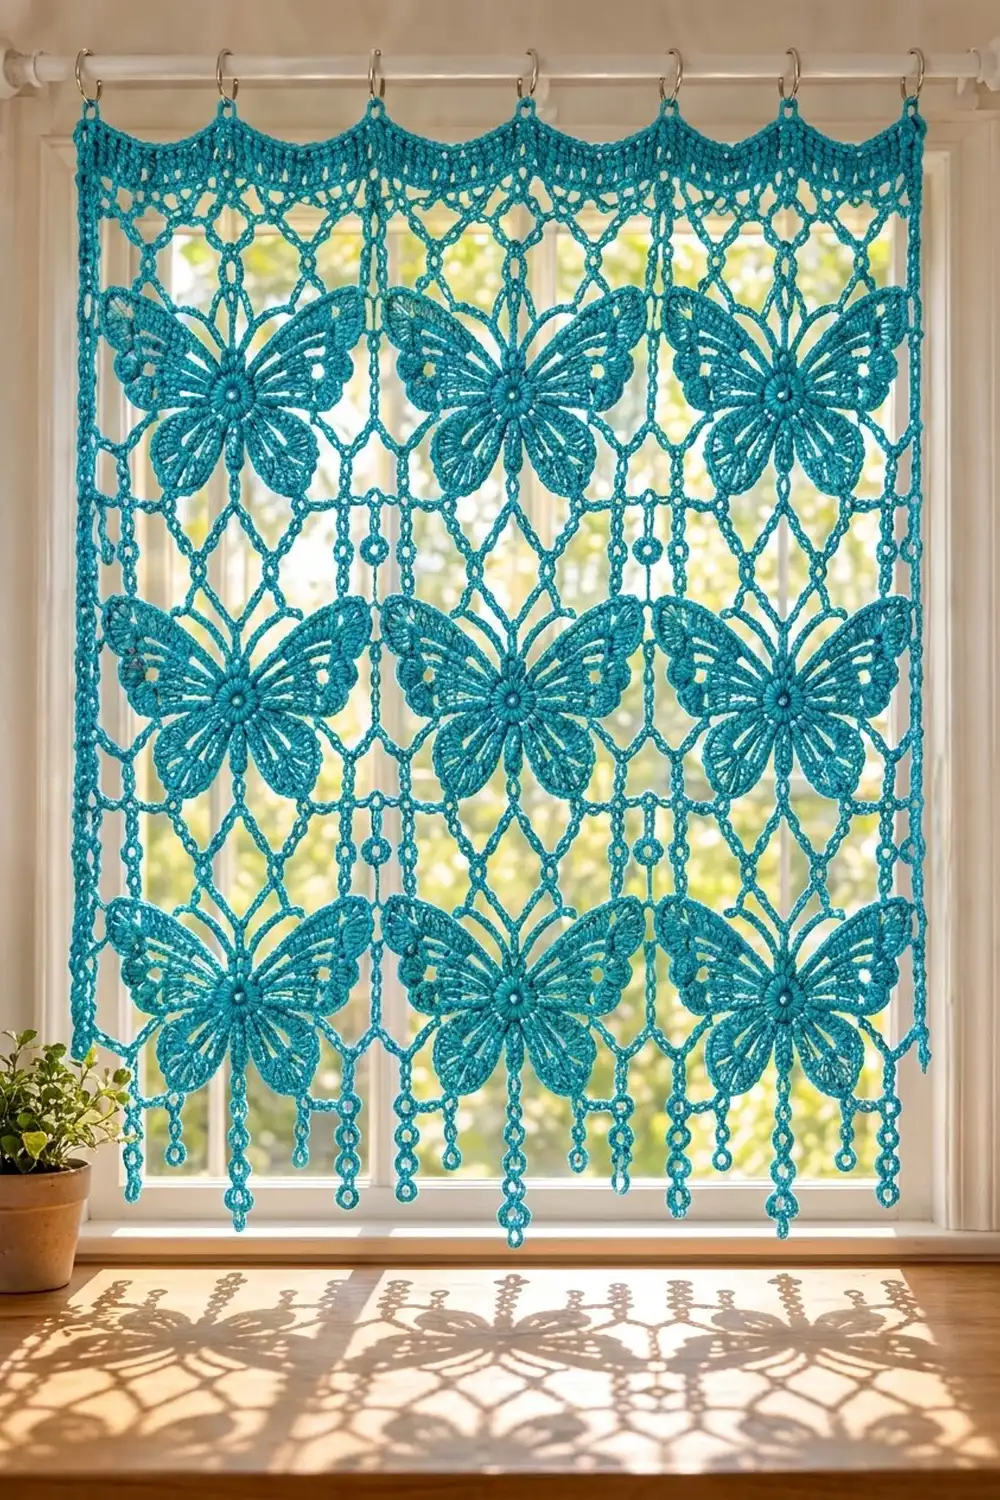
This lace café curtain sets nine butterflies into an open chain lattice. Each butterfly has a raised round body and two large upper wings. Two smaller lower wings sit below them, and all four wings have stitch-ribbed veins and tiny picots along the edges. Fine chain antennae finish each one. A scalloped heading with hanging loops runs along the top, and beaded chain fringe hangs from the bottom.
The sample uses one color, a bright turquoise cotton, so the light coming through the window does the rest of the work. The style is airy and vintage-inspired, and it suits a kitchen or breakfast nook.
This pattern uses US crochet terms. The finished curtain is 25 in (63.5 cm) wide and 26.5 in (67.3 cm) from the bottom border to the scallop peaks. With the fringe it is 34 in (86.4 cm) long. The hanging loops add about 1.5 in (3.8 cm) above the heading.
You make nine square butterfly blocks in the round and join them 3 across by 3 down. Then you work a two-round border, add a scalloped heading to the top edge, and finish with the fringe on the bottom edge.
Finished Size and Construction
- Finished size: 25 in x 26.5 in (63.5 cm x 67.3 cm) for the body; 34 in (86.4 cm) long with fringe
- Skill level: Intermediate
- Terminology: US terms
- Yarn weight: DK / light (#3) mercerized cotton
- Hook: 4.0 mm (G-6)
- Number of pieces: 9 identical butterfly blocks
- Layout: 3 blocks across x 3 blocks down
- Block size: 8 in x 8 in (20.3 cm x 20.3 cm)
- Size before border: 24 in x 24 in (61.0 cm x 61.0 cm)
- Border depth: 0.5 in (1.3 cm) on each side. The heading adds 1.5 in (3.8 cm) and the fringe adds about 7.5 in (19.1 cm).
Materials
Choose a smooth mercerized cotton or cotton blend in DK weight. Mercerized cotton shows the wing ribs crisply and holds its shape when the curtain hangs. Avoid fuzzy or very stretchy yarns, because the lattice will sag.
- Turquoise: 200 g, about 440 m (481 yd)
Tools:
- 4.0 mm (G-6) crochet hook
- Tapestry needle
- Scissors
- Stitch markers (4 or more)
- Rust-proof pins and blocking mats
- Spray bottle
- 8 curtain rings or clip rings, plus a rod
The yarn quantity includes about 25 percent extra to allow for a test block and differences in tension.
Abbreviations (US Terms)
- ch – chain
- sl st – slip stitch
- sc – single crochet
- hdc – half double crochet
- dc – double crochet
- tr – treble crochet
- sp(s) – space(s)
- sk – skip
- st(s) – stitch(es)
- RS / WS – right side / wrong side
- BLO – back loop only
Special stitch – bead: Ch 4, then sl st in the 4th ch from the hook. This makes a small closed ring, used in the fringe and the antennae.
Gauge and Checkpoints
Gauge: 17 sc and 16 rows = 4 in (10.2 cm). 16 ch = 4 in (10.2 cm).
Make one complete block before starting the others. Lace is hard to measure as a swatch, so the first block is your real gauge test.
Checkpoints for one block:
- After Round 4: the butterfly measures about 4.5 in (11.4 cm) across the wings and 3.5 in (8.9 cm) tall.
- After Round 5: the frame measures about 5.5 in (14.0 cm) across.
- After Round 8: the block measures about 7.5 in (19.1 cm) square when lightly stretched.
- After Round 9: the block measures 8 in (20.3 cm) square after blocking. At 17 sc per 4 in, 34 sc along each side gives exactly 8 in.
If your block is too big, go down 0.5 mm in hook size. If it is too small, go up 0.5 mm. Check the sc count on the final edge first. If you have 34 sc per side and the size is still off, the problem is tension, not counting.
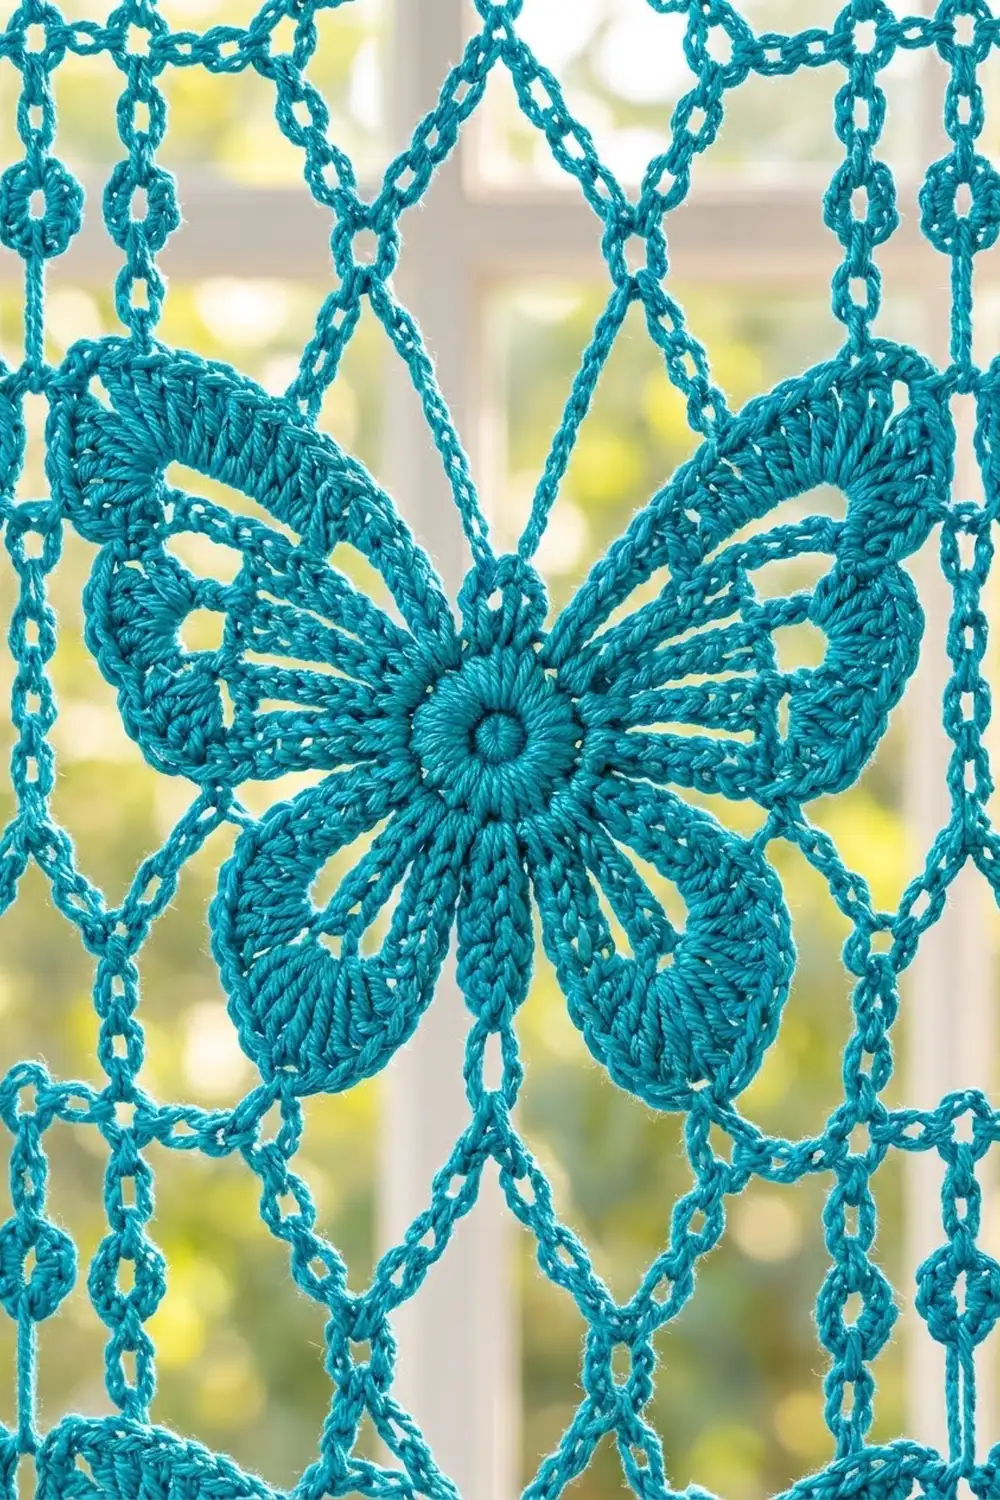
Butterfly Block (make 9)
A ch 1 at the start of a round does not count as a stitch. The ch 3 at the start of Round 1 counts as a dc.
Round 1 (body): Make a magic ring. Ch 3, work 15 dc in the ring, then sl st to the top of the ch-3. (16 dc)
Pull the ring tight. The ch-3 is dc 1, at the top of the body (the head). Place a marker in dc 1.
Round 2 (wing bases): Ch 1, sc in dc 1, ch 9, sk 3, sc in dc 5, ch 7, sk 3, sc in dc 9, ch 7, sk 3, sc in dc 13, ch 9, sl st to the first sc. (4 sc, two ch-9 sps, two ch-7 sps)
The ch-9 sps hold the upper wings: wing A (upper right) and wing D (upper left). The ch-7 sps hold the lower wings: wing B (lower right) and wing C (lower left).
Round 3 (wings): Sl st into the ch-9 sp of wing A.
- Wing A (upper): In the ch-9 sp, work (sc, hdc, 3 dc, ch 2, 3 tr, ch 2, 3 tr, ch 2, 3 dc, hdc, sc). Sl st in the sc at dc 5.
- Wing B (lower): In the ch-7 sp, work (sc, hdc, 3 dc, ch 2, 3 dc, hdc, sc). Sl st in the sc at dc 9.
- Wing C (lower): Work as for wing B. Sl st in the sc at dc 13.
- Wing D (upper): Work as for wing A. Sl st in the first sc of Round 2 to join.
(Each upper wing: 16 sts + 3 ch-2 sps. Each lower wing: 10 sts + 1 ch-2 sp. Round total: 52 sts + 8 ch-2 sps, not counting the joining sl sts.)
The tr groups spread out like veins and give the upper wings their fan shape.
Round 4 (wing edging): Ch 1. Work around each wing in turn: sc in each st, and work (sc, ch 3, sc) in each ch-2 sp. Sl st in the sl st between wings. After wing D, sl st to the first sc to join.
(Each upper wing: 16 + 6 = 22 sc and 3 ch-3 picots. Each lower wing: 10 + 2 = 12 sc and 1 ch-3 picot. Round total: 68 sc and 8 picots.)
The wing tips are the middle picot of each upper wing and the single picot of each lower wing. Mark these four tips and fasten off.
Round 5 (frame): Join yarn in the wing A tip picot. Ch 1, then work (sc, ch 5, sc) in the same picot. [Ch 8. Sc in the sl st between this wing and the next one, working through the Round 2 sc underneath. Ch 8, then work (sc, ch 5, sc) in the next wing tip.] Repeat the bracketed steps 2 more times. Ch 8, sc in the sl st between wings D and A, ch 8, sl st to the first sc.
(4 corner ch-5 sps, 8 ch-8 sps and 12 sc. Each side has 2 ch-8 sps with 1 middle sc between them.)
At this stage the frame is a rounded square with sides that dip slightly inward. Rounds 6 to 8 straighten it.
Round 6 (mesh): Sl st into the corner ch-5 sp. Ch 1, then work (sc, ch 7, sc) in the corner sp. [Ch 5, sc in the next ch-8 sp, ch 5, sc in the middle sc of this side, ch 5, sc in the next ch-8 sp, ch 5, then work (sc, ch 7, sc) in the next corner sp.] Repeat the bracketed steps 3 more times, but leave out the last corner. Instead, sl st to the first sc.
(4 ch-5 loops per side, 16 ch-5 loops in total, 4 corner ch-7 sps)
Round 7 (mesh): Sl st into the corner ch-7 sp. Ch 1, then work (sc, ch 7, sc) in the corner sp. [(Ch 5, sc in the next ch-5 loop) 4 times, ch 5, then work (sc, ch 7, sc) in the next corner sp.] Repeat the bracketed steps around, leaving out the last corner, and sl st to the first sc.
(5 ch-5 loops per side, 20 in total, 4 corner ch-7 sps)
Round 8 (mesh): Work as for Round 7, but work (ch 5, sc in the next ch-5 loop) 5 times along each side.
(6 ch-5 loops per side, 24 in total, 4 corner ch-7 sps)
Round 9 (edge – conversion round): Sl st into the corner ch-7 sp. Ch 1, then work (2 sc, ch 2, 2 sc) in the corner sp. [Work 5 sc in each of the 6 ch-5 loops, then work (2 sc, ch 2, 2 sc) in the next corner sp.] Repeat the bracketed steps around, leaving out the last corner. Sl st to the first sc and fasten off.
(Per side: 2 corner sc + (6 loops x 5 sc = 30) + 2 corner sc = 34 sc between the corner ch-2 sps. Round total: 136 sc + 4 corner ch-2 sps.)
In this pattern, “34 sc per side” means every sc between two corner ch-2 sps. That includes the 2 sc on this side of each corner. The ch-2 corner sps themselves are not counted.
Antennae: Join yarn in dc 16 of Round 1, just beside the head. Ch 8, make a bead, then sl st back down each of the 8 ch. Sl st in the same dc and fasten off. Repeat in dc 2 for the second antenna. The antennae lie over the frame and curl gently outward when blocked.
Weave in all ends. Lightly block each block to 8 in (20.3 cm) square before joining.
Make All Pieces
- Turquoise: 9 butterfly blocks
Layout (B = butterfly block, all heads pointing up):
[ B ] [ B ] [ B ]
[ B ] [ B ] [ B ]
[ B ] [ B ] [ B ]
Joining
Method: slip-stitch join through the back loops.
Hold two blocks with RS together and WS facing out, edges lined up. Join yarn through both corner ch-2 sps. Sl st through the BLO of each matching pair of sc, for 34 sl sts. Finish with a sl st through both of the next corner ch-2 sps. The stitches match one to one because every block has exactly 34 sc per side.
Join the blocks into three horizontal strips of three blocks each. Then join the strips with two long horizontal seams. Where four corners meet, sl st through all of the corner ch-2 sps together.
Tension: Each seam should stretch as much as the block edge does. If your seams pucker, use one hook size larger for the joining only.
Size checkpoint: The joined panel measures 24 in x 24 in (61.0 cm x 61.0 cm). Each outer edge has 3 x 34 = 102 sc.
Border
Border gauge: the same as the block edge, 17 sc = 4 in (10.2 cm).
Border Round 1: With RS facing, join yarn in the top right corner ch-2 sp. Ch 1, then work (sc, ch 2, sc) in the corner sp. [Sc in each sc to the next outer corner. At each seam, don’t work into the joined ch-2 sps; go straight on to the first sc of the next block. Work (sc, ch 2, sc) in the outer corner sp.] Repeat the bracketed steps around, leaving out the last corner. Sl st to the first sc.
(Per side: 1 corner sc + 102 sc + 1 corner sc = 104 sc. Total: 416 sc + 4 ch-2 sps.)
Border Round 2: Ch 1. Sc in each sc around, and work (sc, ch 2, sc) in each corner ch-2 sp. Sl st to the first sc and fasten off.
(Per side: 104 sc + 2 new corner sc = 106 sc. Total: 424 sc + 4 ch-2 sps.)
Why the math works: 3 blocks x 34 sc = 102 sc. Each border round adds 1 sc at each end of a side, so the count goes to 104 and then 106. At 17 sc per 4 in, 106 sc measures 24.9 in, which blocks to 25 in (63.5 cm).
Scalloped Heading (top edge)
Row 1: With RS facing, join yarn in the first sc of the top edge, just after the top right corner sp. Ch 3 (counts as a dc), then dc in each of the next 105 sc. Don’t work into the corner sps. (106 dc)
Row 2 (scallops): Ch 1, turn. Sc in the first dc. [Hdc in the next 2 dc, dc in the next 2 dc, tr in the next 6 dc, dc in the next 2 dc, hdc in the next 2 dc, sc in the next dc.] Repeat the bracketed steps 6 more times. (7 scallops of 15 sts + 1 starting sc = 106 sts, including 8 valley sc)
Row 3 (hanging loops): Ch 1, turn. [Work (sl st, ch 12, sl st) in the valley sc, then sl st in each of the next 14 sts.] Repeat the bracketed steps 6 more times. Work (sl st, ch 12, sl st) in the last valley sc and fasten off. (106 sts worked, 8 ch-12 loops)
The heading is 1.5 in (3.8 cm) deep up to the scallop peaks. Each loop is about 1.5 in (3.8 cm) tall.
Beaded Fringe (bottom edge)
With RS facing, join yarn in the first sc of the bottom edge.
Strand: Ch 12, bead, ch 10, bead, ch 6, bead. Working back up the strand, skip the beads and sl st in the back bump of each ch (28 sl sts). Sl st in the sc at the base.
Fringe row: Work a strand in the first sc. [Sl st in each of the next 6 sc, then work a strand in the next sc.] Repeat the bracketed steps 14 more times and fasten off. (16 strands, in sc 1, 8, 15 and so on up to sc 106)
Each strand hangs about 7.5 in (19.1 cm).
Final Blocking
- Weave in and trim every end.
- Soak the curtain in cool water with a little gentle wash for 15 minutes.
- Roll it in a towel and press out the water. Don’t wring it.
- Lay it flat on blocking mats, RS up.
- Pin the bottom border straight at 25 in (63.5 cm) wide.
- Pin each side edge so it measures 25 in (63.5 cm) from the bottom border to the top border.
- Pin each block corner and each wing tip so the lattice opens into even diamonds.
- Pin each scallop peak and pull each fringe strand straight.
- Mist lightly and let it dry completely, about 24 hours.
Final Quality-Control Checklist
- Each block has 34 sc per side.
- All butterflies face up and each has two antennae.
- The panel measures 24 in x 24 in (61.0 cm x 61.0 cm) before the border.
- Border Round 2 has 106 sc per side.
- The heading has 7 scallops and 8 hanging loops.
- The fringe has 16 strands, one in every 7th sc.
- All ends are woven in securely.
Troubleshooting
- Wings curl or cup: Your tr stitches are too tight. Pull up the first loop of each tr a little higher.
- Block sides pull inward: Your Round 5 chains are too short for your tension. Add 1 ch to each ch-8 sp, but keep the number of loops the same.
- Block edge ruffles: Your Round 9 is too loose. Use a hook 0.5 mm smaller for that round only.
- Seams pucker: Use a larger hook for the joining.
- Panel slants: Check that every block has 34 sc per side, then re-block.
- Fringe twists: Steam it lightly and let it hang to dry.
Care
Hand wash in cool water, press out the water and dry flat. Re-block now and then to keep the lattice crisp.
Final Notes
Here is how the measurements build up. Round 9 gives 34 sc per side, which makes an 8 in (20.3 cm) block. Three blocks across give 102 sc and 24 in (61.0 cm). The two border rounds bring each side to 106 sc and 25 in (63.5 cm). The heading adds 1.5 in (3.8 cm) and the fringe adds about 7.5 in (19.1 cm), for a total length of 34 in (86.4 cm).
Check your first block carefully, and the rest of the curtain will follow.
Happy crocheting!