

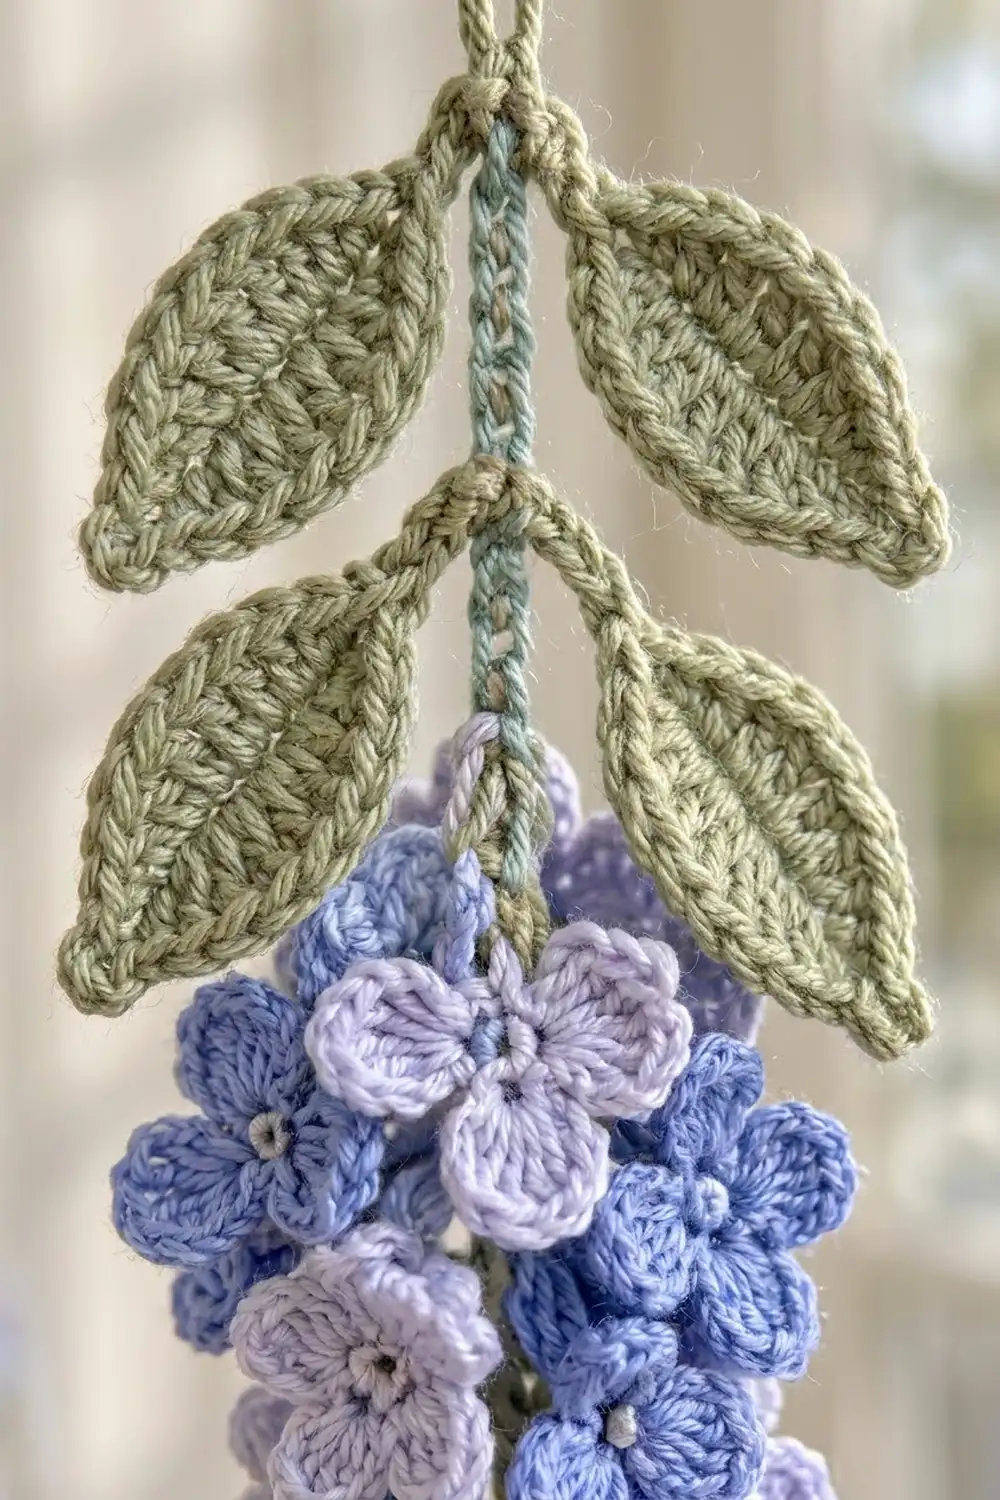
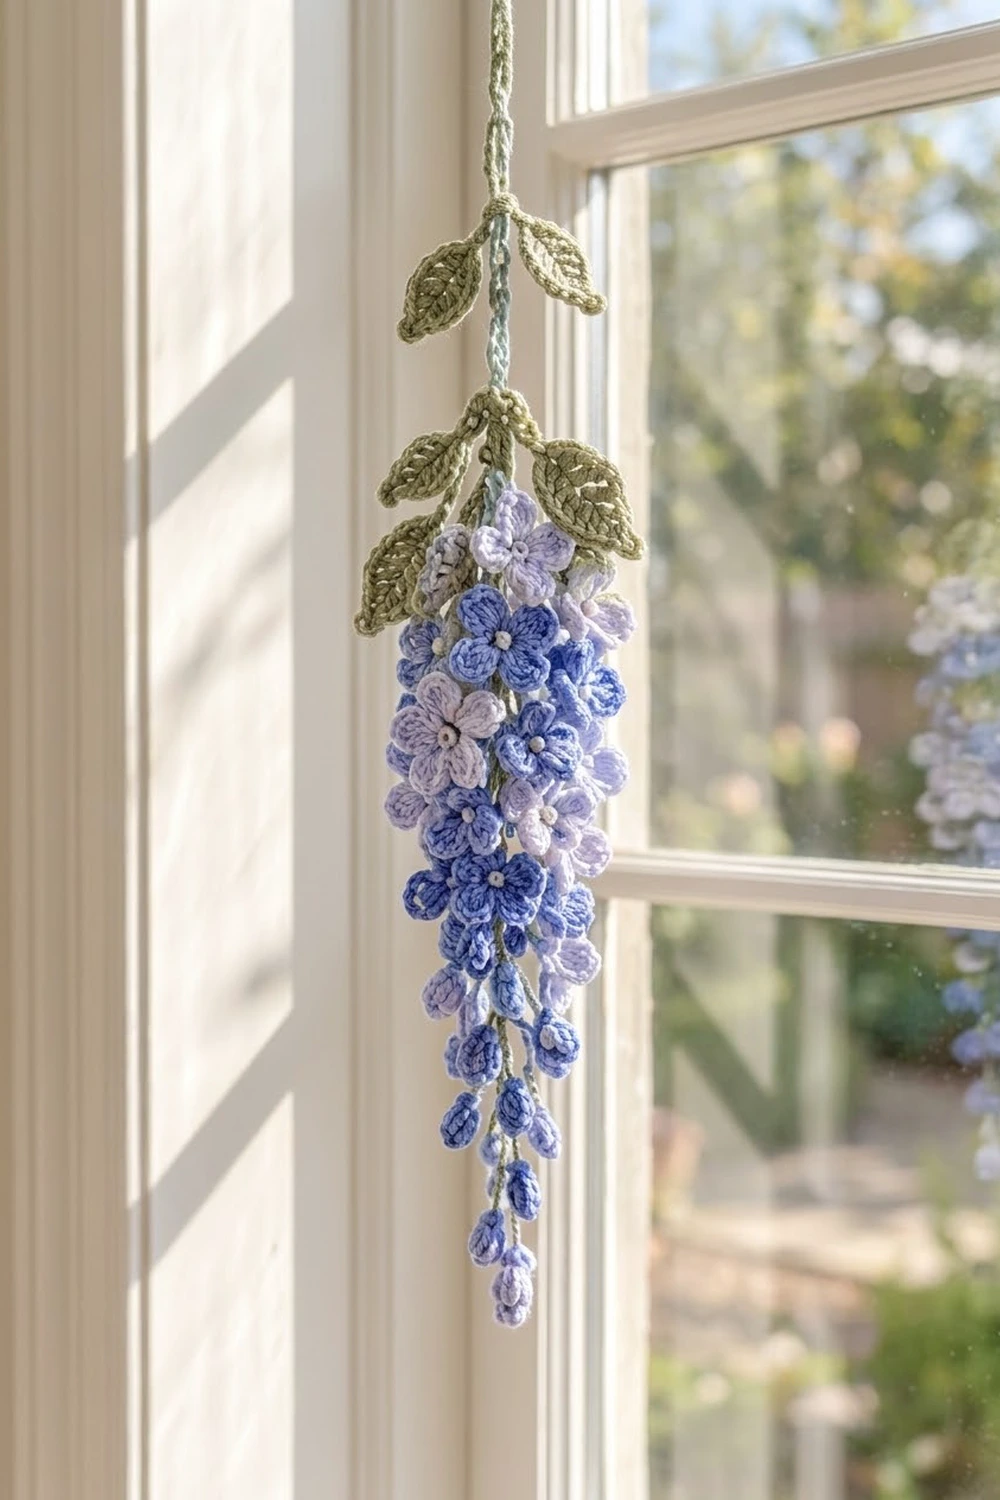
This strand looks like a single bunch of wisteria hanging from a vine. A slim sage-green cord holds two pairs of leaves, and below them is a dense cone of five-petal flowers. The cone is wide at the top and narrows to a tip of small round buds.
The colors are soft and natural: periwinkle blue, pale lavender and sage green. Lavender is used most near the top of the cone and periwinkle most near the tip, which gives the strand a gentle color shift. The style is botanical and a little romantic. One strand makes a pretty window ornament, and several hung side by side give you a wall of wisteria.
The pattern uses US crochet terms. The finished strand is 21 in (53.3 cm) long, including a 1 in (2.5 cm) hanging loop. The flower cone is 8 in (20.3 cm) long and 3.5 in (8.9 cm) wide at the top.
Construction is simple. First you crochet one sage cord, adding four leaves as you go. Then you make 14 small flowers and 9 bobble buds and sew them onto the lower 8 in (20.3 cm) of the cord in tiers. Each leaf gets a slip-stitch edge and a center vein.
Finished Size and Construction
- Finished size: 21 in (53.3 cm) long including the loop; cone 8 in (20.3 cm) long, 3.5 in (8.9 cm) wide at the top
- Skill level: Easy-intermediate
- Terminology: US
- Yarn weight: DK / light (#3) cotton
- Hook: 3.25 mm (D/3)
- Number of pieces: 1 finished strand (one cord with leaves, plus 14 flowers and 9 buds sewn on)
- Layout: one vertical drop: loop, plain cord, 2 leaf pairs, flower cone, bud tip
- Part sizes: flower 1.25 in (3.2 cm); bud 0.5 in (1.3 cm); leaf 1.75 in x 1 in (4.4 cm x 2.5 cm)
- Leaf size before edging: 1.7 in x 0.9 in (4.3 cm x 2.3 cm)
- Edging depth: one round of slip stitches, about 0.05 in (0.1 cm)
Materials
Choose a smooth mercerized or combed cotton in DK weight. Cotton holds the petal shapes crisply and won’t stretch when the strand hangs. Avoid fuzzy yarns, which blur the small flower outlines.
- Color A, periwinkle blue: 10 g (20 m), for 8 flowers and 6 buds
- Color B, pale lavender: 8 g (16 m), for 6 flowers and 3 buds
- Color C, sage green: 6 g (12 m), for the cord and 4 leaves
These amounts include about 25% extra for gauge swatches and long sewing tails.
Tools:
- 3.25 mm (D/3) crochet hook
- Tapestry needle with a sharp or semi-sharp tip
- Scissors
- 4 locking stitch markers
- Ruler or tape measure
- Spray bottle and pins for blocking
Abbreviations (US Terms)
- ch: chain
- sl st: slip stitch
- sc: single crochet
- hdc: half double crochet
- dc: double crochet
- tr: treble crochet
- BLO: back loop only
- sp: space
- st(s): stitch(es)
Special stitch: 5-dc bobble (bob). Yarn over, insert the hook in the stitch, yarn over and pull up a loop, yarn over and pull through 2 loops. Repeat from * to * 4 more times in the same stitch (6 loops on the hook). Yarn over and pull through all 6 loops.
Leaf: a small 2-round shape worked straight off the cord. See Part 2.
Gauge and Checkpoints
Before starting the full strand, make one flower, one bud and one leaf as test pieces. They tell you everything you need to know about your gauge.
- Chain gauge: 5 ch = 1 in (2.5 cm). A slip-stitch cord worked back along the chain also measures 5 sts = 1 in (2.5 cm).
- Flower, Rnd 1: 0.5 in (1.3 cm) across
- Flower, Rnd 2: 1.25 in (3.2 cm) from petal tip to petal tip
- Bud: 0.5 in (1.3 cm) tall
- Leaf before edging: 1.7 in x 0.9 in (4.3 cm x 2.3 cm)
- Leaf after edging: 1.75 in x 1 in (4.4 cm x 2.5 cm)
If a flower is larger than 1.4 in (3.6 cm), switch to a 2.75 mm (C/2) hook. If it is smaller than 1.1 in (2.8 cm), switch to a 3.5 mm (E/4) hook. Change hooks for every part, not just one, so the flowers, leaves and cord stay in proportion.
Part 1: Cord
Use Color C throughout.
Hanging loop: Ch 10, then sl st in the first ch to form a ring. This loop hangs about 1 in (2.5 cm) deep.
Foundation: Ch 100. Checkpoint: the chain measures 20 in (50.8 cm) when held without stretching.
Now work back toward the loop in the back bumps of the chain. Count your slip stitches from the bottom, so st 1 is the lowest.
Cone spine: Sl st in the back bump of the 2nd ch from the hook (this is st 1) and in each of the next 39 ch. (40 sl sts) Place markers in st 1, st 10 and st 40. Checkpoint: the spine from st 1 to st 40 measures 8 in (20.3 cm).
Part 2: Leaves
Don’t cut the yarn. Each leaf starts from the slip stitch you are on.
Leaf, Rnd 1: Ch 9. Work 1 sc in the 2nd ch from the hook, then hdc in the next ch, dc in the next ch, tr in each of the next 2 ch, dc in the next ch, hdc in the next ch and sc in the last ch. That is 8 sts on side 1.
Turn the leaf so you can work into the free loops on the other side of the same 8 ch. Work sc, hdc, dc, tr, tr, dc, hdc and sc, one in each free loop. That is 8 sts on side 2. To finish the tip, work (hdc, ch 2, hdc) in the ch you skipped at the start.
Count: 8 + 8 + 2 hdc = 18 sts plus 1 ch-2 sp.
Leaf, Rnd 2 (edging): Work this round as described in the Border section below. Finish each leaf completely before you start the next one.
Leaf placement:
- Pair A: Make one leaf at st 40. Turn the cord over and make a second leaf on the opposite side of the same st.
- Sl st in the back bump of each of the next 5 ch. This places Pair B 1 in (2.5 cm) above Pair A.
- Pair B: Make 2 leaves on opposite sides, the same way as Pair A.
- Sl st in the back bump of each remaining ch up to the loop. (54 sl sts)
- Sl st into the loop’s joining stitch and fasten off.
Cord total: 40 + 5 + 54 = 99 sl sts, one in each ch after the first ch you skipped. Checkpoint: the plain cord above Pair B measures 10.8 in (27.4 cm).
Part 3: Flowers
Make 14 flowers: 8 in Color A and 6 in Color B.
Rnd 1: Make a magic ring, ch 1 and work 10 sc into the ring. Pull the ring tightly closed and sl st to the first sc. (10 sts)
Rnd 2: Work (hdc, 2 dc, hdc) in the next st, then sl st in the next st. Repeat from * to * 4 more times. The last sl st lands in the joining stitch. (5 petals; 25 sts: 20 petal sts + 5 sl sts)
Each petal uses 2 stitches of Rnd 1, so 5 petals use all 10. Fasten off, leaving a 10 in (25.4 cm) tail for sewing. Checkpoint: the flower measures 1.25 in (3.2 cm).
Optional pale centers: Sew a tiny French knot in Color B at the center of each periwinkle flower.
Part 4: Buds
Make 9 buds: 6 in Color A and 3 in Color B.
Ch 3, then work 1 bob in the 3rd ch from the hook. Ch 1 to close the bobble, then sl st into the same ch at the base so the bud curls into a round bead. (1 bobble) Fasten off, leaving an 8 in (20.3 cm) tail. Checkpoint: the bud is 0.5 in (1.3 cm) tall.
Part 5: Assembly
Lay the cord flat with the leaves at the top. Sew each flower through the center of its Rnd 1 onto the spine, using 3–4 small stitches through the cord. Tilt each flower slightly downward and outward. Turn each tier 60 degrees from the one above so the flowers spiral around the cord.
| Tier | Spine sts | Flowers |
|---|---|---|
| 1 | 36–40 | 3: 2 B, 1 A |
| 2 | 31–35 | 3: 2 B, 1 A |
| 3 | 26–30 | 3: 1 B, 2 A |
| 4 | 21–25 | 2: 1 B, 1 A |
| 5 | 16–20 | 2: 2 A |
| 6 | 11–15 | 1: 1 A |
Flower total: 3 + 3 + 3 + 2 + 2 + 1 = 14 (6 B, 8 A).
Buds: Sew each bud on with a short 0.2 in (0.5 cm) stem of tail yarn so it dangles a little. Place them as follows, mixing the lavender buds in among the periwinkle ones:
- 2 at st 10
- 2 at st 7
- 2 at st 4
- 2 at st 2
- 1 at st 1
Bud total: 2 + 2 + 2 + 2 + 1 = 9 (6 A, 3 B).
Checkpoint: the cone is 3.5 in (8.9 cm) wide at Tier 1, 2 in (5.1 cm) at Tier 5 and 1 in (2.5 cm) across the buds.
Border: Leaf Edging
The leaves are the only bordered parts of this strand. The edging firms up the leaf outline, and the vein afterward brings you back to the cord.
Border gauge: 1 sl st in each existing stitch, which works out to 5 sl sts per 1 in (2.5 cm) of edge.
Rnd 2: Working in BLO, sl st in each of the 8 sts on side 1, then sl st into the cord stitch at the leaf base. Still in BLO, sl st in each of the 8 sts on side 2. Sl st in the next hdc, work (sl st, ch 2, sl st) in the ch-2 tip space, then sl st in the next hdc.
- Side 1: 8 sl sts
- Base: 1 sl st
- Side 2: 8 sl sts
- Tip: 4 sl sts plus a ch-2 picot (a small chain point)
- Total: 21 sl sts plus 1 ch-2 picot
Vein: Hold the yarn behind the leaf. Work 8 surface slip stitches down the center chain to the base, then sl st into the same cord stitch.
Why the math works: Each side of Rnd 1 has 8 stitches, and the edging places exactly 8 sl sts along it. One per stitch, with nothing added or skipped, means the edge won’t ruffle or cup. The only extra stitches are at the tip, where the picot sharpens the point. The edging adds about 0.05 in (0.1 cm) per side, taking the leaf from 1.7 in x 0.9 in (4.3 cm x 2.3 cm) to 1.75 in x 1 in (4.4 cm x 2.5 cm).
Final Blocking
- Lay the strand on a blocking mat or folded towel.
- Spray the leaves and flowers until damp, not soaked.
- Pin each leaf to 1.75 in x 1 in (4.4 cm x 2.5 cm), with the tip pointed and the vein centered.
- Push the petals outward with your fingertips until each flower measures 1.25 in (3.2 cm).
- Straighten the cord gently. Don’t stretch it beyond 20 in (50.8 cm) below the loop.
- Let it dry completely, then hang it by the loop for an hour so the cone settles.
Final Quality-Control Checklist
- The cord has 99 sl sts and measures 20 in (50.8 cm) below the loop.
- There are 4 leaves in 2 opposite pairs, 1 in (2.5 cm) apart.
- Each leaf has 21 edging sl sts, a picot tip and a centered vein.
- All 14 flowers have 5 even petals and 25 sts.
- All 9 buds are round and securely attached.
- The tiers spiral around the cord with no bare cord showing inside the cone.
- The cone narrows from 3.5 in (8.9 cm) to 1 in (2.5 cm).
- All tails are woven in through the backs of the flowers.
Troubleshooting
Uneven or cupped petals: Check that each petal sits in exactly 1 st with a sl st in the next. If petals cup, loosen your tension.
Gap in the magic ring: Pull the tail firmly before joining Rnd 1, then weave it back through the 10 sc once.
Twisting cord: Work the slip stitches loosely and only in the back bumps, then steam the cord flat.
Curling leaf: The edging is too tight. Redo it with a larger hook or looser slip stitches.
Sparse-looking cone: Sew the flowers closer to the spine and tilt the petals outward. Neighboring flowers should overlap by about 0.25 in (0.6 cm).
Strand hangs crooked: Balance each tier evenly around the cord.
Care
Hand wash in cool water with mild soap and press the water out with a towel. Reshape, dry flat and rehang.
Final Notes
Every measurement follows from the chain gauge. At 5 ch per 1 in (2.5 cm), the 100-ch cord is 20 in (50.8 cm), and the loop brings the strand to 21 in (53.3 cm). The 40-stitch spine gives an 8 in (20.3 cm) cone. Flowers 1.25 in (3.2 cm) across, three per tier, make the 3.5 in (8.9 cm) top. One slip stitch per stitch keeps every leaf at 1.75 in x 1 in (4.4 cm x 2.5 cm). Check these numbers as you go, and your strand will match.
Happy crocheting!