

The Plum Seedpod Lace Curtain is a hanging lace panel built from fifteen pointed oval motifs. Each one looks a little like a seedpod: an open slit in the middle, a ring of spokes around it, a solid band, longer outer spokes and a firm rim. Chain loops around each oval link it to its neighbors. With light coming through the window, the panel looks like a lattice of plum lanterns.
The whole curtain is one color, a deep plum DK-weight cotton. A solid header with scalloped shells sits at the top, and ring-chain drops hang below the last row. This pattern uses US crochet terms throughout.
The finished body measures 40 in (101.6 cm) wide by 36 in (91.4 cm) tall. With the 1.5 in (3.8 cm) header and the longest 6 in (15.2 cm) drops, the total length is 43.5 in (110.5 cm).
Here is how it comes together. You work each oval around a chain ring, square it into a rectangle with three rounds of chain loops, and join the motifs as you go on the last round. A single border round evens out the edges. Then you add the header rows across the top and the fringe across the bottom.
Finished Size and Construction
- Finished body: 40 × 36 in (101.6 × 91.4 cm)
- Total length with header and fringe: 43.5 in (110.5 cm)
- Skill level: Intermediate
- Terminology: US
- Yarn weight: DK (#3 light), mercerized cotton
- Hook: 4.0 mm (G-6)
- Number of pieces: 15 identical motifs
- Layout: 5 across × 3 down, with the long side of each oval running vertically
- Motif size: 8 × 12 in (20.3 × 30.5 cm), blocked
- Size before border: 40 × 36 in (101.6 × 91.4 cm)
- Border depth: the side round sits inside the edge loops and adds no width; the header is 1.5 in (3.8 cm); the drops are 4 in (10.2 cm) and 6 in (15.2 cm)
Materials
Choose a smooth, mercerized DK cotton or cotton blend. It shows stitch detail clearly, blocks crisply and won’t fuzz in sunlight. Avoid fuzzy or very stretchy yarns, because a hanging panel will slowly lengthen under its own weight.
- Plum: 500 g, about 1,050 m (1,148 yd)
That covers roughly 24 g per motif (360 g in total), 30 g for the header, 15 g for the border and 15 g for the fringe. The quantity includes a margin of about 15%.
Tools
- 4.0 mm (G-6) crochet hook
- Tapestry needle
- Stitch markers
- Blocking mats and rust-proof pins
- Spray bottle
- Measuring tape
- Curtain rod with 6 rings or clips
Abbreviations (US Terms)
- ch – chain
- sl st – slip stitch
- sc – single crochet
- hdc – half double crochet
- dc – double crochet
- tr – treble crochet
- sp(s) – space(s)
- st(s) – stitch(es)
- RS / WS – right side / wrong side
- JAYG – join as you go
Special stitches
- Loop-dec: Insert hook in the next loop, yo and pull up a loop. Insert hook in the following loop, yo and pull up a loop. Yo and draw through all 3 loops on the hook. This joins 2 loops into 1 anchor.
- Ring link: Ch 11, sl st in 8th ch from hook. This makes an 8-ch ring with a 3-ch stem above it. Then sl st in the next 4 ch, which brings you to the bottom of the ring.
- Ring drop (n links): Work n ring links in a row, each hanging from the bottom of the one before. To return up: sl st in next 4 ring ch (back to the top of that ring), sl st in next 3 stem ch. Repeat from * n times, which brings you back to the anchor.
Gauge and Checkpoints
Stitch gauge: 17 dc = 4 in (10.2 cm).
Make one complete motif, block it, and measure it before you start the rest. Use these checkpoints, measured flat and unstretched:
- After Rnd 1: 4.25 × 1.25 in (10.8 × 3.2 cm)
- After Rnd 3: 6.5 × 3.75 in (16.5 × 9.5 cm)
- After Rnd 5: 9 × 5.75 in (22.9 × 14.6 cm)
- After Rnd 6: 9.75 × 6.5 in (24.8 × 16.5 cm)
- After Rnd 7: 10.75 × 7.25 in (27.3 × 18.4 cm)
- After Rnd 8, blocked: 12 × 8 in (30.5 × 20.3 cm)
If your motif is more than 1/4 in (0.6 cm) too big, go down to a 3.75 mm hook. If it is too small, go up to a 4.5 mm hook. A difference of 1/2 in (1.3 cm) per motif adds up to 2.5 in (6.4 cm) across the width of the curtain.
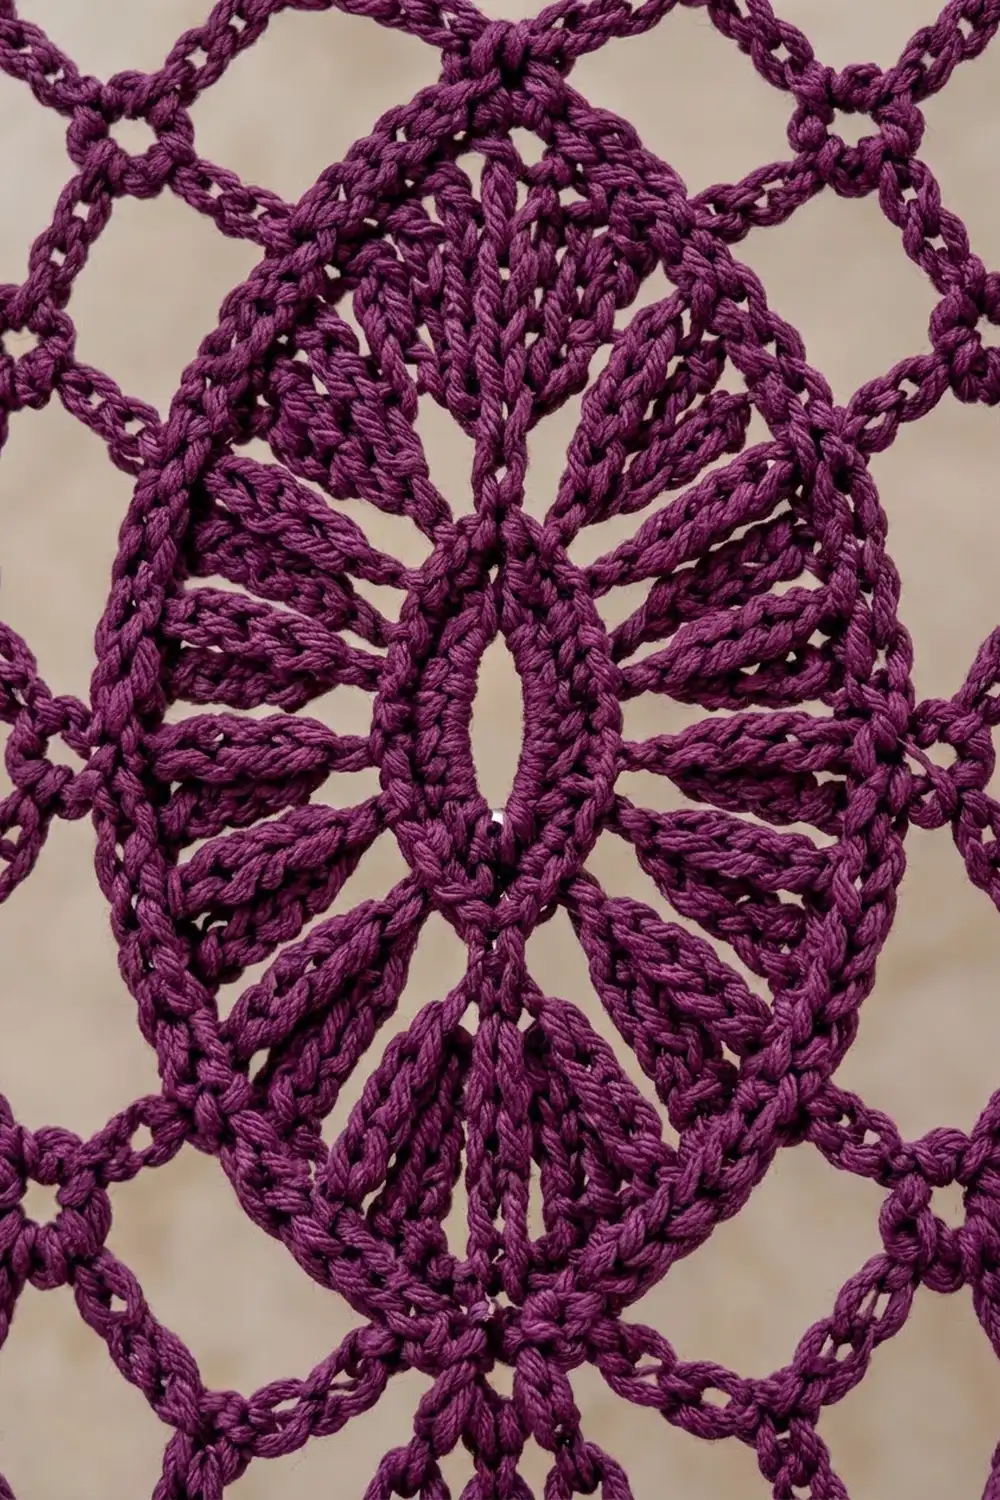
Motif (make 15)
Foundation: Ch 36 and join with a sl st in the first ch to form a ring. Flatten the ring into a narrow eye shape:
- The joining ch is the top tip.
- The 19th ch is the bottom tip.
- There are 17 ch along each side between the tips.
Work Rnd 1 into the chains themselves, not around the ring.
Rnd 1 (eye):
- Ch 3 (counts as dc), ch 3, dc in the same ch. This is the top tip.
- Dc in each of the next 17 ch.
- (Dc, ch 3, dc) in the next ch. This is the bottom tip.
- Dc in each of the next 17 ch.
- Join to the top of the beginning ch-3.
Count: 38 dc and 2 ch-3 tip sps, with 19 dc along each side between the tip sps. The center stays open as a slit.
Rnd 2 (inner spokes):
- Sl st into the top ch-3 sp.
- Ch 5 (counts as tr and ch 1), then (tr, ch 1) twice in the same sp.
- (Tr, ch 1) in each of the next 19 dc.
- (Tr, ch 1) 3 times in the bottom ch-3 sp.
- (Tr, ch 1) in each of the next 19 dc.
- Join to the 4th ch of the beginning ch-5.
Count: 44 tr and 44 ch-1 sps.
Rnd 3 (solid band):
- Ch 3 (counts as dc) in the same st, then dc in the next ch-1 sp.
- (Dc, ch 2, dc) in the next tr. This is the center tr of the top group.
- Work dc in each ch-1 sp and each tr around. In the center tr of the bottom group, work (dc, ch 2, dc).
- Join.
Count: (88 dc worked 1 per tr and sp) + (2 extra dc at the tips) = 90 dc and 2 ch-2 tip sps, with 45 dc along each side.
Rnd 4 (outer spokes):
- Sl st in the next dc and into the top ch-2 sp.
- Ch 4 (counts as tr), then (ch 2, tr) twice in the same sp.
- Ch 2, skip the next dc. Tr in the next dc, ch 2, skip the next dc. Repeat from * 21 more times, for 22 tr along this side.
- In the bottom ch-2 sp, work (tr, ch 2) twice, then tr.
- Repeat step 3 along the second side.
- Join.
Count: 50 tr and 50 ch-2 sps.
Rnd 5 (rim):
- Ch 1, sc in the same st.
- Work 2 sc in each ch-2 sp and 1 sc in each tr around. In the center tr of each tip group, work (sc, ch 3, sc).
- Join to the first sc.
Count: (100 sc in the sps) + (48 sc in the tr) + (4 sc in the 2 center tr) = 152 sc and 2 ch-3 tip sps, with 76 sc along each side.
Rnd 6 (first mesh):
- Sl st in the next 3 sc, in the tip sp, and in the next 2 sc.
- Ch 1, sc in the next sc. This is the 3rd sc of the side.
- Ch 5, skip 3 sc, sc in the next sc. Repeat from * 17 more times, which ends on the 75th sc.
- Ch 5, skip the next sc, the tip sp and the next 2 sc, then sc in the next sc. This loop arches over the bottom tip.
- Repeat steps 3–4 along the second side and over the top tip.
- Join.
Count: 38 ch-5 loops: 18 along each side plus 2 tip loops.
Rnd 7 (second mesh):
- Sl st into the first side loop. Ch 1, sc in the same loop.
- (Ch 6, sc in the next loop) twice.
- Ch 6, loop-dec.
- (Ch 6, sc in the next loop) 3 times.
- Ch 6, loop-dec.
- (Ch 6, sc in the next loop) 3 times.
- Ch 6, loop-dec.
- (Ch 6, sc in the next loop) 3 times.
- Ch 6, sc in the bottom tip loop.
- Repeat steps 2–8 along the second side, starting with an sc in the first loop.
- Ch 6, sc in the top tip loop, ch 6, join.
The loop-decs fall on side loops 4–5, 9–10 and 14–15, so the decreases mirror each other on both sides. Each side has 15 anchors.
Count: 32 ch-6 loops, 16 on each side. Number the loops on each side L1–L16, starting at the top tip.
Rnd 8 (frame): This round turns the oval into an 8 × 12 in (20.3 × 30.5 cm) rectangle. Taller anchor stitches near the tips lift the shoulders of the oval up to a straight edge. Work Rnd 8 in full on Motif 1 only. On the other motifs, use the joining version described below.
- Sl st in the next 3 ch to reach L2.
- Ch 3 (counts as dc) in L2, ch 6, tr in L3.
- Ch 9 (corner loop), tr in L4, ch 6.
- (Sc in the next loop, ch 6) 8 times, for L5–L12.
- Tr in L13, ch 9 (corner loop), tr in L14.
- Ch 6, dc in L15, ch 6, hdc in L16.
- Ch 6. This is the bottom center loop.
- Work the second side in reverse order: hdc in L16, ch 6, dc in L15, ch 6, tr in L14, ch 9, tr in L13, ch 6. Then (sc in the next loop, ch 6) 8 times for L12–L5, tr in L4, ch 9, tr in L3, ch 6, dc in L2, ch 6, hdc in L1.
- Ch 6. This is the top center loop.
- Hdc in L1 of the first side, ch 6, and join to the top of the beginning ch-3.
Count: 32 loops in total: 28 ch-6 loops plus 4 ch-9 corner loops.
Per side, including corners:
- Top and bottom: 7 loops each (corner, 2 loops, center, 2 loops, corner)
- Long sides: 11 loops each (corner, 9 loops, corner)
Check: (2 × 7) + (2 × 11) − 4 shared corners = 32 loops.
Make All Pieces
Make 15 motifs in Plum. Join them in this order, with the long sides vertical:
[ 1] [ 2] [ 3] [ 4] [ 5]
[ 6] [ 7] [ 8] [ 9] [10]
[11] [12] [13] [14] [15]
Joining
Join each motif on Rnd 8 as you work it:
- Side loop (ch 6): Replace the ch 6 with ch 3, sl st in the matching loop of the finished neighbor, ch 3.
- Corner loop (ch 9): Replace the ch 9 with ch 4, sl st in the neighbor’s corner loop, ch 4.
Every loop is joined to the loop opposite it, one for one, and the join adds no stitches.
- A long-side seam joins 11 loops, corners included.
- A top or bottom seam joins 7 loops, corners included.
- Where four corners meet, sl st into the existing join so all four corners lock at one point.
Keep the joining sl sts loose enough that a joined loop stays the same size as an unjoined one. Tight joins pucker the mesh into ridges.
Checkpoint: After each row of 5 motifs, lay it flat. It should measure 40 in (101.6 cm) wide. Once all 15 motifs are joined, the panel should measure 40 × 36 in (101.6 × 91.4 cm).
Border
Border gauge: 5 sc in each edge loop. That works out to about 17–18 sc per 4 in (10.2 cm), which matches the mesh and keeps the edges flat.
Starting loops per side:
- Top and bottom: 5 motifs × 7 loops = 35 loops each
- Each long side: 3 motifs × 11 loops = 33 loops
These counts include the motif corner loops, which sit side by side at every seam. The 4 outer corner loops of the curtain belong to two edges each.
Rnd 1 (all around):
- Join with RS facing.
- Work 5 sc in each edge loop.
- In each of the 4 outer corner loops, work (2 sc, ch 2, 2 sc).
- Join.
Count per side, between the corner ch-2 sps:
- Top and bottom: (33 loops × 5 sc) + (2 corner halves × 2 sc) = 169 sc
- Long sides: (31 loops × 5 sc) + (2 corner halves × 2 sc) = 159 sc
- Total: (2 × 169) + (2 × 159) = 656 sc and 4 ch-2 sps
Fasten off.
Header (worked in rows across the top 169 sc):
- Row 1 (RS): Join with a standing dc in the first sc after the top-right corner sp, then dc in each sc across. Count: 169 dc.
- Row 2: Ch 1, turn, sc in each dc across. Count: 169 sc.
- Row 3: Ch 1, turn, sc in the first sc. Skip 3 sc, 7 dc in the next sc, skip 3 sc, sc in the next sc. Repeat from * 20 more times. Count: 21 shells and 22 sc, 169 sts in total (1 + 21 × 8 = 169).
- Row 4: Ch 1, turn, sl st in each st across. At the 4th dc of shells 1, 5, 9, 13, 17 and 21, work ch 15 and sl st in the same dc. Count: 169 sl sts and 6 hanging loops, spaced about 7.5 in (19.1 cm) apart. Fasten off.
Fringe (worked across the bottom 169 sc):
- With RS facing, join in the first sc and sl st in each sc across.
- Count each motif’s bottom loops from its own corner loop. You’ll get 32 sc under each end motif and 35 sc under each middle motif: 32 + 105 + 32 = 169.
- When you reach the 3rd sc (the center sc) of loops 3 and 5, work a 4-link ring drop. At the 3rd sc of loop 4, work a 6-link ring drop.
- After each drop, return to the anchor, sl st in the same sc, and continue across.
Count: 15 drops: 10 short drops, 4 in (10.2 cm) long, and 5 long drops, 6 in (15.2 cm) long.
Why the math works: the motif loop counts set the edge counts, and 5 sc per loop turns those into stitch counts at a constant gauge. The top count of 169 is also exactly 1 + 21 × 8, so the shell repeat fits with no fudging. The bottom loops are worked the same way, so the drops land in the center of their loops.
Final Blocking
- Wet the curtain, roll it in a towel and press out the water.
- Pin the body to a 40 × 36 in (101.6 × 91.4 cm) rectangle, starting at the four corners.
- Pin the midpoint of every seam so the motif grid is square.
- Pin the peak of every edge loop and both points of each oval.
- Open each ring and pull the drops straight downward.
- Let it dry completely before you unpin it.
Final Quality-Control Checklist
- 15 motifs, each 8 × 12 in (20.3 × 30.5 cm)
- Every seam joined loop for loop: 11 on long sides, 7 on short sides
- Four-corner joins locked at a single point
- Border counts: 169 / 159 / 169 / 159 sc
- Header: 21 shells and 6 hanging loops
- 15 drops: 10 short and 5 long, each long drop centered under its motif
- All ends woven into solid stitches
Troubleshooting
- Oval cups: Check the counts for Rnds 3 and 5. A missing tip increase makes the oval cup, so add it back.
- Oval ruffles: Your tr are too loose, so use a smaller hook for Rnds 2 and 4.
- Corners don’t square: Check that the tr anchors are in L3, L4, L13 and L14, then pin harder when blocking.
- Seams ridge: Your joining sl sts are too tight, so redo them more loosely.
- Header narrower than the body: Your dc are too tight, so work Row 1 with a hook one size larger.
- Drops twist: Spray them and pin them straight.
Care
Hand wash cool with mild detergent, roll it in a towel and dry it flat, pinned to shape. Lay it flat to store rather than hanging it for long periods. That keeps the lace from stretching lengthwise.
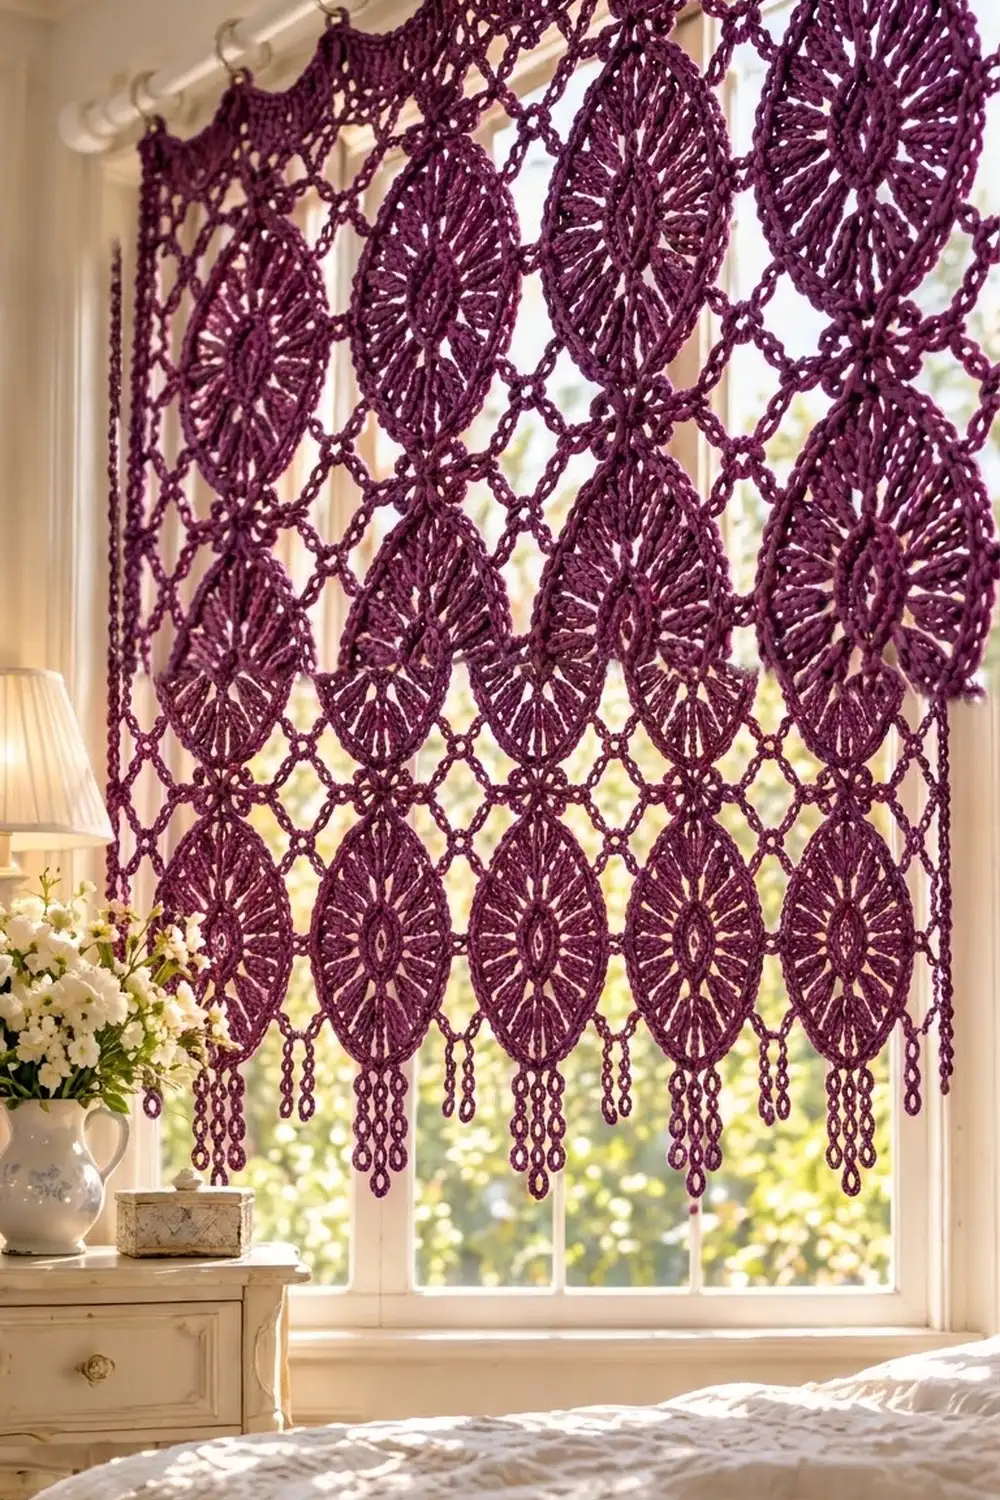
Final Notes
The measurements build on each other:
- Each oval measures 9 × 5.75 in (22.9 × 14.6 cm) after Rnd 5.
- It becomes a 12 × 8 in (30.5 × 20.3 cm) motif after Rnd 8.
- Five across and three down give a 40 × 36 in (101.6 × 91.4 cm) body.
- 5 sc per loop gives 169 sc across the top and bottom.
- Twenty-one shells fit the header exactly, and the drops add 6 in (15.2 cm).
If one motif matches its checkpoints, the whole curtain will measure 43.5 in (110.5 cm) long.
Happy crocheting!