

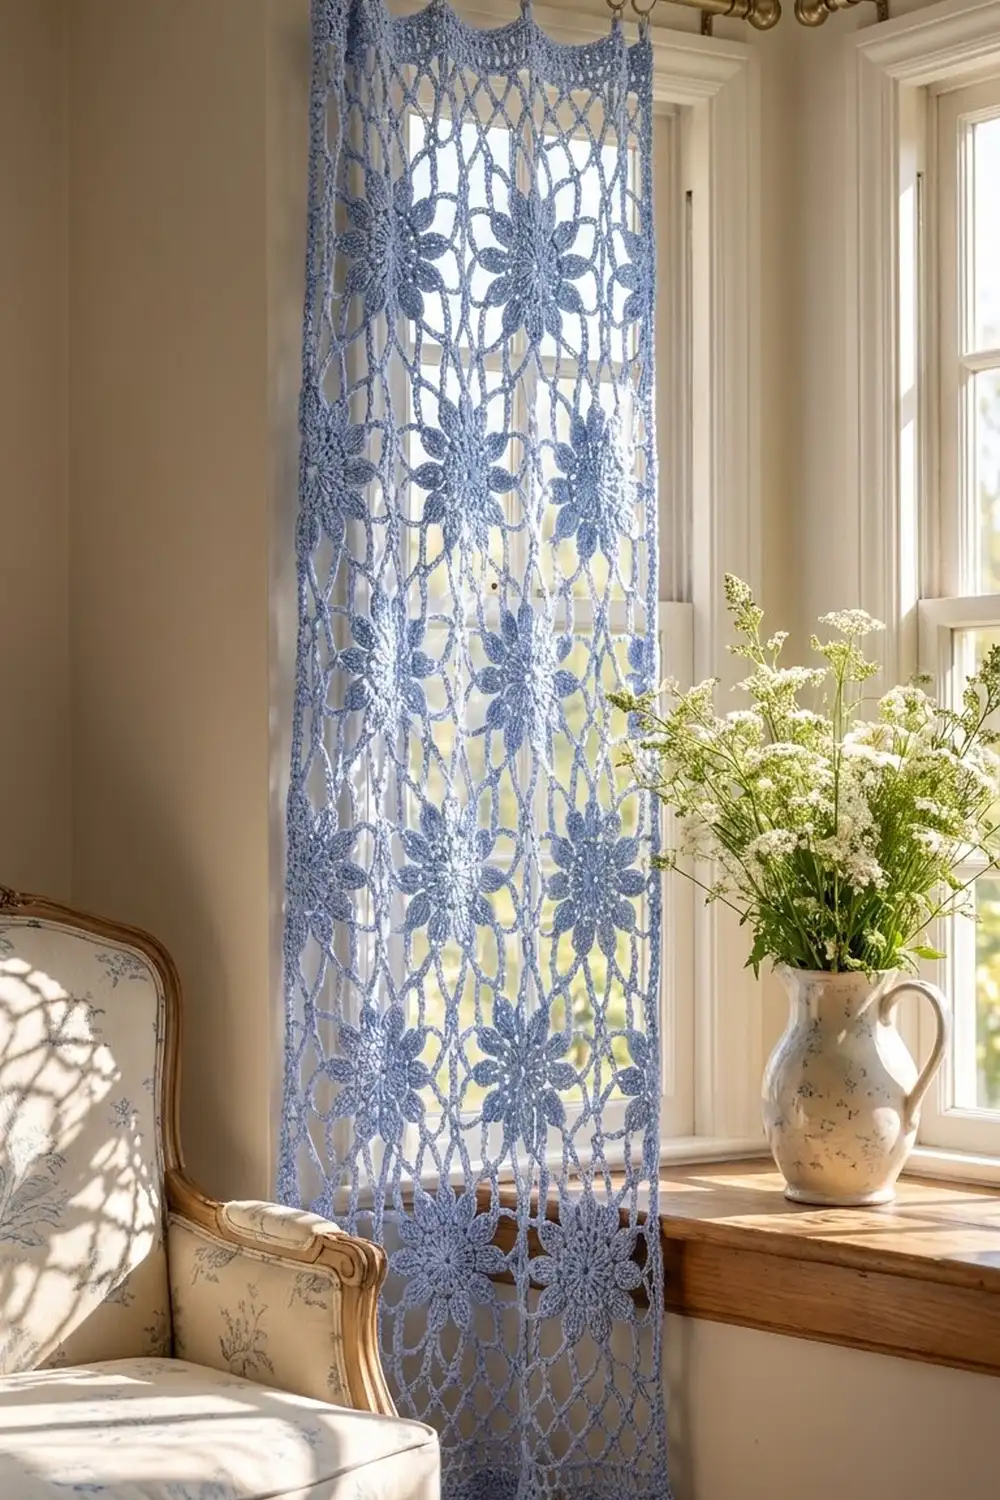
The Bluebell Window Lace Curtain is a light, airy café-style panel. Eight-petal flowers sit inside an open net of chain loops, a firm scalloped header holds the top straight, and a row of corded dangles finishes the bottom. In front of a sunny window the flowers stand out clearly, and the mesh between them lets the light through.
The sample uses a single shade of soft periwinkle blue mercerized cotton. Because there is only one color, the texture does the work: solid flower centers, raised pointed petals and open chain loops. This pattern uses US crochet terms throughout.
The finished panel measures 18.5 in (47.0 cm) wide and 24.75 in (62.9 cm) long, including the header and fringe. The flower field alone is 18 x 18 in (45.7 x 45.7 cm).
You make eight full square flower motifs and two half motifs. All of them are joined as you go into three staggered rows, so the middle row’s half flowers end on the side edges. A sc round frames the panel. Then a scalloped header with hanging loops goes across the top and a corded fringe across the bottom.
Finished Size and Construction
- Finished size: 18.5 x 24.75 in (47.0 x 62.9 cm), including header and fringe
- Skill level: Intermediate
- Terminology: US crochet terms
- Yarn weight: Sport (#2) mercerized cotton
- Hook: 3.25 mm (US D/3)
- Number of pieces: 10 (8 full motifs, 2 half motifs), joined as you go
- Layout: 3 rows in a staggered (brick) layout: 3 full / 1 half + 2 full + 1 half / 3 full
- Piece size: full motif 6 x 6 in (15.2 x 15.2 cm); half motif 3 x 6 in (7.6 x 15.2 cm)
- Size before border: 18 x 18 in (45.7 x 45.7 cm)
- Border depth: 0.25 in (0.6 cm) on the sides and bottom; header 2 in (5.1 cm); fringe 4.5 in (11.4 cm)
Materials
Choose a smooth mercerized cotton. It gives crisp petals, holds its shape after blocking and does not fuzz in sunlight. Avoid acrylic, because it relaxes and the loops sag on a window.
- Periwinkle blue: 150 g (approx. 450 m)
The quantity includes a margin of about 25% for gauge swatching and variations in tension.
Tools:
- 3.25 mm (US D/3) crochet hook
- Tapestry needle
- Stitch markers
- Rustproof pins and a blocking board or foam mats
- Spray bottle
- Measuring tape
- Curtain rod with 6 clip rings
Abbreviations (US Terms)
- ch – chain
- sl st – slip stitch
- sc – single crochet
- hdc – half double crochet
- dc – double crochet
- tr – treble crochet
- st(s) – stitch(es)
- sp – space
- RS – right side
Petal: in the ch-7 loop work (sc, hdc, 2 dc, 2 tr, ch 2, 2 tr, 2 dc, hdc, sc). That is 12 sts plus a ch-2 tip, which makes a pointed oval petal.
Dangle: ch 31, sl st in 2nd ch from hook and in each ch back to the base (30 sl st). This makes a firm corded strand.
Gauge and Checkpoints
Make one full motif first and block it before you go on. That motif is your gauge swatch.
- Gauge: Rounds 1–2 = 2 in (5.1 cm) diameter.
- After Round 4: 4 in (10.2 cm) from petal tip to opposite petal tip.
- After Round 5: 5 in (12.7 cm) across.
- After Round 6: 5.5 in (14.0 cm) across.
- After Round 7 (blocked): 6 x 6 in (15.2 x 15.2 cm), measured side to side.
If the motif is too big, change to a hook 0.25 mm smaller. If it is too small, change to a hook 0.25 mm larger. Don’t change the chain lengths, because the joining and border math depends on them. A difference of 0.25 in (0.6 cm) per motif adds up to 0.75 in (1.9 cm) across the panel.
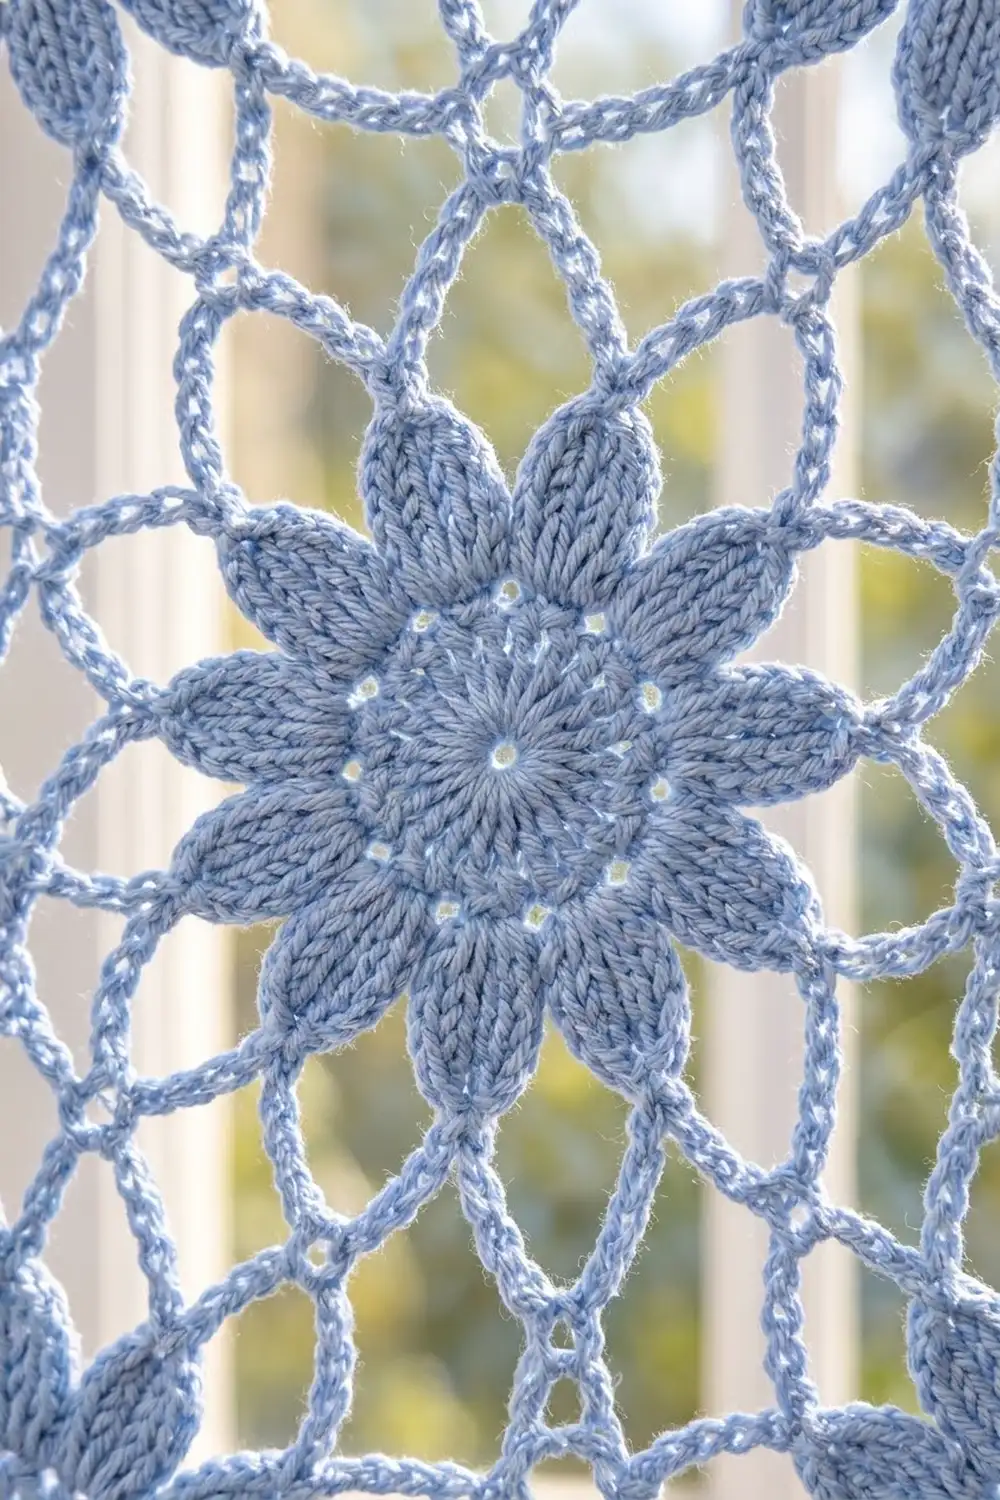
Full Flower Motif (make 8)
Round 1: Magic ring, ch 3 (counts as dc), 15 dc in ring, sl st in top of ch-3. (16 dc)
Round 2: Ch 3 (counts as dc), dc in same st, 2 dc in each st around, sl st in top of ch-3. (32 dc)
This solid disc is the flower center.
Round 3: Ch 1, sc in same st, ch 7, skip 3 sts, sc in next st, ch 7, skip 3 sts; repeat from * 6 more times, sl st in first sc. (8 sc, 8 ch-7 loops)
Round 4 (petals): Work Petal in next ch-7 loop, sl st in next sc; repeat from * around. (8 petals: 96 sts plus 8 ch-2 tips)
The petals cup up slightly. This gives the raised, sculpted flower in the photo.
Round 5: Sl st across to the first ch-2 tip. Ch 1, sc in tip, ch 9, sc in next ch-2 tip; repeat from * 6 more times, ch 9, sl st in first sc. (8 sc, 8 ch-9 loops)
Round 6: Sl st in first 4 ch of the next loop. Ch 1, (sc, ch 7, sc) in ch-9 loop, ch 7; repeat from * in each loop around, sl st in first sc. (16 sc, 16 ch-7 loops)
Round 7 (squaring and joining round): Sl st in first 3 ch of the next loop. Ch 1, (sc, ch 9, sc) in same loop for the corner, [ch 7, sc in next loop] 3 times, ch 7; (sc, ch 9, sc) in next loop, [ch 7, sc in next loop] 3 times, ch 7; repeat from * 2 more times, sl st in first sc. Fasten off. (20 sc; 4 corner ch-9 loops and 16 ch-7 loops)
Each side now has one corner loop, 4 ch-7 loops and 3 single sc points between the corners. The middle sc point is the exact midpoint of the side. You need it for the staggered rows.
Half Flower Motif (make 2)
The half motif is worked in rows. Turn at the end of each row. Its flat edge runs through the flower center, so the flower is cut in half at the side of the curtain.
Row 1: Magic ring, ch 3 (counts as dc), 8 dc in ring. (9 dc)
Row 2: Ch 3 (counts as dc), dc in first st, 2 dc in each of next 7 sts, dc in top of turning ch. (17 dc)
Row 3: Ch 1, sc in first st, [ch 7, skip 3 sts, sc in next st] 4 times. (5 sc, 4 ch-7 loops)
Row 4: Work Petal in next ch-7 loop, sl st in next sc; repeat from * 3 more times. (4 petals)
Row 5: Ch 9, sc in ch-2 tip of first petal, [ch 9, sc in next tip] 3 times, ch 9, sc in first sc of Row 3. (5 ch-9 loops)
Row 6: Ch 1, (sc, ch 7, sc) in first ch-9 loop, [ch 7, (sc, ch 7, sc) in next loop] 4 times. (10 sc, 9 ch-7 loops)
Row 7 (joining row): Ch 1, sc in first ch-7 loop, ch 7, sc in next loop, ch 7, (sc, ch 9, sc) in next loop, [ch 7, sc in next loop] 3 times, ch 7, (sc, ch 9, sc) in next loop, ch 7, sc in next loop, ch 7, sc in last loop. Fasten off. (8 ch-7 loops, 2 corner ch-9 loops)
The top and bottom edges each have 2 loops, which is half a side. The curved inner side is a full side with 4 loops between its 2 corners. The half motif blocks to 3 x 6 in (7.6 x 15.2 cm).
Make All Pieces
Everything is in periwinkle blue. In total you make 8 full motifs and 2 half motifs. Make Motif 1 completely. Work every later piece up to its last round, then join it to its neighbors during that round.
Layout (M = full motif, H = half motif):
Row 1:  [ M ][ M ][ M ]
Row 2:  [H][ M ][ M ][H]
Row 3:  [ M ][ M ][ M ]
Work in this order: Row 1 from left to right, then Row 2 from left to right, then Row 3 from left to right.
Joining
Join as you go in Round 7 (or Row 7 for the half motifs). Use these three rules:
- Loop to loop: When a ch-7 loop meets a neighbor’s ch-7 loop, work ch 3, sl st in the center ch of the neighbor’s loop, ch 3.
- Corner to corner: When a corner meets one or more existing corners, work sc, ch 4, sl st into the center of the neighbor’s corner loop (or into the existing corner join), ch 4, sc.
- Corner to midpoint: In the staggered rows, a corner lands on the middle sc point of the motif above or below. Work sc, ch 4, sl st into that sc, ch 4, sc.
In Row 2, the left half motif joins its 2 top loops to the 2 left-hand bottom loops of the first Row 1 motif. Each full motif in Row 2 joins its top loops 1–2 to one Row 1 motif and its top loops 3–4 to the next. Its top midpoint sits exactly under the Row 1 corner join. Row 3 is set straight under Row 1 and repeats the same logic in reverse.
Tension: Work joining sl sts at the same tension as your chains. If you pull them tight, the loops pucker and the rows bend.
Checkpoint: Pin the joined panel flat. It should measure 18 x 18 in (45.7 x 45.7 cm).
Border
Border gauge: 6 sc per ch-7 loop and 3 sc per half corner loop. Each motif side therefore counts as 3 + (4 x 6) + 3 = 30 sc, including its corner halves. The flat edge of a half motif also counts as 30 sc, worked as shown below.
Round 1 (all sides): With RS facing, join yarn at the top-right corner. Work 30 sc along each motif side. On a flat half-motif edge, work 15 sc per half: 2 sc over the end of Row 1, 2 over Row 2, 1 in the Row 3 sc, 7 in the edge ch-9 loop of Row 5, and 3 over the ends of Rows 6–7. Ch 1 at each of the 4 panel corners. Sl st in first sc. Fasten off.
Count per side: 3 pieces x 30 = 90 sc. Top 90, bottom 90, each side 90 (30 + 30 + 30). That is 360 sc in total plus 4 corner ch-1 sps, which are not counted in the sides. No seam stitches are added, because the joined corner loops are already split into two 3-sc halves.
Header (top edge only, worked in rows):
Row 2: With RS facing, join yarn in the first top sc. Ch 3 (counts as dc), dc in each remaining st. (90 dc)
Row 3: Turn, ch 1, sc in each st. (90 sc)
Row 4 (scallops): Turn, ch 1, sc in next 2 sts, hdc in next 2, dc in next 2, tr in next 3, dc in next 2, hdc in next 2, sc in next 2; repeat from * 5 more times. (6 scallops of 15 sts = 90 sts)
Row 5 (hanging loops): Turn, ch 1, sc in each st, working (sc, ch 8, sc) in the center tr of each scallop. Fasten off. (90 sts worked + 6 extra sc = 96 sc, plus 6 ch-8 loops)
The header measures 2 in (5.1 cm) at the scallop peaks, counting the Round 1 sc. Clip rings go through the 6 hanging loops.
Fringe (bottom edge only):
Row 2: With RS facing, join yarn in the first bottom sc. Ch 1, sc in first 3 sts, Dangle, sc in next 6 sts, Dangle; repeat from * 13 more times, sc in last 3 sts. (90 sc, 15 dangles)
Why the math works: 3 + (14 x 6) + 3 = 90, so the dangles are spaced every 6 sts and each end has 3 sts. In the header, 6 x 15 = 90, so each motif carries exactly 2 scallops.
Final Blocking
- Weave in all ends along the chain loops so the tails don’t show against the light.
- Soak the panel in cool water for 10 minutes, then press out the water in a towel. Don’t wring it.
- Lay it on the blocking mats and pin the side edges straight to 18.5 in (47.0 cm) wide.
- Pin the body to 18.5 in (47.0 cm) tall from the bottom sc to the top of Round 1, then pin the header points to a total of 20.25 in (51.4 cm).
- Pin each petal tip and each ch-9 corner so the loops open evenly.
- Pull each dangle straight to 4.5 in (11.4 cm).
- Leave it to dry completely, at least 24 hours, before you unpin it.
Final Quality-Control Checklist
- Each full motif has 8 petals, 4 corner loops and 16 ch-7 loops.
- Each half motif has 4 petals and a flat edge through the center.
- The panel measures 18 x 18 in (45.7 x 45.7 cm) before the border.
- There are 90 sc on each side of Border Round 1.
- There are 6 scallops and 6 hanging loops across the header.
- There are 15 dangles, with 6 sts between them.
- The finished size is 18.5 x 24.75 in (47.0 x 62.9 cm).
Troubleshooting
- Petals flare or ruffle: Your tr sts are too loose. Pull up shorter loops or go down a hook size for Round 4 only.
- Motif won’t square up: Check that each corner sits in the correct loop of Round 6, with exactly 3 loops between corners.
- Staggered row shifts: Count the loops on each side again. The Row 2 corners must land on the midpoint sc.
- Header ripples: Count 90 sts in Rows 2–4. Extra sts make waves.
- Dangles curl: Spray them and pin them straight. Work the sl sts a little looser next time.
- Side edge pulls in at the half motifs: Work exactly 15 sc per half of the flat edge.
Care
Hand wash in cool water with mild soap, roll in a towel and dry flat. Re-pin the dangles while damp. Avoid long periods of harsh direct sun to protect the blue color.
Final Notes
The measurement chain is simple. Rounds 1–2 measure 2 in (5.1 cm), and each motif blocks to 6 in (15.2 cm). Three motifs across and three rows down make 18 x 18 in (45.7 x 45.7 cm). Border Round 1 has 90 sc per side and brings the panel to 18.5 in (47.0 cm). The header adds height to 20.25 in (51.4 cm), and the fringe finishes at 24.75 in (62.9 cm). If every checkpoint matches, the header, scallops and fringe will line up exactly.
Happy crocheting!