

This curtain panel is a soft pink lace valance built from eight-petal flower motifs set into an open chain mesh. Each flower has a dense, round center with eight puffy, leaf-shaped petals around it. Chain loops link the petal tips into a lattice that lets the light through.
Everything is worked in one color, a candy-pink mercerized cotton. Across the top runs a solid band of double crochet with a small picot edge, and the panel hangs from a rod on clip rings. Along the bottom, chain fringes end in small bobble drops, in short and long groups under each flower.
The pattern uses US crochet terms. The finished lace body measures 24 in (61.0 cm) wide by 16 in (40.6 cm) tall. With the header band added, it is 17.5 in (44.5 cm) tall, and it measures 24.5 in (62.2 cm) to the tips of the long fringe.
Construction is simple. You make six flower motifs that finish as squares and join them as you go on the last round, 3 across and 2 down. Then you work the header band across the top and the bobble fringe along the bottom.
Finished Size and Construction
- Finished size: 24 in (61.0 cm) wide x 17.5 in (44.5 cm) tall including header; 24.5 in (62.2 cm) to long fringe tips
- Skill level: Intermediate
- Terminology: US crochet terms
- Yarn weight: Sport (#2) mercerized cotton
- Hook: 3.5 mm (E-4)
- Number of pieces: 6 flower motifs, joined into one panel
- Layout: 3 motifs across x 2 motifs down
- Piece size: 8 in (20.3 cm) square, blocked
- Size before border: 24 in (61.0 cm) x 16 in (40.6 cm)
- Border depth: header band 1.5 in (3.8 cm); fringe 5.5 in (14.0 cm) short and 7 in (17.8 cm) long
Materials
Choose a smooth, mercerized sport-weight cotton. It shows the stitches clearly, holds a crisp petal shape, and doesn’t stretch much on the rod. Avoid fuzzy or very soft acrylic, because the mesh will sag and the petals won’t stand out.
- Pink: 100 g, about 300 m (328 yd)
Tools:
- 3.5 mm (E-4) crochet hook
- Tapestry needle
- Scissors
- Rustproof pins and a blocking board or foam mats
- Spray bottle
- 7 clip curtain rings
- Tape measure
The yarn quantity includes a margin of about 20% to cover your gauge swatch and small tension differences.
Abbreviations (US Terms)
- ch – chain
- sl st – slip stitch
- sc – single crochet
- hdc – half double crochet
- dc – double crochet
- tr – treble crochet
- sk – skip
- sp – space
- st(s) – stitch(es)
- RS – right side
- JAYG – join as you go
Special stitches
- Picot: Ch 3, sl st in 3rd ch from hook.
- 5-dc bobble: *Yarn over, insert hook in st, pull up a loop, yarn over, pull through 2 loops; repeat from * 4 more times (6 loops on hook), yarn over, pull through all 6 loops.
- Join loop: Use this in place of a ch 9 on the last round: ch 4, sl st in the matching loop of the finished neighbor motif, ch 4.
Gauge and Checkpoints
Gauge: 22 dc = 4 in (10.2 cm) and 18 ch = 4 in (10.2 cm), both relaxed.
Make one complete motif and block it before you start the full panel. Gauge matters here because the header row has to match the width of the joined motifs.
Checkpoints for one motif:
- After Round 2: 2.25 in (5.7 cm) across
- After Round 4: about 5 in (12.7 cm) across, tip to tip
- After Round 5: about 6.25 in (15.9 cm) across
- After Round 6, blocked: 8 in (20.3 cm) square
If your blocked motif is larger than 8.25 in (21.0 cm), go down to a 3.25 mm hook. If it is smaller than 7.75 in (19.7 cm), go up to a 3.75 mm hook. Chain tension has the biggest effect: if your mesh loops are tight, chain a little more loosely before you change hooks.
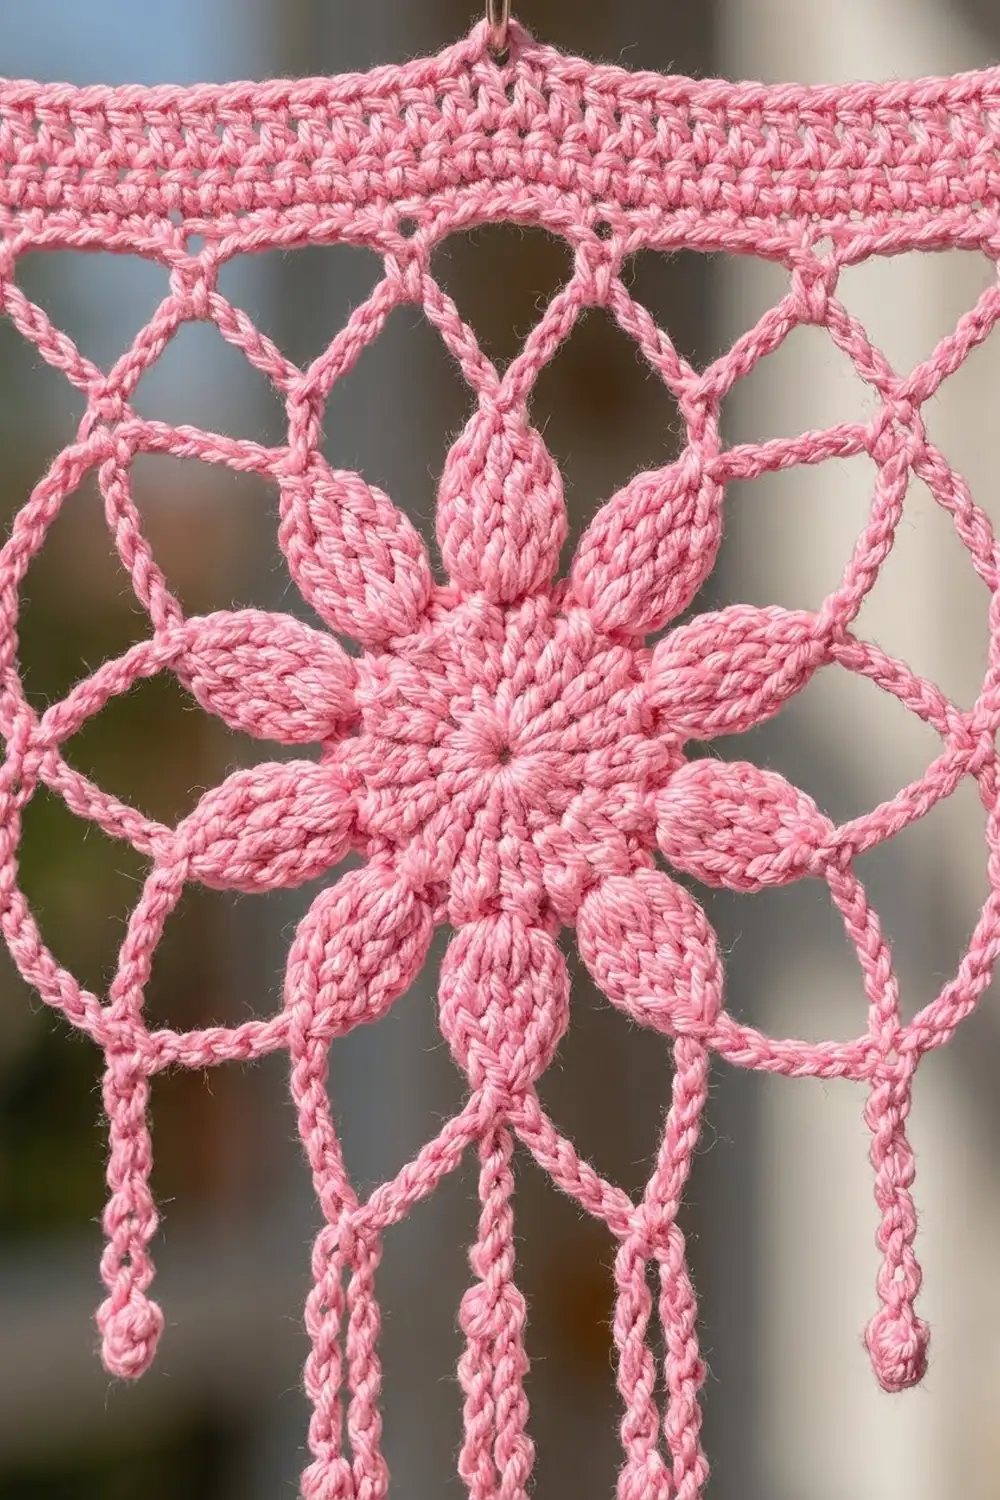
Flower Motif (Make 6)
The ch-3 at the start of a round counts as 1 dc. Keep the RS facing throughout.
Round 1: Make a magic ring. Ch 3, then work 15 dc in the ring. Sl st in the top of the ch-3. Pull the ring closed. (16 dc)
Round 2: Ch 3, dc in the same st, then work 2 dc in each st around. Sl st in the top of the ch-3. (32 dc)
The center should be a flat, solid disk 2.25 in (5.7 cm) across. If it cups, the ring is too tight. If it ruffles, check for extra stitches.
Round 3 (petal loops): Ch 1, sc in the same st. Ch 11, sk 3 dc, sc in next dc. Repeat from * 6 more times. Ch 11, sk 3 dc, sl st in first sc. (8 sc, 8 ch-11 loops)
The sc stitches land on dc 1, 5, 9, 13, 17, 21, 25 and 29. Each loop spans 4 sts of Round 2, so the petals are spaced evenly.
Round 4 (petals): In each ch-11 loop work (sc, hdc, 2 dc, 3 tr, ch 3, 3 tr, 2 dc, hdc, sc), then sl st in the next sc of Round 3. (8 petals; each has 14 sts and 1 ch-3 tip, for 112 sts and 8 ch-3 tips in total)
Because you work over the loop instead of into the chains, each petal wraps around both sides of the chain. This gives the puffy, leaf-shaped look with a center ridge. Each petal is narrow at the base, widest at the trebles, and pointed at the ch-3 tip.
Round 5 (tip mesh): Sl st in each of the next 7 sts (sc, hdc, 2 dc, 3 tr) and into the ch-3 tip sp. Ch 1, sc in the same tip sp. Ch 9, sc in next ch-3 tip sp. Repeat from * 6 more times. Ch 9, sl st in first sc. (8 sc, 8 ch-9 loops)
Round 6 (squaring round): Sl st in each of the first 4 ch of the next loop. Ch 1, then:
- Corner: (sc, ch 9, sc) in the same loop.
- Ch 9, sc in next loop (side loop), ch 9.
- Work a corner (sc, ch 9, sc) in next loop, ch 9, sc in next loop, ch 9. Repeat from * 2 more times.
- Sl st in first sc. Fasten off and weave in the ends.
This round has 12 ch-9 loops in total, 3 per repeat. Each side has 4 loops, including its 2 corner loops: corner loop, side loop, side loop, corner loop. Neighboring sides share their corner loops, so the 4 sides x 4 loops = 16 loop positions come from only 12 actual loops.
Checkpoint: Block the first motif to 8 in (20.3 cm) square. Each loop should span about 2 in (5.1 cm).
Make All Pieces
- Pink: 6 motifs. Finish Motif 1 completely, through Round 6. Work Motifs 2–6 through Round 5, then join each one on its Round 6.
Layout (the numbers show the joining order):
[ 1 ][ 2 ][ 3 ]   <- header edge
[ 4 ][ 5 ][ 6 ]   <- fringe edge
Joining
Join the motifs as you go on Round 6. Work the round as written. On any side that touches a finished motif, replace each ch 9 with a join loop: ch 4, sl st in the matching loop of the neighbor, ch 4.
Stitch-to-stitch logic: each motif has 4 loops on every side, so each shared side gets 4 join points. They match loop for loop: corner to corner, side loop to side loop, side loop to side loop, corner to corner.
- Motif 2: Join its left side to the right side of Motif 1 (4 joins).
- Motif 3: Join its left side to Motif 2 (4 joins).
- Motif 4: Join its top side to the bottom of Motif 1 (4 joins).
- Motif 5: Join its top side to Motif 2 and its left side to Motif 4 (4 joins on each side).
- Motif 6: Join its top side to Motif 3 and its left side to Motif 5 (4 joins on each side).
Where four motifs meet, work the sl st into the join sl st that is already there. This keeps the center point neat.
Tension: keep the ch-4 sections as relaxed as your ordinary ch 9. Tight joins make the seams pucker and pull the panel narrower.
Checkpoint: Pin the joined panel out flat. It should measure 24 in (61.0 cm) x 16 in (40.6 cm), which is 3 x 8 in (20.3 cm) across by 2 x 8 in (20.3 cm) down.
Border: Header Band and Fringe Edge
Border gauge: 11 dc = 2 in (5.1 cm), the same 5.5 dc per inch as your swatch. The side edges are left as open loops on purpose, so they match the lace inside the panel.
Header Band (Top Edge)
The top edge has 3 motifs x 4 loops = 12 loops.
Row 1 (RS): Join the yarn in the top-right corner loop of Motif 3. Ch 3 (counts as dc) and work 10 dc in the same loop. Then work 11 dc in each of the remaining 11 loops across. A corner loop joined to a neighbor still counts as its own loop, so work its 11 dc over both of its ch-4 halves. (132 dc)
Row 2: Ch 3 (counts as dc), turn, dc in each st across. (132 dc)
Row 3: Ch 1, turn, sc in each st across. (132 sc)
Row 4 (picot edge): Ch 1, turn, sc in first 2 sts. Picot, sc in next 4 sts. Repeat from * 31 more times. Picot, sc in last 2 sts. Fasten off. (132 sc, 33 picots)
Why the math works: each motif has 4 loops per side, and each loop spans 2 in (5.1 cm). At 5.5 dc per inch, 2 in takes 11 dc. That gives 12 loops x 11 dc = 132 dc, and 132 ÷ 5.5 = 24 in (61.0 cm), exactly the width of the joined panel. In Row 4, 2 + (32 x 4) + 2 = 132 sc, so the picots are spaced evenly and symmetrically.
Header depth: 2 dc rows at 0.5 in (1.3 cm) each plus 2 sc rows at 0.25 in (0.6 cm) each, for 1.5 in (3.8 cm) total.
Bobble Fringe (Bottom Edge)
The bottom edge also has 3 motifs x 4 loops = 12 loops.
- Short fringe: Ch 26, bobble in 4th ch from hook, sl st in each of the remaining 22 ch. (26 = 3 skipped + 1 bobble ch + 22)
- Long fringe: Ch 34, bobble in 4th ch from hook, sl st in each of the remaining 30 ch. (34 = 3 skipped + 1 bobble ch + 30)
Fringe Row (RS): Join the yarn in the bottom-left corner loop of Motif 4. In each loop, work (2 sc, fringe, 2 sc). For each motif, work the fringes in the order short, long, long, short: the corner loops get short fringes and the two side loops get long ones. Fasten off. (48 sc, 12 fringes: 6 short and 6 long)
The 3 skipped chains curl over the top of each bobble and make a rounded drop. Short fringes hang about 5.5 in (14.0 cm), and long fringes hang about 7 in (17.8 cm). The short-long-long-short grouping puts a cluster of fringes under each flower.
Final Blocking
- Weave in all ends, running each tail through the backs of stitches in at least two directions.
- Soak the panel in cool water for 15 minutes. Press the water out by rolling it in a towel; don’t wring it.
- Lay the panel flat and pin the header straight to 24 in (61.0 cm).
- Pin the motif corners in a square grid at 8 in (20.3 cm) intervals, so the body is 16 in (40.6 cm) tall below the header.
- Pin out every petal tip and the center of every mesh loop so the lattice opens evenly.
- Straighten each fringe and shape each bobble with your fingers.
- Let the panel dry completely before you unpin it, then clip the 7 rings to the header about 4 in (10.2 cm) apart.
Final Quality-Control Checklist
- Each motif has 16 dc in Round 1, 32 dc in Round 2, 8 petals, and 12 loops in Round 6.
- Every shared side has 4 join points.
- All four-way junctions meet at a single sl st.
- Every header row has 132 sts, and Row 4 has 33 picots.
- The fringe row has 12 fringes in short-long-long-short groups.
- The panel measures 24 in (61.0 cm) wide and 17.5 in (44.5 cm) tall including the header.
- All ends are woven in securely.
Troubleshooting
- Center cups: The ring is too tight, or your dc stitches are short. Leave the ring slightly looser when you close it.
- Petals look flat: Work over the ch-11 loop, not into the chains.
- Petals are spaced unevenly: Recount Round 3. There should be exactly 3 skipped dc between each pair of sc.
- Header ripples: You have too many dc. Check for 11 per loop and 132 per row.
- Header pulls the panel in: Your dc gauge is tight. Use a hook one size larger for the header only.
- Seams pucker: The ch-4 joins are too tight. Rework them more loosely.
- Fringes twist: Steam them lightly and let the panel hang for a day.
Care
Hand wash in cool water with a mild detergent. Press the water out with a towel and dry flat with pins, then rehang the panel once it is completely dry.
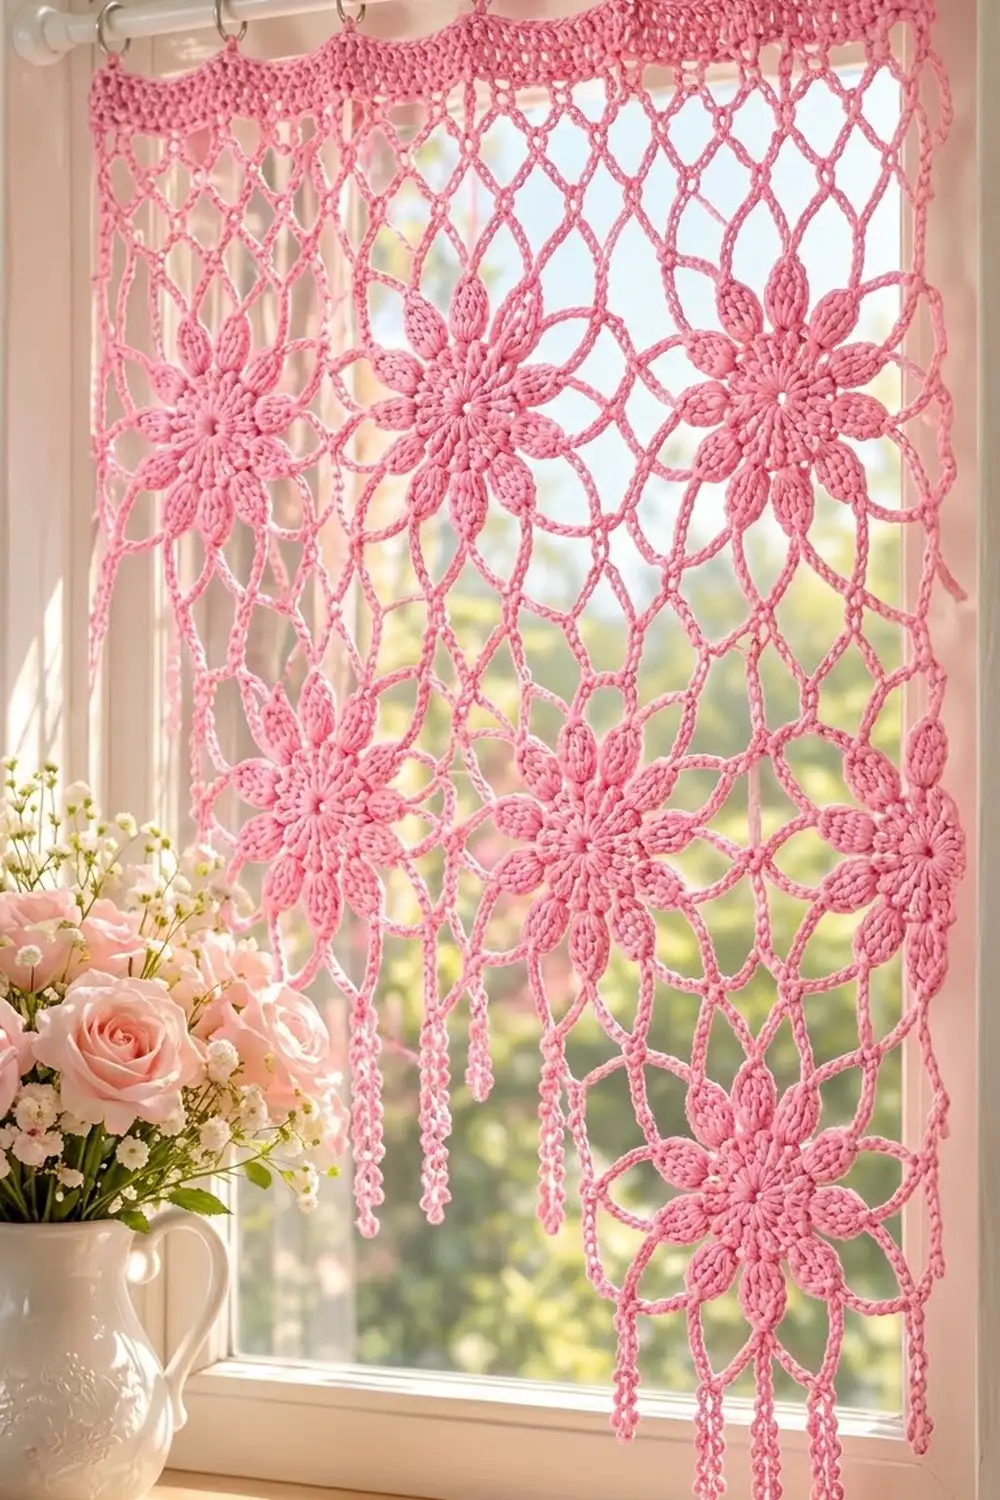
Final Notes
Each motif blocks to 8 in (20.3 cm) with 4 loops per side, and each loop spans 2 in (5.1 cm). Three motifs across give 24 in (61.0 cm), and two down give 16 in (40.6 cm). The 132 header stitches match the 12 top loops exactly and add 1.5 in (3.8 cm). The fringes hang 5.5 in (14.0 cm) and 7 in (17.8 cm) below the lace. If your first motif measures correctly, the rest of the panel will fit.
Happy crocheting!