

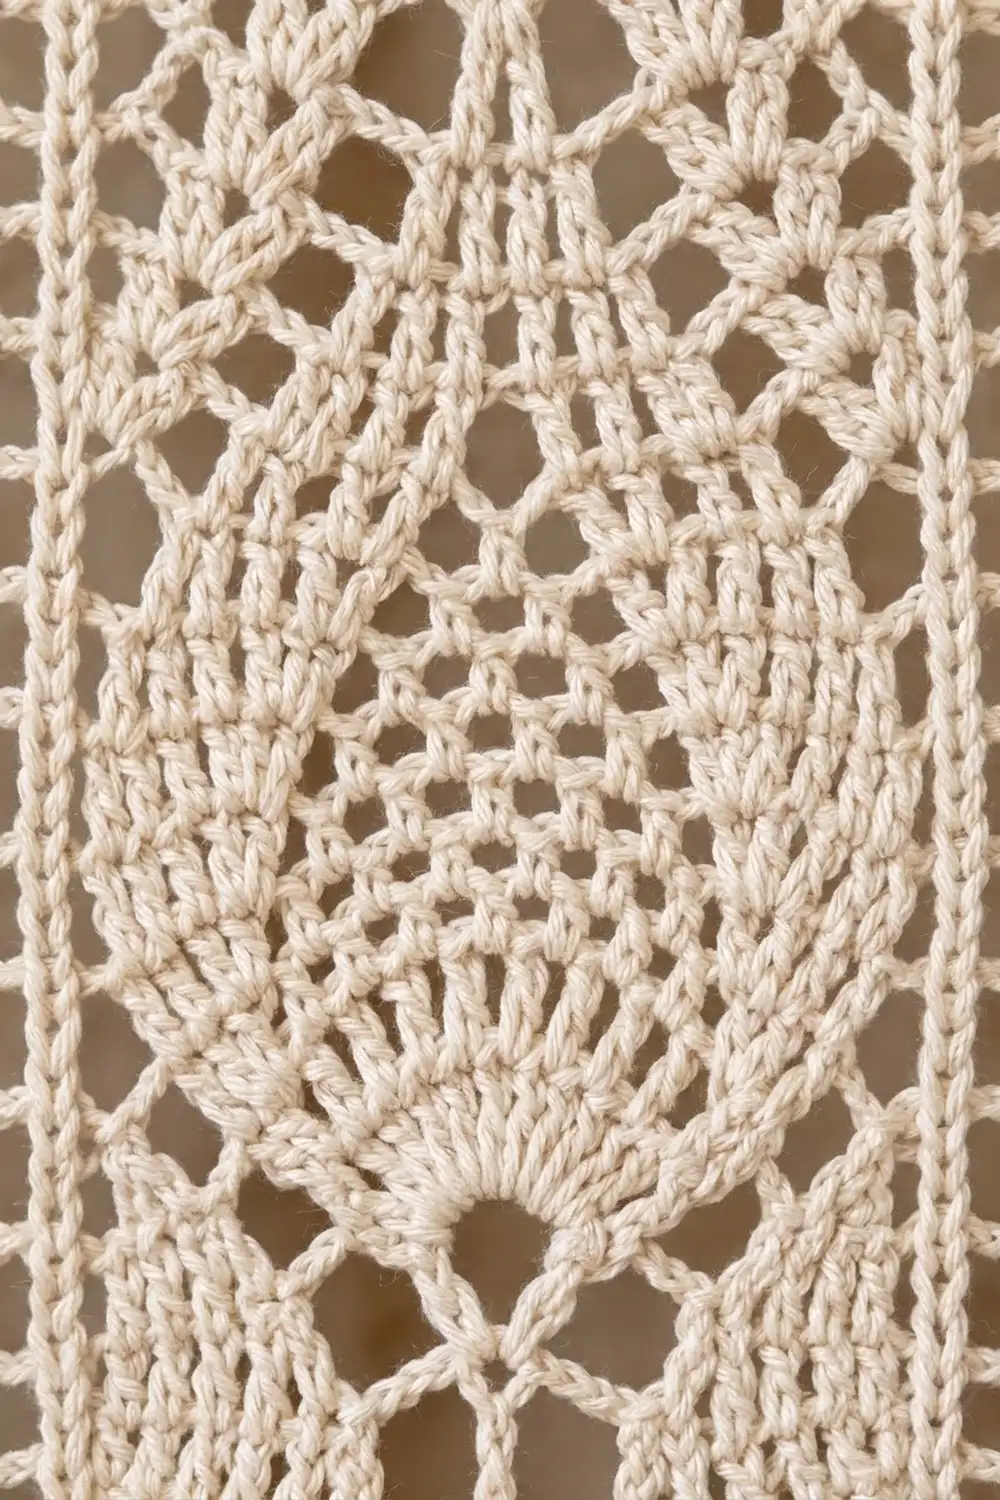
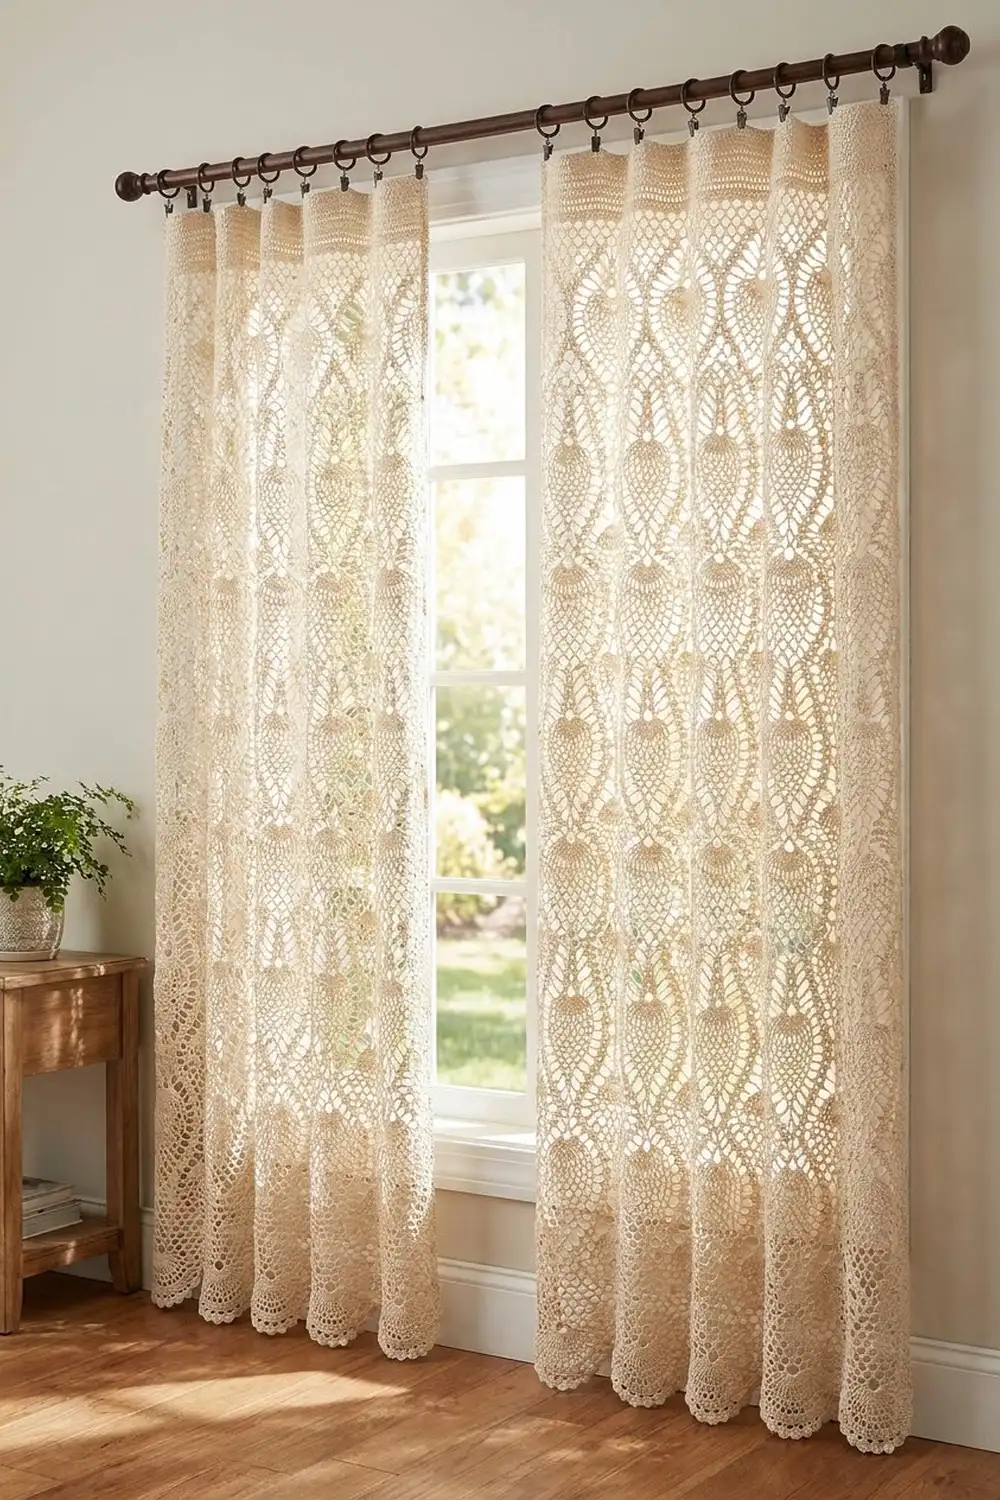
The Hearthside panel is a tall, airy lace curtain in soft cream cotton. Columns of pineapples and open fans run the full length of the panel, with slim double crochet spines between them. A solid band at the top holds curtain clips, and deep shell scallops finish the bottom edge.
The look is classic vintage lace that filters sunlight beautifully. It suits cottage, farmhouse, and traditional rooms, with or without holiday greenery. The sample uses one color, Cream, so all of the texture comes from the stitch pattern.
This pattern uses US crochet terms. One finished panel measures 24.75 in (62.9 cm) wide by 76.5 in (194.3 cm) long after blocking. The window shown uses a pair of identical panels.
Each panel is a single piece worked flat in rows from the bottom up. You work 2 solid base rows, then repeat a 12-row pineapple-and-fan lace pattern 12 times, then finish with a 4-row solid top band. A single crochet border goes all the way around, and 2 scallop rows are added along the bottom only.
Finished Size and Construction
- Finished size (one panel): 24.75 in (62.9 cm) wide x 76.5 in (194.3 cm) long
- Skill level: Intermediate
- Terminology: US crochet terms
- Yarn weight: DK (#3) cotton
- Hook: 4.5 mm (US 7)
- Number of pieces: 2 identical panels, each made as one piece; the panels are not joined
- Layout: one panel on each side of the window
- Panel size before border: 24.25 in (61.6 cm) x 75 in (190.5 cm)
- Border depth: 0.25 in (0.6 cm) on the sides and top; 1.25 in (3.2 cm) at the bottom, including the scallops
Materials
Use a smooth mercerized or combed DK cotton. Cotton keeps the lace open and the shells crisp, and it holds up well to sunlight and washing.
- Cream, DK cotton: 500 g (about 1,150 m) per panel, or 1,000 g (about 2,300 m) for the pair
- 4.5 mm (US 7) crochet hook
- Tapestry needle
- 4 locking stitch markers
- Rust-proof pins and a large blocking surface
- Measuring tape
- Curtain clip rings for hanging
The yarn amounts include a margin of about 10% for the swatch and for differences in tension.
Abbreviations (US Terms)
- ch: chain
- sl st: slip stitch
- sc: single crochet
- dc: double crochet
- sk: skip
- st(s): stitch(es)
- sp: space
- RS / WS: right side / wrong side
- V-st: (dc, ch 1, dc) in the same st or sp
- Shell: the stated number of dc worked into the same st or sp
Counting rule: every dc, every sc, and every chain counts as 1 st. A ch-3 sp is 3 sts, and a V-st is 3 sts. Counted this way, every row of the panel has exactly 97 sts.
Spines: each row starts with ch 3, which counts as a dc and forms the first spine. Each repeat ends with a dc in the next spine st. That gives 5 spines per row, and they stack straight up the panel.
Gauge and Checkpoints
Gauge: 16 sts and 8 rows = 4 in (10.2 cm) in pattern, after blocking. One 24-st lace repeat is 6 in (15.2 cm) wide, and one 12-row repeat is 6 in (15.2 cm) tall.
Make a swatch first. Ch 51 and work Base Rows 1–2 (49 sts). Then work Lace Rows 1–12 once, working the bracketed section 2 times instead of 4. Block the swatch. It should measure 12.25 in (31.1 cm) wide x 7 in (17.8 cm) tall.
- If your swatch is too big: switch to a 4 mm hook.
- If your swatch is too small: switch to a 5 mm hook.
- Match the width first. If the height is slightly off, you can fix the length by adding or removing a lace repeat.
Checkpoints for the full panel (lay it flat without stretching):
- After Base Row 2: 24.25 in (61.6 cm) wide and 1 in (2.5 cm) tall
- After the first lace repeat (panel Row 14): 7 in (17.8 cm) tall
- After 6 lace repeats (Row 74): 37 in (94.0 cm) tall
- After 12 lace repeats (Row 146): 73 in (185.4 cm) tall
- After the top band (Row 150): 75 in (190.5 cm) tall
Base Rows
Foundation: Ch 99.
Base Row 1 (RS): Dc in the 4th ch from hook (the skipped chains count as a dc) and in each ch across, turn. (97 sts)
Base Row 2: Ch 3 (counts as dc here and throughout), dc in each st across, ending in the top of the turning ch, turn. (97 sts)
Place markers in sts 25, 49, and 73 to mark the inner spines. Move the markers up as you work.
Lace Pattern (12-Row Repeat)
Every row follows the same structure: ch 3 (the first spine), then [a 23-st motif section, dc in next spine st] 4 times. The 23-st motif section is symmetrical, so the same instructions work on both RS and WS rows. Turn at the end of every row.
Row 1 (shell base): Ch 3, [ch 4, sk 3 sts, dc in next st, ch 4, sk 7 sts, 5 dc in next st, ch 4, sk 7 sts, dc in next st, ch 4, sk 3 sts, dc in next spine st] 4 times. (23 sts per section; 97 sts)
The shell is worked into the 12th st of each section, and the single dc go into the 4th and 20th sts.
Row 2 (pineapple base): Ch 3, [ch 3, sc in next dc, ch 3, dc in first dc of shell, (ch 1, dc in next dc) 4 times, ch 3, sc in next dc, ch 3, dc in next spine st] 4 times. (23 sts per section; 97 sts)
Row 3: Ch 3, [ch 2, dc in next sc, ch 2, sc in first ch-1 sp of pineapple, (ch 3, sc in next ch-1 sp) 3 times, ch 2, dc in next sc, ch 2, dc in next spine st] 4 times. (pineapple 13 sts; 97 sts)
Row 4: Ch 3, [ch 2, V-st in next dc, ch 2, sc in first ch-3 loop, (ch 3, sc in next ch-3 loop) twice, ch 2, V-st in next dc, ch 2, dc in next spine st] 4 times. (pineapple 9 sts; 97 sts)
Row 5: Ch 3, [ch 3, V-st in ch-1 sp of next V-st, ch 3, sc in first ch-3 loop, ch 3, sc in next ch-3 loop, ch 3, V-st in next V-st sp, ch 3, dc in next spine st] 4 times. (pineapple 5 sts; 97 sts)
Row 6 (pineapple tip): Ch 3, [ch 4, V-st in next V-st sp, ch 4, sc in the ch-3 loop, ch 4, V-st in next V-st sp, ch 4, dc in next spine st] 4 times. (pineapple 1 st; 97 sts)
Row 7 (fans): Ch 3, [ch 3, 5 dc in next V-st sp, ch 3, sc in tip sc, ch 3, 5 dc in next V-st sp, ch 3, dc in next spine st] 4 times. (97 sts)
Row 8: Ch 3, [ch 1, dc in first dc of fan, (ch 1, dc in next dc) 4 times, ch 1, sc in next sc, ch 1, dc in first dc of next fan, (ch 1, dc in next dc) 4 times, ch 1, dc in next spine st] 4 times. (each fan 9 sts; 97 sts)
Row 9: Ch 3, [sc in first ch-1 sp of fan, (ch 2, sc in next ch-1 sp) 3 times, ch 1, dc in center sc, ch 1, sc in first ch-1 sp of next fan, (ch 2, sc in next ch-1 sp) 3 times, dc in next spine st] 4 times. (each loop group 10 sts; 97 sts)
Leave the ch-1 sts on each side of the fans unworked.
Row 10: Ch 3, [sc in first ch-2 sp, (ch 2, sc in next ch-2 sp) twice, ch 2, (dc, ch 1, dc, ch 1, dc) in center dc, ch 2, sc in first ch-2 sp of next group, (ch 2, sc in next ch-2 sp) twice, dc in next spine st] 4 times. (loop groups 7 sts each, center 9 sts; 97 sts)
The shrinking loop groups close each fan into a teardrop, and the new center cluster starts the next pineapple.
Row 11: Ch 3, [ch 3, sc in middle sc of loop group, ch 5, dc in first dc of center cluster, (ch 1, dc in next dc) twice, ch 5, sc in middle sc of next loop group, ch 3, dc in next spine st] 4 times. (97 sts)
Row 12: Ch 3, [ch 3, dc in next sc, ch 5, dc in next dc, (ch 1, dc in next dc) twice, ch 5, dc in next sc, ch 3, dc in next spine st] 4 times. (97 sts)
In Row 12, the dc land on sts 4, 10, 12, 14, and 20 of each section. Row 1 needs dc at sts 4, 12, and 20, so the next repeat lines up exactly.
Work Rows 1–12 a total of 12 times, for 144 lace rows. The panel now has 146 rows.
Top Band
Top Rows 1–4: Ch 3, dc in each st across (1 dc in each ch as well), turn. (97 sts)
After Top Row 4, the panel has 150 rows and measures 24.25 in (61.6 cm) x 75 in (190.5 cm). Do not fasten off.
Make Both Panels
Make 2 identical panels, using 500 g of Cream for each. The panels hang separately and are not joined.
[ Panel 1 ]  [ window ]  [ Panel 2 ]
 24.75 in                 24.75 in
Laid fully flat, the pair is 49.5 in (125.7 cm) wide.
Border
Border gauge: 4 sc = 1 in (2.5 cm). This matches the body on every edge. Across the top and bottom, 97 sts over 24.25 in is 4 sts per in. On the sides, 2 sc per row-end x 2 rows per in also gives 4 sc per in. Because the counts match, the edges lie flat without ruffling or pulling in.
Round 1 (RS): Ch 1, 3 sc in first st (corner), sc in next 95 sts, 3 sc in last st (corner). Work 2 sc in each row-end down the side (150 rows = 300 sc). Working along the bottom, 3 sc in the base of the first st (corner), sc in the base of the next 95 sts, 3 sc in the base of the last st (corner). Work 2 sc in each row-end up the second side (300 sc). Join with a sl st to the first sc and fasten off.
Stitches per side, each count including that side’s 2 corner sts (the center sc of each 3-sc corner):
- Top: 1 + 97 + 1 = 99 sts
- Bottom: 1 + 97 + 1 = 99 sts
- Each long side: 1 + 302 + 1 = 304 sts (the 300 row-end sc plus the outer sc of each corner group)
- Total: 99 + 99 + 304 + 304 − 4 shared corners = 802 sts
To double-check: 4 corners x 3 sc + 95 x 2 + 300 x 2 = 12 + 190 + 600 = 802.
Scallop Row 2 (bottom edge only): With RS facing, join yarn in the first sc after a bottom corner sc. Ch 1, sc in the same st, [sk 2 sts, 7 dc in next st, sk 2 sts, sc in next st] 16 times, ending in the last sc before the next corner sc, turn. (16 shells; 1 + 16 x 8 = 129 sts)
This row uses exactly the 97 bottom sts between the corner sts: 1 + 16 x 6 = 97. The corner sts are left unworked, so the scallops end neatly at each corner.
Scallop Row 3 (WS): Ch 1, sc in first sc, [ch 1, (dc in next dc, ch 1) 7 times, sc in next sc] 16 times. (1 + 16 x 16 = 257 sts) Fasten off.
How the measurements add up: Round 1 adds 0.25 in (0.6 cm) to every edge, so the width is 24.25 + 0.25 + 0.25 = 24.75 in (62.9 cm). The 2 scallop rows add another 1 in (2.5 cm) at the bottom, so the length is 75 + 0.25 + 0.25 + 1 = 76.5 in (194.3 cm). There are 4 scallops under each 24-st lace repeat.
Final Blocking
- Weave in ends along the top band or the spines, where they are easiest to hide.
- Soak the panel in cool water with a little wool wash for 15 minutes.
- Press out the water without wringing, then roll the panel in towels.
- Lay it flat and pin both sides straight at 24.75 in (62.9 cm) apart.
- Pin the length to 76.5 in (194.3 cm), keeping the spines straight and parallel.
- Pin the tip of each scallop so the shells fan out evenly.
- Use your fingers to open each pineapple and fan so the loops lie flat.
- Let the panel dry completely, at least 24 hours, before you unpin it.
Final Quality-Control Checklist
- Every row has 97 sts, and all 5 spines run straight.
- Each pineapple column has 12 pineapples.
- Before the border, the panel measures 24.25 in (61.6 cm) x 75 in (190.5 cm).
- Border Round 1 has 802 sts, with 3 sc in each corner.
- There are 16 scallops between the bottom corners.
- After blocking, the panel measures 24.75 in (62.9 cm) x 76.5 in (194.3 cm).
- The two panels are within 0.5 in (1.3 cm) of each other in length.
Troubleshooting
- Spines lean sideways: one section has the wrong stitch count. Recount at Rows 1 and 7, where the counts are easiest to check.
- Pineapple doesn’t close at the tip: check Row 2. The 5 shell dc should give you exactly 4 ch-1 sps.
- Top band flares: the band is too loose. Work it with a 4 mm hook.
- Side edges ripple: your rows are shorter than gauge. Alternate 2 sc and 1 sc per row-end.
- Scallops curl: steam them lightly and pin them again.
- Panels end up different lengths: compare the two at every checkpoint.
Care
Hand wash, or machine wash cool on a gentle cycle in a mesh bag. Dry the panels flat and re-pin the scallops; never hang them to dry while wet, because wet cotton lace stretches.
Final Notes
Here is how the measurements connect. At 4 sts per in, 97 sts = 24.25 in (61.6 cm). At 2 rows per in, 150 rows = 75 in (190.5 cm). The border adds 0.25 in (0.6 cm) to each edge plus 1 in (2.5 cm) of scallops, for a finished panel of 24.75 in (62.9 cm) x 76.5 in (194.3 cm). To change the length, add or remove whole 12-row repeats, each 6 in (15.2 cm). Make two matching panels, block them the same way, and clip them up to frame your window.
Happy crocheting!