

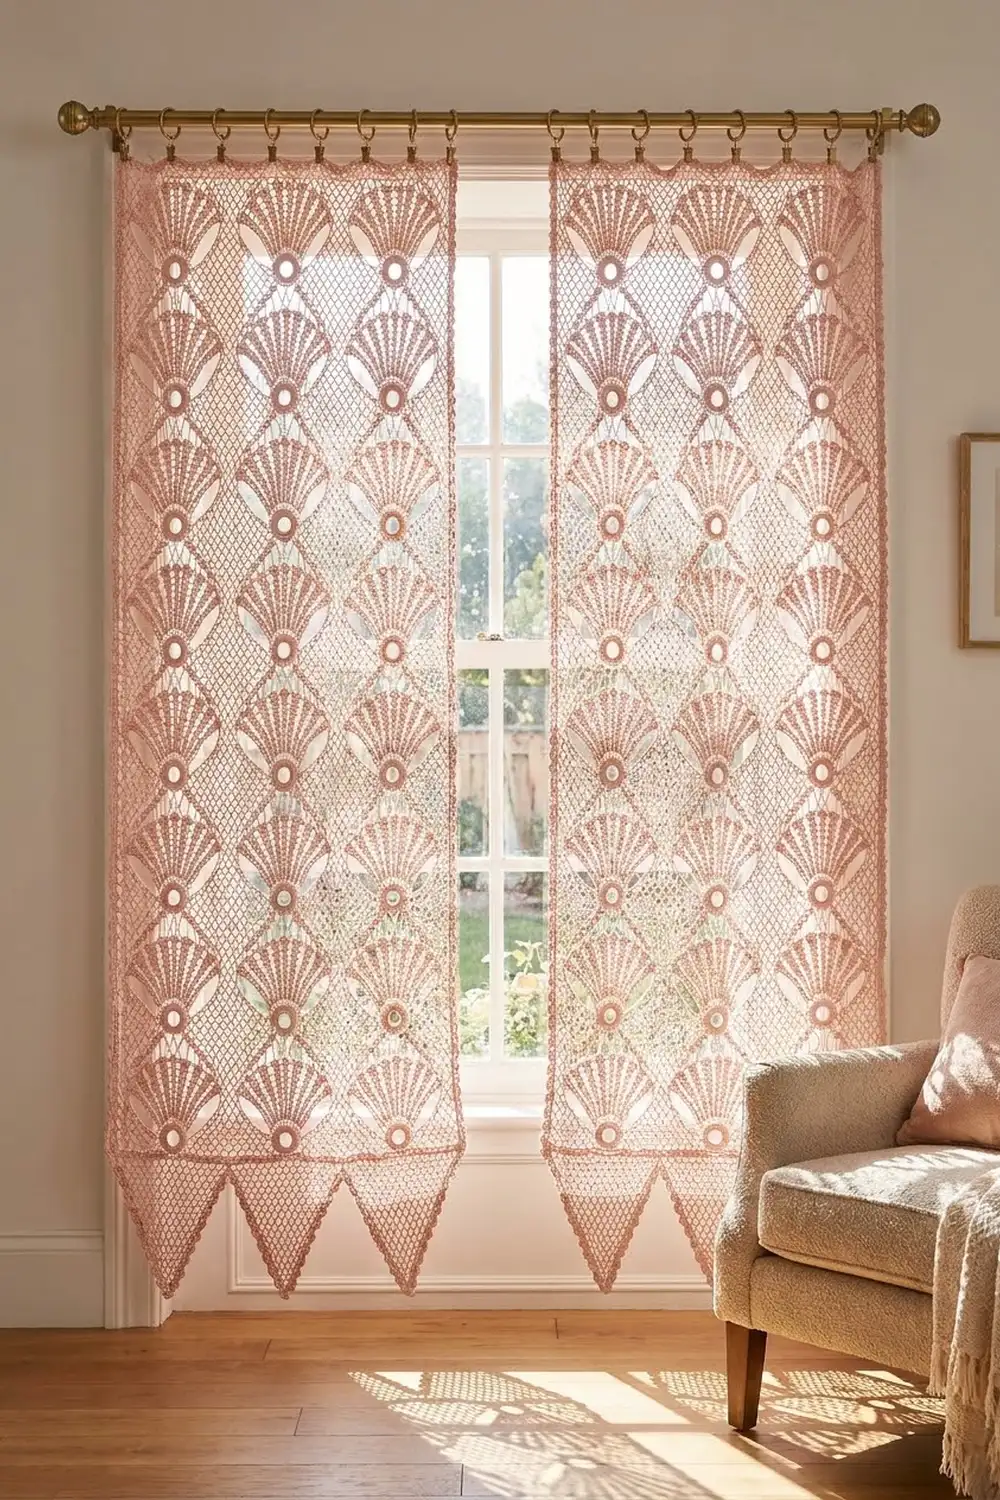
These soft blush-pink curtain panels are covered in open fans that open upward. Each fan grows from a small round eyelet, spreads into airy spokes, and finishes in a gentle arch. Each tier of fans is shifted half a fan from the one below. This leaves diamond-shaped mesh openings between the fans, so the whole panel looks like lace when light shines through it.
The design uses a single color, a pastel pink cotton, so the texture does all the work. The bottom edge ends in three mesh points, one under each column of fans. The sides and top get a neat two-row single crochet edge, and the panels hang from clip rings on a curtain rod.
This pattern uses US crochet terms. Each finished panel measures about 16.2 in (41.1 cm) wide by 54.25 in (137.8 cm) long, including the points and border. You make two identical panels.
Each panel is worked flat in one piece, from the bottom up, in an 8-row fan repeat. Next you work the three points into the free loops of the foundation chain. Last, you add the border along the sides and top.
Finished Size and Construction
- Finished size (per panel): 16.2 in (41.1 cm) wide x 54.25 in (137.8 cm) long
- Skill level: Intermediate
- Terminology: US
- Yarn weight: Worsted (#4) cotton
- Hook: 5.0 mm (H-8)
- Number of pieces: 2 separate, identical panels, each worked in one piece. The panels are not joined.
- Layout: The two panels hang side by side on one rod.
- Body size before border: 15.2 in (38.6 cm) wide x 50.25 in (127.6 cm) long
- Points: 3.5 in (8.9 cm) deep
- Border depth: 0.5 in (1.3 cm) on the sides and top
Materials
Choose a smooth worsted-weight cotton, either mercerized or combed. Cotton gives crisp stitch definition, blocks flat, and won’t stretch much while it hangs. Avoid fuzzy or very splitty yarns, because they blur the clean lines of the fans.
- Blush pink: 750 g / about 1,275 m total for both panels (375 g / about 638 m per panel)
These amounts include about 10% extra for your gauge swatch and small differences in tension.
Tools:
- 5.0 mm (H-8) crochet hook
- Tapestry needle
- Stitch markers
- Rust-proof pins and a blocking surface at least 18 x 56 in (45.7 x 142.2 cm)
- Spray bottle
- Measuring tape
- 14 curtain clip rings (7 per panel)
Abbreviations (US Terms)
- ch – chain
- sl st – slip stitch
- sc – single crochet
- hdc – half double crochet
- dc – double crochet
- tr – treble crochet
- sk – skip
- sp – space
- st(s) – stitch(es)
- RS / WS – right side / wrong side
Special stitches
- Ring: (dc, ch 3, dc) all in the same st. This counts as 5 sts and makes the eyelet at the base of each fan.
- Picot: ch 3, sl st in 3rd ch from hook.
Counting rule: In this pattern, every chain counts as a stitch. That’s why every pattern row has the same total of 73 sts.
Gauge and Checkpoints
Gauge after blocking: one 24-st fan repeat = 5 in (12.7 cm) wide; 8 rows = 6.25 in (15.9 cm) tall.
Test swatch: Ch 26 and work the foundation row (25 sc). Then work Rows 1–8 once, working each starred repeat one time. In Rows 7 and 8, work only the edge instructions. Block the swatch. It should measure 5.2 in (13.2 cm) wide and about 6.5 in (16.5 cm) tall, including the foundation row.
Checkpoints for the panel:
- After Row 8: 6.25 in (15.9 cm) above the foundation, 15.2 in (38.6 cm) wide
- After Row 32: 25 in (63.5 cm)
- After Row 64: 50 in (127.0 cm), plus about 0.25 in (0.6 cm) for the foundation row
Measure with the lace gently stretched, the way it will sit after blocking.
If your swatch is too big, go down 0.5 mm. If it’s too small, go up 0.5 mm. A fan width that’s off by 0.25 in (0.6 cm) adds up to 0.75 in (1.9 cm) across the panel, so fix it before you start.
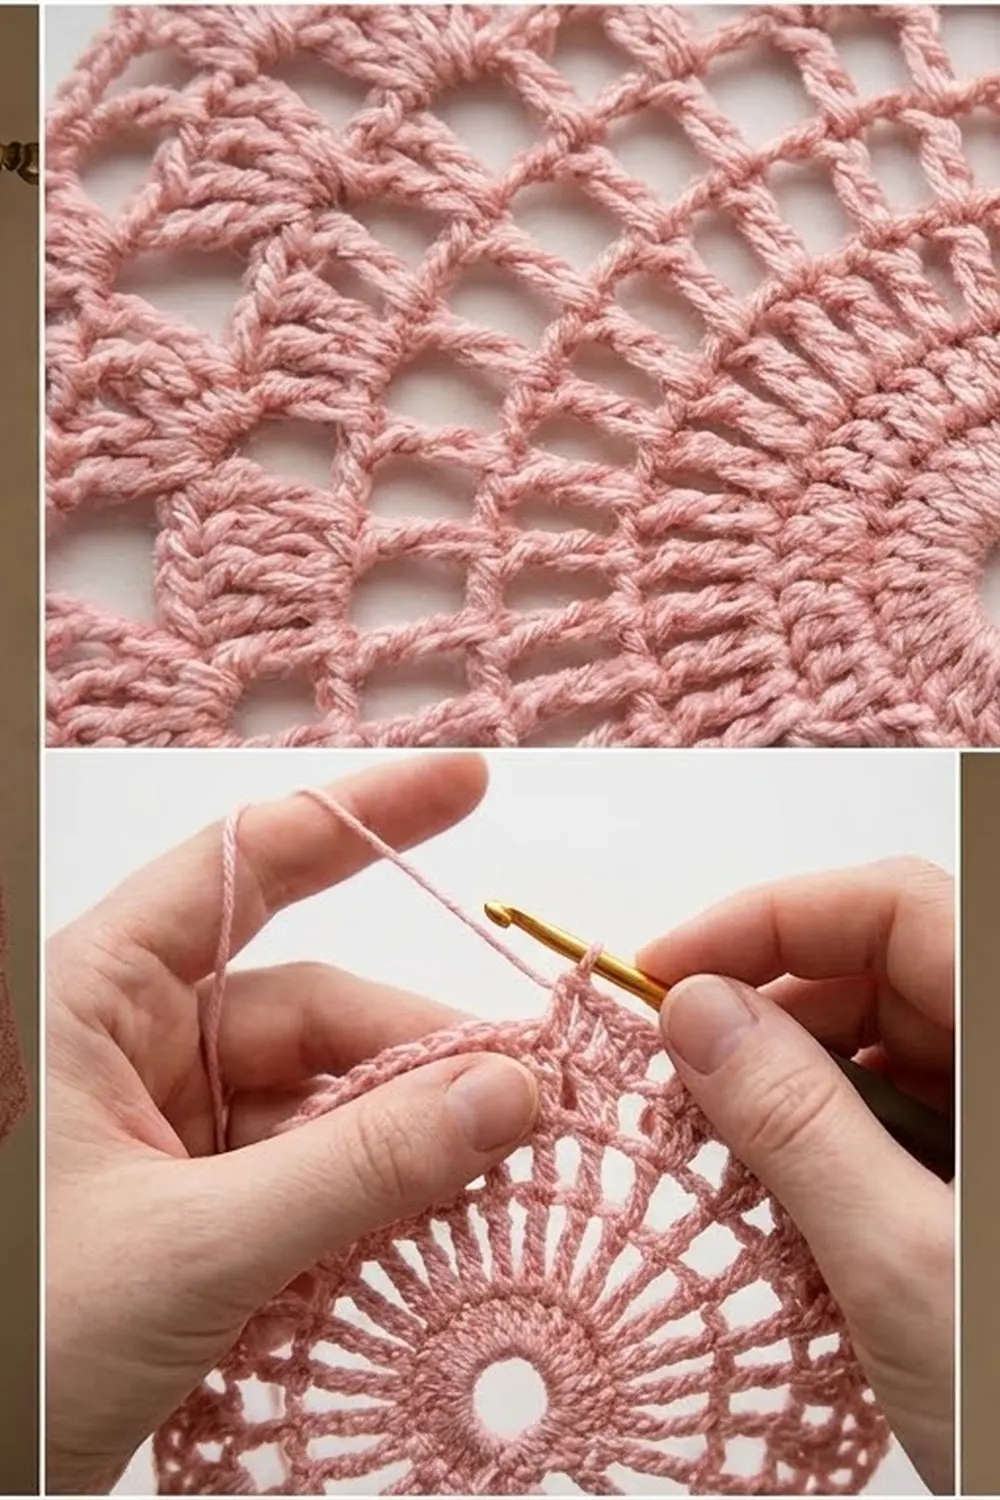
Panel (Make 2)
Ch 74.
Foundation row (WS): Sc in 2nd ch from hook and in each ch across, turn. (73 sc)
Tier A – Fans Centered in Each Repeat
Row 1 (RS): Ch 1, sc in first st. Ch 5, sk 5 sts, sc in next st, ch 3, sk 5 sts, ring in next st, ch 3, sk 5 sts, sc in next st, ch 5, sk 5 sts, sc in next st. Repeat from * 2 more times, turn. (73 sts: 1 + 24 per repeat x 3; 3 rings)
Row 2: Ch 1, sc in first sc. Ch 2, sc in next ch-5 sp, ch 3, 11 dc in ring ch-3 sp, ch 3, sc in next ch-5 sp, ch 2, sc in next sc. Repeat from * 2 more times, turn. (73 sts; 3 fans of 11 dc)
Row 3: Ch 1, sc in first sc. Ch 1, dc in first dc of fan, (ch 1, dc in next dc) 10 times, ch 1, sc in next sc. Repeat from * 2 more times, turn. (73 sts: 1 + [1 + 21 + 1 + 1] x 3)
Row 4: Ch 1, sc in first sc. Ch 1. Over the next 11 dc, work one st in each dc, skipping the ch-1 sps and working ch 1 between the sts, in this order: sc, hdc, dc, dc, tr, tr, tr, dc, dc, hdc, sc. Ch 1, sc in next sc. Repeat from * 2 more times, turn. (73 sts)
The tall stitches in the middle of Row 4 give each fan its arched top. The center tr of each arch sits on st 12 of its repeat.
Tier B – Half-Drop Fans
Row 5: Ch 4 (counts as dc + ch 1), dc in first sc (edge half ring). Ch 3, sk 5 sts, sc in next st, ch 5, sk 5 sts, sc in next st (the center tr), ch 5, sk 5 sts, sc in next st, ch 3, sk 5 sts, ring in next sc. Repeat from * 2 more times. On the last repeat, work (dc, ch 1, dc) in the last sc instead of a ring. Turn. (73 sts: 3 + 24 + 24 + 22; 2 full rings and 2 edge half rings)
Row 6: Ch 3 (counts as dc), 5 dc in ch-1 sp. Ch 3, sc in next ch-5 sp, ch 2, sc in next sc, ch 2, sc in next ch-5 sp, ch 3, 11 dc in next ring sp. Repeat from * 2 more times. On the last repeat, replace the 11 dc with 5 dc in the last ch-1 sp, then dc in 3rd ch of turning ch. Turn. (73 sts: 6 + 24 + 24 + 19)
Row 7: Ch 4 (counts as dc + ch 1), (dc in next dc, ch 1) 4 times, dc in next dc. Ch 1, sc in next sc, ch 1, dc in first dc of fan, (ch 1, dc in next dc) 10 times. Repeat from * once more. Ch 1, sc in next sc, ch 1, dc in next dc, (ch 1, dc in next dc) 5 times, working the last dc in top of turning ch. Turn. (73 sts: 11 + 24 + 24 + 14)
Row 8: Ch 4 (counts as tr), ch 1. Work one st in each of the next 5 dc, with ch 1 between them, in this order: tr, dc, dc, hdc, sc. Ch 1, sc in next sc, ch 1, then work a full arch over the next 11 dc as in Row 4. Repeat from * once more. Ch 1, sc in next sc, ch 1. Work one st in each of the last 6 dc, with ch 1 between them, in this order: sc, hdc, dc, dc, tr, tr (last tr in top of turning ch). Turn. (73 sts)
After Row 8, the sc between the Tier B fans sit on sts 12, 36, and 60. That’s where the next Tier A rings go, which keeps the tiers offset.
Rows 9–64: Repeat Rows 1–8 seven more times, for 8 repeats in total. Fasten off.
Checkpoint: The body measures 15.2 x 50.25 in (38.6 x 127.6 cm), with 8 fans stacked in each column.
Bottom Points
Rotate the panel so the foundation chain is at the top and the RS is facing you. You’ll work into the 73 free loops of the foundation chain. Each point covers 25 loops and shares its last loop with the next point.
Row P1: Join yarn in first loop, ch 1, sc in same loop, (ch 3, sk 1 loop, sc in next loop) 12 times, turn. (13 sc, 12 ch-3 sps)
Row P2: Sl st to the center of the first ch-3 sp, ch 1, sc in same sp, (ch 3, sc in next sp) 10 times, turn. (11 ch-3 sps)
Rows P3–P12: Work as for Row P2, with 1 fewer ch-3 sp in each row. (Row P12: 1 ch-3 sp)
Row P13: Sl st into the ch-3 sp, ch 1, (sc, picot, sc) in same sp. Fasten off. (1 point)
For the second point, join yarn in the same loop that holds the last sc of the first point’s Row P1, and work over the next 25 loops. Make the third point the same way. Each point sits under a Tier A ring and measures 3.5 in (8.9 cm) from the foundation to the picot tip.
Make the Second Panel
Make a second panel exactly like the first. Check your stitch counts at the same rows on both panels so their lengths match.
[ Panel 1 ]   [ Panel 2 ]
 3 points      3 points
The panels hang separately and are not joined, so there’s no joining step.
Border
Border gauge: 24 sc = 5 in (12.7 cm). This matches the lace gauge, so the border won’t pull in or ruffle.
The border runs up the right side, across the top, and down the left side. The points are left without edging.
Border Row 1 (RS): Join yarn at the bottom right corner of the body, at the foundation row. Ch 1, then sc evenly up the side: 1 sc in the foundation row end, then 30 sc over each 8-row repeat (3 sc in each Row 1 and Row 5 end, and 4 sc in every other row end). (241 sc on the side) Work 3 sc in the first st of the top row, 1 sc in each of the next 71 sts, and 3 sc in the last st. (77 sc on the top, including both corner groups) Work down the left side the same way as the right side. (241 sc) Turn. (559 sc total)
Border Row 2: Ch 1, sc in each sc, working 3 sc in the center sc of each corner group. Fasten off. (241 sc on each side, 81 on the top, 563 total)
Why the math works: The body is 50 in (127.0 cm) tall, and the border gauge is 4.8 sc per in, so 50 x 4.8 = 240 sc. The foundation row adds 1, for 241 sc. Across the top, 73 sts at 4.8 per in measure 15.2 in (38.6 cm), so 1 sc goes in each stitch. The extra sc in the corner groups (4 in Row 1, 4 more in Row 2) only turn the corners; they don’t widen the top.
Final Blocking
- Weave in all ends through solid stitches, never across open mesh.
- Soak the panel in cool water for 15 minutes. Press the water out in a towel; don’t wring it.
- Lay the panel flat, RS up, and pin the corners so it’s 16.2 in (41.1 cm) wide.
- Pin the sides straight to 50.75 in (128.9 cm), which is the body plus the top border.
- Pin each point tip 3.5 in (8.9 cm) below the foundation, and open each picot.
- Pin every ring open into a round shape, then spread the spokes of each fan out evenly.
- Let the panel dry completely, for at least 24 hours. Block the second panel to exactly the same measurements.
Final Quality-Control Checklist
- Every pattern row had 73 sts.
- Each column has 8 fans stacked, and every ring is open.
- Each Tier B fan sits centered between the Tier A fans.
- All 3 points are the same depth, and the picot tips line up.
- The border has 241 sc on each side and 81 sc on the top.
- Both panels measure 16.2 x 54.25 in (41.1 x 137.8 cm).
- No ends show on the RS.
Troubleshooting
- Fans lean to one side: You probably miscounted the skipped sts in Row 1 or Row 5. Count chains as stitches, and check that the center sc lands on the center tr.
- Rings close up: Work the ch 3 of each ring more loosely, or pin the ring open with a pencil tip while blocking.
- Arches look flat: Make sure Rows 4 and 8 use the full sequence of sc, hdc, dc, dc, tr, tr, tr, then back down.
- Edges wave: Your body is probably shorter than 50 in (127.0 cm). Measure it, multiply by 4.8, and use that side count instead.
- Points are uneven: Rip back to Row P1, and make sure each point starts and ends on the shared loops.
- Panel too short: Add another 8-row repeat, which adds 6.25 in (15.9 cm), and work 30 more sc on each side in Border Row 1.
Care
Hand wash in cool water and dry flat, reshaping the fans while they’re damp. Between washes, shake the panels out gently outdoors to remove dust.
Final Notes
Here’s how the measurements add up. Three 5 in (12.7 cm) fan repeats plus 1 st give a body 15.2 in (38.6 cm) wide. Eight 6.25 in (15.9 cm) repeats give 50 in (127.0 cm), and the foundation row adds 0.25 in (0.6 cm). With 3.5 in (8.9 cm) points and a 0.5 in (1.3 cm) border, each panel finishes at 16.2 x 54.25 in (41.1 x 137.8 cm). If your swatch matches the gauge and every row counts to 73, both panels will match.
Happy crocheting!