

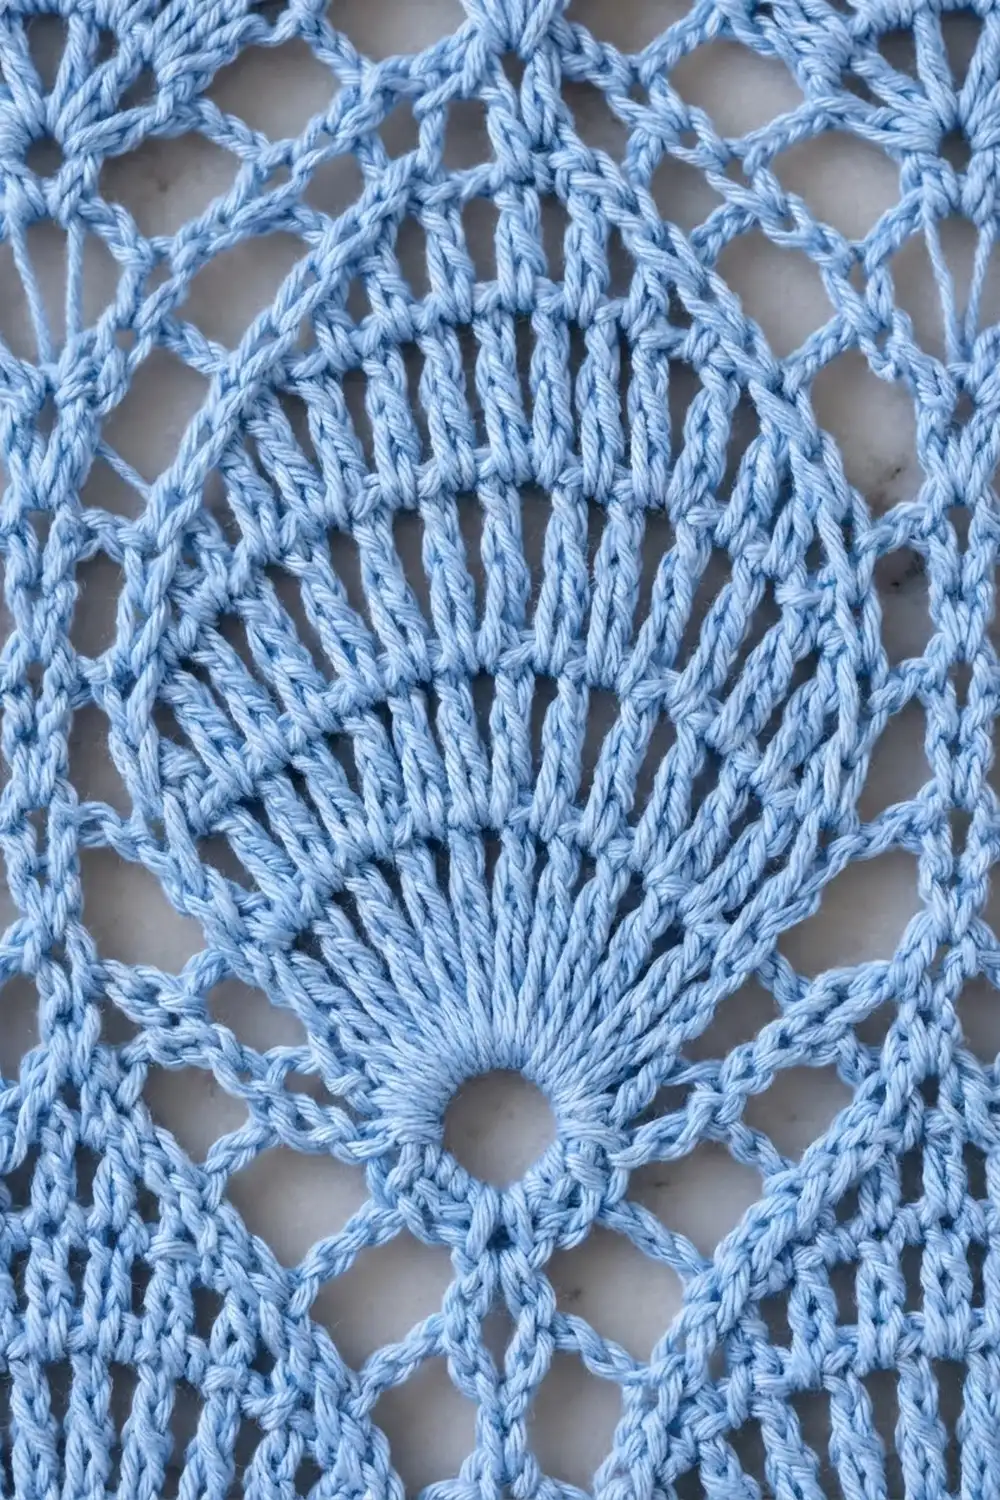
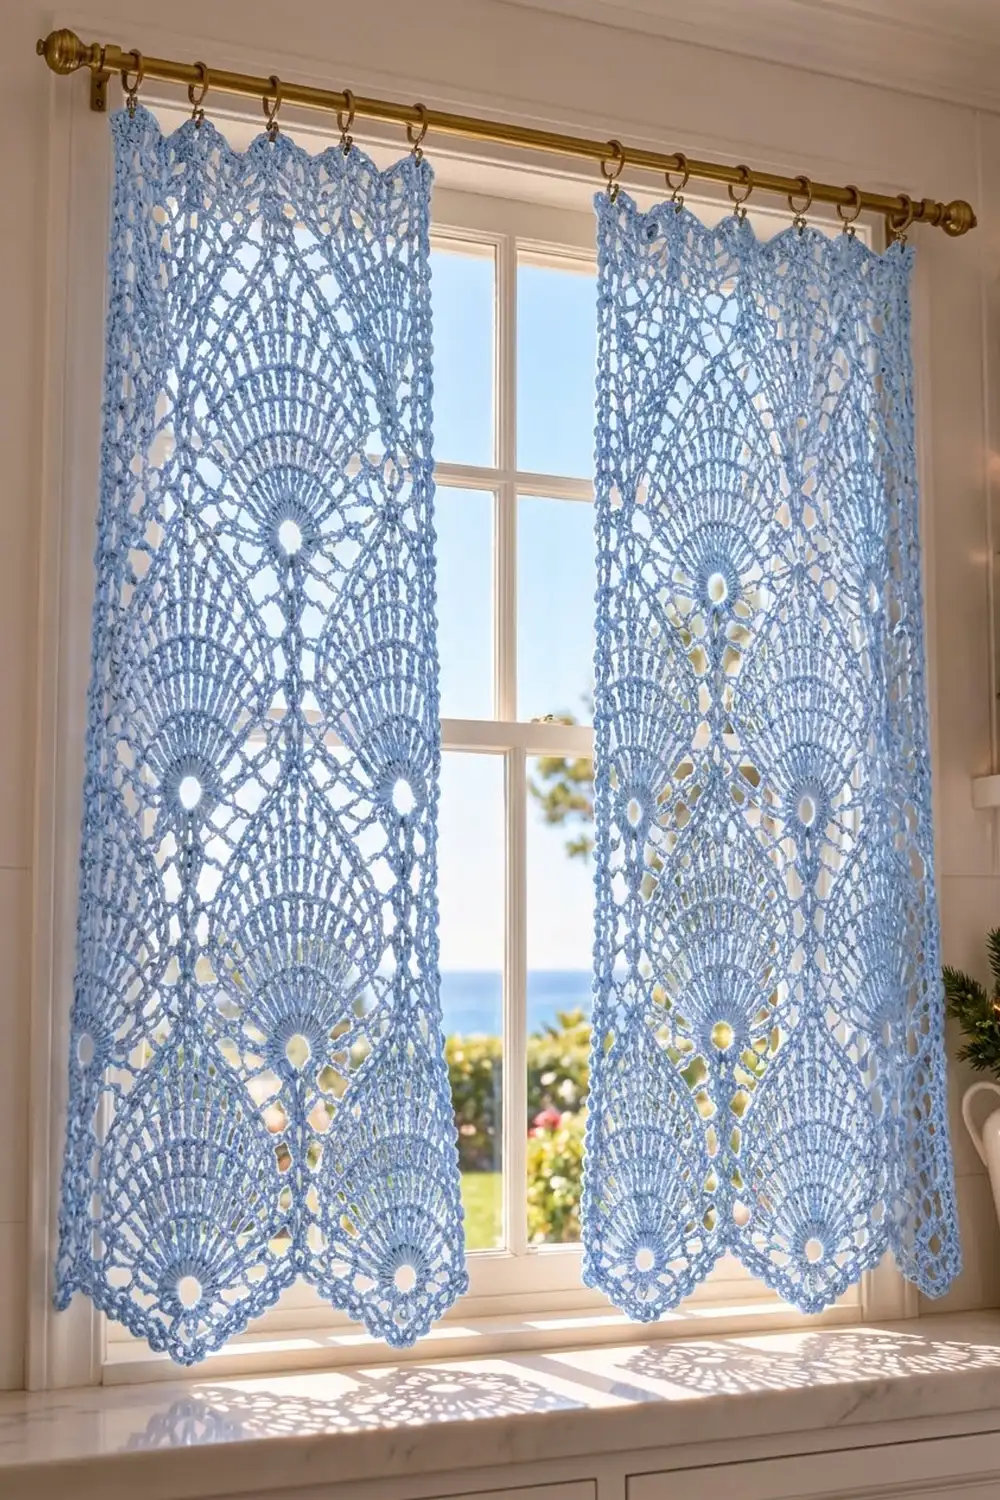
This airy curtain panel is built from tall columns of fans. Each fan opens upward from a round eyelet, and chain arches and slim stitch columns frame it. The hem ends in three points, and each point is one more fan narrowing to a sharp tip. Hung in a sunny window, the lace casts patterned shadows across the sill.
The sample is worked in one color, a soft light cornflower blue mercerized cotton. That fits a coastal kitchen, a cottage window or a holiday look with greenery. The pattern uses US crochet terms throughout.
One finished panel measures 18.7 in (47.5 cm) wide by 36.5 in (92.7 cm) long, including the hem points and border. For a pair like the one shown, make two identical panels. The panels are not joined to each other.
You work the panel top-down in rows. You start with a solid header band, then work 10 fan tiers. Each tier is a 6-row repeat, and the last row of each tier is a solid row that becomes the base for the next tier. Next, you work the three hem points one at a time on the same base row. A two-round single crochet border then goes around the whole outline.
Finished Size and Construction
- Finished size: 18.7 in x 36.5 in (47.5 cm x 92.7 cm), points included
- Skill level: Intermediate
- Terminology: US crochet terms
- Yarn weight: Fingering (#1 super fine) cotton
- Hook: 2.75 mm (US C-2)
- Number of pieces: 1 per panel (make 2 for a pair; they are not joined)
- Layout: 3 fan columns across, 10 fan tiers deep, 3 hem points
- Piece size: 18.2 in x 36 in (46.2 cm x 91.4 cm) before border
- Size before border: 18.2 in x 36 in (46.2 cm x 91.4 cm)
- Border depth: 0.25 in (0.6 cm), 2 rounds of sc
Materials
Yarn: Use a smooth, mercerized fingering-weight cotton. Cotton holds the fan shapes crisply, blocks well and doesn’t stretch out over time the way acrylic can in a sunny window. Choose a firm, round-plied yarn so the stitch definition stays clear.
- Light cornflower blue: 250 g (about 850 m) per panel; 500 g (about 1,700 m) for a pair
These quantities include a margin of about 10% for your gauge swatch and blocking adjustments.
Tools:
– 2.75 mm (US C-2) crochet hook
– Tapestry needle
– Stitch markers (at least 4)
– Rust-proof pins and a blocking board or foam mats
– Measuring tape
– Spray bottle
– Curtain clip rings for hanging
Abbreviations (US Terms)
- ch – chain
- sl st – slip stitch
- sc – single crochet
- dc – double crochet
- tr – treble crochet
- sk – skip
- sp – space
- st(s) – stitch(es)
- tch – turning chain
- sc2tog / sc3tog – single crochet 2 / 3 together
Special stitches:
– V-st: (tr, ch 2, tr) in the same stitch or space.
– tr7tog (treble 7 together): *Yarn over twice, insert hook in next st, pull up a loop, (yarn over, pull through 2 loops) twice. Repeat from * 6 more times (8 loops on hook). Yarn over and pull through all 8 loops.
Gauge and Checkpoints
Base gauge: 24 dc and 10 rows = 4 in (10.2 cm) in plain dc rows. That is 6 dc per inch and 0.4 in (1.0 cm) per dc row.
Test one repeat first. Ch 39. Dc in the 4th ch from hook and in each ch across: 37 dc, counting the skipped ch as a dc. Then work one fan tier (Rows T1–T6 below) on these 37 sts. On a one-repeat swatch there are no V-sts: start each row with the edge stitch, work the fan section once, and end with the last edge stitch. Row T6 should give 37 dc again (1 + 6 groups of 6).
Block the swatch. It should measure 6.2 in (15.7 cm) wide, and the tier should be 3 in (7.6 cm) tall.
- Too big: go down to a 2.5 mm hook.
- Too small: go up to a 3.0 mm hook.
- Width right but tier too tall: tighten your chain arches; they are the usual reason a tier grows.
Checkpoints on the panel (lightly stretched flat):
– Row 1: 109 dc, 18.2 in (46.2 cm) wide
– End of header band: 2 in (5.1 cm) tall
– End of Tier 1: 5 in (12.7 cm)
– End of Tier 5: 17 in (43.2 cm)
– End of Tier 10: 32 in (81.3 cm)
– After the hem points: 36 in (91.4 cm)
Header Band
Foundation: Ch 111.
Row 1: Dc in the 4th ch from hook and in each ch across. Turn. (109 dc, counting the skipped 3 ch as 1 dc)
Rows 2–5: Ch 3 (counts as dc), dc in each dc across, dc in top of tch. Turn. (109 dc per row)
The header measures 2 in (5.1 cm) tall. Each row of the panel holds 3 pattern repeats of 36 sts, plus 1 edge stitch: 3 x 36 + 1 = 109.
Fan Tiers (Rows T1–T6, Work 10 Times)
In each repeat, the fan sits over the center 21 sts. Seven skipped sts on each side carry the chain arches. A V-st column marks the boundary between repeats, at sts 37 and 73.
Row T1 (fan opens): Ch 4 (counts as tr), ch 6, sk 7 dc, tr in next dc, (ch 2, sk 1 dc, tr in next dc) 10 times, ch 6, sk 7 dc, V-st in next dc. Repeat from * once more. Then ch 6, sk 7 dc, tr in next dc, (ch 2, sk 1, tr in next dc) 10 times, ch 6, sk 7 dc, tr in last dc. Turn.
(2 edge tr, 2 V-sts, 6 ch-6 arches, 33 fan tr, 30 ch-2 sps)
Check: 1 + 3 x (7 + 21 + 7) + 2 V-st sts + 1 = 109. The fans sit over sts 9–29, 45–65 and 81–101.
Row T2 (rays close): Ch 4 (counts as tr), ch 7, tr in next fan tr, (ch 1, tr in next tr) 10 times, ch 7, V-st in ch-2 sp of next V-st. Repeat from * once more. Then ch 7, tr in next fan tr, (ch 1, tr in next tr) 10 times, ch 7, tr in top of tch. Turn.
(2 edge tr, 2 V-sts, 6 ch-7 arches, 33 fan tr, 30 ch-1 sps)
Row T3 (solid fan): Ch 4, ch 8, tr in next tr, (tr in next ch-1 sp, tr in next tr) 10 times, ch 8, V-st in next V-st sp. Repeat from * once more. Then ch 8, work the 21-tr fan as before, ch 8, tr in top of tch. Turn.
(2 edge tr, 2 V-sts, 6 ch-8 arches, 63 fan tr — 21 per fan)
Row T4 (eyelet): Ch 4, ch 8, tr7tog over next 7 tr, ch 5, sk next 7 tr, tr7tog over next 7 tr, ch 8, V-st in next V-st sp. Repeat from * once more. Then ch 8, tr7tog, ch 5, sk 7 tr, tr7tog, ch 8, tr in top of tch. Turn.
(2 edge tr, 2 V-sts, 6 ch-8 arches, 6 clusters, 3 ch-5 eyelet sps)
The ch-5 under the 7 skipped tr forms the round eyelet at the base of each fan. The 21 rays gather into it, so the fan opens upward when the panel hangs.
Row T5 (mesh): Ch 3 (counts as dc), ch 5, sc in next ch-8 arch, ch 5, sc in top of next cluster, ch 5, sc in ch-5 eyelet sp, ch 5, sc in next cluster, ch 5, sc in next ch-8 arch, ch 5, dc in next V-st sp. Repeat from * once more. Work the third repeat the same way, but end with dc in top of tch instead of in a V-st sp. Turn.
(18 ch-5 loops, 15 sc, 4 dc — 6 loops per repeat)
Row T6 (new base): Ch 3 (counts as dc). 5 dc in next ch-5 loop, dc in next st (sc or dc). Repeat from * 17 more times. Turn.
(109 dc = 1 + 18 x 6)
This is a conversion row: the 109 sts come from 6 dc for each of the 18 loops, plus the starting ch-3. Each repeat is back to 36 sts, so the next tier lines up exactly.
Work Rows T1–T6 a total of 10 times. Each tier adds 3 in (7.6 cm), so 10 tiers add 30 in (76.2 cm). Check the 32 in (81.3 cm) checkpoint before you start the points.
Hem Points (Work 3 Times)
Each point is worked on its own 37 sts of the last T6 row. Neighboring points share a stitch: Point 1 uses sts 1–37, Point 2 uses sts 37–73, and Point 3 uses sts 73–109. Mark sts 37 and 73 before you begin.
Point 1, Row P1: Do not fasten off after the last T6 row; turn. Ch 4 (counts as tr), ch 6, sk 7 dc, tr in next dc, (ch 2, sk 1, tr in next dc) 10 times, ch 6, sk 7 dc, tr in st 37. Turn.
(2 edge tr, 2 ch-6, 11 fan tr, 10 ch-2)
Row P2: Sl st in next 3 ch, ch 1, sc in same ch-6 loop, ch 5, tr in first fan tr, (ch 1, tr in next tr) 10 times, ch 5, sc in last ch-6 loop. Turn.
(2 sc, 2 ch-5, 11 tr, 10 ch-1)
Row P3: Sl st in next 3 ch, ch 1, sc in same loop, ch 4, tr in first tr, (tr in ch-1 sp, tr in next tr) 10 times, ch 4, sc in last loop. Turn.
(2 sc, 2 ch-4, 21 tr)
Row P4: Sl st in next 2 ch, ch 1, sc in same loop, ch 4, tr7tog, ch 5, sk 7 tr, tr7tog, ch 4, sc in last loop. Turn.
(2 sc, 2 ch-4, 2 clusters, 1 ch-5 eyelet)
Row P5: Sl st in next 2 ch, ch 1, sc in same loop, ch 4, sc in cluster, ch 4, sc in eyelet sp, ch 4, sc in next cluster, ch 4, sc in last loop. Turn. (5 sc, 4 loops)
Row P6: Sl st in next 2 ch, ch 1, sc in same loop, (ch 4, sc in next loop) 3 times. Turn. (4 sc, 3 loops)
Row P7: As P6, but repeat the ( ) twice. Turn. (3 sc, 2 loops)
Row P8: As P6, but work the ( ) once. Turn. (2 sc, 1 loop)
Row P9 (tip): Sl st in next 2 ch, ch 1, (sc, ch 3, sc) in same loop. Fasten off. (2 sc, 1 ch-3 tip)
Points 2 and 3: With the same side facing as for Point 1’s Row P1, join the yarn with a sl st in the marked shared stitch (st 37 for Point 2, st 73 for Point 3). Work Rows P1–P9 over that point’s 37 sts.
Each point is 6.2 in (15.7 cm) wide at its base and 4 in (10.2 cm) deep. The panel now measures 18.2 in x 36 in (46.2 cm x 91.4 cm).
Border
Border gauge: 6 sc per inch along the top, which matches the stitches. Along the sides, work 2 sc per dc row-end and 3 sc per tr row-end. Along the hem slopes, work 3 sc per row-end step.
Round 1: With the right side facing, join the yarn at the top right corner (the far end of the foundation chain).
– Top: 3 sc in the first foundation ch, sc in each of the next 107 ch, 3 sc in the last ch. Top side = 113 sc, including both corner groups.
– Left side: Header band 5 dc rows x 2 = 10 sc. Each tier is 4 tr rows x 3 + 2 dc rows x 2 = 16 sc, so 10 tiers = 160 sc. Side = 170 sc; no corners are included, since they were counted with the top.
– Hem, each point: 3 sc at the P1 row-end, 3 sc at each of the P2–P8 row-ends (21 sc), so 24 sc down the slope. Then (sc, ch 3, sc) in the tip ch-3 sp, and 24 sc up the other slope.
– Valleys: Work the last sc of one slope and the first sc of the next slope together as sc2tog.
– Hem total: 3 x 50 − 2 = 148 sc, plus 3 ch-3 tips.
– Right side: 170 sc, as for the left side.
Sl st to the first sc. Round 1 = 113 + 170 + 148 + 170 = 601 sc.
Round 2: Ch 1, then sc in each sc around, with these changes:
– At each top corner, work 3 sc in the center sc. Top = 117 sc.
– At each tip, work (sc, ch 3, sc) in the ch-3 sp.
– At each valley, sc3tog over the valley stitch and the stitches on each side of it.
Each side = 170 sc. Hem = 148 + 6 − 4 = 150 sc. Sl st to the first sc and fasten off.
Round 2 = 117 + 170 + 150 + 170 = 607 sc.
Why the math works:
– Top: one sc per foundation chain keeps the width at 18.2 in (46.2 cm) with no ruffling.
– Sides: a dc is about as tall as 2 sc and a tr about 3 sc, so the side edges lie flat.
– Points: the extra sc at the corners and tips let the edge turn sharply, and the decreases at the valleys keep each V crisp instead of rounded.
– Size: 2 rounds add 0.25 in (0.6 cm) on every edge. The finished size is 18.7 in x 36.5 in (47.5 cm x 92.7 cm).
Final Blocking
- Weave in all ends along tr posts or the border, never across open mesh.
- Soak the panel in cool water for 15 minutes, then press the water out. Do not wring.
- Roll the panel in a towel to remove the excess water.
- Lay it flat on the blocking mats and pin the top edge straight at 18.7 in (47.5 cm).
- Pin both sides straight down to the base of the points, 32.5 in (82.6 cm) from the top including the border.
- Pin each tip so the panel measures 36.5 in (92.7 cm) from the top to the tips.
- Open each fan: pin through the eyelets and spread the rays evenly.
- Let it dry completely, ideally for 24 hours.
Final Quality-Control Checklist
- 109 sts in every T6 row and in the header rows
- 10 complete tiers, with all fans stacked in straight columns
- Every eyelet open and round
- All three points the same depth, 4 in (10.2 cm)
- Border counts: 601 sc in Round 1 and 607 sc in Round 2
- Top edge straight with no waves
- Sides the same length, with no flare
- Finished size 18.7 in x 36.5 in (47.5 cm x 92.7 cm)
- For a pair: both panels match within 0.25 in (0.6 cm)
Troubleshooting
- Fans drift out of their columns: recount the T6 groups. Every loop takes exactly 5 dc followed by 1 dc in the next stitch.
- Panel narrows as you go: your chain arches are too tight. Loosen the chains, or go up a hook size for the arch chains only.
- Side edges ripple: use 2 sc per dc row-end and 3 per tr row-end. Don’t add extras.
- Eyelets close up: make sure you skip all 7 center tr in Rows T4 and P4.
- Points look blunt: check the (sc, ch 3, sc) at each tip, and re-pin the tips when blocking.
- Tiers taller than 3 in (7.6 cm): tighten the tr stitches by pulling the first yarn-over snug.
Care
Hand wash cool or machine wash on a gentle cycle in a laundry bag, then reshape and dry flat. Re-block if the points lose their shape. Cotton can fade in strong sun, so rotate the pair from time to time.
Final Notes
The measurement chain is simple:
– 24 dc = 4 in, so each 36-st repeat is 6 in (15.2 cm).
– 109 sts = 18.2 in (46.2 cm) wide.
– The 2-in (5.1 cm) header plus 10 tiers of 3 in (7.6 cm) = 32 in (81.3 cm).
– The 4-in (10.2 cm) points bring the length to 36 in (91.4 cm).
– The 0.25-in (0.6 cm) border gives a finished panel of 18.7 in x 36.5 in (47.5 cm x 92.7 cm).
Check your gauge at the start and confirm the counts at each checkpoint, and your fans will line up all the way down. Make a second panel for the matching pair.
Happy crocheting!