

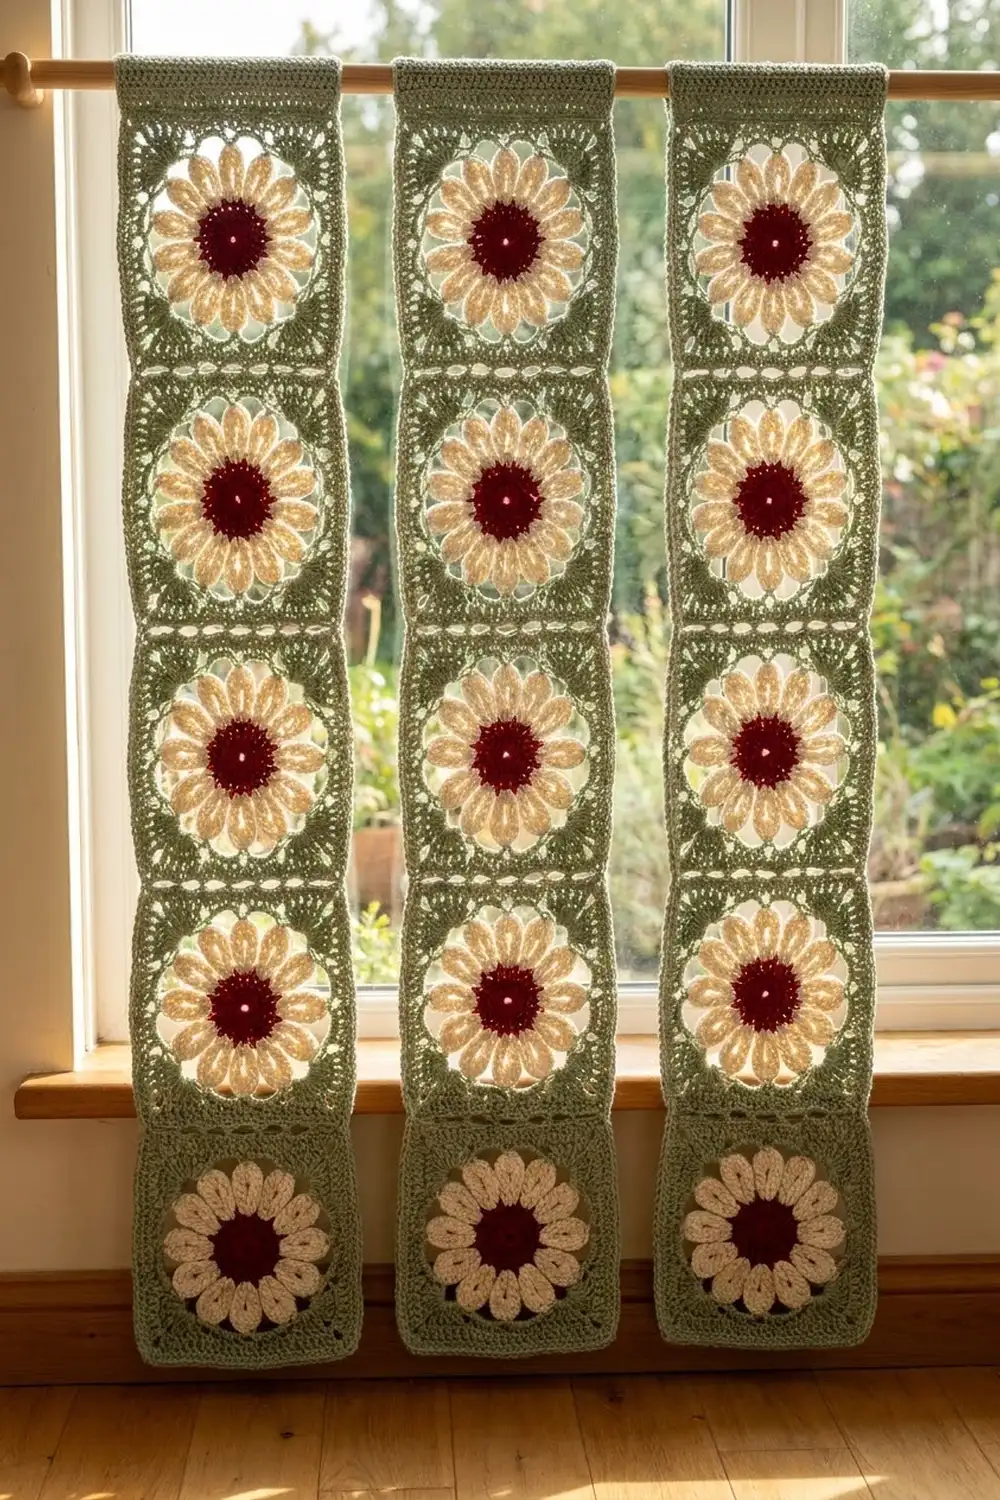
This curtain is built from bright daisy squares stacked into tall, narrow strips. Each square has a deep red center, a ring of twelve cream petals, and sage green corners that turn the round flower into a square. Small open gaps between the petals and the green framing let light through, so the strips glow in a sunny window.
The palette is simple: red, cream, and sage green. The style is cottage-meets-vintage, with a lacy look but a sturdy, flat fabric that hangs straight.
All instructions use US crochet terms. Each finished strip measures 7 in (17.8 cm) wide and 61 in (154.9 cm) long after the border and blocking. The curtain shown is three separate strips hung side by side.
You work 30 identical squares in the round and join them into three columns of 10 with a flat slip-stitch seam. Then you add a two-round green border to each strip. Final blocking evens out every square.
Finished Size and Construction
- Finished strip size: 7 in x 61 in (17.8 cm x 154.9 cm)
- Skill level: Intermediate
- Terminology: US crochet terms
- Yarn weight: DK (light worsted, #3), cotton or cotton blend
- Hook: 4.0 mm (US G-6)
- Number of pieces: 30 squares (3 strips of 10)
- Layout: 3 separate strips, each 1 square wide x 10 squares tall
- Single square size: 6 in x 6 in (15.2 cm x 15.2 cm)
- Strip size before border: 6 in x 60 in (15.2 cm x 152.4 cm)
- Border depth: 0.5 in (1.3 cm) on every side
Materials
Choose a smooth DK cotton. Cotton holds the petal shapes, blocks crisply, and doesn’t stretch much when it hangs. A skein of about 50 g / 125 m (137 yd) is typical for this weight.
- Red (center): 100 g, approximately 250 m (273 yd)
- Cream (petals): 150 g, approximately 375 m (410 yd)
- Sage green (corners, joining, border): 350 g, approximately 875 m (957 yd)
These quantities include a margin of roughly 20 to 25 percent over the calculated use. Gauge differences or a few frogged rounds will not leave you short.
Tools:
- 4.0 mm (US G-6) crochet hook
- Tapestry needle
- Stitch markers (at least 4)
- Scissors and tape measure
- Blocking mats, rustproof pins, and a spray bottle
- Curtain rod with clip rings (about 4 clips per strip)
Abbreviations (US Terms)
- ch – chain
- sl st – slip stitch
- sc – single crochet
- hdc – half double crochet
- dc – double crochet
- tr – treble crochet
- sp – space
- st(s) – stitch(es)
- BLO – back loop only
- RS – right side
Special stitch – standing dc: With a slip knot on the hook, yarn over, insert the hook into the indicated space, and complete a dc as usual. This starts a round without a turning chain.
Petal tip: On each petal, the chain you skip when you work “sc in 2nd ch from hook” stays at the outer end of the petal. That skipped chain is the petal tip used in Round 5.
Gauge and Checkpoints
Make one complete square and block it before starting the rest. The square is your gauge swatch.
- After Round 3 (red): center measures about 2 in (5.1 cm) across.
- After Round 4 (cream): flower measures about 5 in (12.7 cm) from petal tip to petal tip.
- After Round 7 (green): square measures 6 in x 6 in (15.2 cm x 15.2 cm) after blocking.
- Edge gauge: 29 sts per side = 6 in (15.2 cm).
If your square is larger than 6.25 in (15.9 cm), go down to a 3.75 mm hook. If it is smaller than 5.75 in (14.6 cm), go up to a 4.5 mm hook. Change the hook, not the stitch counts, because the joining and border math depend on exactly 29 stitches per side.
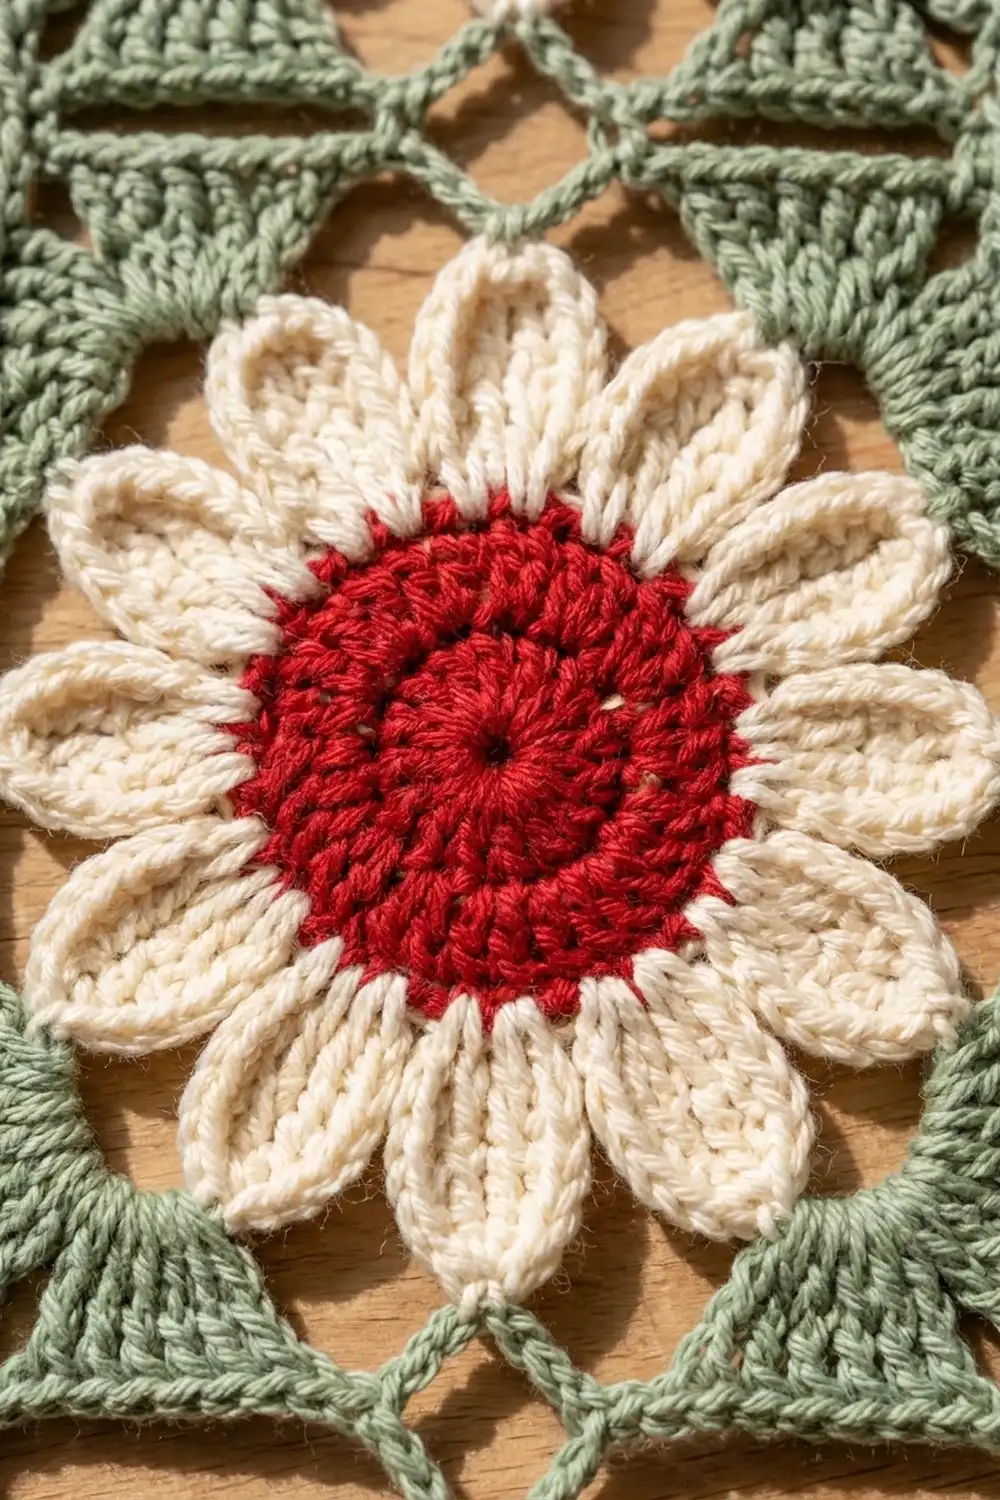
Daisy Square (Make 30)
Red Center
Round 1: With red, make a magic ring. Ch 3 (counts as dc), 11 dc in ring. Join with sl st to top of ch-3. Pull ring closed. (12 dc)
Round 2: Ch 3 (counts as dc), dc in same st, 2 dc in each st around. Join with sl st to top of ch-3. (24 dc)
Round 3: Ch 3 (counts as dc), 2 dc in next st, dc in next st, 2 dc in next st; repeat from * around. Join with sl st to top of ch-3. (36 dc)
Fasten off red. The center should lie flat and measure about 2 in (5.1 cm).
Cream Petals
Round 4: Join cream with sc in any st of Round 3. Ch 7, sc in 2nd ch from hook, hdc in next ch, dc in next 3 ch, hdc in next ch (petal made), skip next 2 sts of Round 3, sc in next st; repeat from * 10 more times. Work the 12th petal the same way, skip the last 2 sts, and join with sl st to the first sc. (12 petals, 12 base sc)
Each repeat uses 3 sts of Round 3 (1 base sc plus 2 skipped), so 12 x 3 = 36 sts, matching Round 3 exactly. Each petal is narrow at the tip, widest across the dc stitches, and slightly narrower at the base, which gives it a soft oval shape. Fasten off cream.
Green Corners
Place a marker on 4 petals, with 2 unmarked petals between each marked one. The marked petals sit at the middle of each side of the finished square.
Round 5: Join green with sc in the tip of any marked petal. Ch 6, sc in tip of next petal, ch 12, sc in tip of next petal, ch 6, sc in tip of next (marked) petal; repeat from * 3 more times, omitting the final sc on the last repeat. Join with sl st to first sc. (12 sc, 8 ch-6 sps, 4 ch-12 sps)
The ch-12 loops arc outward toward the four corners. The triangular gaps between the petal edges and these chains form the open lacy windows of the square.
Round 6: Ch 1, sc in same st. 5 sc in next ch-6 sp, sc in next sc, (4 dc, 3 tr, ch 3, 3 tr, 4 dc) in next ch-12 sp, sc in next sc, 5 sc in next ch-6 sp, sc in next sc; repeat from * 3 more times, omitting the final sc on the last repeat. Join with sl st to first sc. (108 sts, 4 ch-3 corner sps)
Each repeat has 5 + 1 + 14 + 1 + 5 + 1 = 27 sts, and 27 x 4 = 108. The 14 stitches packed into each ch-12 loop push the corner outward and build the solid green triangle. Between corner spaces, each side reads: 3 tr, 4 dc, 1 sc, 5 sc, 1 sc, 5 sc, 1 sc, 4 dc, 3 tr = 27 sts. Fasten off.
Round 7: Join green with standing dc in any ch-3 corner sp, ch 2, dc in same sp (corner made). Sc in next 3 tr, hdc in next 4 dc, hdc in next sc, dc in next 5 sc, dc in next sc, dc in next 5 sc, hdc in next sc, hdc in next 4 dc, sc in next 3 tr, (dc, ch 2, dc) in next corner sp; repeat from * 3 more times, omitting the last corner on the final repeat. Join with sl st to top of standing dc. (116 sts, 4 ch-2 corner sps)
This is a squaring round. Short stitches go over the tall corner stitches, and taller stitches go over the low sc near the side centers, so the outer edge comes out straight.
Per side: 27 sts worked 1-per-stitch + 2 corner dc = 29 sts. Those 29 stitches include both corner stitches of that side. Each corner holds 2 dc and each dc belongs to one side only, so 29 x 4 = 116 total. Fasten off and weave in all ends.
Checkpoint: Pin the square to 6 in x 6 in (15.2 cm x 15.2 cm), mist it, and let it dry before comparing it with your gauge targets.
Make All Pieces
Make 30 identical squares: 30 red centers (Rounds 1 to 3), 30 cream petal rounds (Round 4), and 30 green corner sets (Rounds 5 to 7). Each strip uses 10 squares. Lay them out before joining:
Strip A   Strip B   Strip C
[ 1 ]     [ 1 ]     [ 1 ]
[ 2 ]     [ 2 ]     [ 2 ]
[ 3 ]     [ 3 ]     [ 3 ]
[ 4 ]     [ 4 ]     [ 4 ]
[ 5 ]     [ 5 ]     [ 5 ]
[ 6 ]     [ 6 ]     [ 6 ]
[ 7 ]     [ 7 ]     [ 7 ]
[ 8 ]     [ 8 ]     [ 8 ]
[ 9 ]     [ 9 ]     [ 9 ]
[10 ]     [10 ]     [10 ]
The strips are not joined to each other. They hang separately, with a small gap of light between them.
Joining
Join each strip with a flat slip-stitch seam in green, worked through the back loops only. This seam lies almost flush on the RS and keeps the openwork look.
- Place square 1 above square 2, RS facing up, with the bottom edge of square 1 against the top edge of square 2.
- Join green with sl st through both matching corner ch-2 sps.
- Work 1 sl st through the BLO of each matching pair of stitches: 29 sl sts, one for each stitch on the side.
- Finish with 1 sl st through the next pair of matching corner ch-2 sps. (31 sl sts per seam)
- Fasten off and repeat down the column until all 10 squares are joined. (9 seams per strip)
Stitch-to-stitch logic: Each side has exactly 29 sts, so stitch 1 of the upper square always meets stitch 1 of the lower square. If you have a stitch left over at the end, you skipped or doubled one. Pull back and redo the seam.
Tension: Keep the slip stitches as loose as the square’s own stitches. A tight seam puckers and shortens the strip. If needed, use a 4.5 mm hook for the seams only.
Checkpoint: The joined strip should measure 6 in x 60 in (15.2 cm x 152.4 cm) laid flat without stretching.
Border
Work the border on each strip separately, in green. Border gauge matches the square edge: 29 sc = 6 in (15.2 cm).
The starting count per side is the number of squares on that side multiplied by 29:
- Short sides (top and bottom): 1 x 29 = 29 sts
- Long sides: 10 x 29 = 290 sts
At every seam, the joining slip stitches have already closed the two corner ch-2 sps. Do not work into them, so no stitches are added at seams.
Border Round 1: With RS facing, join green with sc in any outer corner ch-2 sp of the strip, ch 2, sc in same sp. Sc in each st across to next outer corner, skipping the closed seam spaces, (sc, ch 2, sc) in corner sp; repeat around, omitting the last corner. Join with sl st to first sc.
- Short sides: 29 sc worked 1-per-stitch + 2 corner sc = 31 sts
- Long sides: 290 sc worked 1-per-stitch + 2 corner sc = 292 sts
- Total: 646 sts, plus 4 ch-2 corner sps
Border Round 2: Sl st into corner ch-2 sp. Ch 2 (does not count as a st), (hdc, ch 2, hdc) in same sp. Hdc in each st across to next corner, (hdc, ch 2, hdc) in corner sp; repeat around, omitting the last corner. Join with sl st to first hdc. Fasten off.
- Short sides: 31 hdc worked 1-per-stitch + 2 corner hdc = 33 sts
- Long sides: 292 hdc worked 1-per-stitch + 2 corner hdc = 294 sts
- Total: 654 sts, plus 4 ch-2 corner sps
Why the math works: Working one border stitch into each edge stitch matches the edge gauge, so the border neither ruffles nor draws in. The only added stitches are 2 per side per round, at the corners, which lets the fabric turn 90 degrees and stay flat. Round 1 adds about 0.2 in (0.5 cm) and Round 2 about 0.3 in (0.8 cm), for a border depth of 0.5 in (1.3 cm). The strip grows from 6 in to 7 in (15.2 cm to 17.8 cm) wide and from 60 in to 61 in (152.4 cm to 154.9 cm) long.
Final Blocking
- Weave in every remaining end through stitches of the same color.
- Lay one strip RS up on blocking mats or towels.
- Pin the four outer corners to 7 in x 61 in (17.8 cm x 154.9 cm).
- Pin each seam line straight, checking that every square is 6 in (15.2 cm) tall between seams.
- Open each petal so it lies flat and points straight out from the center.
- Mist evenly until damp, not dripping.
- Let it dry completely, usually 12 to 24 hours, before unpinning.
- Repeat for the other two strips.
Final Quality-Control Checklist
- Every square has 12 petals and 29 sts on each side.
- Every red center lies flat.
- Each strip measures 6 in x 60 in (15.2 cm x 152.4 cm) before the border.
- All 9 seams per strip have 31 sl sts and lie flat.
- Border Round 1: 31 sts per short side, 292 sts per long side.
- Border Round 2: 33 sts per short side, 294 sts per long side.
- Each finished strip measures 7 in x 61 in (17.8 cm x 154.9 cm).
- All three strips are within 0.5 in (1.3 cm) of each other in length.
- No ends are visible on the RS.
Troubleshooting
Red center ruffles: Recount Round 3 for 36 dc, then try a smaller hook.
Petals twist: Work the petal chain loosely and block with the petals pinned open.
Square is not square: Check Round 6 for 14 sts in each ch-12 loop and Round 7 for the short-to-tall stitch sequence.
Seam puckers: Redo the seam more loosely or with a larger hook.
Border ruffles: You probably worked into seam spaces. Recount each long side for 292 sts.
Strips hang at different lengths: Re-block the odd strip to 61 in (154.9 cm), pinning each square to 6 in (15.2 cm).
Care
Hand wash in cool water with mild detergent, roll in a towel to remove the water, and dry flat, pinned to size if needed. Never hang the strips while wet, because cotton can stretch under its own weight.
Final Notes
The measurement chain is simple. A 2 in (5.1 cm) red center grows into a 5 in (12.7 cm) daisy, and the green rounds square it off at 6 in (15.2 cm) with 29 stitches per side. Ten squares join into a 6 in x 60 in (15.2 cm x 152.4 cm) strip, and a 0.5 in (1.3 cm) border brings each strip to 7 in x 61 in (17.8 cm x 154.9 cm). Hang the three strips side by side and let the sunlight do the rest.
Happy crocheting!