

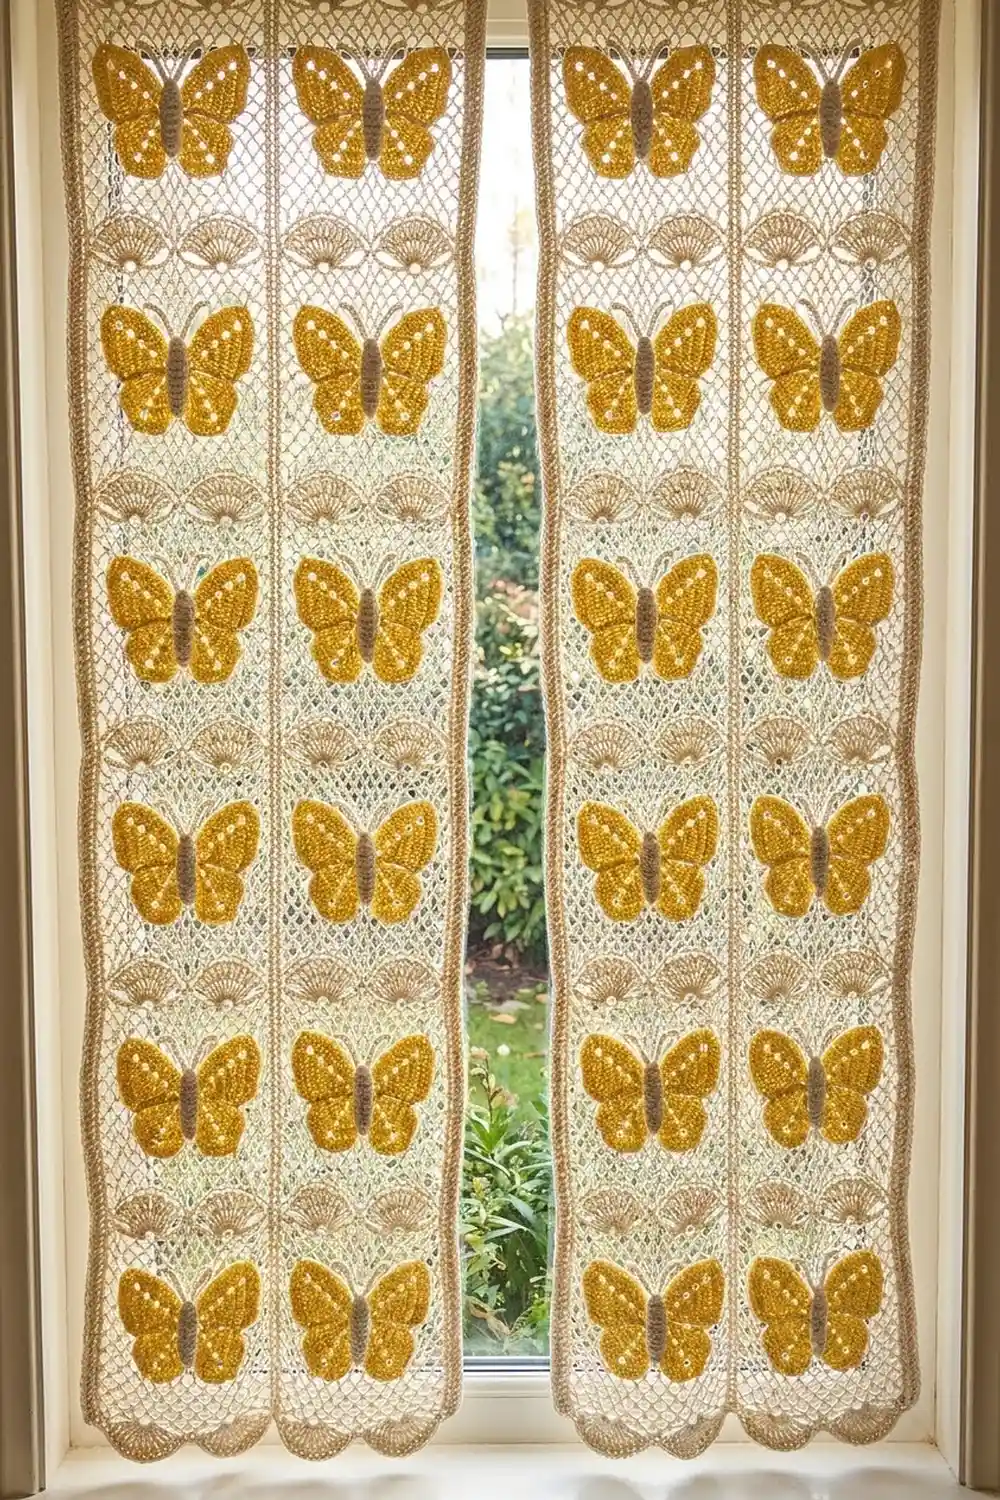
The Buttercup Flutter curtain panel is a sheer, airy lace panel made from two long cream strips joined side by side. Each strip has a rope-like rail on both edges, a diamond chain net in the center, and a pair of fan shells between motifs. A butter-yellow butterfly is sewn over every net window.
The palette is soft and simple: ivory cream for the lace and butter yellow for the wings. Each butterfly has a raised cream body and two curled antennae. Light passes through the net around the wings, so the panel looks best in a sunny window.
This pattern uses US crochet terms. One finished panel measures 15.5 in (39.4 cm) wide and 68 in (172.7 cm) long after blocking. To make a pair like the one shown, make two panels.
You crochet two strips from the bottom up in rows and make 22 butterflies. Sew one butterfly into each window, join the strips with a slip stitch seam, and finish with a two-round shell border.
Finished Size and Construction
- Finished panel size: 15.5 in x 68 in (39.4 cm x 172.7 cm)
- Skill level: Intermediate
- Terminology: US crochet terms
- Yarn weight: DK / light worsted (#3) mercerized cotton
- Hook: 3.5 mm (E-4)
- Pieces per panel: 2 lace strips + 22 butterflies (each butterfly = 4 wings + 1 body)
- Layout: 2 strips side by side, with 11 butterflies stacked in each strip
- Strip size: 7 in x 66.5 in (17.8 cm x 168.9 cm)
- Size before border: 14 in x 66.5 in (35.6 cm x 168.9 cm)
- Border depth: 0.75 in (1.9 cm) on every side
Materials
Choose a smooth mercerized cotton in DK weight. Cotton keeps the fan shells crisp, blocks flat, and stretches very little while hanging. Avoid fuzzy yarns because they blur the net.
Yarn per panel (quantities include a margin of about 15%):
- Cream (Color A): 450 g, about 1,035 m (strips, bodies, border)
- Butter yellow (Color B): 200 g, about 460 m (wings)
For a pair of panels, double both amounts.
Tools:
- 3.5 mm (E-4) crochet hook
- Tapestry needle
- Locking stitch markers
- Rust-proof pins and a large blocking surface
- Spray bottle
- Measuring tape
Abbreviations (US Terms)
- ch – chain
- sl st – slip stitch
- sc – single crochet
- dc – double crochet
- sk – skip
- sp(s) – space(s)
- st(s) – stitch(es)
- rep – repeat
- RS / WS – right side / wrong side
Special stitch – Fan: 9 dc worked into the same stitch.
Turning chain: On the strip, ch 3 at the start of a row always counts as the first dc. “Last 2 sts” means the last dc and the top of the turning chain.
Gauge and Checkpoints
Gauge is 20 dc = 4 in (10.2 cm) in a dc row. The strip is 35 dc = 7 in (17.8 cm) wide. One 13-row repeat (Rows 2–14) is 6 in (15.2 cm) tall after blocking.
Test one piece of each kind first. Make one butterfly and work Rows 1–14 of a strip. Block both pieces, then check:
- Strip test piece: 7 in (17.8 cm) wide x 6.5 in (16.5 cm) tall
- Upper wing: 2 in (5.1 cm) from ring to edge
- Lower wing: 1.5 in (3.8 cm) from ring to edge
- Body: 2.5 in (6.4 cm) long
- Assembled butterfly: 4.5 in (11.4 cm) wide x 4 in (10.2 cm) tall
If the strip is too wide, go down one hook size. If it is too narrow, go up one size. If the width is right but the repeat is taller than 6 in (15.2 cm), work the ch-5 loops more firmly. The butterfly must fit inside the 6.2 in (15.7 cm) net window between the rails.
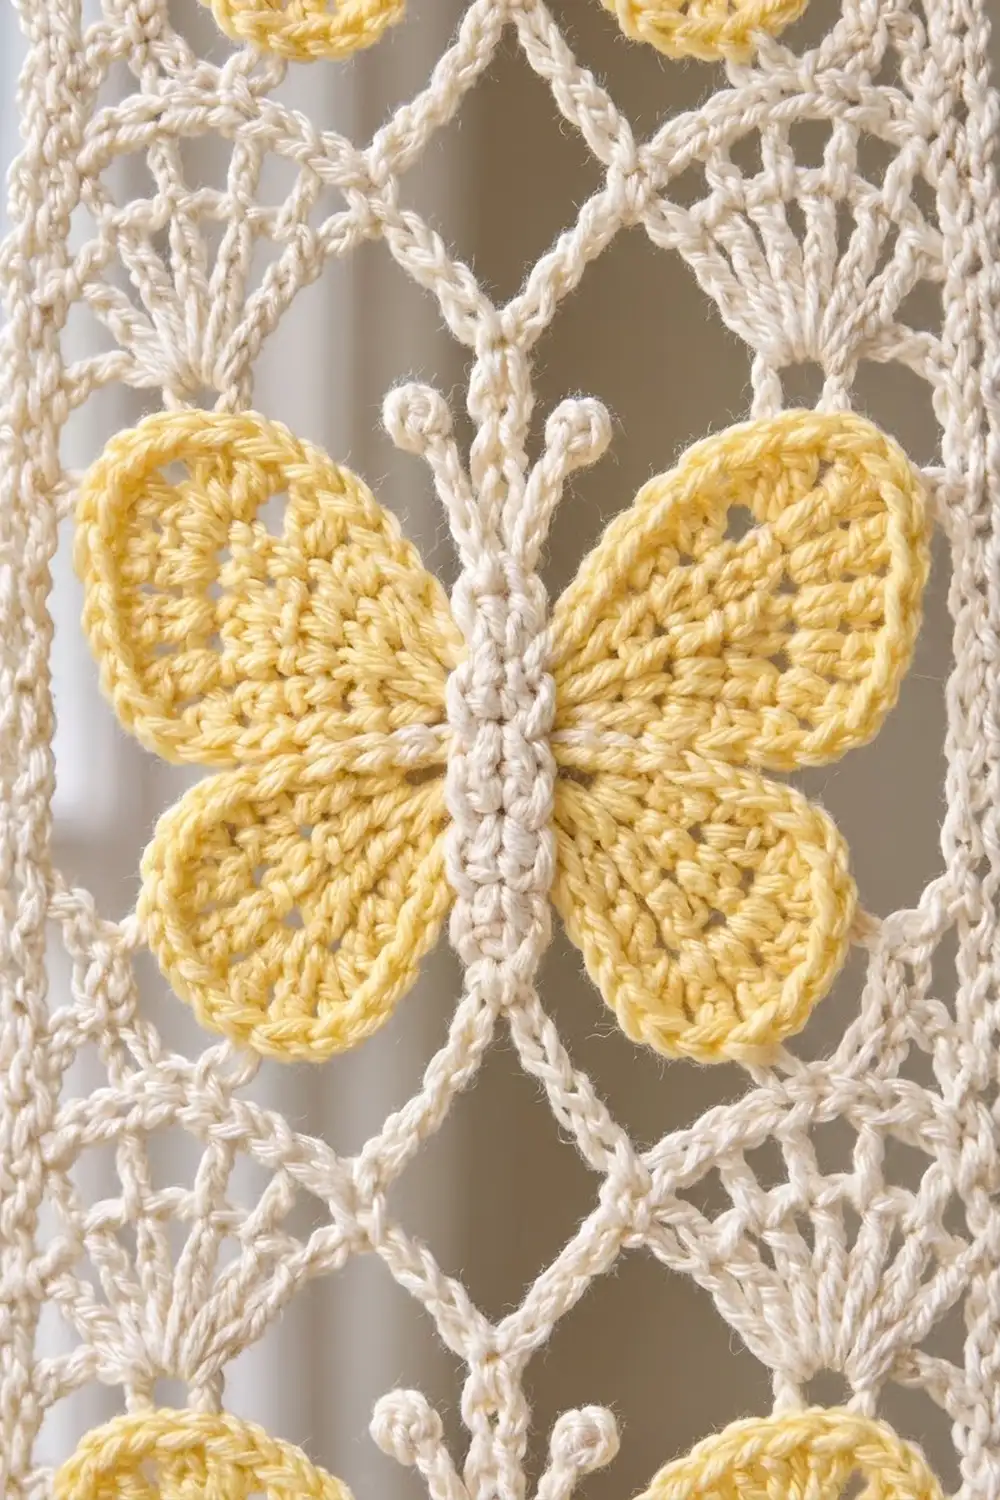
Lace Strip (Make 2)
With Color A, ch 37.
Row 1 (RS): Dc in 4th ch from hook (the skipped ch count as the first dc) and in each ch across. Turn. (35 dc)
Row 2 (fan row): Ch 3, dc in next dc (rail). Sk next 3 dc, Fan in next dc, ch 5, sk next 6 dc, sc in next dc, ch 5, sk next 4 dc, sc in next dc, ch 5, sk next 4 dc, sc in next dc, ch 5, sk next 6 dc, Fan in next dc, sk next 3 dc, dc in last 2 sts. Turn. (4 rail dc, 2 Fans = 18 dc, 3 sc, 4 ch-5 sps)
Check: the Fans sit in sts 6 and 30, and the sc are in sts 13, 18 and 23. Positions are counted from the start of the row, so the row is symmetrical.
Row 3: Ch 3, dc in next dc. [Dc in next dc, ch 1] 8 times, dc in next dc (opened Fan). Ch 2, sk first ch-5 sp, sc in next ch-5 sp, ch 5, sc in next ch-5 sp, ch 2, sk last ch-5 sp. Rep from * to * once. Dc in last 2 sts. Turn. (4 rail dc, 18 Fan dc, 16 ch-1 sps, 2 sc, 2 ch-2 sps, 1 ch-5 sp)
The ch-2, ch-5, ch-2 path between the Fans forms the pointed chain arch.
Row 4 (net setup): Ch 3, dc in next dc, ch 5, sc in 3rd ch-1 sp of first Fan, ch 5, sc in 7th ch-1 sp of same Fan, ch 5, sc in center ch-5 sp, ch 5, sc in 2nd ch-1 sp of next Fan, ch 5, sc in 6th ch-1 sp of same Fan, ch 5, dc in last 2 sts. Turn. (4 dc, 5 sc, 6 ch-5 loops)
The Fan tops stay as scallops below the new loops.
Row 5 (net row A): Ch 3, dc in next dc, ch 3, sc in first ch-5 loop, [ch 5, sc in next ch-5 loop] 5 times, ch 3, dc in last 2 sts. Turn. (4 dc, 6 sc, 5 ch-5 loops, 2 ch-3 sps)
Row 6 (net row B): Ch 3, dc in next dc, ch 5, sk ch-3 sp, sc in next ch-5 loop, [ch 5, sc in next ch-5 loop] 4 times, ch 5, sk ch-3 sp, dc in last 2 sts. Turn. (4 dc, 5 sc, 6 ch-5 loops)
Rows 7–12: Rep Rows 5–6 three times.
Row 13: Rep Row 5. (4 dc, 6 sc, 5 ch-5 loops, 2 ch-3 sps)
Rows 4–13 form the diamond net window, which is about 4.4 in (11.2 cm) tall.
Row 14 (closing row): Ch 3, dc in next dc, 3 dc in ch-3 sp, [sk sc, 5 dc in next ch-5 loop] 5 times, sk sc, 3 dc in ch-3 sp, dc in last 2 sts. Turn. (2 + 3 + 25 + 3 + 2 = 35 dc)
Row 14 brings the count back to the full 35 sts, so the next Row 2 lines up exactly.
Rows 15–144: Rep Rows 2–14 ten more times, for 11 repeats in total.
Checkpoint: Row 1 plus 3 repeats measures about 18.5 in (47.0 cm). The finished strip has 144 rows and measures 7 in x 66.5 in (17.8 cm x 168.9 cm) after blocking. Fasten off and weave in the ends.
Butterfly (Make 22)
Upper Wing (make 2 per butterfly)
With Color B, make a magic ring.
Row 1: Ch 3 (counts as dc), 6 dc in ring. Pull the ring closed but not tight, so it leaves a small eyelet. Turn. (7 dc)
Row 2: Ch 3, dc in same st, 2 dc in each dc across. Turn. (14 dc)
Row 3: Ch 3, [2 dc in next st, dc in next st] 6 times, 2 dc in last st. Turn. (1 + 18 + 2 = 21 dc)
Row 4: Ch 3, dc in next st, [2 dc in next st, dc in next 2 sts] 6 times, 2 dc in last st. Turn. (2 + 24 + 2 = 28 dc)
Edging: Ch 1, sc in each dc across. (28 sc) Fasten off and leave a 10 in (25.4 cm) tail.
The wing is a rounded fan that measures 2 in (5.1 cm) from ring to edge.
Lower Wing (make 2 per butterfly)
Work Rows 1–3 of the Upper Wing (21 dc). Edging: Ch 1, sc in each dc across. (21 sc) Fasten off and leave a long tail. The wing measures 1.5 in (3.8 cm).
Body (make 1 per butterfly)
With Color A, ch 11.
Rnd 1: Sc in 2nd ch from hook, sc in next 8 ch, 3 sc in last ch. Working along the underside of the chain, sc in next 8 ch, 2 sc in last ch (the one holding the first sc). Join with sl st to first sc. (1 + 8 + 3 + 8 + 2 = 22 sc)
Rnd 2: Sl st in each sc around. (22 sl sts) This round gives the body its raised, ridged texture.
Antennae: At one narrow end (the head), ch 10. Sl st in 4th ch from hook to make a knob, sl st in each of next 6 ch, then sl st into the head. Rep once more. Fasten off and leave a long tail. Each antenna measures about 1.25 in (3.2 cm).
Assemble the Butterfly
Place the upper wings with their eyelet points touching at the center, angled up and out. Place the lower wings below them with the points also at the center, angled down and out, slightly overlapping the upper wings. Sew the points together. Center the body on top so it covers all four points, then sew it down along both long edges. The butterfly measures 4.5 in x 4 in (11.4 cm x 10.2 cm).
Make All Pieces
Per panel:
- Color A: 2 lace strips and 22 bodies
- Color B: 44 upper wings and 44 lower wings
Sew one butterfly into each net window (Rows 4–13 of every repeat). Center it between the rails with the body vertical and the head at the top. Tack the body through the net, and add one small tack at the outer edge of each wing.
Layout grid (one panel, top of curtain first):
Strip 1 | Strip 2
  B11   |   B11
  B10   |   B10
  B9    |   B9
  B8    |   B8
  B7    |   B7
  B6    |   B6
  B5    |   B5
  B4    |   B4
  B3    |   B3
  B2    |   B2
  B1    |   B1
Joining
Place the two strips RS together with Row 1 at the bottom, so the fan bands line up.
With Color A, work a slip stitch seam along one long edge, inserting the hook through the rails of both strips at once. Work 2 sl sts in each row end and match row to row. The seam has 144 x 2 = 288 sl sts.
Keep your tension relaxed, because a tight seam puckers and shortens the panel. Every 2 repeats, open the panel flat and check that the fan bands are level.
Checkpoint: the joined panel measures 14 in x 66.5 in (35.6 cm x 168.9 cm), with 70 sts along the top and 70 along the bottom.
Border
Border gauge: on the long sides, Rnd 1 has 2 sc per row end. On the short sides it has 1 sc per st. Rnd 1 adds 0.25 in (0.6 cm), and Rnd 2 adds 0.5 in (1.3 cm).
Rnd 1 (RS): Join Color A at the top right corner. Work across the top (Row 144 of both strips) as follows: 2 sc in first st, sc in next 68 sts, 2 sc in last st (70 sts worked + 2 added = 72 sc), then ch 2 for the corner. Down the long side: 2 sc in each row end (144 x 2 = 288 sc), ch 2. Across the bottom, working into the foundation chain: 2 sc in first st, sc in next 68 sts, 2 sc in last st (72 sc), ch 2. Up the second long side: 288 sc, ch 2. Join to first sc. (720 sc: 72 per short side and 288 per long side, plus 4 corner ch-2 sps)
The corner ch-2 sps are not counted in any side, so no corner stitch is counted twice.
Rnd 2 (shells): Ch 1. On each side, work [sc in next sc, sk 2 sc, 5 dc in next sc, sk 2 sc] across. This gives 72 / 6 = 12 shells on each short side and 288 / 6 = 48 shells on each long side. In each corner ch-2 sp, work (2 dc, ch 2, 2 dc). Join to first sc. (120 shells, 120 sc, 4 corner groups)
Why the math works: each shell repeat uses exactly 6 sts. The 2 sts added to each short side bring 70 up to 72, which is a multiple of 6. The long sides have 288 sts, which is already a multiple of 6, so every side ends cleanly at its corner.
Final size: 14 + 0.75 + 0.75 = 15.5 in (39.4 cm) wide, and 66.5 + 0.75 + 0.75 = 68 in (172.7 cm) long. Fasten off and weave in all ends.
Final Blocking
- Lay the panel flat with the RS up. Work in sections if needed.
- Pin the long edges straight and 15.5 in (39.4 cm) apart, checking every 6 in (15.2 cm).
- Pin each fan band level, then gently open each net window so the diamonds are even.
- Round the butterfly wings with your fingers.
- Pin the shells along the bottom edge into points.
- Spray until damp, not soaked.
- Let the panel dry fully, unpin it, and confirm it measures 15.5 in x 68 in (39.4 cm x 172.7 cm).
Final Quality-Control Checklist
- Each strip has 144 rows and 11 repeats.
- Every Row 14 has 35 dc.
- Every B row has 6 loops, and every A row has 5 loops plus 2 half loops.
- All 22 butterflies are centered with heads up and tacked down.
- The fan bands line up across the seam.
- Border Rnd 1 has 72 sc per short side and 288 sc per long side.
- Border Rnd 2 has 12 shells per short side and 48 per long side.
- All ends are woven into rails or solid stitches.
Troubleshooting
- Net window bulges: the ch-5 loops are too loose. Work them more firmly.
- Strip leans: make sure every row starts and ends with exactly 2 rail dc.
- Row 14 count is off: recount Row 13. It should have 5 ch-5 loops plus 2 ch-3 sps.
- Butterfly too wide for the window: make the wings with a hook one size smaller.
- Seam puckers: remove it and rejoin with a larger hook.
- Border ripples: keep exactly 2 sc per row end on the long sides.
Care
Hand wash in cool water with mild soap, roll the panel in a towel, and dry it flat, pinning again if needed. Never hang the panel while it is wet, because cotton lace stretches lengthwise.
Final Notes
Here is the measurement chain. At gauge, a 35-st strip is 7 in (17.8 cm) wide, and each repeat adds 6 in (15.2 cm). Row 1 plus 11 repeats makes a 66.5 in (168.9 cm) strip. Two joined strips measure 14 in x 66.5 in (35.6 cm x 168.9 cm). The 0.75 in (1.9 cm) border brings the panel to 15.5 in x 68 in (39.4 cm x 172.7 cm). Check each stage and the panel will hang straight.
Happy crocheting!