

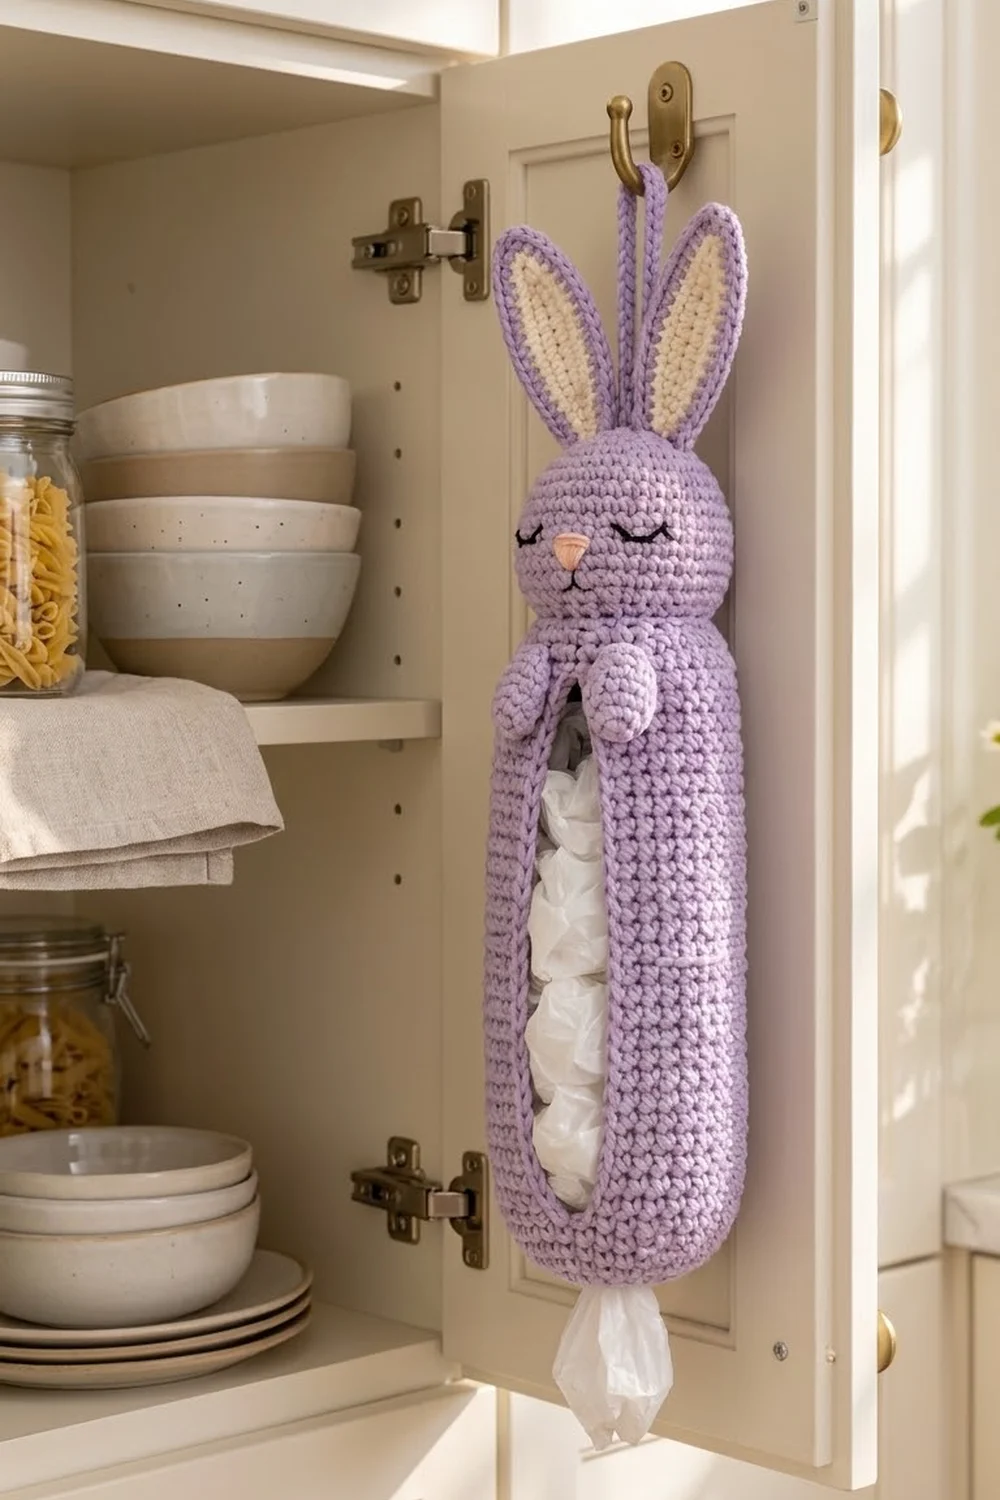
This sleepy bunny keeps your plastic bags tidy and makes a cabinet door look a lot friendlier. She is a tall, soft tube with a long oval window down the front so you can see the bags inside. A small hole at the bottom lets you pull out one bag at a time.
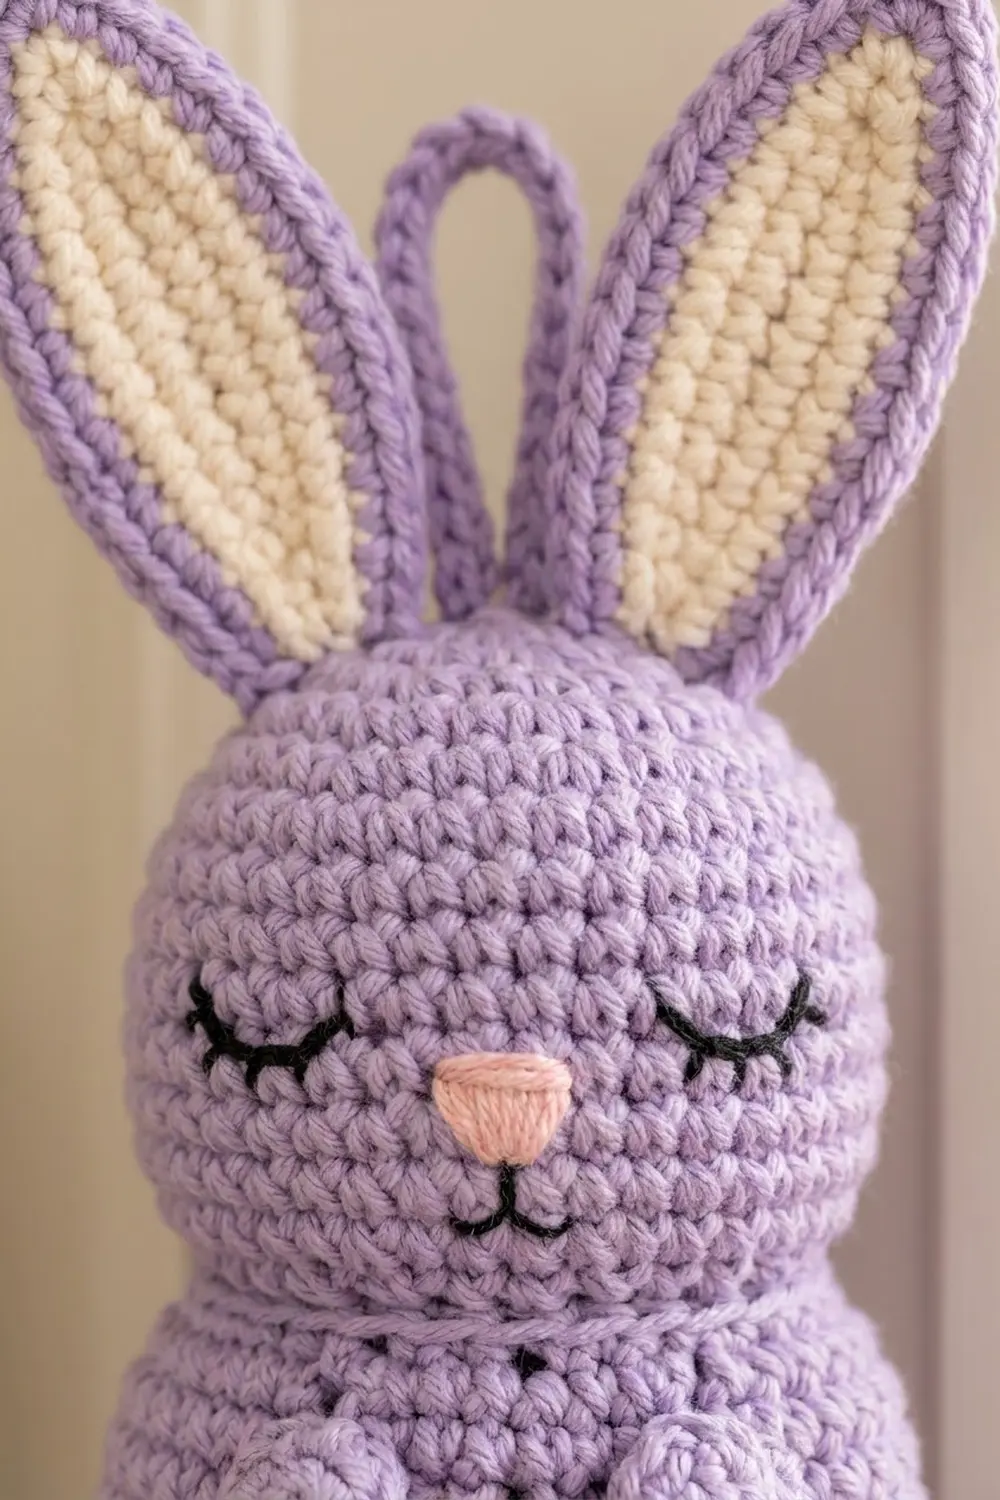
The main color is soft lavender. The ears have cream inner panels with a lavender rim. The face has closed, lashed eyes and a small mouth in black, plus a pink nose. Two little paws rest at the top corners of the opening, and a loop between the ears hangs her on a hook. Butter yellow also works well as the main color.
The pattern uses US crochet terms. The finished holder is about 20 in (50.8 cm) tall, not counting the hanging loop, and the body is about 3.75 in (9.5 cm) across.
You work the body from the bottom up. It starts with a flat base worked around a chain ring, which leaves the dispensing hole. Then you work joined rounds, switch to turned rows to make the front opening, and close the top of the opening with a chain bridge. The head, ears, paws and loop are made separately and sewn on.
Finished Size and Construction
- Finished size: about 20 in (50.8 cm) tall, 3.75 in (9.5 cm) in diameter
- Skill level: Easy to intermediate
- Terminology: US crochet terms
- Yarn weight: Worsted (#4), cotton or cotton blend
- Hook: 4.0 mm (US G-6)
- Number of pieces: 1 finished holder, made from 6 parts (body, head, head base disc, 2 ears, 2 paws) plus a hanging loop
- Layout: Single vertical holder; head on top, opening centered on the front
- Body size: 12 in (30.5 cm) around, 13.6 in (34.5 cm) tall
- Opening before border: 1.5 in (3.8 cm) wide x 10 in (25.4 cm) tall
- Border depth: about 0.25 in (0.6 cm), 2 rounds
Materials
Choose a smooth worsted cotton or cotton blend at about 85 m per 50 g. Cotton keeps its shape when the holder is full.
- Lavender (main color): 160 g, about 272 m
- Cream (inner ears): 10 g, about 17 m
- Black (eyes, lashes, mouth): 1 g, about 2 m (yarn or embroidery floss)
- Pink (nose): 1 g, about 1 m (yarn or embroidery floss)
All quantities include a small safety margin.
Tools:
- 4.0 mm (US G-6) crochet hook
- Locking stitch markers
- Tapestry needle and a sharp embroidery needle
- Polyester fiberfill, about 20 g
- Scissors
- Rustproof pins and a towel for blocking
Abbreviations (US Terms)
- ch – chain
- sl st – slip stitch
- sc – single crochet
- hdc – half double crochet
- dc – double crochet
- inc – 2 sc in the same stitch
- dec – single crochet decrease (invisible decrease recommended)
- BLO – back loop only
- MR – magic ring
- st(s) – stitch(es)
- sp – space
Special stitch – invisible decrease: Insert the hook in the front loop of the next st, then in the front loop of the following st. Yarn over and pull through both front loops, then yarn over and pull through the 2 loops on the hook.
Gauge and Checkpoints
Gauge: 16 sc and 18 rounds = 4 in (10.2 cm).
Test your gauge on the body base first (Rounds 1–6). It should measure 3.75 in (9.5 cm) across. If it does, keep going: the base is the start of your body.
Checkpoints:
- After Round 6: base is 3.75 in (9.5 cm) across.
- After Row 57: body is 11.3 in (28.7 cm) tall from the base edge.
- After Round 63: body is 12.7 in (32.3 cm) tall.
- After Round 67: body is 13.6 in (34.5 cm) tall.
- Head after Round 16: about 3.75 in (9.5 cm) across.
Too big: try a 3.75 mm (US F-5) hook. Too small: try a 4.5 mm (US 7) hook. Keep the fabric firm so the stuffing doesn’t show through.
Body
Join every body round: start with ch 1 (it does not count as a st) and end with a sl st to the first sc.
Base
Ch 18 and sl st to the first ch to form a ring, without twisting the chain. This ring becomes the dispensing hole, about 1.5 in (3.8 cm) across.
- Round 1: Ch 1, sc in each ch around, join. (18)
- Round 2: (Sc 2, inc) 6 times. (24)
- Round 3: (Sc 3, inc) 6 times. (30)
- Round 4: (Sc 4, inc) 6 times. (36)
- Round 5: (Sc 5, inc) 6 times. (42)
- Round 6: (Sc 6, inc) 6 times. (48)
Check: the base is flat and 3.75 in (9.5 cm) across.
Lower tube
- Round 7: Ch 1, sc in the BLO of each st around, join. (48)
- Rounds 8–12: Sc in each st around. (48)
Front opening (worked in rows)
- Row 13: Ch 1, sc in the next 42 sts and leave the last 6 sts unworked. (42) Ch 1, turn.
- Rows 14–57: Sc in each st across. (42) Ch 1 and turn at the end of every row except Row 57.
That makes 45 rows, about 10 in (25.4 cm). The 6 skipped sts form the bottom of the opening, and Row 57 ends on the same side as Row 13.
Check: the body is 11.3 in (28.7 cm) tall from the base edge.
Closing the opening
- Round 58: Ch 6, then sl st to the first sc of Row 57 to bridge the gap. Ch 1, sc in each of the 42 sc, then sc in each of the 6 ch, join. (42 + 6 = 48)
- Rounds 59–63: Sc in each st around. (48)
Check: 12.7 in (32.3 cm) tall.
Top shaping
- Round 64: (Sc 6, dec) 6 times. (42)
- Round 65: (Sc 5, dec) 6 times. (36)
- Round 66: (Sc 4, dec) 6 times. (30)
- Round 67: (Sc 3, dec) 6 times. (24)
Fasten off and leave a 24 in (61.0 cm) tail. Check: 13.6 in (34.5 cm) tall.
Head
Work in a continuous spiral and mark the first st of each round.
- Round 1: 6 sc in MR. (6)
- Round 2: Inc in each st. (12)
- Round 3: (Sc 1, inc) 6 times. (18)
- Round 4: (Sc 2, inc) 6 times. (24)
- Round 5: (Sc 3, inc) 6 times. (30)
- Round 6: (Sc 4, inc) 6 times. (36)
- Round 7: (Sc 5, inc) 6 times. (42)
- Round 8: (Sc 6, inc) 6 times. (48)
- Rounds 9–16: Sc in each st around. (48)
- Round 17: (Sc 6, dec) 6 times. (42)
- Round 18: (Sc 5, dec) 6 times. (36)
- Round 19: (Sc 4, dec) 6 times. (30)
- Round 20: (Sc 3, dec) 6 times. (24)
Don’t fasten off yet. Embroider the face now, while you can still reach inside.
Face: At the center front, between Rounds 12 and 13, use black to stitch two downward-curving closed eyes. Make each eye about 0.5 in (1.3 cm) wide and leave 4 sts between them. Add 3 short lashes under the outer half of each eye. With pink, stitch a small triangle nose over 2 sts, one round lower and centered. Use black to add a tiny “w” mouth under the nose.
Head base disc (lavender):
- Round 1: 6 sc in MR. (6)
- Round 2: Inc in each st. (12)
- Round 3: (Sc 1, inc) 6 times. (18)
- Round 4: (Sc 2, inc) 6 times. (24)
Fasten off.
- Head Round 21 (joining): Stuff the head firmly. Hold the disc over the opening, wrong sides together. Sc through each st of head Round 20 and the matching st of disc Round 4, topping up the stuffing before you close. (24) Fasten off.
Ears (make 2)
Inner ear (cream): Ch 13.
- Round 1: Starting in the 2nd ch from the hook: sc 2, hdc 3, dc 4, hdc 2. In the last ch, work (hdc, ch 2, hdc). Continue along the other side of the chain: hdc 2, dc 4, hdc 3, sc 2. Join to the first sc. (24 sts + ch-2 sp) Fasten off.
Rim (lavender):
- Round 2: Join in the first sc at the base. Ch 1, 2 sc in the first sc, sc in the next 10 sts, sc in the hdc, (sc, ch 2, sc) in the ch-2 sp, sc in the hdc, sc in the next 10 sts, 2 sc in the last sc. Join. (24 + 2 base inc + 2 in sp = 28 sc + ch-2 sp, 14 sc per side)
- Round 3: Ch 1, sc in the next 14 sts, (sc, ch 2, sc) in the ch-2 sp, sc in the next 14 sts. Join. (28 + 2 = 30 sc + ch-2 sp)
Fasten off and leave a 12 in (30.5 cm) tail. Each ear measures about 3.75 in (9.5 cm) long and 1.75 in (4.4 cm) wide, with a pointed tip and a narrow base.
Paws (make 2)
- Round 1: 6 sc in MR. (6)
- Round 2: Inc in each st. (12)
- Rounds 3–6: Sc in each st around. (12)
Stuff lightly and flatten. Sc through both layers to close. (6) Leave a 10 in (25.4 cm) tail. Each paw is about 1.25 in (3.2 cm) long.
Hanging Loop
Ch 36.
- Row 1: Sc in the 2nd ch from the hook and in each ch across. (35)
Fasten off and leave a 10 in (25.4 cm) tail. The strip is about 8.75 in (22.2 cm) long. Folded in half, it makes a loop about 4 in (10.2 cm) high.
Border: Opening Edge
Work the border before you sew on the paws.
Border gauge: The sides of the opening are row ends. At 16 sts and 18 rows per 4 in (10.2 cm), you need 8 sc for every 9 row ends. Each side has 45 row ends: 45 x 8 / 9 = 40 sc.
- Round 1: Join lavender in the first of the 6 unworked sts at the bottom of the opening. Ch 1, then work:
- Bottom: 1 sc in each of the 6 unworked sts. (6)
- First side: 40 sc along the 45 row ends, skipping every 9th row end. (40)
- Top: 1 sc in the free loop of each of the 6 bridge chains. (6)
- Second side: 40 sc along the 45 row ends, skipping every 9th row end. (40)
- Join. (6 + 40 + 6 + 40 = 92)
- Round 2: Sl st loosely in each st around. (92) Fasten off.
Why the math works: 40 sc at 4 sts per inch is 10 in (25.4 cm), and 45 rows at 4.5 rows per inch is also 10 in (25.4 cm). Because the lengths match, the edge lies flat without rippling or pulling. The top and bottom are worked 1 sc per st, so they stay 1.5 in (3.8 cm) wide.
The finished frame is about 0.25 in (0.6 cm) deep. When empty, the opening looks about 1 in (2.5 cm) wide and 9.5 in (24.1 cm) long. It stretches open when the holder is full.
Assembly
- Head to body: Set the head on the body’s open top with the face centered over the opening. With the body tail, whipstitch the 24 sts of body Round 67 to the 24 sts of head Round 21, one stitch to one stitch. Go around twice.
- Ears: Pinch each ear base in half lengthwise. Sew the ears to the top of the head over Rounds 4–6, about 6 sts apart, cream sides facing forward.
- Loop: Fold the strip in half and sew both ends to the center top of the head, between the ears. Stitch through several times, because this point carries all the weight.
- Paws: Sew one paw on each side of the top of the opening, over Rounds 58–60, just under the head. The rounded ends should overlap the border slightly.
Weave in all ends.
Final Blocking
- Lightly mist the holder with water.
- Fill the body with a rolled towel to make an even tube 3.75 in (9.5 cm) across.
- Pin the ears flat and shape each tip to a point, with the ears 3.75 in (9.5 cm) long.
- Smooth the border so both sides run straight and parallel.
- Let it dry completely, then remove the towel and pins.
Final Quality-Control Checklist
- Base is flat, 3.75 in (9.5 cm) across, with a round 1.5 in (3.8 cm) hole.
- Body is 13.6 in (34.5 cm) tall and 12 in (30.5 cm) around.
- Opening is centered under the face and 10 in (25.4 cm) tall before the border.
- Border Round 1 has 92 sts: 6 + 40 + 6 + 40.
- Ears match, cream panels face forward, and the face is level.
- The head and loop hold firm when pulled.
Troubleshooting
- Base cups or ruffles: Change the hook size and check that each round has 6 evenly spaced increases.
- Opening slants: A stitch was lost or added. Count 42 sts in every row.
- Border ripples: You worked too many sc. Skip every 9th row end so each side has 40.
- Head tilts forward: Add stuffing at the back of the head and reinforce the joint.
- Bags slip out the bottom: Bunch the bags loosely instead of folding them flat, so each one catches on the hole.
Care
Spot clean with mild soap and cool water, then lay flat to dry. Don’t machine dry, because the stuffed head may lose its shape.
Final Notes
Each measurement depends on the one before it. A 16-sc gauge gives a 48-st base 3.75 in (9.5 cm) across and a 12 in (30.5 cm) tube. Forty-five rows of 42 sts make a 10 in (25.4 cm) opening, the 6-ch bridge brings the count back to 48 sts, and decreasing to 24 sts matches the head’s 24-st base. Check each stage and your bunny will hang straight.
Happy crocheting!