

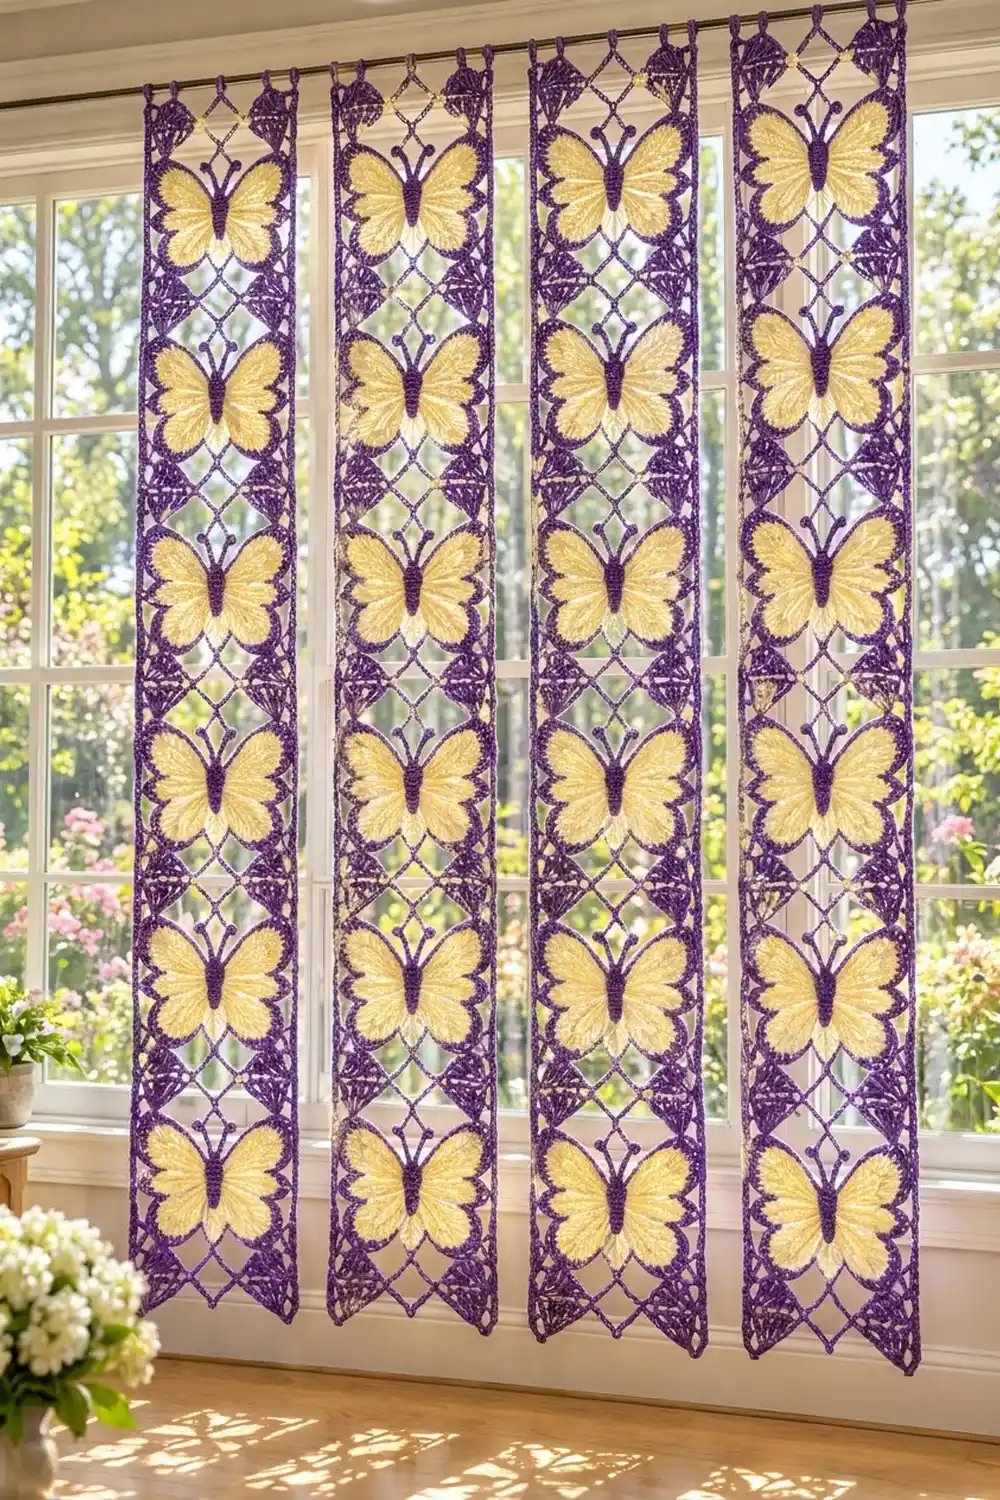
The Lavender Flutter Curtain is a set of four lacy strip panels. Each one is a column of butterfly blocks that ends in a soft point. When sunlight comes through, the lattice casts diamond shadows on the floor.
Each block has a butter-yellow butterfly with ridged, fanned wings, a corded purple outline, and a raised purple body with bobble-tipped antennae. A purple frame of chain-loop diamonds and corner fans turns the butterfly into a neat rectangle. The palette is just two colors, violet and pale yellow, so it looks fresh and a little vintage.
This pattern uses US crochet terms. Each finished strip measures about 6.5 x 51.5 in (16.5 x 130.8 cm), not counting the hanging tabs. Hung side by side, four strips cover about 26 in (66.0 cm) of rod, plus any gaps you leave between them.
Here’s how it’s built. You crochet the butterfly in rounds, sew on its body, and then work a frame in rounds around it until it becomes a 6 x 8 in (15.2 x 20.3 cm) rectangle. Six blocks join into a strip. Decreasing rows make the point, and a two-round border with hanging tabs finishes the panel.
Finished Size and Construction
- Finished strip size: 6.5 x 51.5 in (16.5 x 130.8 cm), not counting the tabs
- Skill level: Intermediate
- Terminology: US
- Yarn weight: #1 super fine (fingering) mercerized cotton
- Hook: 2.5 mm
- Number of pieces: 24 blocks (6 per strip), plus 4 tips worked onto the strips
- Layout: 4 separate strips, each 1 block wide x 6 blocks long
- Block size: 6 x 8 in (15.2 x 20.3 cm), with 36 x 48 sc around the edge
- Strip size before border: 6 x 51 in (15.2 x 129.5 cm), which is 48 in (121.9 cm) of blocks plus a 3 in (7.6 cm) tip
- Border depth: 0.25 in (0.6 cm) per side
Materials
Use a smooth mercerized cotton in fingering weight, about 170 m per 50 g. It gives crisp stitch definition, keeps the fans and lattice sharp, and holds up well in sunlight.
- Pale yellow (wings): 100 g, about 340 m
- Violet purple (outline, body, frame, tips, border): 250 g, about 850 m
Both amounts include a safety margin of roughly 15–20 percent. One block uses about 3 g of yellow and 7 g of purple.
Tools:
– 2.5 mm crochet hook
– Tapestry needle
– Stitch markers
– Scissors
– Blocking mats, rust-proof pins, and a spray bottle
– Ruler or tape measure
– Curtain rod up to 0.75 in (1.9 cm) in diameter
Abbreviations (US Terms)
- ch – chain
- sl st – slip stitch
- sc – single crochet
- hdc – half double crochet
- dc – double crochet
- tr – treble crochet
- dc3tog / dc4tog – double crochet 3 (or 4) together
- rev sc – reverse single crochet (crab stitch)
- st(s) – stitch(es)
- sp – space
- RS – right side
Bobble: (yo, insert hook in st, pull up a loop, yo, pull through 2 loops) 4 times in the same st, then yo and pull through all 5 loops on the hook.
Rev sc: Work sc from left to right, inserting the hook in the next st to the right. This makes the beaded, corded edge.
Gauge and Checkpoints
Gauge: 6 sc = 1 in (2.5 cm); 10 dc rows = 3 in (7.6 cm).
Make one full block before you start the rest, and check it at each stage:
- After Butterfly Rnd 5: about 4 in (10.2 cm) wide x 3.75 in (9.5 cm) tall
- After Frame Rnd 3: about 5.75 x 7.75 in (14.6 x 19.7 cm)
- After Frame Rnd 4: 6 x 8 in (15.2 x 20.3 cm), lightly blocked
If your block is too big, go down to a 2.25 mm hook. If it’s too small, go up to a 2.75 mm hook. Keep the long chain loops at the same tension as your stitches, because tight chains make the corners curl.
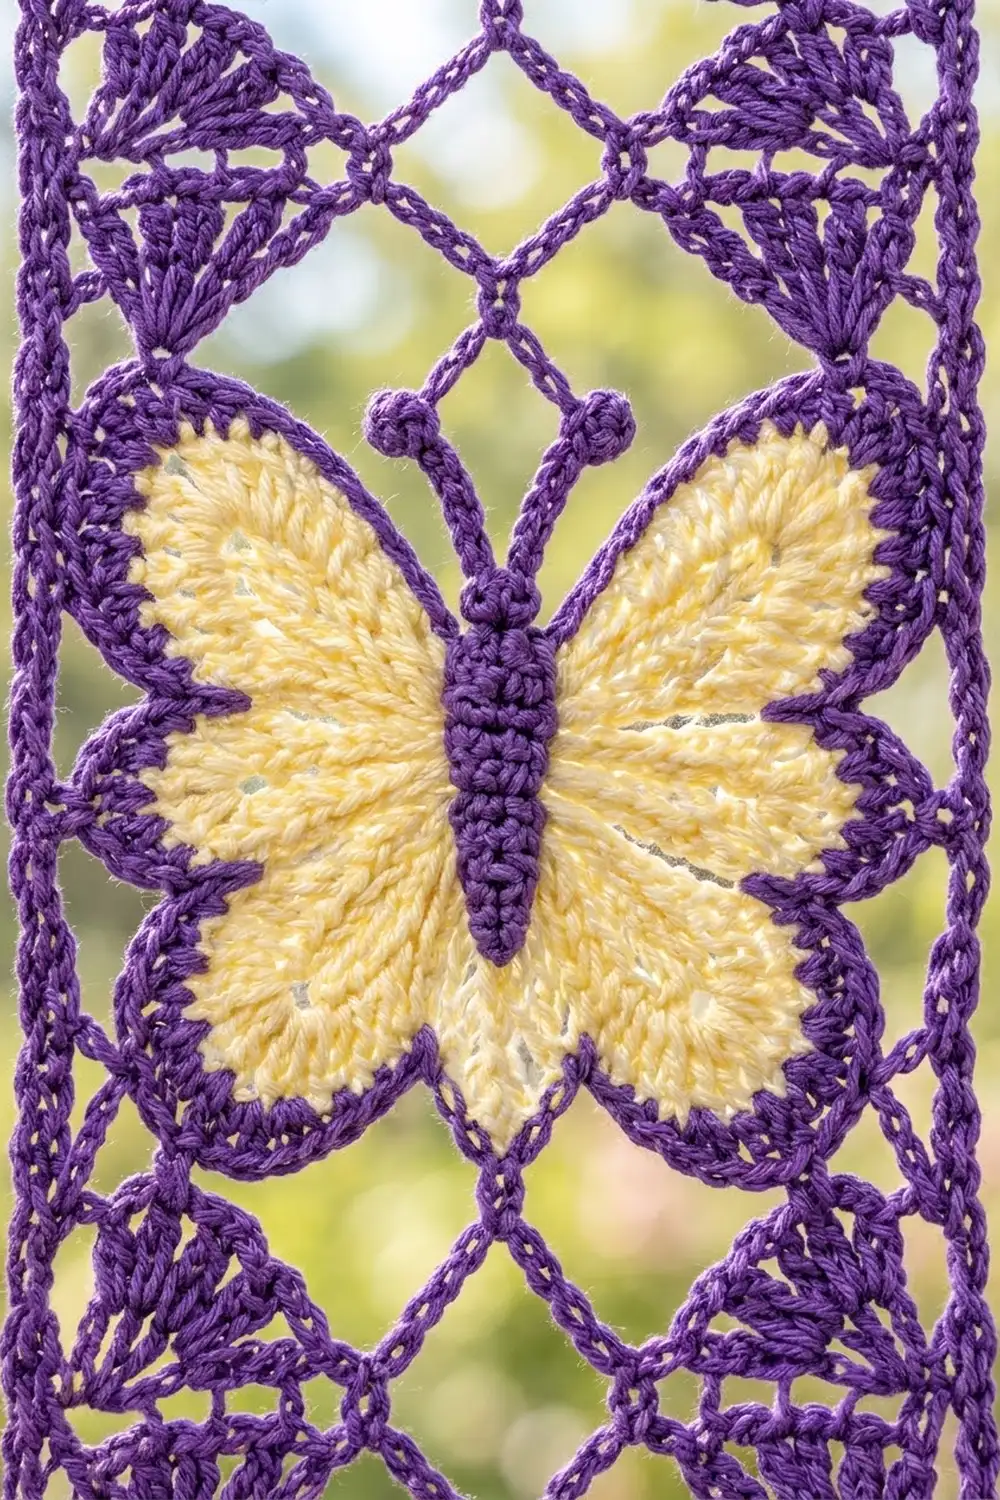
Butterfly Wings (make 24)
Use yellow. The wings are made as one piece. The “top” st is where the head will sit.
Rnd 1: Magic ring, ch 3 (counts as dc), 15 dc in ring, join to top of ch-3. (16 dc)
Rnd 2: Sl st in same st as join (top). 2 tr in each of next 4 sts (upper wing), sc in next st (notch), 3 dc in each of next 2 sts (lower wing), sl st in next st (bottom), 3 dc in each of next 2 sts (lower wing), sc in next st (notch), 2 tr in each of next 4 sts (upper wing). Join to first sl st. (32 sts: 8 tr per upper wing, 6 dc per lower wing, 2 sc, 2 sl st)
Rnd 3: Sl st in top st. 2 tr in each of next 8 tr, sc in sc, 2 dc in each of next 6 dc, sl st in bottom st, 2 dc in each of next 6 dc, sc in sc, 2 tr in each of next 8 tr. Join. (60 sts: 16 tr per upper wing, 12 dc per lower wing, 2 sc, 2 sl st)
Fasten off yellow. The doubled tall stitches make the ridged ray texture.
Rnd 4: Join purple in top st. Sl st in top st, (sc in next st, 2 sc in next st) 8 times, sl st in notch, (sc, 2 sc) 6 times, sl st in bottom st, (sc, 2 sc) 6 times, sl st in notch, (sc, 2 sc) 8 times. Join. (88 sts: 24 sc per upper wing, 18 sc per lower wing, 4 sl st)
Rnd 5: Ch 1, rev sc in each st around, join. (88 rev sc) Fasten off.
Body and Antennae (make 24)
Use purple.
Body: Ch 15. Sc in 2nd ch from hook, hdc in next 2 ch, dc in next 8 ch, hdc in next 2 ch, 5 sc in last ch (head). Now work along the opposite side of the chain: hdc in next 2 ch, dc in next 8 ch, hdc in next 2 ch, 4 sc in the same ch as the first sc. Join. (34 sts)
Antennae: Sl st to the 2nd sc of the 5-sc head group. Ch 7, bobble in 3rd ch from hook, sl st in each of next 4 ch. Sl st in the 4th sc of the head group and repeat from * to * once. Fasten off, leaving a 12 in (30.5 cm) tail.
Sew the body down the center of the wings, with the head at the top notch and the tail just past the bottom notch.
Lattice Frame (on each butterfly)
Use purple and work around Butterfly Rnd 5. Count stitches starting from the top st (st 1).
Frame Rnd 1: Join purple with sc in top st. Ch 9, skip 10 sts, sc in next st 7 times, ch 9, join to first sc. (8 sc, 8 ch-9 loops)
The sc anchors land on sts 1, 12, 23, 34, 45, 56, 67, and 78. Sts 12, 34, 56, and 78 are on the wing tips that point toward the corners.
Frame Rnd 2: Sl st in next 5 ch, ch 1, sc in same loop. Then ch 13, sc in next loop; ch 15, sc in next loop; ch 13, sc in next loop; ch 11, sc in next loop; ch 13, sc in next loop; ch 15, sc in next loop; ch 13, sc in next loop; ch 11, join to first sc. (8 sc; 4 ch-13 corner loops, 2 ch-15 side loops, 2 ch-11 top/bottom loops)
These loops cross the Rnd 1 loops to make the diamond lattice. Tack each antenna bobble to the nearest chain of the top ch-11 loop.
Frame Rnd 3 (squaring round):
– Ch 3 (counts as dc).
– In the first corner loop: sc, 2 hdc, 3 dc, 3 tr, ch 2, 3 tr, 4 dc, 3 hdc, 3 sc.
– Hdc in next sc, 18 hdc in side loop, hdc in next sc.
– In the next corner loop: 3 sc, 3 hdc, 4 dc, 3 tr, ch 2, 3 tr, 3 dc, 2 hdc, sc.
– Dc in next sc; in bottom loop work 2 hdc, 10 dc, 2 hdc; dc in next sc.
– In the next corner loop: sc, 2 hdc, 3 dc, 3 tr, ch 2, 3 tr, 4 dc, 3 hdc, 3 sc.
– Hdc in next sc, 18 hdc in side loop, hdc in next sc.
– In the last corner loop: 3 sc, 3 hdc, 4 dc, 3 tr, ch 2, 3 tr, 3 dc, 2 hdc, sc.
– Dc in next sc; in top loop work 2 hdc, 10 dc, 2 hdc. Join to top of ch-3.
(160 sts + 4 ch-2 corner sps. Each short side has 34: 9 + 1 + 14 + 1 + 9. Each long side has 46: 13 + 1 + 18 + 1 + 13.)
The trebles in each corner form the fan clusters.
Frame Rnd 4: Ch 1, sc in each st, working (sc, ch 2, sc) in each corner sp. Join. (168 sc + 4 ch-2 sps. Short sides: 34 + 2 = 36. Long sides: 46 + 2 = 48. Each count includes its 2 corner sc.) Fasten off.
Make All Pieces
Make 24 complete blocks, which means 24 yellow wing pieces, 24 purple bodies with antennae, and 24 purple frames. Block each one to 6 x 8 in (15.2 x 20.3 cm) before joining.
The layout is four separate strips that are never joined to each other. Every block sits with the antennae toward the top.
Strip 1   Strip 2   Strip 3   Strip 4
[ B1 ]    [ B1 ]    [ B1 ]    [ B1 ]
[ B2 ]    [ B2 ]    [ B2 ]    [ B2 ]
[ B3 ]    [ B3 ]    [ B3 ]    [ B3 ]
[ B4 ]    [ B4 ]    [ B4 ]    [ B4 ]
[ B5 ]    [ B5 ]    [ B5 ]    [ B5 ]
[ B6 ]    [ B6 ]    [ B6 ]    [ B6 ]
  \/        \/        \/        \/
Joining
Join the blocks along their 36-st short edges with purple.
- Hold two blocks RS together, with the bottom edge of the upper block against the top edge of the lower block.
- Sl st through both corner ch-2 sps.
- Sl st through both loops of each pair of sts, from corner sc to corner sc. (36 sl sts)
- Sl st through the last pair of corner sps and fasten off.
Every stitch is matched one to one, so the seam adds and skips nothing. Keep your sl sts as loose as the sc so the seam doesn’t pucker. Join six blocks for each strip.
Checkpoint: Each joined strip measures 6 x 48 in (15.2 x 121.9 cm).
Pointed Tip
Work into the bottom edge of Block 6 with RS facing.
Row 1: Join purple in the first corner sc. Ch 3 (counts as dc), dc in each of next 35 sts, turn. (36 dc)
Row 2: Ch 2 (doesn’t count), dc3tog, dc in next 30 sts, dc3tog, turn. (32 sts)
Rows 3–9: Repeat Row 2, working 4 fewer dc between the decreases each row. (28, 24, 20, 16, 12, 8, 4 sts)
Row 10: Ch 2, dc4tog. (1 st) Fasten off.
Checkpoint: The tip is 3 in (7.6 cm) deep, so the strip now measures 6 x 51 in (15.2 x 129.5 cm).
Border
Border gauge: 6 sc = 1 in (2.5 cm) on straight edges, and 3 sc per dc row-end on the tip.
Border Rnd 1: With RS facing, join purple in the top-right corner sp of the strip and work as follows:
– Top edge: (sc, ch 2, sc) in corner sp, sc in each of 36 sts, (sc, ch 2, sc) in corner sp. The top edge has 38 sc: the 36 sts plus 1 sc from each corner group.
– Long side: Sc in each st down all six blocks, skipping the joined corner sps at the seams. That’s 6 x 48 = 288 sc. Then work 1 sc in the bottom corner sp of Block 6. The side total is 1 + 288 + 1 = 290 sc, counting the corner sc at the top.
– Tip edge: 3 sc in each row-end of Rows 1–9 (27 sc), then (sc, ch 2, sc) in Row 10. Each tip edge has 28 sc, counting 1 point sc.
– Work the other tip edge and long side the same way, then join.
(Total: 38 + 290 + 290 + 28 + 28 = 674 sc; 3 ch-2 sps)
Why the math works: Each block side has 48 sts at 6 per inch, so 288 sc lie flat along 48 in (121.9 cm). Each slanted tip edge is 4.25 in (10.8 cm) long, so 27 sc gives about 6.4 sc per inch and the diagonal stays flat.
Border Rnd 2: Ch 1. Rev sc in each sc, and work 1 rev sc in each ch-2 sp. (674 rev sc + 3 = 677 rev sc) On the top edge, make the hanging tabs over Rnd 1 top-edge sts 2, 13, 26, and 37: rev sc in that st, ch 18, sl st in the same st. Join and fasten off.
Checkpoint: The strip measures 6.5 x 51.5 in (16.5 x 130.8 cm).
Final Blocking
- Weave in all ends along stitch lines, never across the open lattice.
- Soak each strip in cool water for 15 minutes. Press the water out in a towel without wringing.
- Pin the strip flat to 6.5 x 51.5 in (16.5 x 130.8 cm).
- Pin each corner fan and every lattice crossing so the diamonds open evenly.
- Shape the wing outlines into smooth curves and lift the bodies slightly.
- Let the strip dry completely before unpinning.
Final Quality-Control Checklist
- Every block measures 6 x 8 in (15.2 x 20.3 cm), with 36 and 48 sts per side.
- All butterflies face up, and the antennae are tacked down.
- The seams are flat, with 36 sl sts each.
- The tip comes to a centered point.
- The border has 674 sc in Rnd 1 and 677 rev sc in Rnd 2.
- All four strips are the same length and have 4 tabs each.
Troubleshooting
- Corners cupping: The chains are too tight. Loosen them, or add 1 ch to each Rnd 2 corner loop.
- Wings ruffling: Rnd 3 is too loose. Go down half a hook size for the wings.
- Wavy long sides: You worked into the seam corner sps. Skip them.
- Off-center tip: Recount Row 2. Both dc3tog must start exactly at the edges.
- Sagging butterfly: Tack the wing-tip anchors from the back.
Care
Hand wash in cool water, dry flat, and re-pin the lattice if needed. Swap the strips’ positions now and then so any sun fading stays even.
Final Notes
Here is the measurement chain. A 4 in (10.2 cm) butterfly grows into a 6 x 8 in (15.2 x 20.3 cm) block of 36 x 48 sc. Six blocks make a 6 x 48 in (15.2 x 121.9 cm) column, and the tip brings it to 51 in (129.5 cm). The border finishes the strip at 6.5 x 51.5 in (16.5 x 130.8 cm). Check each stage and all four strips will hang evenly.
Happy crocheting!