

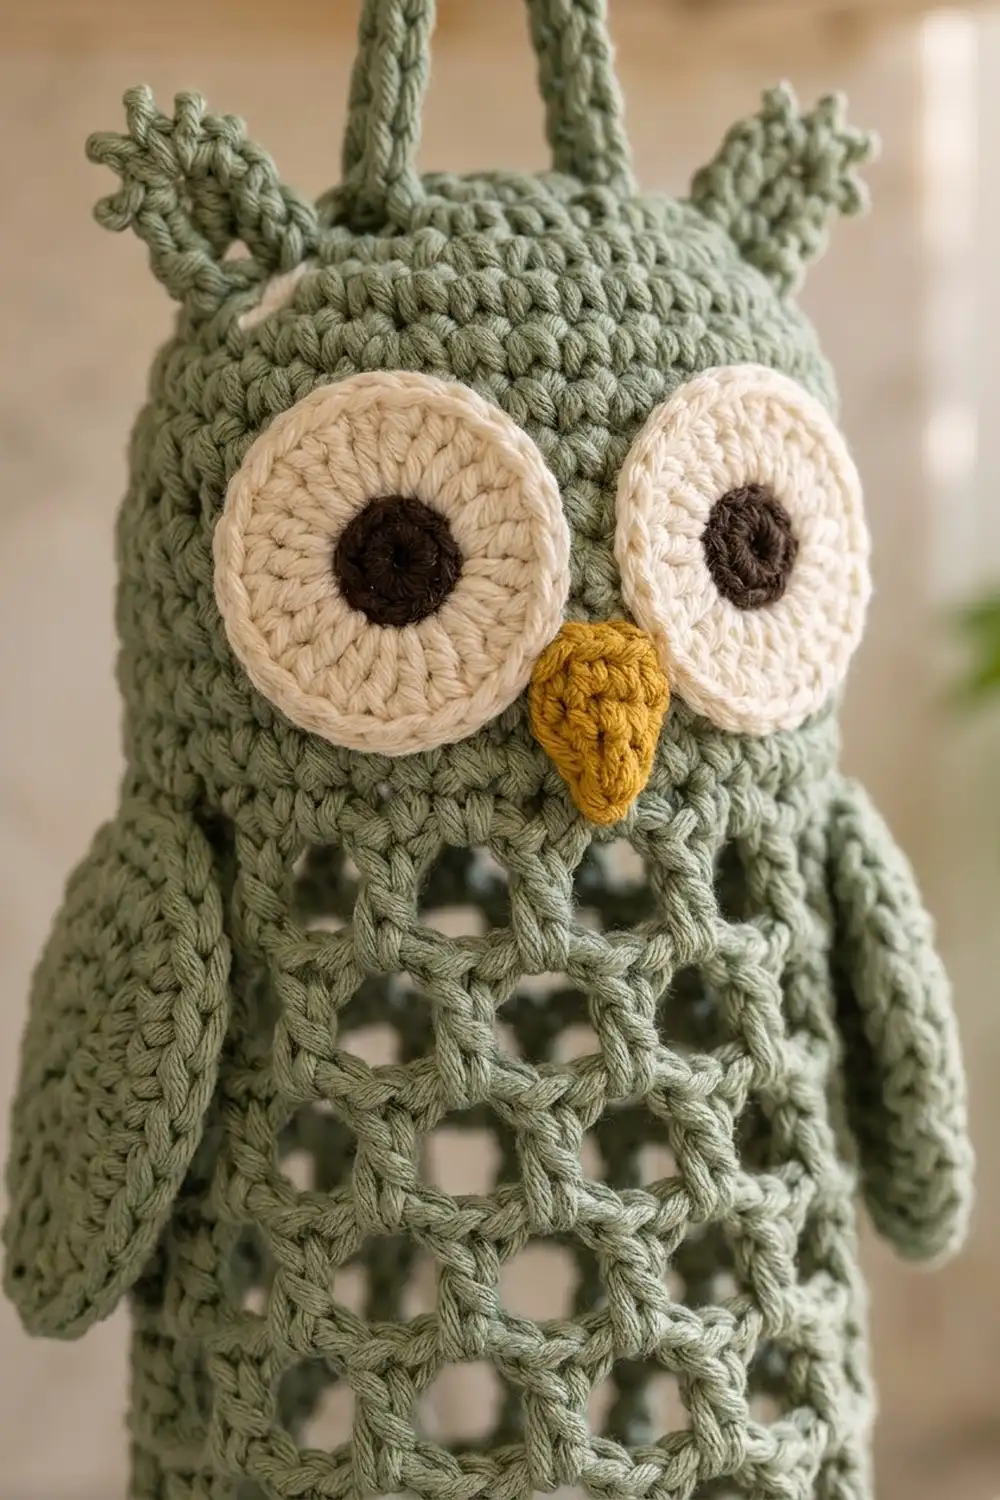
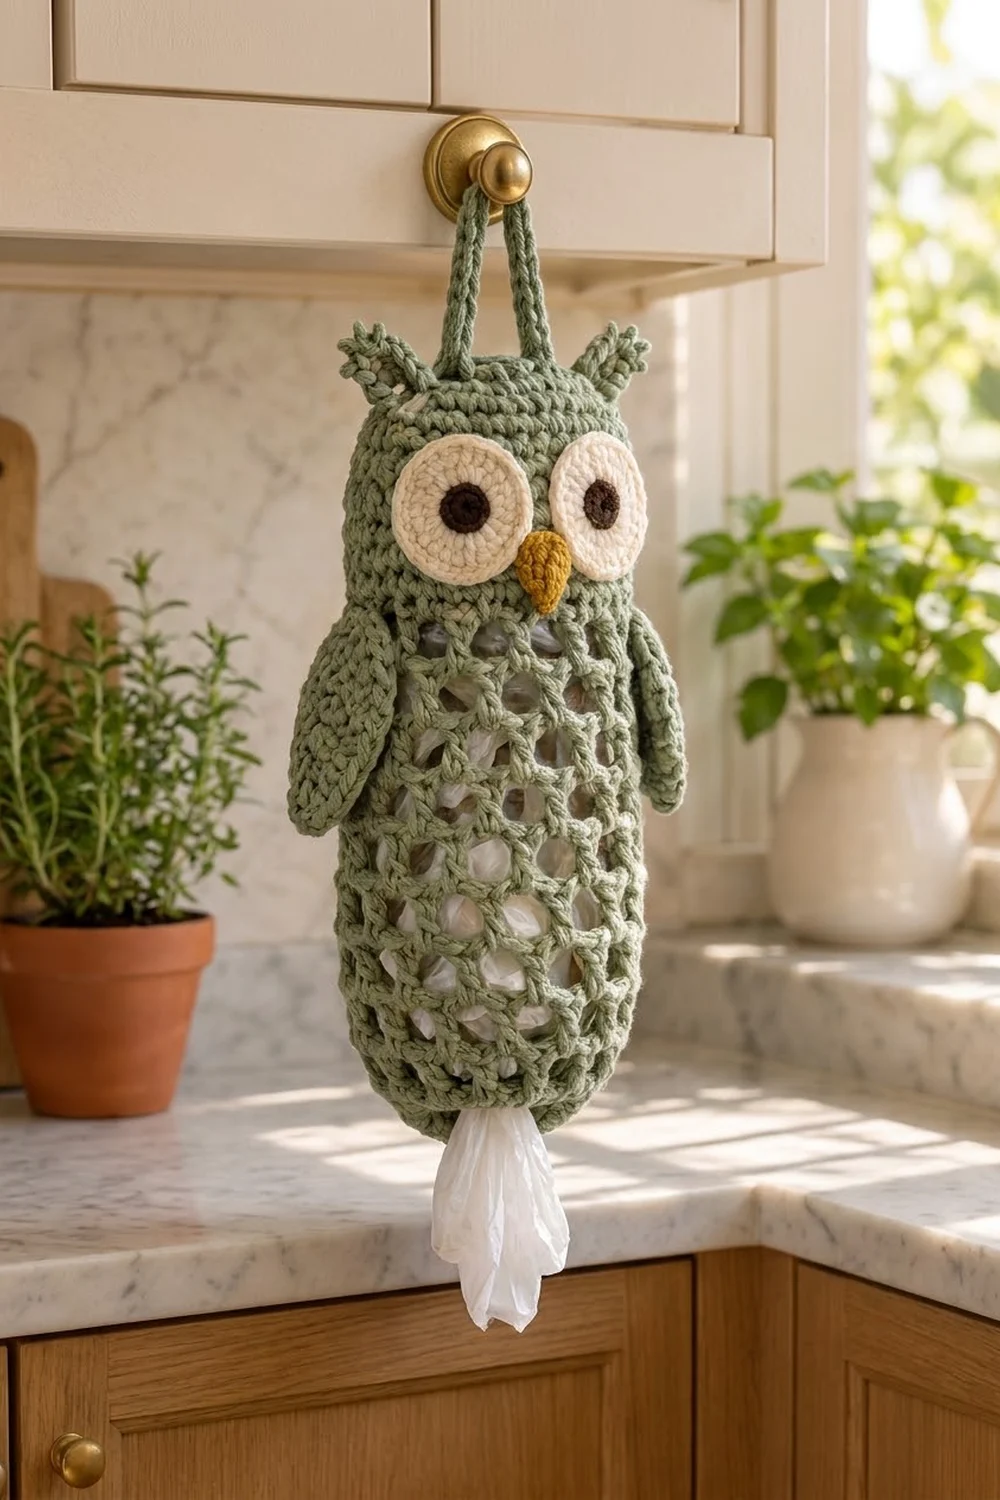
This owl plastic bag holder is a soft, practical kitchen helper. It is a single crocheted tube with an open mesh body, a solid head and a few small appliqués that turn it into a friendly sage-green owl. You push used grocery bags up through the bottom opening and pull them out again one at a time from the same opening.
The colors are calm and natural. The body, wings, ears and hanging loop are sage green, the large round eyes are cream, the pupils are dark brown and the small pointed beak is mustard. The style is cottage-kitchen cute, with a clean grid of square mesh holes so you can see the bags inside.
This pattern uses US crochet terms. The finished holder is 5.25 in (13.3 cm) wide when flat. It is 15 in (38.1 cm) tall from the bottom edge to the top seam, not counting the ear tufts and the hanging loop.
Construction is simple. You work the body in joined rounds from the bottom up: a foundation round, a filet-style mesh section, a solid single crochet head and a flat seam across the top. Then you add a firm, slightly tapered border around the bottom opening. Finally, you sew on the eyes, beak, wings and ears, and add the loop.
Finished Size and Construction
- Finished size: 5.25 in (13.3 cm) wide flat x 15 in (38.1 cm) tall
- Skill level: Easy / advanced beginner
- Terminology: US crochet terms
- Yarn weight: Worsted (#4), cotton or cotton blend
- Hook: 5.0 mm (H-8)
- Number of pieces: 1 tubular body plus 7 small appliqués (2 eyes, 1 beak, 2 wings, 2 ears) and a hanging loop worked onto the top seam
- Layout: Single standalone piece, no joining of motifs
- Body circumference: 42 sts = 10.5 in (26.7 cm)
- Size before border: 5.25 in (13.3 cm) wide x 14 in (35.6 cm) tall
- Border depth: 1 in (2.5 cm), tapering the bottom opening to 4.5 in (11.4 cm) wide flat
Materials
Choose a smooth cotton or cotton-acrylic worsted yarn. Cotton holds its shape when the holder is full of bags and does not stretch out over time. Avoid fuzzy yarns, because they hide the mesh grid.
- Sage green (MC): 85 g, about 145 m
- Cream (A): 10 g, about 17 m
- Dark brown (B): 2 g, about 4 m
- Mustard (C): 2 g, about 4 m
These amounts include a margin of roughly 20 percent for your gauge swatch and tails.
Tools:
- 5.0 mm (H-8) crochet hook
- Tapestry needle
- Stitch markers (at least 2)
- Scissors
- Rust-proof pins for placing appliqués
- Measuring tape
Abbreviations (US Terms)
- ch – chain
- sl st – slip stitch
- sc – single crochet
- dc – double crochet
- sc2tog – single crochet 2 together
- sk – skip
- sp – space
- st(s) – stitch(es)
- rnd(s) – round(s)
- MR – magic ring
Special stitch – mesh unit: dc in the next dc (or st), ch 2, skip the next 2 sts (or the ch-2 sp). One mesh unit counts as 3 sts and is 0.75 in (1.9 cm) wide.
Picot spike: ch 3, sl st in 2nd ch from hook, sl st in next ch.
Gauge and Checkpoints
Sc gauge (in the round): 16 sts and 16 rnds = 4 in (10.2 cm).
Mesh gauge: 14 mesh units around = 10.5 in (26.7 cm), and 8 mesh rnds = 4 in (10.2 cm). Each mesh rnd is 0.5 in (1.3 cm) tall.
Test before you commit. Work the foundation chain and the first 4 mesh rnds, then measure.
- Checkpoint 1 (after Rnd 1): the tube lies flat at 5.25 in (13.3 cm) wide.
- Checkpoint 2 (after Rnd 9): the mesh section alone is 4 in (10.2 cm) tall.
- Checkpoint 3 (after Rnd 23): the body is 11.25 in (28.6 cm) tall.
- Checkpoint 4 (after the top seam): the body is 14 in (35.6 cm) tall.
- Checkpoint 5 (after the border): the total height is 15 in (38.1 cm).
If your tube is too wide, go down to a 4.5 mm hook. If it is too narrow, go up to a 5.5 mm hook. If the width is right but the mesh rnds are too tall, keep the hook and work one fewer mesh rnd for every extra 0.5 in (1.3 cm) of height. Don’t change the stitch count: every round and the top seam depend on the 42-st circumference.
Body
Work the body in joined rounds with the right side always facing. Keep the round join at the left side of the tube. That edge becomes a side fold when you flatten the tube for the top seam.
Foundation: With MC, ch 42. Sl st in the first ch to form a ring, taking care not to twist.
Rnd 1: Ch 1, sc in each ch around, sl st to first sc. (42 sc)
Mesh Section
Rnd 2: Ch 5 (counts as dc + ch 2), sk 2 sts, dc in next sc, ch 2, sk 2 sts; repeat from * 12 more times, sl st in 3rd ch of beginning ch-5. (14 dc and 14 ch-2 sps = 42 sts)*
Rnds 3–23: Ch 5 (counts as dc + ch 2), dc in next dc, ch 2; repeat from * 12 more times, sl st in 3rd ch of beginning ch-5. (14 dc and 14 ch-2 sps = 42 sts each rnd)*
Each dc sits directly on top of the dc below, so the holes stack into a neat square grid. That makes 22 mesh rnds, 11 in (27.9 cm) tall. Including Rnd 1, the body now measures 11.25 in (28.6 cm).
Head
Rnd 24 (conversion round): Ch 1, sc in same st as join, 2 sc in next ch-2 sp, sc in next dc, 2 sc in next ch-2 sp; repeat from * 12 more times, sl st to first sc. (14 sc worked 1-per-dc + 28 sc worked into the spaces = 42 sc)*
Rnds 25–33: Ch 1, sc in each st around, sl st to first sc. (42 sc each rnd)
The head is now 10 rnds tall, or 2.5 in (6.4 cm).
Top Seam
Flatten the tube so the round join sits exactly on the left fold, with 21 sts on the front layer and 21 sts on the back layer. Place a marker in the first front st and another in the first back st to keep them lined up.
Seam row: Ch 1. Working through 1 front st and the matching back st together, sc across. (21 sc)
The seam adds 0.25 in (0.6 cm). The body before the border now measures 14 in (35.6 cm): 0.25 in (0.6 cm) of foundation, 11 in (27.9 cm) of mesh, and 2.75 in (7.0 cm) of head and seam. Fasten off, leaving a short tail.
Hanging Loop
With the front facing you, join MC with a sl st in the 9th seam st.
Loop: Ch 30, sk the next 3 seam sts, sl st in the 13th seam st. Turn, sc in each of the 30 chs, sl st in the 9th seam st. (30 sc) Fasten off.
The loop stands about 3 in (7.6 cm) tall and is centered over the 11th (center) seam st.
Appliqués
Leave a 10 in (25.4 cm) tail on every piece for sewing.
Eyes (make 2)
Rnd 1: With B, MR, 6 sc in ring. Change to A on the sl st to the first sc. Pull the ring closed. (6 sc)
Rnd 2: With A, ch 1, 2 sc in each st, sl st to first sc. (12 sc)
Rnd 3: Ch 1, sc in next st, 2 sc in next st; repeat from * 5 more times, sl st to first sc. (18 sc)*
Rnd 4: Ch 1, sc in next 2 sts, 2 sc in next st; repeat from * 5 more times, sl st to first sc. (24 sc)*
Fasten off. Each eye is 2 in (5.1 cm) across, with a dark pupil 0.5 in (1.3 cm) across.
Beak
With C, ch 2.
Row 1: Sc in 2nd ch from hook. (1 sc)
Row 2: Ch 1, turn, 3 sc in the sc. (3 sc)
Row 3: Ch 1, turn, 2 sc in first st, sc in next st, 2 sc in last st. (5 sc)
Row 4: Ch 1, turn, sc in each st. (5 sc)
Fasten off. The beak is a small rounded triangle, 1.25 in (3.2 cm) wide at the top and 1 in (2.5 cm) tall. Row 1 is the point, and it faces down.
Wings (make 2)
With MC, ch 9.
Rnd 1: Sc in 2nd ch from hook, sc in next 6 chs, 3 sc in last ch. Working along the other side of the chain, sc in next 6 chs, 2 sc in same ch as first sc, sl st to first sc. (18 sc)
Rnd 2: Ch 1, 2 sc in first st, sc in next 6 sts, 2 sc in each of next 3 sts, sc in next 6 sts, 2 sc in each of last 2 sts, sl st to first sc. (24 sc)
Rnd 3: Ch 1, sc in next st, 2 sc in next st, sc in next 6 sts, sc in next st, 2 sc in next st; repeat from * 2 more times, sc in next 6 sts, sc in next st, 2 sc in next st; repeat from * once more, sl st to first sc. (30 sc)
Fasten off. Each wing is a smooth oval, 1.5 in (3.8 cm) wide and 3.5 in (8.9 cm) long.
Ears (make 2)
With MC, ch 4.
Row 1: Sc in 2nd ch from hook and in next 2 chs. (3 sc)
Row 2: Ch 1, turn, sc in each st. (3 sc)
Row 3: Turn, work 1 picot spike, sl st in next sc; repeat from * 2 more times. (3 spikes)*
Fasten off. Each ear is a small square base 0.75 in (1.9 cm) wide, topped with 3 short spikes. It is about 1 in (2.5 cm) tall in total.
Bottom Border
The border finishes the raw foundation edge, firms up the opening the bags come out of, and tapers it a little so bags feed out one at a time. The border gauge matches the body: 16 sc and 16 rnds = 4 in (10.2 cm).
Hold the holder upside down. Join MC with a sl st in the free loop of the foundation chain at the left fold.
Rnd 1: Ch 1, sc in each free loop of the foundation ch, sl st to first sc. (42 sc: 21 per flat side)
Rnd 2: Ch 1, sc in next 5 sts, sc2tog; repeat from * 5 more times, sl st to first sc. (36 sc: 18 per flat side)*
Rnd 3: Ch 1, sc in each st, sl st to first sc. (36 sc)
Rnd 4: Ch 1, sc in each st, sl st to first sc. (36 sc)
Fasten off and weave in the end.
Why the math works: Rnd 1 puts exactly one sc in each foundation ch, so it matches the 42-st body without ruffling. Rnd 2 removes 1 st from every 7 (6 decreases). That shrinks the opening from 10.5 in (26.7 cm) around to 9 in (22.9 cm) around, or 4.5 in (11.4 cm) flat. The six evenly spaced decreases fall 3 per flat side, so the taper is symmetrical. Four rnds at 4 rnds per inch add exactly 1 in (2.5 cm), for a total height of 15 in (38.1 cm).
Assembly
Lay the holder flat with the round join on the left fold and the loop centered on top.
- Eyes: Pin both eyes side by side on the head, touching in the center, with their tops 1 rnd below the seam. Whipstitch around the outer edge with the cream tail.
- Beak: Pin the beak centered between the eyes, point facing down, with its wide top tucked just under the inner edges of the eyes. Sew around the edge with the mustard tail.
- Ears: Sew one ear to each top corner of the seam, with the spikes pointing up and slightly outward.
- Wings: Sew one wing to each side fold, with its top tip at Rnd 24 (the base of the head). Stitch only the top 1.5 in (3.8 cm) of the wing so the lower part hangs free.
Final Blocking
- Weave in all ends, running each one through solid sc rather than the mesh.
- Spray the holder lightly with water until it is damp but not dripping.
- Slide a rolled towel inside so the tube is round and even.
- Lay it flat and pat it to 5.25 in (13.3 cm) wide and 15 in (38.1 cm) tall.
- Line up the mesh so each column of dc stitches runs straight up.
- Pat the eyes flat and round, and press the ear spikes upward.
- Let it dry completely before hanging.
Final Quality-Control Checklist
- Body measures 5.25 in (13.3 cm) wide and 15 in (38.1 cm) tall.
- Every mesh rnd has 14 dc and 14 ch-2 sps.
- Mesh columns run straight with no slant.
- Top seam has 21 sc and lies flat, with no gaps.
- Hanging loop is centered and firmly attached.
- Bottom opening is 4.5 in (11.4 cm) wide flat, with even decreases.
- Eyes match, are round and sit level.
- Beak points down and is centered.
- Wings and ears mirror each other on both sides.
- All ends are secured and hidden.
Troubleshooting
The mesh columns slant. You are probably working the dc into the ch-2 sp instead of into the dc. Always dc into the top of the dc below.
The tube twisted on the foundation ring. Check the chain before joining. If it is already twisted after Rnd 1, start over, because it can’t be fixed later.
The head looks puckered at Rnd 24. Work exactly 2 sc into each ch-2 sp. One sc pulls the edge in, and three makes it flare.
The eyes cup instead of lying flat. Your increases are too tight. Use a 5.5 mm hook for the eyes only, or block them flat under a damp cloth.
The bags fall out too easily. After Rnd 4 of the border, work one more rnd of sc in next 4 sts, sc2tog around, for 30 sts. That gives a 3.75 in (9.5 cm) opening when flat.
The loop stretches. Add a second row of sc along the loop, or use a firmer cotton.
Care
Hand wash in cool water with mild soap, gently press out the excess water, and lay flat to dry. Reshape the mesh while it is still damp.
Final Notes
The whole design rests on one number: 42 stitches around. That gives you 14 mesh units, a 21-stitch top seam and a 10.5 in (26.7 cm) circumference that lies 5.25 in (13.3 cm) flat. Add up 0.25 in (0.6 cm) of foundation, 11 in (27.9 cm) of mesh, 2.75 in (7.0 cm) of head and seam, and 1 in (2.5 cm) of border, and you reach 15 in (38.1 cm). Check each measurement as you go, and your owl will hang straight and hold a generous stack of bags.
Happy crocheting!