

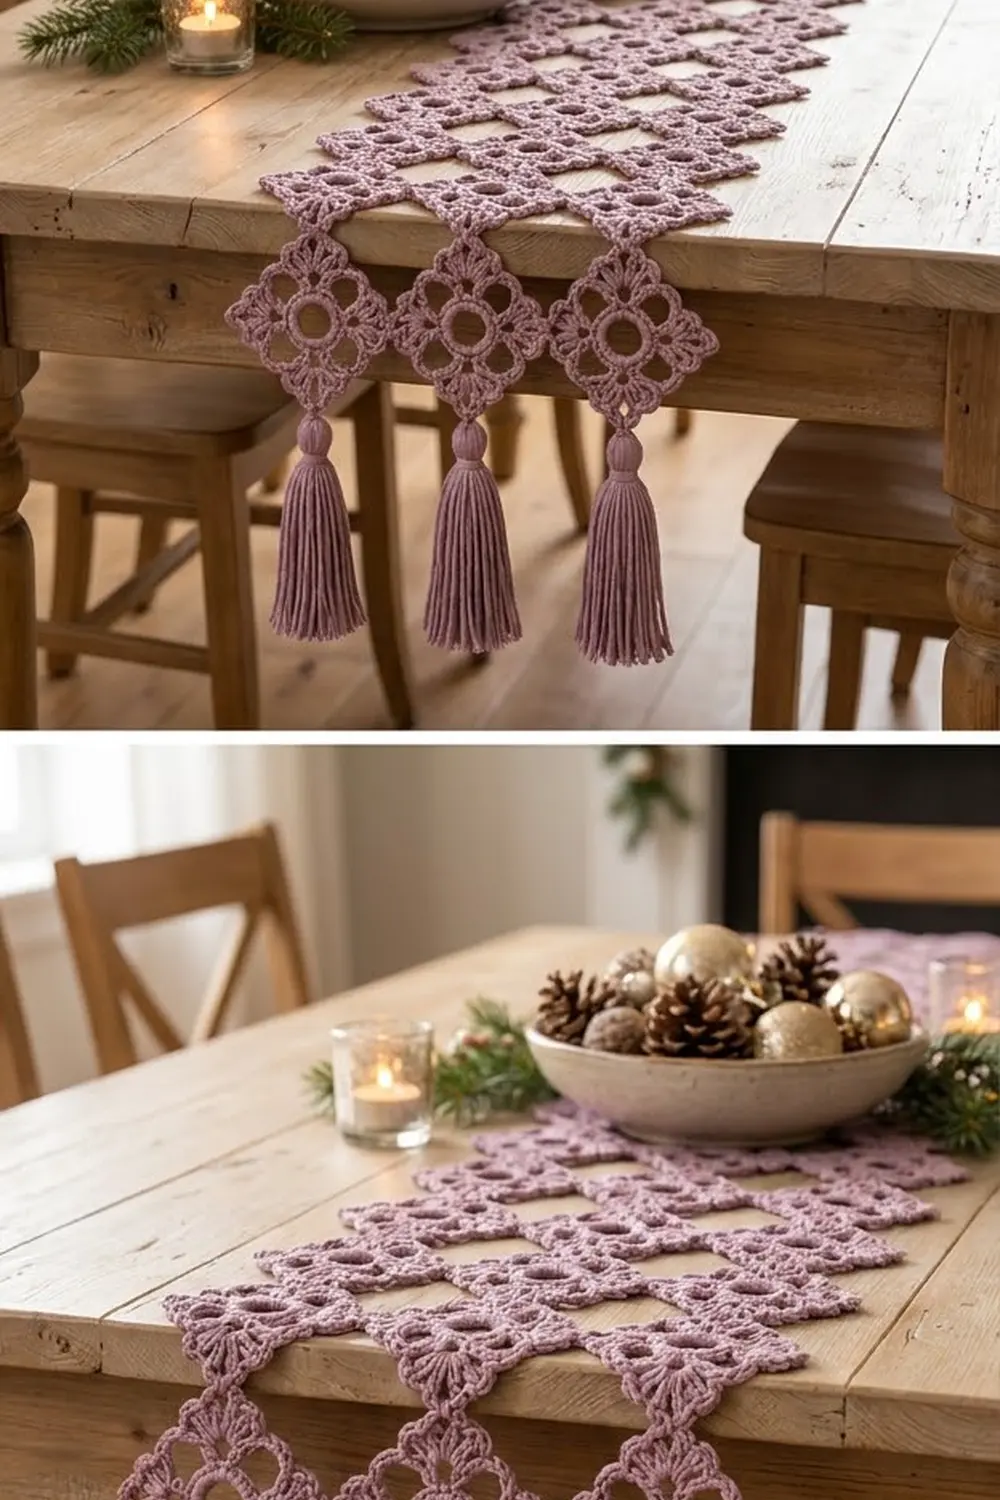
The Lilac Frost Diamond Table Runner is a light, airy lace runner made from on-point diamond motifs joined tip to tip. Each motif has a padded center ring, four rounded scallop loops and four fanned points. When the motifs are joined, a diamond-shaped window opens between them, so the table shows through the lace.
The whole runner uses one soft dusty lilac. A single color keeps the look calm and elegant and lets the texture stand out. It suits holiday tables, spring tables and everyday use. Long matching tassels at each end add weight and help the runner hang neatly over the table edge.
This pattern uses US crochet terms. The finished runner measures 15 in (38.1 cm) wide by 50 in (127.0 cm) long without tassels, or 60 in (152.4 cm) long including 5 in (12.7 cm) tassels at both ends.
Construction is simple. You make one motif in five rounds, then join each new motif to its neighbors in its last round using joining picots at the tips. You work 30 motifs in a grid 3 across and 10 long. There is no crocheted border; the motif edges are the finished edge. Six tassels finish the short ends.
Finished Size and Construction
- Finished size: 15 in x 50 in (38.1 cm x 127.0 cm), plus 5 in (12.7 cm) tassels at each end
- Skill level: Intermediate
- Terminology: US crochet terms
- Yarn weight: DK / light (#3) cotton or cotton blend
- Hook: US G-6 (4 mm)
- Number of pieces: 30 motifs, plus 6 tassels
- Layout: 3 motifs across x 10 motifs long, on point
- Piece size: 5 in (12.7 cm) tip to tip; each straight side is about 3.54 in (9.0 cm)
- Size before border: 15 in x 50 in (38.1 cm x 127.0 cm)
- Border depth: none; Round 5 of each motif is the finished edge
Materials
Yarn advice: Choose a smooth, tightly plied DK cotton or cotton-blend yarn. Mercerized or lightly sheened cotton shows the fans and the padded ring best. It also blocks crisply and holds its shape on a table. Avoid fuzzy yarns, which blur the lace.
- Lilac (dusty mauve): 200 g, about 420 m (459 yd)
- Motifs: about 255 m (279 yd)
- Tassels: about 54 m (59 yd)
- The rest is safety margin
Tools:
– US G-6 (4 mm) crochet hook
– Tapestry needle
– Scissors
– Stiff card, 5.5 in (14.0 cm) tall, for the tassels
– Rust-proof pins
– Blocking mats
– Spray bottle
– Measuring tape
All yarn quantities include a margin of roughly 25% to allow for gauge differences, swatching and weaving in ends.
Abbreviations (US Terms)
- ch – chain
- sl st – slip stitch
- sc – single crochet
- dc – double crochet
- tr – treble crochet
- sk – skip
- sp – space
- st(s) – stitch(es)
- rep – repeat
Special stitches
- Picot: Ch 3, sl st in the first ch made.
- Joining picot: Ch 1, sl st into the matching picot of the finished neighbor motif, ch 1, sl st in the first ch made.
Gauge and Checkpoints
Make one complete motif first and block it before you start the other 29. Every measurement in the runner depends on this one motif.
Checkpoints:
- After Round 1: The ring measures 1.5 in (3.8 cm) across its outer edge.
- After Round 3: The motif measures 3.5 in (8.9 cm) from the tip of one fan to the tip of the opposite fan.
- After Round 4: 4.5 in (11.4 cm) from corner to corner.
- After Round 5, blocked: 5 in (12.7 cm) from tip to tip.
If your motif is too big (over 5.25 in / 13.3 cm), go down one hook size, to 3.75 mm.
If your motif is too small (under 4.75 in / 12.1 cm), go up one hook size, to 4.5 mm.
Even a small gauge error adds up quickly. A motif that is 0.5 in (1.3 cm) too large makes the runner 5 in (12.7 cm) too long over 10 rows.
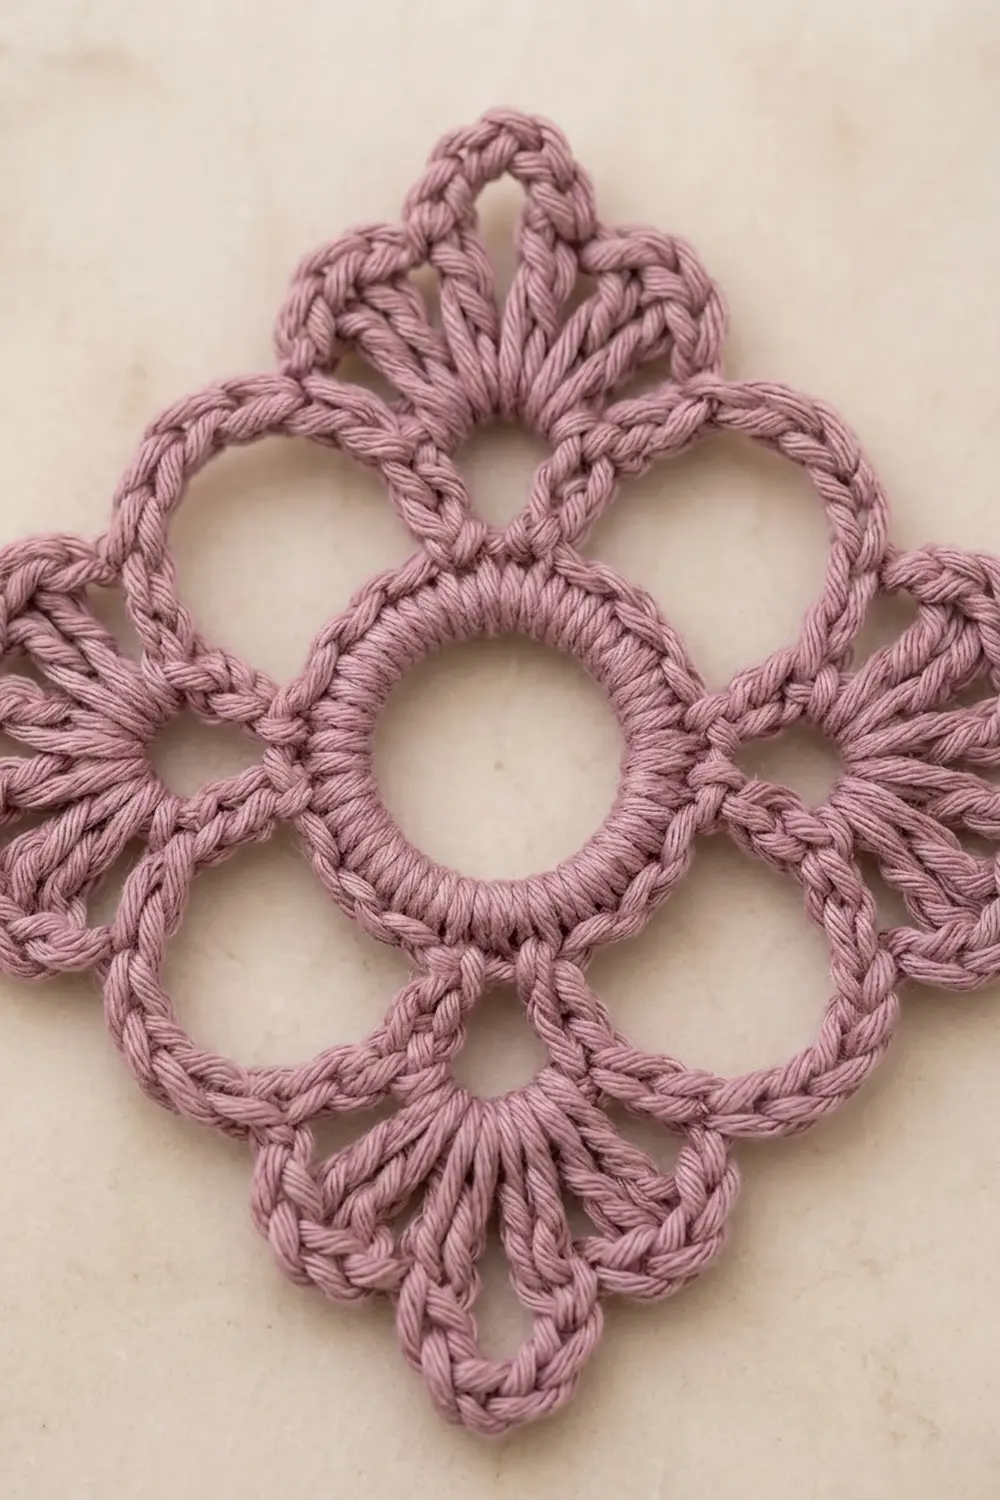
Motif Pattern
Work in the round with the right side facing you the whole time. Do not turn.
Round 1 (padded ring): Ch 12, sl st in the first ch to form a ring. Ch 1, work 24 sc into the ring, working over the starting tail as you go to pad the ring. Sl st in the first sc to join.
(24 sc)
Round 2 (spokes): Ch 1, sc in the same st. Ch 3, sk 2 sc, sc in next sc, ch 9, sk 2 sc. If this is not the final repeat, sc in the next sc. Rep from * 3 more times. Sl st in the first sc to join.
(8 sc, 4 ch-3 sps, 4 ch-9 loops)
Each repeat uses 6 stitches of Round 1, and 4 repeats x 6 = 24. The ch-3 spaces become the four tips. The ch-9 loops become the four side scallops.
Round 3 (fans and scallops): Sl st in the first ch-3 sp. Ch 3 (counts as dc), 6 dc in the same sp. Sk next sc, 13 sc in the next ch-9 loop, sk next sc, 7 dc in the next ch-3 sp. Rep from * 2 more times. Sk next sc, 13 sc in the last ch-9 loop. Sl st in the top of the beginning ch-3 to join.
(28 dc + 52 sc = 80 sts: 4 fans of 7 dc and 4 scallops of 13 sc)
The 13 sc fully cover each ch-9 loop. This gives the thick, rounded scallop outline.
Round 4 (points): Ch 4 (counts as tr). This tr sits in the first dc of the fan.
Work the rest of the first fan as follows: ch 1, tr in the next dc, ch 1, tr in the next dc, ch 1, (tr, ch 3, tr) in the next dc (the center dc), ch 1, tr in the next dc, ch 1, tr in the next dc, ch 1, tr in the last dc of the fan.
Then work across the scallop: ch 5, sk 6 sc, sc in the next sc (the 7th, center sc of the scallop), ch 5, sk 6 sc.
Work the fan sequence above into the next fan, starting with a tr in the first dc. Then work the scallop sequence across the next scallop. Rep from * 2 more times. Sl st in the 4th ch of the beginning ch-4 to join.
Count per fan: 8 tr, 6 ch-1 sps, 1 ch-3 corner sp.
Count per scallop: 1 sc, 2 ch-5 sps.
Round total: 32 tr, 4 sc, 24 ch-1 sps, 4 ch-3 corner sps, 8 ch-5 sps.
Check the scallop: 6 skipped + 1 sc + 6 skipped = all 13 sc. Check the fan: 7 dc used, with the center dc holding 2 tr, so 8 tr in total.
Round 5 (outline and picots): This is a trim round. Every st and sp gets sc, and only the picots are added.
Ch 1, sc in the same st as the join. Sc in the next ch-1 sp, sc in the next tr. Rep this pair 2 more times. That gives 7 sc in total, reaching the tr just before the corner.
In the ch-3 corner sp, work (2 sc, picot, 2 sc).
Then work sc in the next tr and sc in the next ch-1 sp; rep this pair 2 more times; sc in the last tr of the fan. That is 7 sc.
Work 5 sc in the ch-5 sp, sc in the sc, and 5 sc in the next ch-5 sp. That is 11 sc.
Sc in the first tr of the next fan, and continue the same sequence around. Sl st in the first sc to join and fasten off, leaving a 6 in (15.2 cm) tail.
Count per repeat: 7 + 4 + 7 + 11 = 29 sc, plus 1 picot.
Round total: 116 sc + 4 picots (29 sc x 4).
Per side: Counting from corner picot to corner picot gives 2 + 7 + 11 + 7 + 2 = 29 sc on each side, plus the picots at the tips. The 4 corner sc from each tip split 2 to each side, so no stitch is counted twice: 29 x 4 = 116.
Block this first motif and check it against the gauge section.
Make All Pieces
- Lilac: 30 motifs total. Motif 1 is made in full. The other 29 are joined as you go in Round 5.
Layout (on point, tips touching; each ◆ is one motif):
Row 1:   ◆1   ◆2   ◆3     ← tassel end
Row 2:   ◆4   ◆5   ◆6
Row 3:   ◆7   ◆8   ◆9
Row 4:   ◆10  ◆11  ◆12
Row 5:   ◆13  ◆14  ◆15
Row 6:   ◆16  ◆17  ◆18
Row 7:   ◆19  ◆20  ◆21
Row 8:   ◆22  ◆23  ◆24
Row 9:   ◆25  ◆26  ◆27
Row 10:  ◆28  ◆29  ◆30    ← tassel end
Between every block of four motifs you get a diamond-shaped opening. There are 2 x 9 = 18 of these windows.
Joining
Method: Join as you go, at the tip picots only.
Work Rounds 1 to 4 of the new motif as normal. In Round 5, replace a regular picot with a joining picot at any tip that touches a finished motif.
- Motifs 2 and 3: Join the left tip to the right tip of the motif before. That is 1 join each.
- First motif of each new row (4, 7, 10, and so on): Join the top tip to the bottom tip of the motif directly above. That is 1 join.
- All other motifs: Join the top tip to the motif above and the left tip to the motif on the left. That is 2 joins.
Join count:
– Across the rows: 2 per row x 10 rows = 20 joins
– Down the columns: 3 per column-gap x 9 gaps = 27 joins
– Total: 47 joins
Stitch-to-stitch logic: Each join replaces the 3 picot chains with ch 1, a sl st into the neighbor and ch 1. The 2 sc on each side of the tip stay unchanged, so every motif keeps exactly 29 sc per side. Nothing is added or removed at the seams, which means the tips meet exactly and add no extra length.
Tension advice: Keep the joining sl st relaxed. If you pull it tight, the tips pucker and the windows close up. If it is too loose, the points will sag apart. Before you join each new motif, lay it flat beside the finished section and check that it lines up.
Size checkpoint:
– After Row 1, the strip measures 15 in (38.1 cm) from outer tip to outer tip (3 x 5 in / 12.7 cm).
– After 4 rows, the length is 20 in (50.8 cm).
– After all 10 rows, the length is 50 in (127.0 cm).
Border
This design has no crocheted border. That is a deliberate choice: the scallop loops and picot points are the edge you see in the finished runner. A straight border would fill in the outer half-windows and hide the scallops.
Edge math, for reference:
– Each long side has 10 motifs, and each one shows 2 outer sides of 29 sc. That is 10 x 2 x 29 = 580 sc along each zigzag edge.
– Each short end has 3 motifs showing 2 sides each. That is 3 x 2 x 29 = 174 sc.
These counts come straight from Round 5, so the edges lie flat with no ruffling or cupping.
Tassels (make 6):
- Wrap yarn 30 times around the 5.5 in (14.0 cm) card.
- Slide a 12 in (30.5 cm) strand under the wraps at the top edge of the card and tie it tightly.
- Cut the wraps along the bottom edge. You now have 60 strands, folded in half.
- Wrap a second 18 in (45.7 cm) strand tightly around all strands, 1 in (2.5 cm) below the top fold, about 8 times. Knot it and bury the ends inside the tassel.
- Trim the bottom evenly to 5 in (12.7 cm) from the top fold.
- Use the top tie strands to attach one tassel to the outer bottom-tip picot of Motifs 1, 2 and 3, and one to the tip picot of Motifs 28, 29 and 30.
Final Blocking
- Weave in all ends along the sc outline, not through the open chains.
- Soak the runner in cool water for 10 minutes, then press out the water in a towel. Do not wring it.
- Lay it flat on blocking mats. Measure 15 in (38.1 cm) across and 50 in (127.0 cm) down.
- Pin every tip picot first, keeping the windows square.
- Pin the center sc of each outer scallop so it curves outward.
- Gently open each center ring with a fingertip.
- Let it dry completely. Unpin it, then steam the tassels lightly and comb them straight.
Final Quality-Control Checklist
- [ ] 30 motifs, each with 116 sc and 4 picots or joining picots
- [ ] Each motif is 5 in (12.7 cm) from tip to tip
- [ ] 47 joins, all at tips and none along the sides
- [ ] 18 inner windows, all square and evenly sized
- [ ] Runner is 15 in x 50 in (38.1 cm x 127.0 cm)
- [ ] 6 tassels, each 5 in (12.7 cm), hanging at the end tips
- [ ] All ends woven in securely and invisibly
Troubleshooting
- The ring cups or ruffles: 24 sc in a ch-12 ring should lie flat. If it cups, check that you made 12 chains. If it ruffles, you may have worked more than 24 sc.
- The scallops look flat or pointed: Make sure you work all 13 sc into each ch-9 loop in Round 3, and that the single sc in Round 4 lands on the center (7th) sc.
- The points are blunt: The (tr, ch 3, tr) must go into the 4th, center dc of the fan. If it is off by one stitch, the tip leans to one side.
- Round 5 count is off: Count each side separately. You should have 29 sc from picot to picot. The most common slip is skipping the final tr of a fan before the ch-5 sp.
- The runner is wider at one end: Your gauge has drifted. Measure every finished row at 15 in (38.1 cm).
- The tassels look thin: Add 5 to 10 wraps, and add the same number to every tassel.
Care
Hand wash in cool water with mild soap, press dry in a towel and lay flat to dry. Re-pin the tips if needed. Avoid tumble drying, which distorts the lace.
Final Notes
The measurement chain is short and reliable. The 1.5 in (3.8 cm) ring becomes a 3.5 in (8.9 cm) fan motif after Round 3, a 4.5 in (11.4 cm) motif after Round 4 and a 5 in (12.7 cm) motif after Round 5. Three motifs across give 15 in (38.1 cm) of width, and ten rows give 50 in (127.0 cm) of length. The 5 in (12.7 cm) tassels at each end bring the total to 60 in (152.4 cm). Keep every motif at 116 sc and every join at the tips only, and the runner will lie flat with crisp, even windows.
Happy crocheting!