

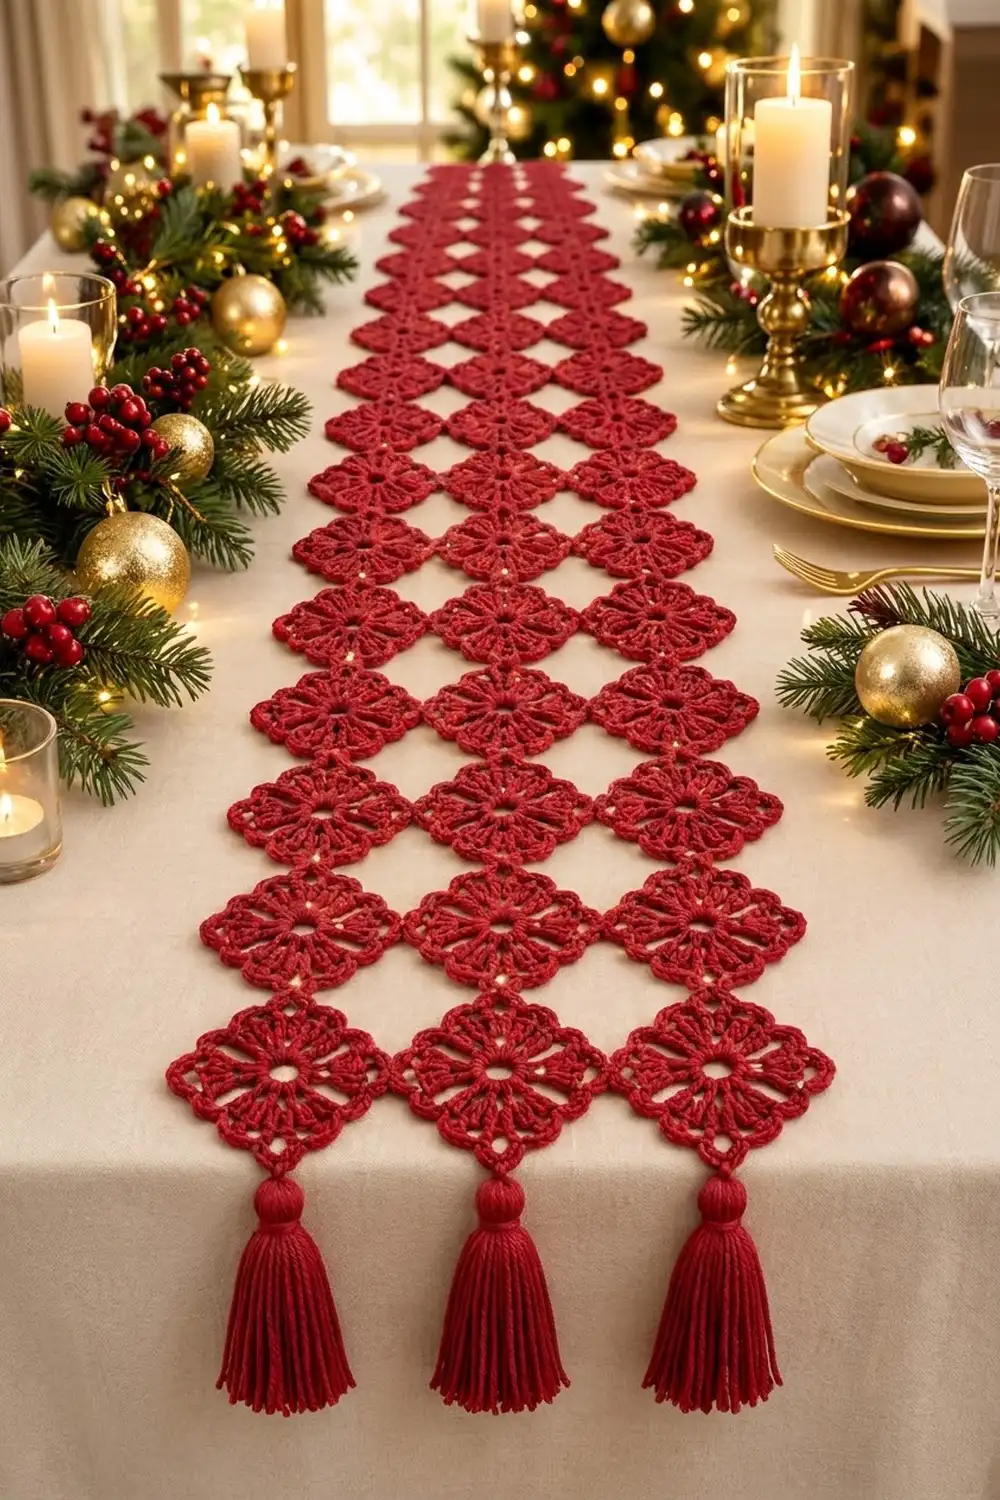
The Crimson Lattice Table Runner is a lacy holiday runner made from small square motifs set on point. Each motif has an open center ring, a wheel of paired double crochet spokes, a softly squared lace round, and a solid single crochet edge with a small chain loop at each corner. Joined tip to tip, the motifs form a diamond lattice with open diamond windows between them.
The whole runner uses one color, a deep cranberry red, which looks warm and rich against a cream or white tablecloth. Three red tassels hang from the bottom tips of the end motifs at each short end. The style is classic and festive, and the lace is simple enough to use every day.
This pattern uses US crochet terms. Without tassels, the finished runner measures 17.25 in (43.8 cm) wide and 69 in (175.3 cm) long. With a 4 in (10.2 cm) tassel at each end, the total length is 77 in (195.6 cm).
You will make 36 identical motifs in a layout 3 motifs wide and 12 motifs long. You join them as you go on the last round, at the corner tips only. There is no added border. The zigzag outer edge of the motifs is the finished edge, and the tassels finish the ends.
Finished Size and Construction
- Finished size: 17.25 in x 69 in (43.8 cm x 175.3 cm), plus 4 in (10.2 cm) tassels at each end
- Skill level: Easy intermediate
- Terminology: US crochet terms
- Yarn weight: DK / light (#3) cotton or cotton blend
- Hook: 3.5 mm (E-4)
- Number of pieces: 36 motifs plus 6 tassels
- Layout: 3 motifs across, 12 motifs long, each set on point (diamond orientation)
- Motif size: 4 in (10.2 cm) per side; 5.75 in (14.6 cm) from tip to tip
- Size before border: 17.25 in x 69 in (43.8 cm x 175.3 cm)
- Border depth: 0 in (0 cm). There is no separate border; Round 5 of the motifs is the finished edge
Materials
Choose a smooth mercerized cotton or a cotton blend in DK weight. Cotton shows lace clearly, holds its shape after blocking, and washes well, which matters on a dining table. Avoid fuzzy or very stretchy yarns, because the open spaces will close up and the tips will droop.
- Cranberry red: 300 g (about 680 m / 744 yd)
- Motifs: about 6 g each, so 216 g for 36 motifs
- Tassels: about 6 g each, so 36 g for 6 tassels
- The rest covers differences in gauge and the gauge swatch
Tools:
- 3.5 mm (E-4) crochet hook
- Tapestry needle
- Sharp scissors
- Stitch markers
- Stiff card, 4.5 in (11.4 cm) wide, for tassels
- Blocking mats, rust-proof pins, and a spray bottle
- Tape measure
All yarn amounts include a margin of roughly 15 percent. Buy all your yarn from the same dye lot, because any shade change shows clearly in a single solid color.
Abbreviations (US Terms)
- ch – chain
- sl st – slip stitch
- sc – single crochet
- dc – double crochet
- sp – space
- st(s) – stitch(es)
- rep – repeat
- * * – repeat the instructions between asterisks as directed
Special stitch – Joining tip (JT): Ch 1, remove the hook from the loop, insert the hook from front to back into the ch-3 corner loop of the neighboring finished motif, pick up the dropped loop and pull it through, ch 1. The JT replaces the ch 3 at that corner.
Gauge and Checkpoints
Gauge is measured on Round 5: 28 sc = 4 in (10.2 cm), or 7 sc per 1 in (2.5 cm), along one blocked side of the motif.
Make one complete motif first and block it before you make the rest. Check it at each stage:
- After Round 1: ring is about 1.5 in (3.8 cm) across
- After Round 2: circle is about 2.25 in (5.7 cm) across
- After Round 3: square is about 3.25 in (8.3 cm) per side
- After Round 4: square is about 3.75 in (9.5 cm) per side
- After Round 5 (blocked): 4 in (10.2 cm) per side and 5.75 in (14.6 cm) from tip to tip
If your motif is too big, go down half a hook size (3.25 mm). If it is too small, go up half a size (3.75 mm). A difference of only 0.25 in (0.6 cm) per motif adds up to 3 in (7.6 cm) over 12 motifs, so it is worth getting this right.
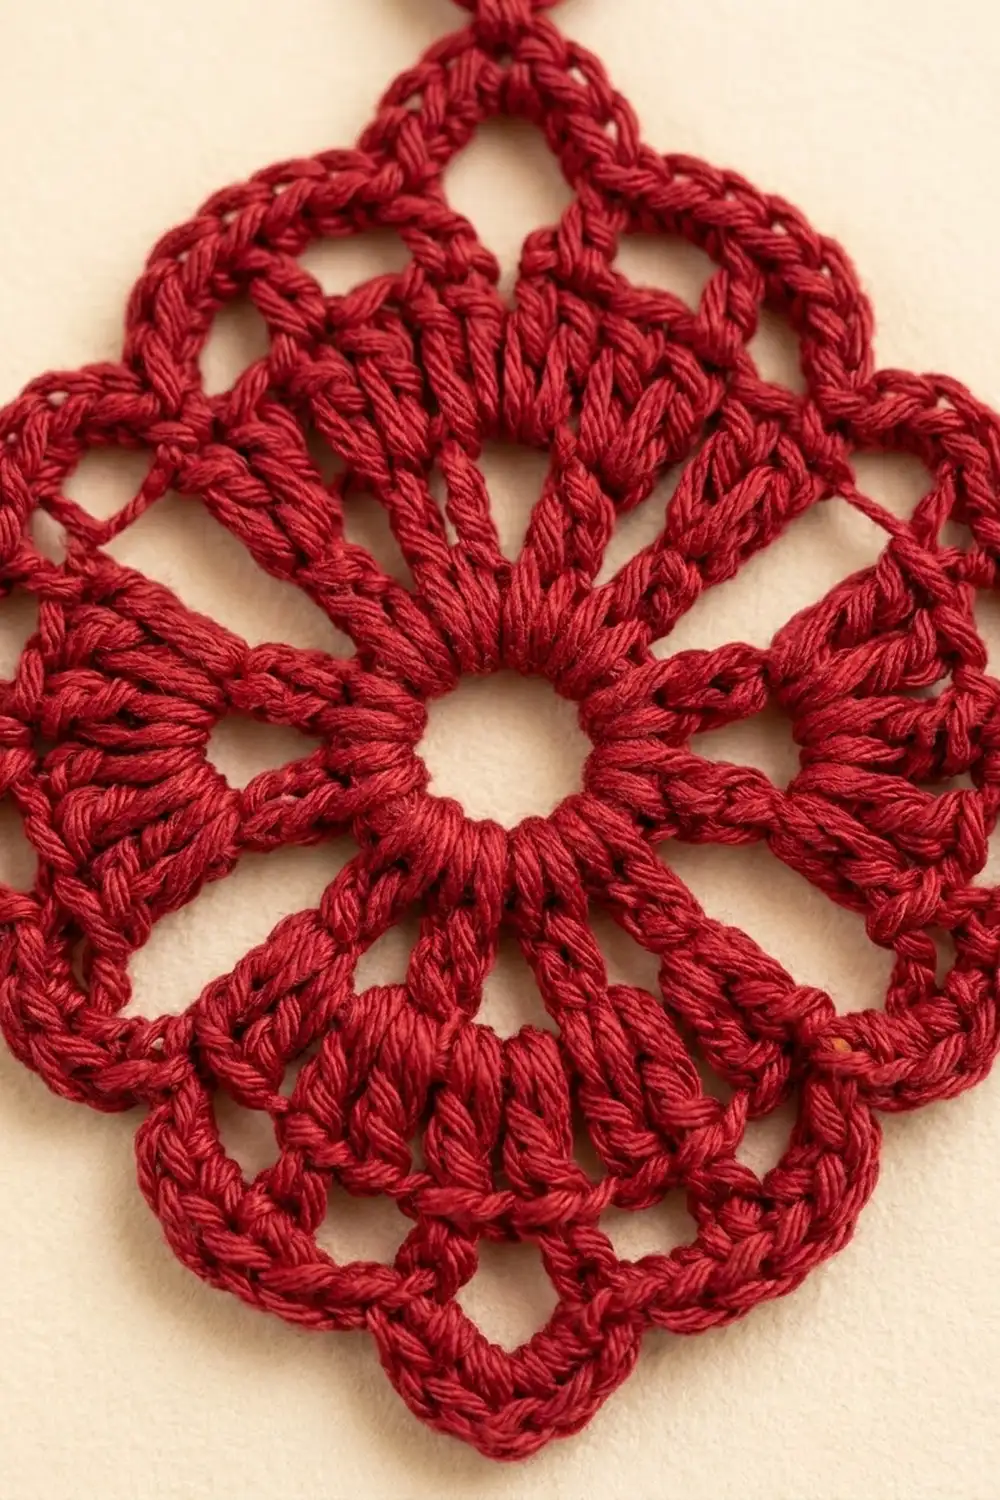
Motif (make 36)
Work the first motif completely. Work Rounds 1 to 4 the same way on every other motif, then join each one on Round 5 (see Joining).
Ch 6, sl st to the first ch to form a ring.
Round 1: Ch 3 (counts as dc), 23 dc into the ring, sl st to the top of the beginning ch-3. (24 dc)
Do not pull the ring tight, so the center opening stays open and round.
Round 2: Ch 3 (counts as dc), dc in the next st, ch 2, *dc in each of the next 2 sts, ch 2*; rep from * to * 10 more times, sl st to the top of the beginning ch-3. (24 dc in 12 pairs, 12 ch-2 sps)
These 12 pairs of double crochet are the spokes of the wheel.
Round 3 (squaring round): Sl st in the next dc and into the next ch-2 sp. Ch 3 (counts as dc), (2 dc, ch 3, 3 dc) in the same sp for the first corner, ch 1, [3 dc in the next ch-2 sp, ch 1] twice; *(3 dc, ch 3, 3 dc) in the next ch-2 sp, ch 1, [3 dc in the next ch-2 sp, ch 1] twice*; rep from * to * 2 more times, sl st to the top of the beginning ch-3. (48 dc, 4 ch-3 corner sps, 12 ch-1 sps)
Each side now has 12 dc between the corner ch-3 sps (3 + 3 + 3 + 3). This round turns the circle into a square by making 4 of the 12 spaces into corners.
Round 4 (lace round): Sl st in the next 2 dc and into the ch-3 corner sp. Ch 1, (sc, ch 7, sc) in the same corner sp, *[ch 4, sc in the next ch-1 sp] 3 times, ch 4, (sc, ch 7, sc) in the next corner sp*; rep from * to * 2 more times, [ch 4, sc in the next ch-1 sp] 3 times, ch 4, sl st to the first sc. (20 sc, 16 ch-4 arches, 4 ch-7 corner loops)
Each side has 4 ch-4 arches between the corner loops. These arches make the ring of open lace around the spokes.
Round 5 (edge round): Sl st into the first ch-7 corner loop. Ch 1, (4 sc, ch 3, 4 sc) in the same loop, *5 sc in each of the next 4 ch-4 arches, (4 sc, ch 3, 4 sc) in the next ch-7 loop*; rep from * to * 2 more times, 5 sc in each of the last 4 ch-4 arches, sl st to the first sc. Fasten off. (112 sc, 4 ch-3 corner tips)
Count per side: 4 sc (half of the corner) + 20 sc (4 arches x 5 sc) + 4 sc (half of the corner) = 28 sc. Four sides x 28 sc = 112 sc. The ch-3 tip at each corner is not included in this count and is the joining point.
Weave in the tails on the wrong side through the solid sc and dc stitches, not through the lace chains.
Make All Pieces
Make 36 motifs in cranberry red. Complete 1 full motif. On the other 35, work Rounds 1 to 4 only, so you can join them on Round 5.
Layout grid (A, B, C = columns; 1 to 12 = rows; every motif sits on point):
Row 1:   A1  B1  C1    <- tassel end
Row 2:   A2  B2  C2
Row 3:   A3  B3  C3
 ...     ..  ..  ..
Row 11:  A11 B11 C11
Row 12:  A12 B12 C12   <- tassel end
Each motif touches its left and right neighbors at its side tips. It touches the motifs above and below at its top and bottom tips. Where 4 motifs meet, the space between them forms an open diamond window.
Joining
Method: Join as you go on Round 5, at the ch-3 corner tips only. Work Round 5 exactly as written. At each corner that meets a finished motif, replace the ch 3 with a JT. Each joint connects only two motifs, so no tip is ever joined more than once.
Order:
- A1 is the full motif you already made.
- B1: join its left tip to the right tip of A1.
- C1: join its left tip to the right tip of B1.
- A2: join its top tip to the bottom tip of A1.
- B2: join its top tip to B1 and its left tip to A2.
- C2: join its top tip to C1 and its left tip to B2.
- Continue row by row until C12.
Stitch-to-stitch logic: The JT is ch 1, join, ch 1. It is the same length as 3 chains, just like the ch 3, so every corner tip is the same size whether it is joined or free. The 28 sc on each side do not change. Nothing is added or removed at any seam.
Count: 2 side joints per row x 12 rows = 24, plus 3 top-to-bottom joints x 11 gaps between rows = 33. Total: 57 joints.
Tension: Keep the JT loose and even with the rest of the chain. If it is too tight, the tips pucker and the lattice pulls in. If it is too loose, the diamonds wobble.
Size checkpoint: After Row 3, lay the piece flat and measure. It should be 17.25 in (43.8 cm) wide and 17.25 in (43.8 cm) long, because 3 x 5.75 in = 17.25 in (3 x 14.6 cm = 43.8 cm).
Border: Edge Finish and Tassels
This runner has no added border round. Round 5 of the outer motifs forms the zigzag edge, so the finished edge matches the look of the lattice inside.
Edge gauge: 7 sc per 1 in (2.5 cm), the same as the motif gauge.
Edge count for each side of the runner:
- Each long side: 12 motifs x 2 outer edges = 24 diamond edges x 28 sc = 672 sc. There are 12 free ch-3 tips pointing out and 11 V-shaped inner points where the motifs meet.
- Each short end: 3 motifs x 2 outer edges = 6 diamond edges x 28 sc = 168 sc, with 3 free ch-3 bottom tips for the tassels.
Why the math works: Every motif keeps its 28 sc per side, and each joint uses a corner ch-3 loop that is already there. No stitches are added at the seams or along the edge. The outer edge therefore has the same stitch density as a single motif, and it lies flat without ruffling or cupping.
Tassels (make 6):
- Wrap yarn around the 4.5 in (11.4 cm) card 40 times.
- Slide a 10 in (25.4 cm) strand under the loops at the top and tie it tightly. Leave its ends long.
- Cut the loops at the bottom.
- To make a rounded head, wrap a 12 in (30.5 cm) strand 6 times around the tassel, 0.75 in (1.9 cm) below the top. Tie it and hide the ends inside the tassel.
- Trim the bottom evenly so the tassel is 4 in (10.2 cm) long from the top.
- Use the tie ends to attach one tassel to the free bottom ch-3 tip of each end motif: A1, B1, C1, A12, B12, and C12. Knot securely and weave the ends into the tassel.
Final Blocking
- Weave in all tails before blocking.
- Soak the runner in cool water for 10 minutes. Press out the water gently; do not wring.
- Roll it in a towel to remove extra moisture.
- Lay it flat on blocking mats. Pin the side tips of the outer motifs to a total width of 17.25 in (43.8 cm).
- Pin the top and bottom tips of each column so the length is 69 in (175.3 cm).
- Pin each free ch-3 corner tip into a sharp point.
- Check that all diamond windows are the same size and that the spokes in each center are straight.
- Let it dry completely, then unpin. Smooth the tassels with damp fingers and trim if needed.
Final Quality-Control Checklist
- 36 motifs, each with 112 sc and 4 corner tips
- Each motif is 4 in (10.2 cm) per side and 5.75 in (14.6 cm) from tip to tip
- 57 joints, each a single JT linking 2 motifs
- Width is 17.25 in (43.8 cm) and length is 69 in (175.3 cm)
- Every center ring is open and round
- All diamond windows are the same size
- 6 tassels, each 4 in (10.2 cm) long, firmly attached to the end tips
- No tails visible on the right side
Troubleshooting
Motif cups or curls: Your Round 5 sc may be too tight. Go up half a hook size for Round 5 only, or work the sc more loosely.
Motif ruffles: Check that you worked 5 sc, not 6, in each ch-4 arch, and 4 sc on each side of each ch-3 tip.
Square looks round: Check Round 3. Corner spaces need (3 dc, ch 3, 3 dc), and side spaces need 3 dc only.
Joints pull or pucker: Make the JT chains as loose as the ch 3 at the free tips.
Runner is too long or too short: Measure one blocked motif from tip to tip and multiply by 12. Change your hook size, or add or remove a row of 3 motifs.
Tassel heads look flat: Wrap the head strand more tightly, and push the yarn above it upward to round out the head.
Care
Hand wash in cool water with a mild detergent, press out the water, and dry flat, pinning the tips if needed. Do not tumble dry. If you need to press it, use a warm iron through a cloth.
Final Notes
The measurement chain is simple. Each blocked motif has 28 sc per side, which gives 4 in (10.2 cm) per side and 5.75 in (14.6 cm) from tip to tip. Three motifs across make 17.25 in (43.8 cm), and 12 motifs down make 69 in (175.3 cm). Each joint uses an existing corner loop and adds nothing, so the edge counts stay exact: 672 sc on each long side and 168 sc on each short end. Adding 4 in (10.2 cm) tassels at both ends brings the total length to 77 in (195.6 cm).
Check your first motif carefully, keep your joins even, and block the runner well. The lattice will open up beautifully on your holiday table.
Happy crocheting!