

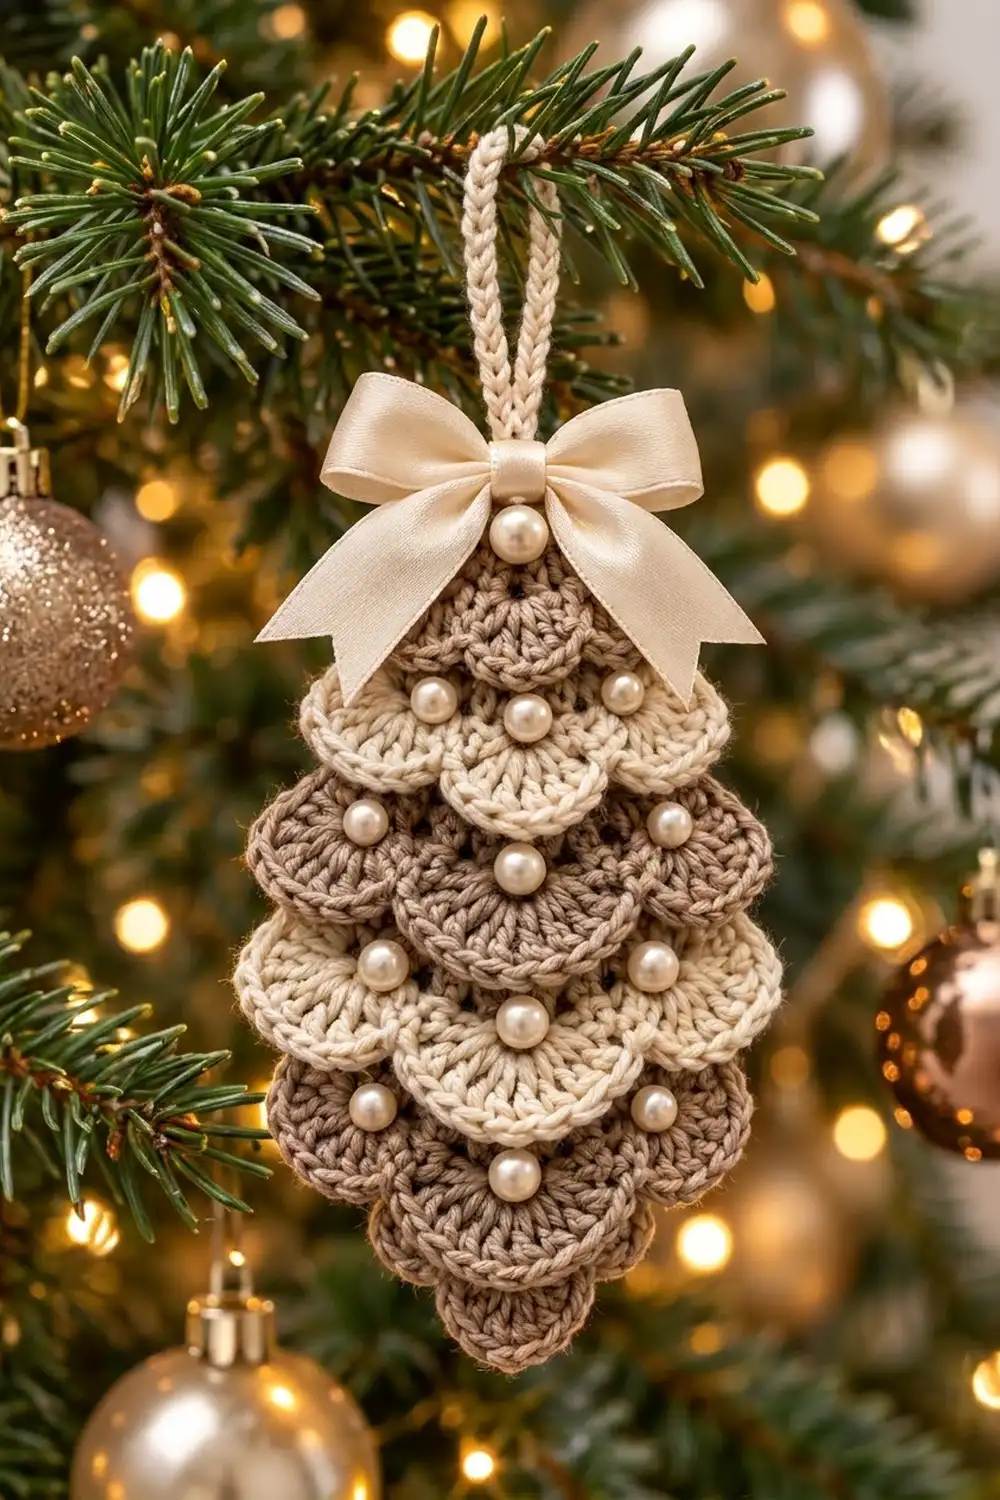
This little tree ornament is made of soft scallop tiers that overlap like shingles. The tiers alternate between warm taupe and creamy ivory. Each fan has a pearl bead sewn at its center, and a cream satin bow with a larger pearl sits at the top. The result feels vintage and elegant, and it looks right at home on a tree full of gold lights and champagne baubles.
The finished body is about 3.6 in (9.1 cm) wide and 5.4 in (13.7 cm) tall, not counting the hanging loop. The outline starts with a single fan at the top, widens to four fans across the middle, and narrows back to a single rounded fan at the bottom. A cream cord loop adds about 1.75 in (4.4 cm) above the bow.
This pattern uses US crochet terms throughout.
The construction is simple. First you work a small single crochet base panel in taupe, top-down in rows, shaped like an elongated diamond. Every fourth row is worked in back loops only, which leaves a line of free front loops on the right side. Then you work the seven fan tiers into those free loops, so each tier hangs down over the rows below. A slip stitch edging, a crocheted cord, pearls and a ribbon bow finish the piece.
Finished Size and Construction
- Finished size: about 3.6 in (9.1 cm) wide x 5.4 in (13.7 cm) tall, plus a 1.75 in (4.4 cm) loop
- Skill level: Easy to Intermediate
- Terminology: US crochet terms
- Yarn weight: DK (#3, light)
- Hook: 3.5 mm (E-4)
- Number of pieces: 1 crocheted body, plus 1 hanging cord
- Layout: 7 overlapping fan tiers holding 1, 2, 3, 4, 3, 2, 1 fans
- Base panel size: 3.4 in (8.6 cm) at its widest x 4.9 in (12.4 cm) tall
- Size before edging: 3.4 in (8.6 cm) x 4.9 in (12.4 cm) base panel
- Edging depth: slip stitch edge, about 1/16 in (0.2 cm)
Materials
Choose a smooth DK cotton or cotton blend. Cotton gives crisp fans with clear stitch definition and holds its shape on the tree. Avoid fuzzy yarn, because it hides the fan texture.
- Taupe (base panel, tiers 1, 3, 5, 7, edging): 10 g / 23 m
- Cream (tiers 2, 4, 6, hanging cord): 6 g / 14 m
These amounts assume a yarn of about 115 m per 50 g. They include a margin for your gauge swatch and for weaving in ends.
Tools and notions:
- 3.5 mm (E-4) crochet hook
- Tapestry needle
- 1 stitch marker
- 16 ivory pearl beads, 6 mm
- 1 ivory pearl bead, 8 mm
- Cream satin ribbon, 5/8 in (1.6 cm) wide, 12 in (30.5 cm) long
- Sewing needle and cream thread
- Scissors, pins and a blocking mat
Abbreviations (US Terms)
- ch – chain
- sl st – slip stitch
- sc – single crochet
- dc – double crochet
- tr – treble crochet
- sc2tog – single crochet 2 together
- BLO – back loop only
- FL – front loop
- sk – skip
- st(s) – stitch(es)
- RS / WS – right side / wrong side
Special stitch – Fan: (2 dc, 3 tr, 2 dc) all in the same stitch. Each Fan has 7 sts and stands about 5/8 in (1.6 cm) tall.
Gauge and Checkpoints
Gauge: 20 sc and 22 rows = 4 in (10.2 cm) in sc worked in rows. That is 5 sc and 5.5 rows per 1 in (2.5 cm).
Gauge matters because the panel width and the free-loop counts set the whole outline. Make one ornament as a test piece before starting a batch, and measure at each checkpoint:
- After Row 6: 9 sts, about 1.8 in (4.6 cm) wide; panel about 1.1 in (2.8 cm) tall
- After Row 14: 17 sts, about 3.4 in (8.6 cm) wide; panel about 2.5 in (6.4 cm) tall
- After Row 27: panel about 4.9 in (12.4 cm) tall
- After all tiers: about 3.6 in (9.1 cm) x 5.4 in (13.7 cm)
If your panel is too big, switch to a 3.25 mm hook. If it is too small, switch to a 3.75 mm hook. Change the hook, not the stitch counts, because every tier depends on its exact free-loop count.

Base Panel
Use taupe. The panel is worked top-down. The ch 1 at the start of a row does not count as a stitch. An increase is 2 sc in one stitch, and a decrease is sc2tog.
Rows marked BLO are always RS rows. Working them in back loops leaves the front loops of the row before them free on the RS. The tiers are worked into these free loops later.
Row 1 (RS): Ch 6, sc in 2nd ch from hook and in each ch across, turn. (5 sts) Place a marker on the RS.
Row 2 (WS): Ch 1, sc in each st across, turn. (5 sts)
Row 3 (RS, BLO): Ch 1, 2 sc in first st, sc in next 3 sts, 2 sc in last st, turn. (7 sts)
Row 4: Ch 1, sc across, turn. (7 sts)
Row 5: Ch 1, 2 sc in first st, sc in next 5 sts, 2 sc in last st, turn. (9 sts)
Row 6: Ch 1, sc across, turn. (9 sts)
Row 7 (BLO): Ch 1, 2 sc in first st, sc in next 7 sts, 2 sc in last st, turn. (11 sts)
Row 8: Ch 1, sc across, turn. (11 sts)
Row 9: Ch 1, 2 sc in first st, sc in next 9 sts, 2 sc in last st, turn. (13 sts)
Row 10: Ch 1, sc across, turn. (13 sts)
Row 11 (BLO): Ch 1, 2 sc in first st, sc in next 11 sts, 2 sc in last st, turn. (15 sts)
Row 12: Ch 1, sc across, turn. (15 sts)
Row 13: Ch 1, 2 sc in first st, sc in next 13 sts, 2 sc in last st, turn. (17 sts)
Row 14: Ch 1, sc across, turn. (17 sts) This is the widest row.
Row 15 (BLO): Ch 1, sc2tog, sc in next 13 sts, sc2tog, turn. (15 sts)
Row 16: Ch 1, sc across, turn. (15 sts)
Row 17: Ch 1, sc2tog, sc in next 11 sts, sc2tog, turn. (13 sts)
Row 18: Ch 1, sc across, turn. (13 sts)
Row 19 (BLO): Ch 1, sc2tog, sc in next 9 sts, sc2tog, turn. (11 sts)
Row 20: Ch 1, sc across, turn. (11 sts)
Row 21: Ch 1, sc2tog, sc in next 7 sts, sc2tog, turn. (9 sts)
Row 22: Ch 1, sc across, turn. (9 sts)
Row 23 (BLO): Ch 1, sc2tog, sc in next 5 sts, sc2tog, turn. (7 sts)
Row 24: Ch 1, sc across, turn. (7 sts)
Row 25: Ch 1, sc2tog, sc in next 3 sts, sc2tog, turn. (5 sts)
Row 26: Ch 1, sc across, turn. (5 sts)
Row 27 (BLO): Ch 1, sc in each st across. (5 sts) Fasten off and weave in ends.
You now have seven lines of free front loops on the RS, in Rows 2, 6, 10, 14, 18, 22 and 26.
Fan Tiers
Each tier uses a multiple of 4 sts plus 1. The repeat is: sk 1 FL, Fan in next FL, sk 1 FL, sl st in next FL. One Fan uses 4 loops, and the final sl st lands exactly on the last loop.
Hold the panel with the RS facing you, turned so the bottom tip points up. Fans worked this way grow toward the bottom of the ornament and lie down over the rows below. Work from the bottom tier up, so finished fans never cover loops you still need.
Tier pattern: Join the yarn with a sl st in the first free FL, *sk next FL, Fan in next FL, sk next FL, sl st in next FL; rep from * as stated in the table. Fasten off and weave in ends on the WS.
| Tier | Color | Free loops (row) | Repeats | Fans | Sts in tier |
|---|---|---|---|---|---|
| 7 | Taupe | 5 (Row 26) | 1 | 1 | 7 + 2 sl st |
| 6 | Cream | 9 (Row 22) | 2 | 2 | 14 + 3 sl st |
| 5 | Taupe | 13 (Row 18) | 3 | 3 | 21 + 4 sl st |
| 4 | Cream | 17 (Row 14) | 4 | 4 | 28 + 5 sl st |
| 3 | Taupe | 13 (Row 10) | 3 | 3 | 21 + 4 sl st |
| 2 | Cream | 9 (Row 6) | 2 | 2 | 14 + 3 sl st |
| 1 | Taupe | 5 (Row 2) | 1 | 1 | 7 + 2 sl st |
Total: 16 Fans, 8 in each color.
Checkpoint: Each Fan stands about 5/8 in (1.6 cm) tall. The tiers are 4 rows apart, about 0.7 in (1.8 cm), so each tier nearly reaches the next one. Tier 7 hangs about 1/2 in (1.3 cm) below Row 27, which makes the body about 5.4 in (13.7 cm) tall.
Hanging Cord
With cream, ch 26. Sl st in the back bump of the 2nd ch from hook and in each back bump across. (25 sl st) Fasten off, leaving an 8 in (20.3 cm) tail.
The cord is about 3.5 in (8.9 cm) long. Fold it in half to make a 1.75 in (4.4 cm) loop, and set it aside. You will attach it after blocking.
Edging
Edging gauge: 1 sl st per row end on the sides, and 1 sl st per stitch on the top and bottom. Lift the fans out of the way as you work.
Edging round (taupe): With the RS facing, join in the first st of Row 27. Work along the bottom: sl st in each st of Row 27 (5 sl st). Work up the side: sl st in each row end (27 sl st). Work across the top: sl st in each ch of the foundation chain (5 sl st). Work down the other side: sl st in each row end (27 sl st). Join with a sl st to the first sl st. (64 sl st) Fasten off and weave in ends.
Why the math works: Each side count equals the 27 rows, so the edging matches the row gauge without ruffling or pulling in. The top and bottom counts equal the 5 sts of Row 1 and Row 27. The corner stitches are already part of these counts, so nothing is counted twice. Slip stitches add almost no width, so the panel stays 3.4 in (8.6 cm) at its widest.
Final Blocking
- Lightly mist the ornament with cool water, or hold a steam iron 1 in (2.5 cm) above it. Never press.
- Lay it RS up on a blocking mat.
- Pin the base panel to 3.4 in (8.6 cm) wide at Row 14 and 4.9 in (12.4 cm) tall.
- Shape each Fan into a smooth half-circle that overlaps the tier below.
- Check that the body measures about 3.6 in (9.1 cm) x 5.4 in (13.7 cm).
- Let it dry completely before removing the pins.
- Once dry, sew the cord ends to the WS of Rows 1 to 2 at the center top.
- With sewing thread, stitch one 6 mm pearl to the center of each Fan, about 1/4 in (0.6 cm) below the sl st line, on the middle tr. Pass the thread through twice and knot it on the WS. This uses 16 pearls.
- Tie the ribbon into a bow about 2.5 in (6.4 cm) wide, and trim the tails at an angle. Sew the bow to the top center, over Row 1 and the cord ends. Stitch the 8 mm pearl through the knot.
Pearls and ribbon go on after blocking because satin can mark with heat or moisture.
Final Quality-Control Checklist
- Base panel has 27 rows and 17 sts at its widest
- Seven tiers in this order: taupe, cream, taupe, cream, taupe, cream, taupe
- Fan counts are 1, 2, 3, 4, 3, 2, 1
- Every Fan has 7 sts and is anchored by a sl st on each side
- Edging has 64 sl st and the sides lie flat
- 16 pearls sit at the Fan centers, and the 8 mm pearl is on the bow
- The cord loop is secure and centered
- No yarn ends show on the RS
- Body is about 3.6 in (9.1 cm) x 5.4 in (13.7 cm)
Troubleshooting
Not enough free loops for a tier. You probably worked the BLO row on the WS. Check that Rows 3, 7, 11, 15, 19, 23 and 27 are RS rows.
Fans stand up instead of lying down. You worked the tier with the top tip pointing up. Turn the panel so the bottom tip points up, then rework the tier.
Fans ruffle too much. Your tr are too loose. Go down one hook size for the tiers only.
Base panel shows between tiers. Your rows are taller than the gauge. Use a smaller hook for the panel.
Edges look jagged. Make sure the edging has exactly one sl st per row end.
Ornament curls. Block it flat again and let it dry while pinned.
Care
Spot clean with a damp cloth and mild soap, and lay flat to dry. Store the ornament flat in tissue paper so the fans and bow keep their shape.
Final Notes
Every size in this pattern comes from the gauge. A gauge of 5 sc and 5.5 rows per 1 in (2.5 cm) gives a base panel of 3.4 in (8.6 cm) x 4.9 in (12.4 cm). The free loop counts of 5, 9, 13, 17, 13, 9, 5 give tiers of 1, 2, 3, 4, 3, 2, 1 Fans. Fans 5/8 in (1.6 cm) tall bring the finished body to about 3.6 in (9.1 cm) x 5.4 in (13.7 cm). Check your gauge first, and every later number will fall into place.
Happy crocheting!