

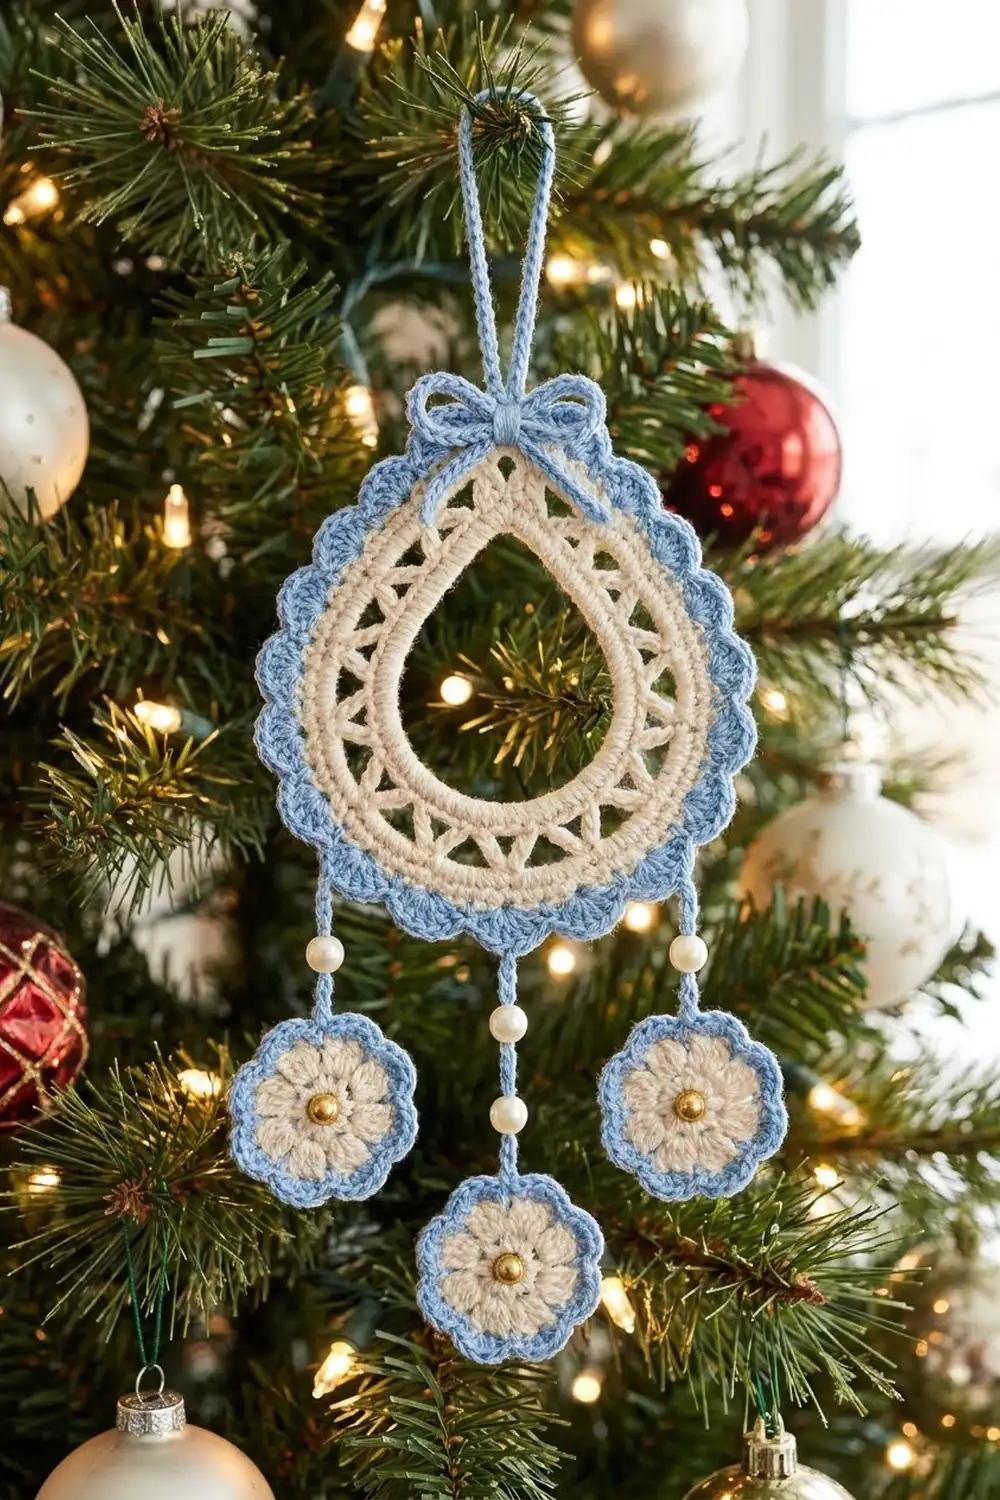
This ornament is a lacy cream teardrop with an open center. A ring of triangle windows runs around the frame, and a powder-blue scalloped edge finishes the outside. A small blue bow sits at the top point over a chain hanging loop. Three little flowers hang from the bottom edge on short chains, and each chain carries a pearl bead.
The palette is soft and wintry. Cream is used for the frame and flower centers. Dusty powder blue is used for the border, bow, flower edges, and drop chains. Gold beads sit in the flower centers and ivory pearls sit on the drops. The ornament looks vintage and delicate, and it stands out against dark branches.
This pattern uses US crochet terms. The teardrop frame measures 3.5 in (8.9 cm) wide and 4 in (10.2 cm) tall, including the border. From the top of the hanging loop to the bottom of the center flower, the ornament is about 8.25 in (21.0 cm) long.
You work the frame in joined rounds around a chain ring. A pointed stitch group at the top of each round gives the teardrop its shape. Then you make one bow and three flowers, add the hanging loop and bead drops in blue, and sew the bow over the point.
Finished Size and Construction
- Finished frame size: 3.5 in wide x 4 in tall (8.9 x 10.2 cm)
- Total length with loop and drops: about 8.25 in (21.0 cm)
- Skill level: Intermediate
- Terminology: US
- Yarn weight: Sport (#2) cotton
- Hook: 2.75 mm (C-2)
- Number of pieces: 5 (1 teardrop frame, 1 bow, 3 flowers)
- Layout: Bow at the top point, one flower at the bottom center, one flower on each side
- Flower size: 1.25 in (3.2 cm) across
- Frame size before border: 2.75 in wide x 3.25 in tall (7.0 x 8.3 cm)
- Border depth: 0.375 in (1.0 cm)
Materials
Mercerized sport-weight cotton works best. It holds the point, shows off the triangle windows, and blocks crisp. A matte cotton blend also works, but the edges will look softer. Avoid fuzzy yarns, because the fuzz fills in the windows.
Yarn:
– Color A, Cream: 8 g, about 24 m (frame and flower centers)
– Color B, Powder Blue: 6 g, about 18 m (border, bow, flower edges, loop, drop chains)
These amounts assume about 3 m per gram. They include a margin for testing and for tails.
Tools and notions:
– 2.75 mm (C-2) crochet hook
– 3 pearl beads, 4–5 mm, with holes big enough for your yarn
– 3 gold beads, 3–4 mm, for the flower centers
– Tapestry needle
– Sewing needle and cream thread
– Dental floss threader or a fine beading needle for stringing the pearls
– 4 locking stitch markers
– Blocking mat, rustproof pins, and a spray bottle
– Optional: liquid fabric stiffener
Abbreviations (US Terms)
- ch: chain
- sl st: slip stitch
- sc: single crochet
- hdc: half double crochet
- dc: double crochet
- sp: space
- MR: magic ring
- beg: beginning
- st(s): stitch(es)
Special stitch:
– V-st (V-stitch): (dc, ch 2, dc) in the same stitch.
Gauge and Checkpoints
Gauge: 24 sc and 26 rows = 4 in (10.2 cm) in sc worked flat. Gauge matters most for the frame, because small differences in stitch size add up over 71 border stitches.
Make the frame through Round 4 and measure it before you crochet anything else.
Checkpoints:
– After Round 1: the opening is about 1.25 in wide x 1.75 in tall (3.2 x 4.4 cm).
– After Round 2: 1.75 in wide x 2.25 in tall (4.4 x 5.7 cm), measured to the outer edge.
– After Round 4: 2.75 in wide x 3.25 in tall (7.0 x 8.3 cm).
– After Round 5 (border): 3.5 in wide x 4 in tall (8.9 x 10.2 cm).
– Each flower: 1.25 in (3.2 cm) across.
If the frame is too big by more than 0.25 in (0.6 cm), switch to a 2.5 mm hook. If it is too small, switch to a 3 mm hook. If the frame cups, your dc are too short, so work Round 3 more loosely. If it ruffles, work Round 4 more tightly.
Teardrop Frame (Color A, then Color B)
The frame starts with a chain ring that becomes the open center. In every round, a (stitch, ch 2, stitch) group at the top builds a sharp point. Increases along the bottom curve keep the frame flat.
Foundation: With Color A, ch 40. Without twisting, sl st in the first ch to form a ring. Lay the ring flat as a drop shape with the joined ch at the top.
Round 1: Ch 1, (sc, ch 2, sc) in the first ch, then sc in each of the next 39 ch. Sl st to the first sc.
(41 sc = 40 sc worked 1 per ch + 1 extra sc at the point; plus 1 ch-2 sp at the point)
Round 2: Sl st in the point ch-2 sp, ch 1, (sc, ch 2, sc) in the same sp. Sc in the next 8 sc, then [2 sc in the next sc, sc in the next 3 sc] 6 times. Work 2 sc in the next sc, then sc in the next 8 sc. Sl st to the first sc.
(50 sc: 41 sc worked 1 per stitch + 7 increases + 2 at the point; plus 1 ch-2 sp at the point)
Check: 8 + 24 + 1 + 8 = 41 stitches worked. The 7 increases are centered on the bottom curve, so the sides stay straight on the way up to the point.
Round 3 (triangle mesh): Sl st in the point ch-2 sp. Ch 3 (counts as dc), then (dc, ch 2, 2 dc) in the same sp. This is the point shell. Ch 1. Skip the next 2 sc, V-st in the next sc, ch 1. Repeat from * 15 more times, for 16 V-sts in total. Skip the last 2 sc, then sl st to the top of the beg ch-3.
(36 dc: 4 in the point shell + 32 in the 16 V-sts; plus 16 V ch-2 sps, 17 ch-1 sps, and 1 ch-2 sp at the point)
Check: 16 x 3 + 2 = 50 sc used. The V-sts fan outward and the ch-1 bars span the skipped stitches, which opens the ring of triangle windows.
Round 4: Sl st in the next dc and in the point ch-2 sp. Ch 1, (sc, ch 2, sc) in the same sp. Sc in each of the next 2 dc, then sc in the next ch-1 sp. Sc in the next dc, sc in the V ch-2 sp, sc in the next dc, sc in the next ch-1 sp. Repeat from * 15 more times. Sc in the top of the beg ch-3 and in the next dc. Sl st to the first sc. Fasten off Color A.
(71 sc = 70 sc worked 1 per stitch or space + 1 extra sc at the point; plus 1 ch-2 sp at the point)
Check: 2 + 2 + 1 + 64 + 2 = 71. Working only 1 sc into each V space keeps the windows open and the edge flat.
Checkpoint: The frame should measure 2.75 x 3.25 in (7.0 x 8.3 cm). Fix the size now, before you start the border.
Make All Pieces
Color A, Cream: 1 frame (Rounds 1–4), plus Rounds 1–3 of all 3 flowers.
Color B, Powder Blue: frame border (Round 5), Round 4 of all 3 flowers, 1 bow, the hanging loop, and 3 drop chains.
Layout (front view):
            [ loop ]
            [ BOW  ]
          /  frame   \
         |  (open)    |
          \__________/
       |        |        |
     [F1]       |      [F3]
              [F2]
F1 and F3 hang on the shorter side chains. F2 hangs on the longer center chain.
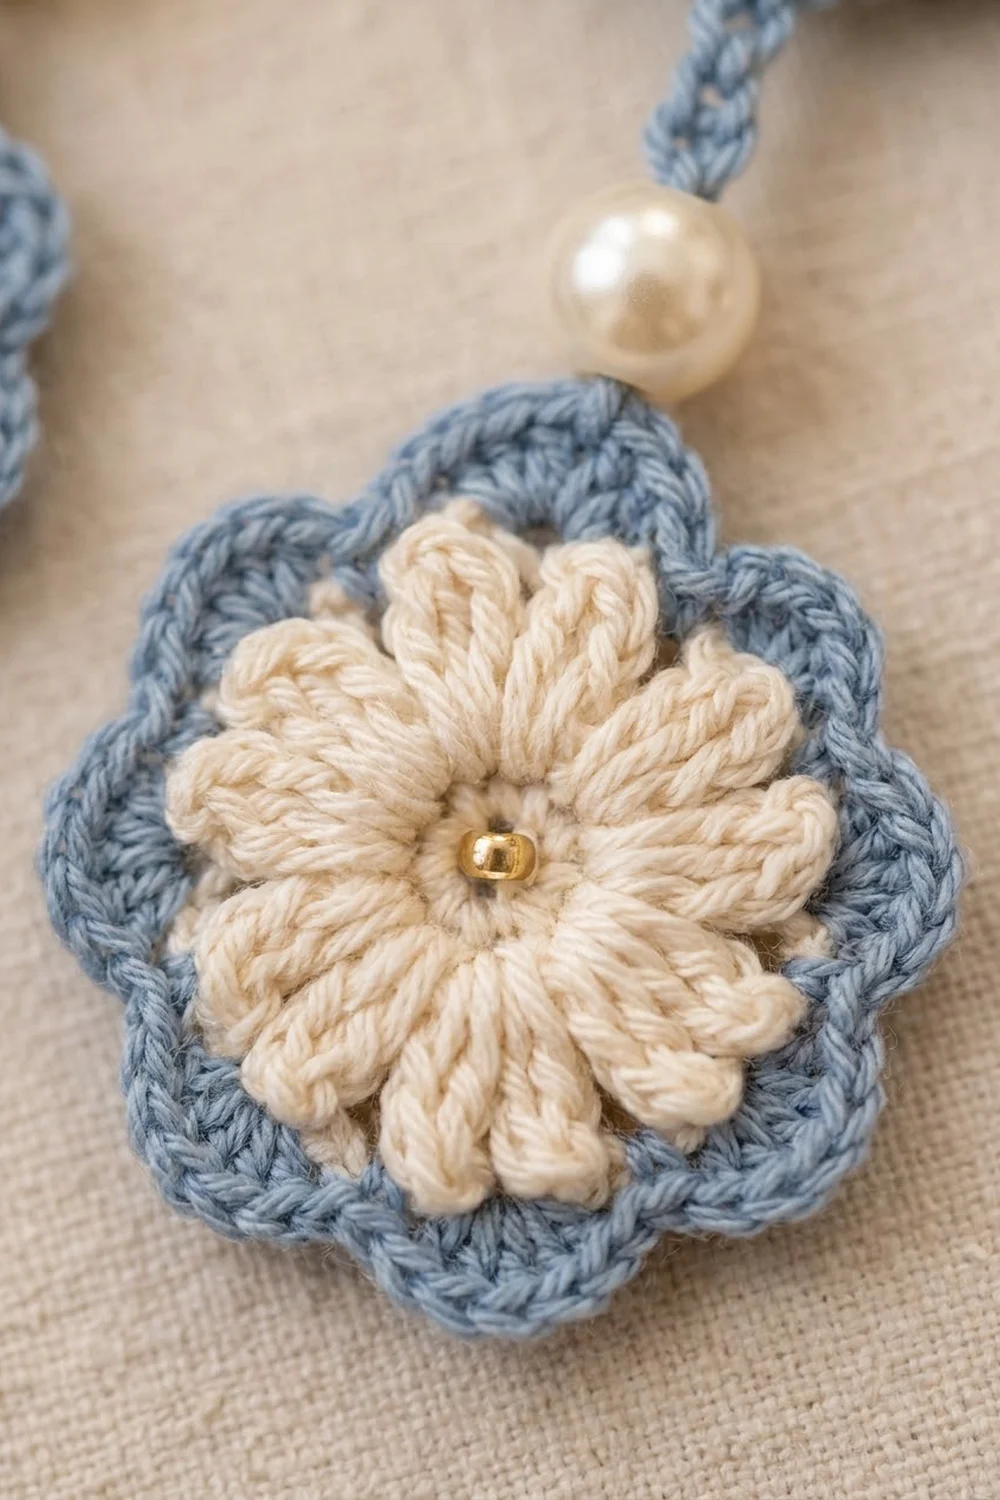
Flower (make 3)
Round 1: With Color A, make a MR, ch 1, and work 8 sc in the ring. Sl st to the first sc and pull the ring closed. (8 sc)
Round 2: Ch 1, 2 sc in each sc around. Sl st to the first sc. (16 sc)
Round 3: Ch 1. Sc in the next sc, (hdc, dc, hdc) in the next sc. Repeat from * 7 more times. Sl st to the first sc and fasten off Color A.
(32 sts: 8 sc + 8 petals of 3 sts each)
Round 4: Join Color B with a sl st in any sc between petals. Ch 1. Sc in the sc, hdc in the next hdc, (hdc, ch 1, hdc) in the next dc, hdc in the next hdc. Repeat from * 7 more times. Sl st to the first sc and fasten off.
(40 sts: 8 sc + 32 hdc; plus 8 ch-1 peaks)
The blue round follows each petal and rises to a peak at the ch-1, which makes the scalloped outline. Sew 1 gold bead to the center of each flower with cream thread.
Bow (make 1)
Row 1: With Color B, ch 20. Hdc in the 3rd ch from the hook and in each ch across. Fasten off and leave an 8 in (20.3 cm) tail. (18 hdc)
Fold both ends of the strip to the center back so they overlap by about 0.25 in (0.6 cm). This forms two loops. Wrap the tail tightly around the center 6–8 times to pinch it, then secure the tail on the back. The bow should be 1.5 in (3.8 cm) wide.
Bow tails: With Color B, ch 10 and fasten off. Fold the chain into a V and sew the fold behind the bow center. The ends should hang about 0.75 in (1.9 cm) below the bow.
Joining: Border, Loop, and Drops
Round 5: Scalloped Border (Color B)
Border gauge: Each scallop covers 4 stitches of Round 4, which is about 0.67 in (1.7 cm) of edge. The border adds 0.375 in (1.0 cm) on every side.
Join Color B with a sl st in the point ch-2 sp. Ch 1 and sc in the same sp. This sc is anchor 0. Skip the next sc, 5 dc in the next sc, skip the next sc, sc in the next sc. Repeat from * 16 more times, for 17 scallops. Skip the next sc, 5 dc in the next sc, skip the last sc, then sl st to the first sc.
(18 scallops: 90 dc + 18 sc anchors)
Why the math works: Round 4 has 71 sc. The 17 full repeats use 17 x 4 = 68 stitches, and the last scallop uses 3 more, for 68 + 3 = 71. Anchor 0 sits in the point space, so it doesn’t use any of the 71 stitches. The scallops mirror each other from the point, so anchor 9 lands exactly at the bottom center.
Hanging loop: Don’t fasten off. Ch 24, then sl st in anchor 0 again. Fasten off and weave in the end. The loop stands about 1.5 in (3.8 cm) tall.
Bead Drops
Count the sc anchors from anchor 0 in the direction you worked, and mark anchors 7, 9, and 11. Anchor 9 is the bottom center. Anchors 7 and 11 mirror each other.
Side drops (make 2): String 1 pearl onto Color B. Join with a sl st in anchor 7. Ch 3, slide the pearl up close to the hook, then ch 3. Sl st in any ch-1 peak of a flower and fasten off. Repeat at anchor 11. Each chain is about 1 in (2.5 cm) long.
Center drop: String 1 pearl onto Color B and join in anchor 9. Ch 5, slide the pearl up, then ch 4. Sl st in a ch-1 peak of the third flower and fasten off. This chain is about 1.5 in (3.8 cm) long.
Tension: Keep the drop chains as firm as your sc. Loose chains stretch under the flowers’ weight, and the pearls slide.
Attach the bow: Center the bow over the top point so it covers the base of the hanging loop. Stitch through the bow center and the point stitches from the back, so the stitches don’t show on the front.
Size checkpoint: Measure from the top of the loop to the bottom of the center flower. It should be about 8.25 in (21.0 cm).
Final Blocking
- Weave in all ends through stitches of the same color. Don’t trim them yet.
- Spray the ornament until it is evenly damp but not dripping.
- Pin the frame to 3.5 x 4 in (8.9 x 10.2 cm). Place the first pins at the top point and at the bottom anchor.
- Pin each scallop at its center dc to round it out.
- Pin each triangle window open with one pin through the middle.
- Pin each flower flat at 1.25 in (3.2 cm) across, with one pin in each ch-1 peak.
- Shape the bow loops with your fingers and fill each loop with a small roll of paper towel.
- Optional: brush on a thin coat of fabric stiffener.
- Let the ornament dry completely, then trim the ends.
Final Quality-Control Checklist
- Frame measures 3.5 x 4 in (8.9 x 10.2 cm).
- The open center is clean and drop-shaped, with a sharp top point.
- All 16 V-sts and their triangle windows are open and even.
- There are 18 blue scallops, 9 on each side.
- The hanging loop is secure and about 1.5 in (3.8 cm) tall.
- The bow is centered and covers the base of the loop.
- The drops hang from anchors 7, 9, and 11.
- The center flower hangs lower than the side flowers.
- The gold beads are sewn on tightly and the pearls sit snugly on their chains.
- No ends show on the front.
Troubleshooting
The point looks rounded: Work each point group into the ch-2 space itself, not into the stitch next to it.
The frame cups: Your Round 3 dc are too tight. Redo the round and pull up taller loops.
The frame ruffles: Check that Round 4 has 71 sc. The usual cause is extra stitches in the V spaces.
The border isn’t even: Recount Round 4. If you have 70 or 72 stitches, correct the count instead of adjusting the border.
The windows close up: Use a crisper yarn, or pin each window open and block with stiffener.
The ornament hangs crooked: Recount the anchors. The center drop must hang from anchor 9.
The pearls slide: Tighten the chain after each bead, or add a small stitch of thread under it.
Care
Hand wash in cool water, then pin flat to dry. Store flat in tissue so the scallops and bow keep their shape.
Final Notes
Each stage sets up the next one. At a gauge of 24 sc per 4 in (10.2 cm), Round 4 gives a 2.75 x 3.25 in (7.0 x 8.3 cm) frame with 71 sc. Those 71 sc divide evenly into 18 scallops. The 0.375 in (1.0 cm) border brings the frame to 3.5 x 4 in (8.9 x 10.2 cm), and the loop, bow, and bead drops finish the ornament at about 8.25 in (21.0 cm) long. Measure at each checkpoint before you move on, and the ornament will hang straight.
Happy crocheting!