

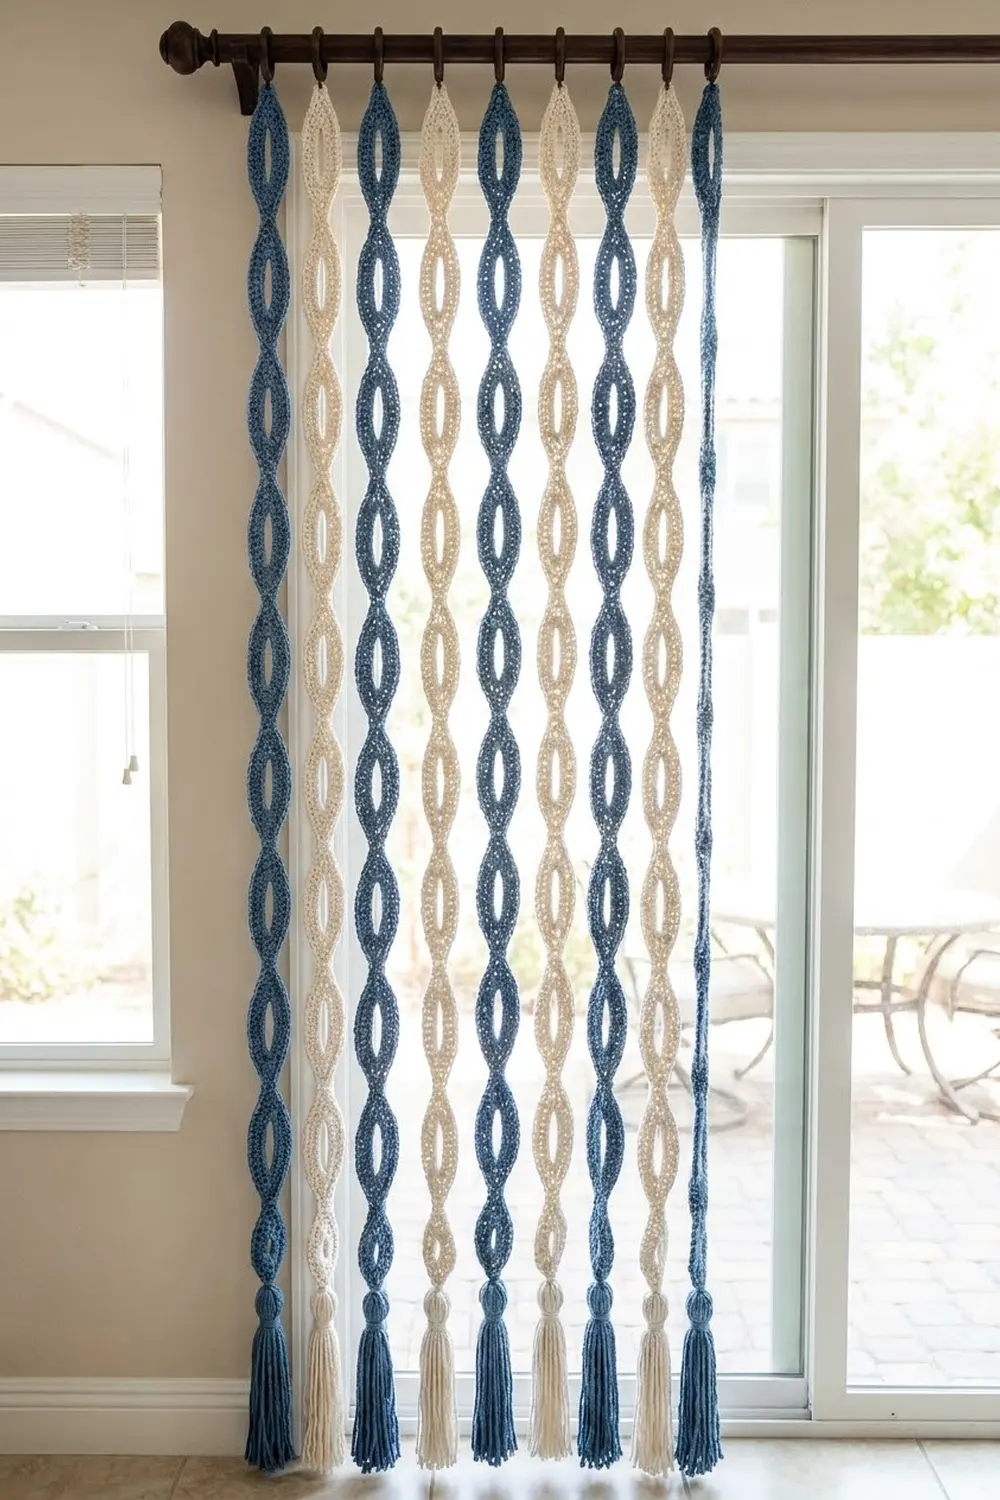
This strand curtain is made from separate crocheted cords. Each cord is a line of linked almond-shaped “eyes,” finished at the bottom with a round-headed tassel. Hung side by side on a rod, the strands let light and air through but still soften a window or doorway.
The sample alternates denim blue and cream. The look is relaxed and coastal, with a slightly boho feel. The thick single crochet edging makes each strand look like twisted rope.
All instructions use US crochet terms. Each finished strand measures 1 3/4 in (4.4 cm) wide and 84 3/4 in (215.3 cm) long from the top of the hanging loop to the tip of the tassel. Twenty strands spaced across a 48 in (121.9 cm) rod make one panel.
Each strand is worked in one piece. You chain a long skeleton up one side and come back down the other side to create open eyes. Then you cover the skeleton with single crochet and finish with an edging round. The tassels are made separately and tied on.
Finished Size and Construction
- Finished strand: 1 3/4 in (4.4 cm) wide x 84 3/4 in (215.3 cm) long, including the tassel
- Strand body (bottom waist to top waist): 75 3/4 in (192.4 cm)
- Hanging loop: 2 in (5.1 cm) tall
- Tassel: 7 in (17.8 cm) long, including the head
- Skill level: Easy / advanced beginner
- Terminology: US crochet terms
- Yarn weight: Worsted (#4) cotton
- Hook: US H-8 (5.0 mm)
- Number of pieces: 20 strands (10 blue, 10 cream) plus 20 tassels
- Layout: One row of 20 free-hanging strands, alternating colors
- Panel size: 48 in (121.9 cm) wide x 84 3/4 in (215.3 cm) long
- Strand width before edging: 1 1/4 in (3.2 cm)
- Edging depth: 1/4 in (0.6 cm) on each long side
Materials
Use a smooth worsted-weight cotton or cotton blend with about 190 m (208 yd) per 100 g. Cotton keeps the stitches crisp, and it hangs straight without stretching as much as acrylic. A tightly plied yarn gives the clearest rope texture.
- Color A, Denim Blue: 500 g (about 950 m / 1,040 yd)
- Color B, Cream: 500 g (about 950 m / 1,040 yd)
One strand with its tassel uses about 44 g (84 m). These quantities include a margin of about 15% for gauge differences and test swatches.
Tools:
- US H-8 (5.0 mm) crochet hook
- 20 wooden beads, 1 in (2.5 cm) across, for the tassel heads
- Stiff cardboard cut to 9 in (22.9 cm) tall, for wrapping tassels
- Tapestry needle
- Sharp scissors
- Locking stitch markers
- Tape measure
- Curtain rod no thicker than 1 in (2.5 cm)
Abbreviations (US Terms)
- ch – chain
- sc – single crochet
- sl st – slip stitch
- sp – space
- st(s) – stitch(es)
- inc – 2 sc in the same stitch
- rep – repeat
Special technique – sc over an arc: Insert your hook into the chain space (under the whole chain arc, not into individual chains) and work a single crochet. Pack the stitches snugly side by side so they fully cover the chain.
Gauge and Checkpoints
Gauge: 16 sc and 18 rows = 4 in (10.2 cm) in sc worked in rows.
Gauge matters here because small errors repeat 25 times along every strand. Make one complete strand before starting the rest, and measure it at each stage:
- After the skeleton: The skeleton is floppy, so don’t measure it for size yet. Just check that you have 25 open eyes.
- After Round 2: Four eye units, each measured from waist to waist, should be 12 in (30.5 cm) long, or 3 in (7.6 cm) per unit. The strand should be 1 1/4 in (3.2 cm) wide at the widest point of an eye.
- After Round 3: Each eye should be 1 3/4 in (4.4 cm) wide. Each waist should measure 3/4 in (1.9 cm) along the strand, and each eye 2 1/4 in (5.7 cm).
If your strand is too long or too wide, go down one hook size. If it is too short or too narrow, go up one hook size. If the eyes ripple or cup, your Round 2 stitches are too loose. Tighten your tension rather than changing the stitch counts.

Strand Pattern
Each strand starts at the bottom waist. The skeleton goes up Side A and comes back down Side B. Round 2 then covers Side B going up, makes the hanging loop, and covers Side A coming down. Round 3 follows the same path.
Skeleton – Side A (Foundation Chain)
Ch 3 for the bottom waist.
*Ch 11 for the arc, ch 3 for the waist; rep from * 24 more times (25 arcs total).
Ch 1 for turning.
Total: 354 ch (3 + 25 x 14 + 1).
The last 3 chains before the turning chain form the top waist. Lay the chain flat and make sure it isn’t twisted.
Skeleton – Side B (Coming Back Down)
Sc in the 2nd ch from the hook and in the next 2 ch (3 sc on the top waist).
*Ch 11, skip the next 11 ch (the Side A arc), sc in each of the next 3 ch (waist); rep from * 24 more times.
Total: 353 sts (3 sc + 25 x [11 ch + 3 sc]): 78 sc and 275 ch.
You now have 25 open eyes. Each eye is framed by two ch-11 arcs, and the 3-stitch waists hold the arcs together. Do not fasten off.
Round 2 – Covering Round
Ch 1 and turn so the Side B arcs face you.
Side B (working up): Sc in each of the first 3 sc (bottom waist). Work 14 sc over the next ch-11 arc, then sc in each of the next 3 sc (waist); rep from * 24 more times.
Side B count: 428 sc* (3 + 25 x 17).
Hanging loop: Ch 20.
Side A (working down): Working into the free loops on the opposite side of the foundation chain, sc in each of the 3 top-waist ch. Work 14 sc over the next Side A ch-11 arc, then sc in the free loops of each of the next 3 waist ch; rep from * 24 more times.
Side A count: 428 sc.*
Join with a sl st to the first sc of the round.
Round 2 total: 856 sc + 1 ch-20 loop.
Packing 14 sc onto 11 chains pushes each arc outward into a smooth curve. The stitch tops sit along the outer edge, and the wrapped bases line the inside of the eye. Check your Round 2 measurements now.
Round 3 – Edging (Border)
This round is the strand’s border. See the Border section below for the stitch-by-stitch counts and why they work.
Make All Pieces
Make 20 complete strands:
- Color A (Denim Blue): 10 strands, 10 tassels
- Color B (Cream): 10 strands, 10 tassels
Layout across the rod, seen from the front (A = blue, B = cream):
| A | B | A | B | A | B | A | B | A | B | A | B | A | B | A | B | A | B | A | B |
  1   2   3   4   5   6   7   8   9  10  11  12  13  14  15  16  17  18  19  20
Lay all strands next to each other before hanging them. Every strand should have 25 eyes and measure 75 3/4 in (192.4 cm) from the bottom waist to the top waist, give or take 1/2 in (1.3 cm).
Joining: Tassels, Hanging, and Spacing
The strands are never sewn to each other. “Joining” here means attaching each tassel to its strand and spacing the strands evenly on the rod.
Make each tassel:
- Cut a 12 in (30.5 cm) tie strand and set it aside.
- Wrap yarn 50 times around the 9 in (22.9 cm) cardboard.
- Slide the tie strand under the wraps at the top edge and knot it tightly. Cut through the wraps at the bottom edge to get 50 strands, each 18 in (45.7 cm) long, folded at the center.
- Thread both ends of the tie strand up through the hole of a 1 in (2.5 cm) bead, so the fold sits under the bead.
- Spread the strands evenly over the bead to cover it. Wrap a 24 in (61.0 cm) length of matching yarn tightly 8 times around the strands just below the bead to form the neck. Knot it, then use the needle to bury the ends inside the tassel.
- Trim the fringe so the tassel is 7 in (17.8 cm) long from the top of the head.
Attach the tassel: Thread the two tie-strand ends through the center of the bottom waist, between the Side A and Side B stitches. Tie a tight square knot so the bead sits right against the waist. Weave the ends up into the strand.
Tension advice: Tie firmly but don’t pucker the bottom eye. The bottom waist should stay 3/4 in (1.9 cm) long.
Spacing: Slide all 20 loops onto the rod in layout order. Space them 2.4 in (6.1 cm) apart, center to center, across 48 in (121.9 cm).
Size checkpoint: The panel should measure 48 in (121.9 cm) wide and 84 3/4 in (215.3 cm) from the top of the loops to the tassel tips.
Border
The border is Round 3, a single round of sc worked into the Round 2 stitches all the way around the strand.
Border gauge: 4 sc per 1 in (2.5 cm) along the edge. The edging is 1/4 in (0.6 cm) deep on each long side.
Ch 1 (does not count as a stitch).
Side B (working up): Sc in each of the first 3 sc (bottom waist). *Over the next arc, work [sc in each of the next 7 sc, inc in the next sc] twice, then sc in each of the next 3 sc (waist); rep from * 24 more times.
- Each arc: 16 sc = 14 sts worked one per existing stitch + 2 increases.
- Each waist: 3 sc, worked one per existing stitch, with no increases.
- Side B count: 478 sc (3 + 25 x [16 + 3]).
Hanging loop: Work 26 sc over the ch-20 loop.
Side A (working down): Work as for Side B: 3 sc on the top waist, then 16 sc over the arc (with the same 2 increases) and 3 sc on the waist; rep from * 24 more times.
Side A count: 478 sc.*
Join with a sl st to the first sc. Fasten off and weave in the ends.
Round 3 total: 982 sc (478 + 26 + 478).
Why the math works: Round 3 sits farther from the eye’s center than Round 2, so the outer curve is longer. Two increases per arc give just enough extra length to keep the arc flat without ruffling. The waists curve inward, so they need no extra stitches; adding any there would make them bulge. On the loop, 26 sc over 20 chains packs it into a firm cord that keeps its shape on the rod. Adding 1/4 in (0.6 cm) on each side takes the eye from 1 1/4 in (3.2 cm) to 1 3/4 in (4.4 cm) wide.
Final Blocking
- Lay each strand flat on a long towel or blocking mats. Work in sections if your surface is shorter than the strand.
- Spray the strand evenly with water until it is damp but not soaked.
- Gently open each eye into a symmetrical almond shape. Line the waists up straight down the center.
- Pin each eye at its widest point to 1 3/4 in (4.4 cm). Check that each unit is 3 in (7.6 cm) long.
- Leave the strand to dry completely.
- Hang each tassel upside down, mist the fringe, and smooth it straight. Let it dry, then re-trim the tips to 7 in (17.8 cm).
- Hang the dry strands on the rod and let them settle for 24 hours.
Final Quality-Control Checklist
- [ ] Every strand has exactly 25 eyes and 26 waists.
- [ ] Each eye measures 1 3/4 in (4.4 cm) wide and 2 1/4 in (5.7 cm) long.
- [ ] Each waist measures 3/4 in (1.9 cm).
- [ ] The strand body is 75 3/4 in (192.4 cm) from waist to waist.
- [ ] The hanging loop is 2 in (5.1 cm) tall and slides freely on the rod.
- [ ] The tassels are 7 in (17.8 cm) long, with the bead fully covered.
- [ ] The colors alternate A, B across all 20 strands.
- [ ] All yarn ends are woven in and invisible from both sides.
Troubleshooting
The strand twists into a spiral. The foundation chain was twisted before you started Side B. Steam-block it flat. On the next strand, lay the chain flat before turning.
The eyes look closed or squashed. Round 2 is too tight, or you worked fewer than 14 sc per arc. Recount, and loosen your tension slightly.
The arcs ripple. You have too many stitches or the tension is too loose. Make sure Round 3 has exactly 2 increases per arc.
The strands are different lengths. Your tension changed between strands. Measure four units after Round 2 on every strand, and use a different hook for any strand that runs off.
The bead shows through the tassel head. Use more wraps (up to 60) or spread the strands more evenly over the bead.
The loop is too tight for the rod. Rework the hanging loop with ch 24 and 30 sc. This adds about 1/2 in (1.3 cm) to the loop’s height.
Care
Hand wash in cool water with mild soap, roll the strands in a towel, and dry them flat. Comb the tassels gently with your fingers while they are damp.
Final Notes
Everything in this pattern builds on one measurement chain. If gauge is 16 sc per 4 in (10.2 cm), each eye unit is 3 in (7.6 cm), and the eyes are 1 1/4 in (3.2 cm) wide after Round 2 and 1 3/4 in (4.4 cm) after the border. Twenty-five units make a 75 3/4 in (192.4 cm) body. Add a 2 in (5.1 cm) loop and a 7 in (17.8 cm) tassel, and the strand is 84 3/4 in (215.3 cm) long. Twenty strands fill a 48 in (121.9 cm) rod. Check the first strand carefully, and the other 19 will match it.
Happy crocheting!