

The Cornflower Lace Curtain Panel is a full-length lace panel made of eight-petal flower motifs. Every flower has a cream puff-stitch center and long, pointed denim-blue petals. Each petal has an open slit down its middle, which gives it a light, airy look. When the panel hangs at a window, light shows through the diamond-shaped spaces between the flowers.
There are only two colors: soft denim blue and warm cream. The style is cottage-inspired and calm, and it suits bedrooms, sunrooms and farmhouse windows. All instructions use US crochet terms.
The finished panel measures 37 in x 85 in (94.0 cm x 215.9 cm) with the border, made from 84 motifs arranged 6 wide and 14 tall.
The construction is simple. You crochet the first flower completely. After that, each new flower joins to its neighbors during its last round (join-as-you-go), at its petal tips only. When the grid is done, a three-round border straightens all four edges.
Finished Size and Construction
- Finished size: 37 in x 85 in (94.0 cm x 215.9 cm)
- Skill level: Intermediate
- Terminology: US crochet terms
- Yarn weight: Worsted (#4), cotton or cotton blend
- Hook: 5.0 mm (H-8)
- Number of pieces: 84 flower motifs
- Layout: 6 motifs wide x 14 motifs tall
- Piece size: 6 in (15.2 cm) square footprint, measured from one petal pair to the opposite pair
- Size before border: 36 in x 84 in (91.4 cm x 213.4 cm)
- Border depth: 0.5 in (1.3 cm) on each side
Materials
Yarn advice: Choose a smooth, mercerized or combed cotton in worsted weight. Cotton holds the pointed petal tips crisply and hangs well. Avoid fuzzy yarns, because the fuzz fills in the petal slits and the open diamonds.
- Color A, Denim Blue (petals and border): 900 g, about 1,710 m
- Color B, Cream (centers): 240 g, about 456 m
These figures assume about 190 m per 100 g. Both quantities include a margin of roughly 10% for gauge differences and swatching.
Tools:
– 5.0 mm (H-8) crochet hook
– Tapestry needle
– Scissors
– Locking stitch markers
– Rust-proof pins and a blocking mat or folded towels
– Measuring tape
– Spray bottle
Abbreviations (US Terms)
- ch: chain
- sl st: slip stitch
- sc: single crochet
- hdc: half double crochet
- dc: double crochet
- tr: treble crochet
- rev sc: reverse single crochet (crab stitch)
- sp: space
- st(s): stitch(es)
- yo: yarn over
Special stitch:
Puff stitch (puff): Yo, insert hook in the indicated stitch, yo, and pull up a loop to about 0.25 in (0.6 cm). Repeat from * to * 2 more times (7 loops on the hook). Yo, pull through all 7 loops, then ch 1 to lock. The locking ch 1 does not count as a stitch.
Gauge and Checkpoints
Make one complete motif before you start the panel and block it. Every measurement in this pattern depends on that first flower.
Border gauge: 16 sc = 4 in (10.2 cm)
Checkpoints:
– After Round 3 (cream center): 2 in (5.1 cm) across.
– After Round 5 (finished motif): 6 in (15.2 cm) from the outer edge of one petal pair to the outer edge of the opposite pair. Measured from a single tip to the tip directly across, it is about 6.25 in (15.9 cm).
– Two joined motifs: 12 in (30.5 cm) wide.
– First full row of 6 motifs: 36 in (91.4 cm) wide.
– After 3 rows: 18 in (45.7 cm) tall.
If your motif is too big: go down to a 4.5 mm hook, or shorten the petal loops in Round 4 from ch 13 to ch 12.
If your motif is too small: go up to a 5.5 mm hook. Don’t add chains first. Longer loops make the petals thin and floppy.
Petal tips: they should be sharp, and the slit down each petal should stay open. If the slit closes, your tension around the loop is too tight.
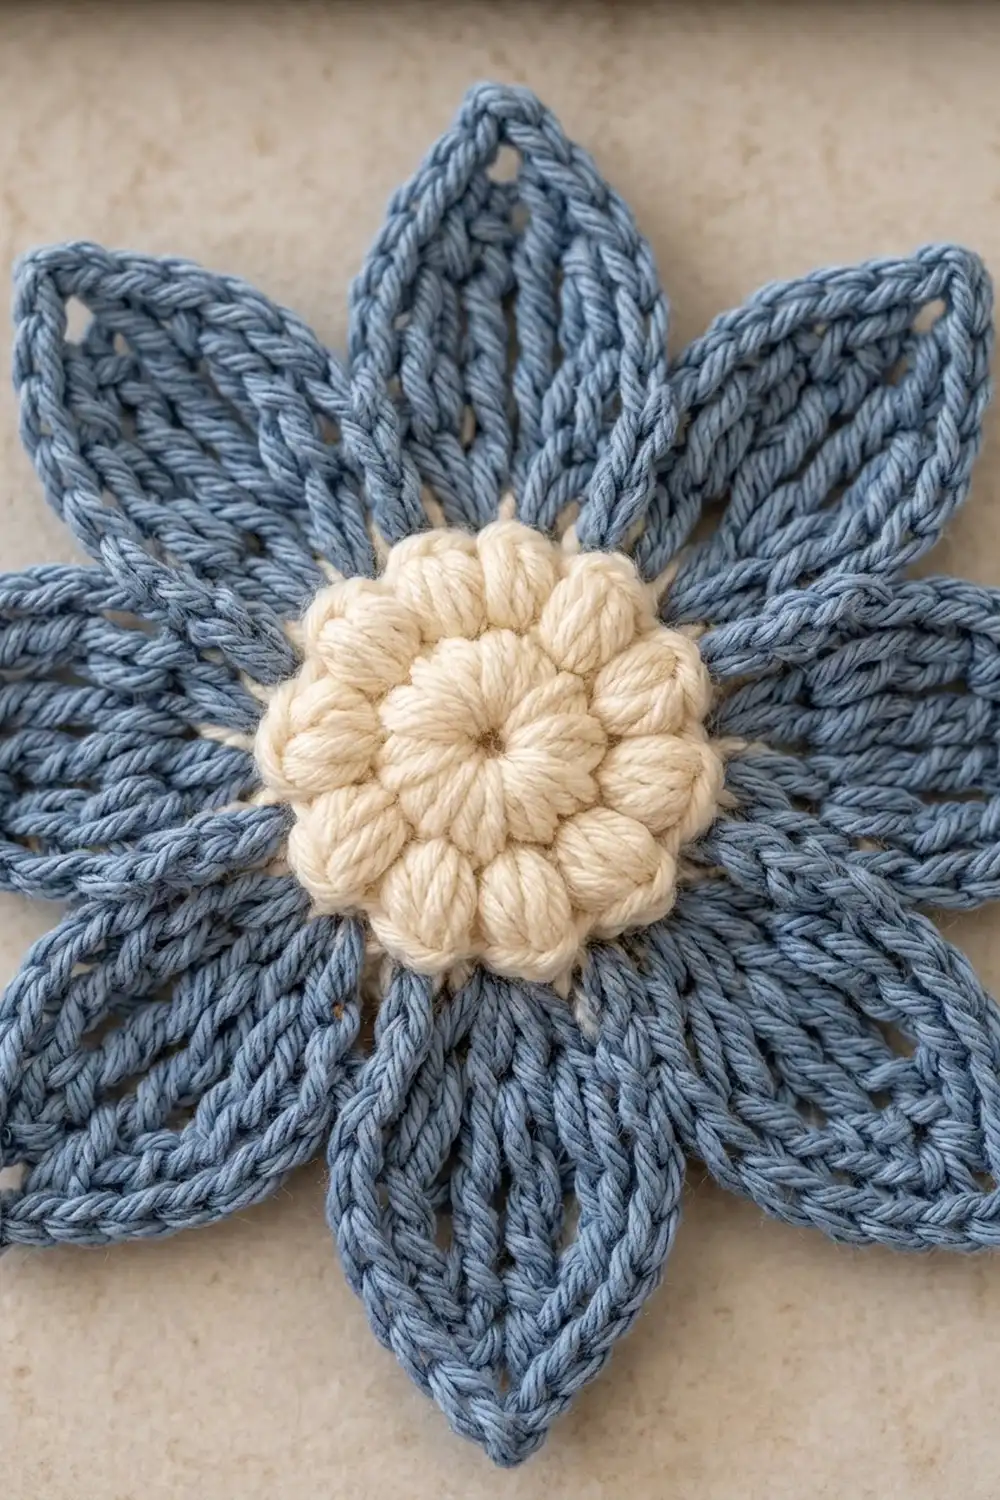
Flower Motif
Center (Color B, Cream)
Round 1: Make a magic ring. Ch 1 (does not count as a st), work 8 sc in the ring, and sl st to the first sc. Pull the ring closed. (8 sts)
Round 2: Ch 2 (does not count as a st). Work 1 puff in the next st, ch 1. Repeat from * to * 8 times. Sl st to the top of the first puff. (8 puffs, 8 ch-1 sps)
Round 3 (conversion round): Ch 1. Work 1 sc in the top of the next puff, then 2 sc in the next ch-1 sp. Repeat 8 times and sl st to the first sc. (8 sc worked 1 per puff + 16 sc in the ch-1 sps = 24 sts)
Fasten off Color B and weave in the tail. Check that the center measures 2 in (5.1 cm) across. The puffs should stand up in a raised ring, with the sc edge framing them.
Petals (Color A, Denim Blue)
Round 4 (petal loops): Join Color A with a sc in any sc of Round 3. Ch 13, skip the next 2 sts, sc in the next st. Repeat from * to * 6 more times. Ch 13, skip the last 2 sts, and sl st to the first sc. (8 sc + 8 ch-13 loops; 8 × 3 = 24 Round 3 sts used)
Round 5 (petals): Work all of the following into the next ch-13 loop: (sc, hdc, 2 dc, 4 tr, ch 3, 4 tr, 2 dc, hdc, sc). Sl st in the next sc of Round 4. Repeat from * to * 8 times. The last sl st goes into the joining sc. (16 sts per petal × 8 = 128 sts + 8 ch-3 tips)
Fasten off and weave in the tails.
Why the petals look the way they do: All of the stitches wrap around the chain loop rather than going into individual chains. That leaves the inside of the loop open, which creates the slit down each petal. The stitches climb from sc up to tr and back down, which gives the petal its leaf shape. The ch-3 makes the sharp tip.
Orienting the motif: Lay the flower flat so that two petals point toward each side, with none pointing straight up. In that position the motif has 4 “sides,” and each side has 2 tips. These pairs of tips are where the motifs join.
Make All Pieces
You need 84 motifs in total. Make the first motif completely. Make the other 83 with join-as-you-go in Round 5.
- Color B centers (Rounds 1-3): 84
- Color A petals (Rounds 4-5): 84
You can make all 84 centers in advance. They are quick, and batching them keeps their size consistent.
Layout grid (6 wide × 14 tall, M = motif):
Row 1:  M  M  M  M  M  M
Row 2:  M  M  M  M  M  M
Row 3:  M  M  M  M  M  M
 ...    (repeat rows to)
Row 14: M  M  M  M  M  M
Columns: 6 × 6 in = 36 in (91.4 cm). Rows: 14 × 6 in = 84 in (213.4 cm).
Joining
Method: Join-as-you-go at the petal tips during Round 5.
Joining a tip: Work the petal as written up to the ch-3 tip. Instead of ch 3, work ch 1, sl st into the ch-3 tip sp of the matching petal on the neighboring motif, then ch 1. Finish the petal with 4 tr, 2 dc, hdc, sc as usual. The ch 1, sl st, ch 1 takes the same space as the ch-3, so the tips stay sharp and the motif keeps its size.
Stitch-to-stitch logic:
– Row 1, Motif 1: no joins.
– Row 1, Motifs 2-6: join the 2 tips on the left side to the 2 tips on the right side of the previous motif.
– Rows 2-14, first motif: join its 2 top tips to the 2 bottom tips of the motif above it.
– All other motifs: join the 2 left tips and the 2 top tips, for 4 joins in total.
Total joins: 14 rows × 5 seams × 2 tips = 140 side-to-side joins, plus 13 seams × 6 columns × 2 tips = 156 top-to-bottom joins.
Nothing joins at the places where 4 motifs meet. Those areas stay open and form the diamond-shaped spaces.
Tension: Keep the joining sl st relaxed, about the same size as the ch 1 on either side of it. A tight sl st pulls the tips together and the grid starts to pucker.
Size checkpoint: Lay the panel flat after every 2 rows. It should be 36 in (91.4 cm) wide, and each row should add 6 in (15.2 cm) of height. When all 14 rows are joined, the panel measures 36 in x 84 in (91.4 cm x 213.4 cm).
Border
Border gauge: 16 sc = 4 in (10.2 cm), which is 4 sts per inch.
Each motif contributes the same count along every outer side of the panel: 24 sts per motif side.
Round 1 (bridge round, Color A)
With the right side facing, join Color A with a sc in the left tip of the top-left motif’s top pair. The sc counts as the first of the 3 sc below.
Work 3 sc in the tip sp, ch 7, 3 sc in the next tip sp of the same motif, ch 11. Repeat from * to * for every motif on every side.
- On edge motifs, the ch 11 crosses the gap to the first tip of the next motif.
- On corner motifs, the ch 11 wraps around the panel corner to the first tip on the next side.
Sl st to the first sc.
Count per motif side: 3 + 7 + 3 + 11 = 24 sts.
- Top and bottom: 6 motifs × 24 = 144 sts each
- Left and right: 14 motifs × 24 = 336 sts each
- Total: (144 + 336) × 2 = 960 sts
Every count includes that side’s own corner ch-11, so no stitch is counted twice.
Round 2 (straightening round)
Ch 1. Sc in each sc and in each ch around. In the 6th ch of each corner ch-11, work 3 sc instead of 1. Sl st to the first sc.
- Top and bottom: 144 sts worked 1 per st + 2 extra corner sts = 146 sts each
- Left and right: 336 + 2 = 338 sts each
- Total: 960 + 8 = 968 sts
Round 3 (edge round)
Ch 1. Rev sc in each st around, and sl st to the first st. (968 sts: 146 / 338 / 146 / 338)
Fasten off and weave in the tails.
Why the math works: One motif is 6 in (15.2 cm) wide, and at 4 sts per inch that edge needs 6 × 4 = 24 sts, which is exactly what Round 1 gives each motif. The two chain lengths are sized to the two gaps along the edge:
- Ch 7 spans the roughly 2.3 in (5.8 cm) gap between the two tips of one motif.
- Ch 11 spans the roughly 3.7 in (9.4 cm) gap between neighboring motifs.
Because the stitch count matches the edge length, the border lies flat. It doesn’t ruffle and it doesn’t pull in. Round 2 adds only the 2 extra stitches that each corner needs to turn.
Finished size check: 36 in + 0.5 in + 0.5 in = 37 in (94.0 cm) wide, and 84 in + 0.5 in + 0.5 in = 85 in (215.9 cm) tall.
Final Blocking
- Lay the panel on blocking mats or towels with the right side up.
- Mist the panel evenly until it is damp all the way through, but not dripping.
- Pin the four border corners to a 37 in x 85 in (94.0 cm x 215.9 cm) rectangle.
- Pin the straight edges every 3 in (7.6 cm), keeping the rev sc edge straight.
- Working one motif at a time, gently open each petal slit and point each tip with your fingers.
- Check that the open diamonds are even. Re-pin any joins that sit out of line.
- Leave the panel until it is completely dry, usually 24-48 hours, before you unpin it.
Final Quality-Control Checklist
- 84 motifs, arranged 6 wide by 14 tall
- Every center measures 2 in (5.1 cm) and has 8 raised puffs
- Every motif has 8 sharp tips and 8 open petal slits
- All 296 joins are tight and the diamonds are open
- Border counts are 146 / 338 / 146 / 338
- The panel measures 37 in x 85 in (94.0 cm x 215.9 cm)
- All tails are woven into the petals, not into the open spaces
Troubleshooting
Petals curl or twist: The chain loop is too tight. Chain more loosely, or use a hook one size larger for the chains only.
Center cups like a bowl: The puffs are pulled up too tall. Pull each loop up to about 0.25 in (0.6 cm) and no taller.
Grid puckers at the joins: The joining sl st is too snug. Undo it and rework it with a looser sl st.
Border ruffles: You have extra stitches. Recount Round 1, which should have 24 sts per motif side.
Border pulls in: The bridging chains are too tight. Work them with a larger hook.
Corners are pointy or flat: Check that you worked 3 sc in the 6th ch of each corner ch-11.
Care
Hand wash or machine wash on a gentle cycle in cool water, with the panel inside a mesh laundry bag. Reshape it and dry it flat, then hang it only once it is completely dry.

Final Notes
Everything in this pattern follows from the first motif. The chain of measurements is:
- Center: 2 in (5.1 cm)
- Finished motif: 6 in (15.2 cm)
- Row of 6 motifs: 36 in (91.4 cm)
- Grid of 14 rows: 84 in (213.4 cm)
- Border at 24 sts per motif side, adding 0.5 in (1.3 cm) on each side
- Finished panel: 37 in x 85 in (94.0 cm x 215.9 cm)
Check each stage as you go and the panel will block out square and even.
Happy crocheting!