

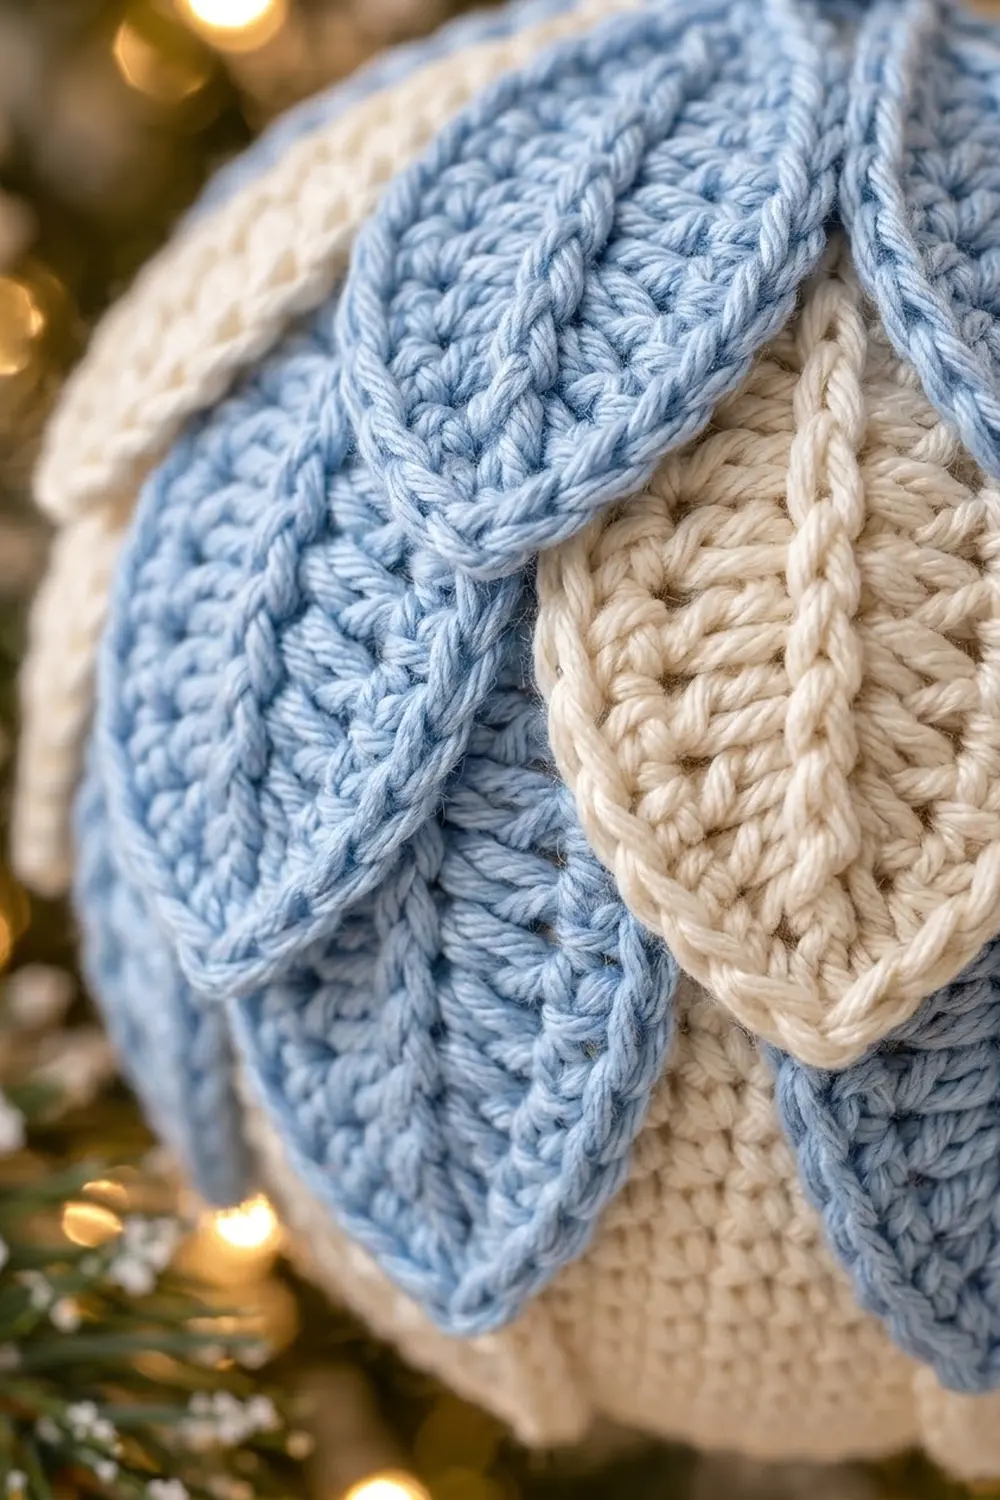
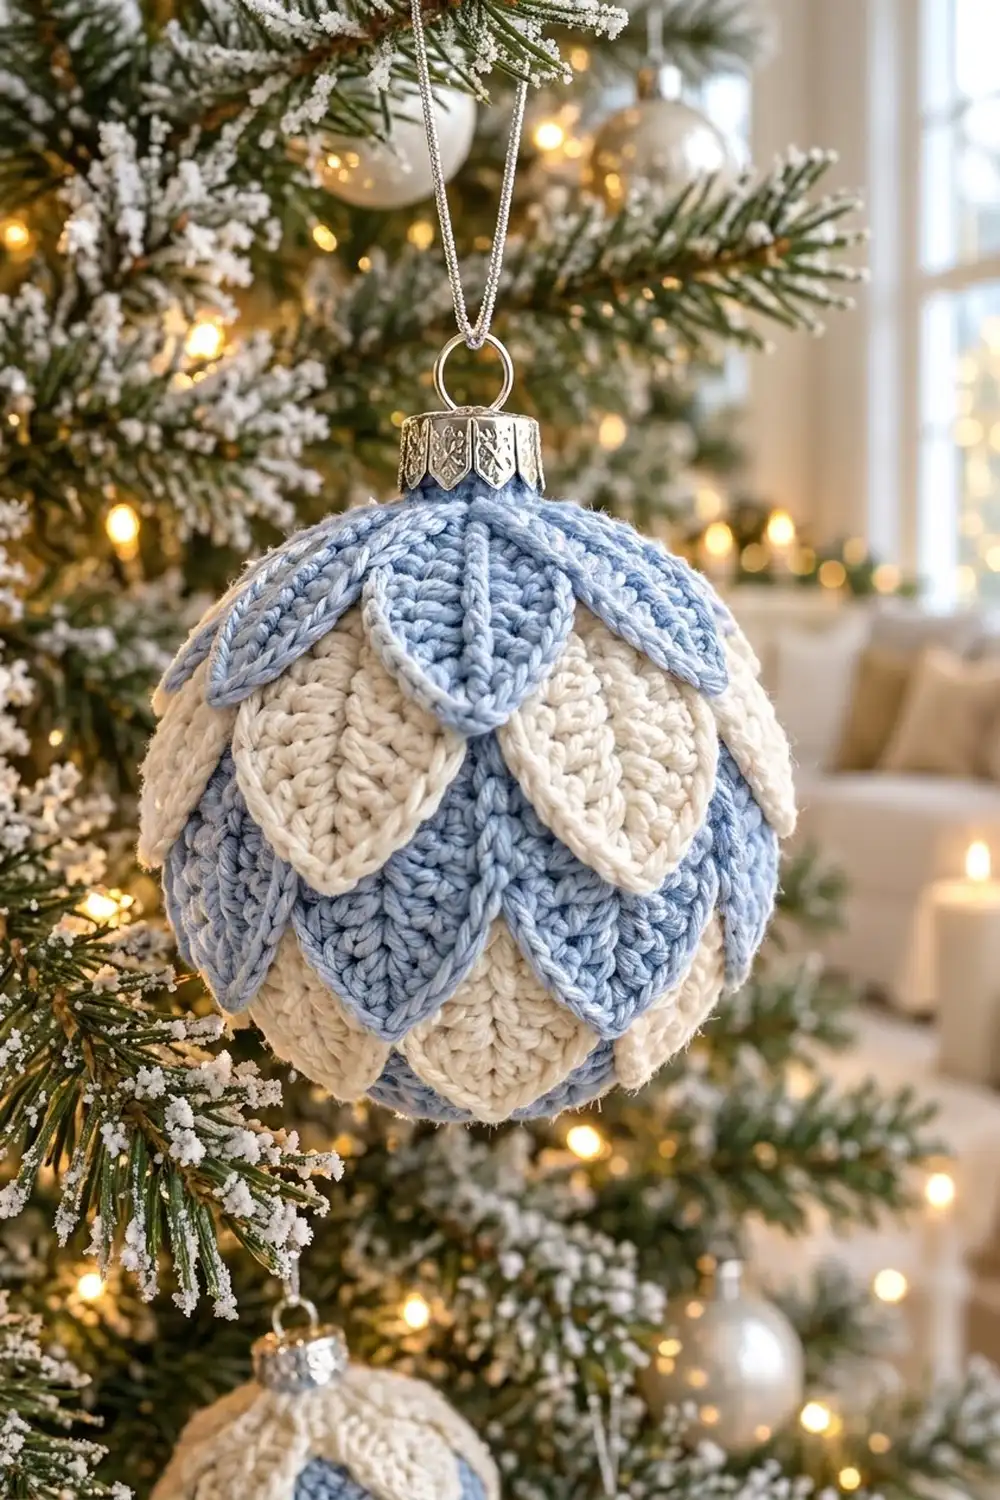
This ornament is a round Christmas bauble covered in small, pointed leaves that overlap like the scales of a pinecone. Each leaf has a raised center vein and textured double-crochet ribs, so the ornament catches the light on the tree without any beads or sequins.
The palette is soft powder blue and warm cream. The tiers alternate from the top down (blue, cream, blue, cream), and every tier is offset by half a leaf. The look is calm and wintry, and it suits Scandinavian, coastal, or frosted-white tree themes.
This pattern uses US crochet terms. The finished ornament measures about 3.5 in (8.9 cm) across and about 4.25 in (10.8 cm) tall including the cap and ring.
Construction is simple. First you crochet a cream single-crochet cover that fits tightly around a 3 in (7.6 cm) plastic ball ornament. Then you make 32 small leaves, each worked in two rounds around a foundation chain. Finally, you sew the leaves to the cover in four offset tiers, starting at the bottom.
Finished Size and Construction
- Finished size: about 3.5 in (8.9 cm) diameter; 4.25 in (10.8 cm) tall with cap
- Skill level: Intermediate (simple stitches, careful assembly)
- Terminology: US crochet terms
- Yarn weight: DK / light worsted (#3), cotton or cotton blend
- Hook: 3.5 mm (E-4)
- Number of pieces: 33 (1 ball cover + 32 leaves), joined into one ornament
- Layout: 4 tiers of 8 leaves, alternating blue and cream, each tier offset
- Leaf size: 1.75 in (4.4 cm) long × 1 in (2.5 cm) wide
- Leaf size before edging: 1.5 in (3.8 cm) × 0.8 in (2.0 cm)
- Edging depth: about 1/8 in (0.3 cm) on each edge
Materials
Choose a smooth, mercerized or matte cotton DK yarn. Cotton holds the leaf points crisp and shows the ribs and vein clearly. Fuzzy acrylic will blur the texture. These amounts assume about 110 m per 50 g.
- Cream: 20 g / 44 m (cover plus 16 leaves)
- Powder blue: 15 g / 33 m (16 leaves)
Quantities include a safety margin of about 25% for gauge swatching and sewing tails.
Tools:
– 3.5 mm (E-4) crochet hook
– 1 shatterproof plastic ball ornament, 3 in (7.6 cm), with a removable silver cap
– Tapestry needle
– 8 locking stitch markers
– Fine silver cord, 6 in (15.2 cm), for hanging
– Scissors
– Optional: a drop of clear craft glue for the cap
Abbreviations (US Terms)
- ch – chain
- sl st – slip stitch
- sc – single crochet
- hdc – half double crochet
- dc – double crochet
- inc – 2 sc in the same stitch
- dec – sc2tog (insert in next st, pull up loop, insert in following st, pull up loop, yarn over, pull through all 3 loops)
- MR – magic ring
- sp – space
- st(s) – stitch(es)
Special stitch: surface slip stitch. Hold the yarn behind the work. Insert the hook from front to back through the fabric, pull up a loop, and pull it through the loop on the hook. This makes a raised chain line on the front.
Gauge and Checkpoints
Gauge: 5 sc and 5 rounds = 1 in (2.5 cm) in sc worked in the round.
Make one leaf first and use it as your gauge test, because leaf size controls how well the tiers cover the ball.
- Leaf after Round 1: 1.5 in (3.8 cm) long × 0.8 in (2.0 cm) wide.
- Leaf after Round 2: 1.75 in (4.4 cm) long × 1 in (2.5 cm) wide.
- Cover after Rnd 8: a slightly cupped disc about 3.2 in (8.1 cm) across.
- Cover, Rnds 9–17: circumference 9.6 in (24.4 cm), just over the ball’s 9.4 in (23.9 cm). This gives a snug fit.
If your leaf is too big, go down to a 3.25 mm hook. If it is too small, go up to 3.75 mm. Make the cover with the same hook. A cover that is a little loose on the ball can be fixed by working one fewer even round (Rnds 9–16 instead of 9–17).
Ball Cover (Cream, Make 1)
Work in continuous rounds without joining. Mark the first stitch of each round.
Rnd 1: 6 sc in MR. (6)
Rnd 2: inc in each st around. (12)
Rnd 3: (sc, inc) × 6. (18)
Rnd 4: (2 sc, inc) × 6. (24)
Rnd 5: (3 sc, inc) × 6. (30)
Rnd 6: (4 sc, inc) × 6. (36)
Rnd 7: (5 sc, inc) × 6. (42)
Rnd 8: (6 sc, inc) × 6. (48)
Checkpoint: the disc measures about 3.2 in (8.1 cm) across.
Rnds 9–17: sc in each st around. (48)
Checkpoint: the cover is a cup 3.4 in (8.6 cm) deep from the MR. Remove the metal cap from the ball ornament and set it aside. Slide the ball into the cover with the neck facing the opening.
Rnd 18: (6 sc, dec) × 6. (42)
Rnd 19: (5 sc, dec) × 6. (36)
Rnd 20: (4 sc, dec) × 6. (30)
Rnd 21: (3 sc, dec) × 6. (24)
Rnd 22: (2 sc, dec) × 6. (18)
Rnd 23: (sc, dec) × 6. (12)
Sl st to the next st and fasten off with a 6 in (15.2 cm) tail. The 12-st opening measures 2.4 in (6.1 cm) around and about 0.75 in (1.9 cm) across, which fits around the ornament neck. Weave the tail through the front loops of Rnd 23, snug it against the neck, and secure it.
Total cover height over the ball: 23 rounds, about 4.7 in (11.9 cm) from pole to neck, which is half the ball’s circumference.
Leaf (Make 32)
Each leaf is worked around both sides of a foundation chain. The chain becomes the center vein.
Ch 9.
Round 1:
– Side A: sc in 2nd ch from hook, hdc in next ch, dc in next 4 ch, hdc in next ch, sc in last ch. (8 sts)
– Tip: ch 2.
– Side B: rotate and work into the bottom loops of the same chains. Sc in the same last ch, hdc in next ch, dc in next 4 ch, hdc in next ch, sc in the first ch. (8 sts)
– Base: ch 2, sl st to the first sc.
Round 1 total: 16 sts + 2 ch-2 sps. Both sides are identical: sc, hdc, 4 dc, hdc, sc. This makes the pointed oval silhouette, with tall dc at the widest part and short sc at both points.
Checkpoint: 1.5 in (3.8 cm) × 0.8 in (2.0 cm).
Round 2 is in the Border section below. Then add the vein and fasten off.
Make All Pieces
- Cream: 1 ball cover + 16 leaves
- Powder blue: 16 leaves
- Total: 33 pieces
Leave a 10 in (25.4 cm) tail on every leaf for sewing.
Layout (top of ornament to bottom pole; each letter = 1 leaf):
Tier 1 (Rnd 21, blue):    B   B   B   B   B   B   B   B
Tier 2 (Rnd 17, cream):     C   C   C   C   C   C   C   C
Tier 3 (Rnd 13, blue):    B   B   B   B   B   B   B   B
Tier 4 (Rnd 9,  cream):     C   C   C   C   C   C   C   C
Bottom pole:              small cream center (Rnds 1–2 visible)
The indentation shows the offset. Each tier’s leaves sit centered between two leaves of the tier above.
Joining
Method: whipstitch each leaf’s base to the cover using the leaf’s own tail. Work from the bottom tier up, so each upper tier overlaps the bases of the tier below.
Stitch-to-stitch logic:
- Tier 4, Rnd 9 (48 sts): 48 ÷ 8 = 6. Place a marker in st 4, then every 6th st (4, 10, 16, 22, 28, 34, 40, 46).
- Tier 3, Rnd 13 (48 sts): markers in st 1, then every 6th st (1, 7, 13, 19, 25, 31, 37, 43). This is offset by 3 sts, which is half a leaf.
- Tier 2, Rnd 17 (48 sts): same positions as Tier 4 (4, 10, 16 … 46).
- Tier 1, Rnd 21 (24 sts): 24 ÷ 8 = 3. Markers in st 2, then every 3rd st (2, 5, 8 … 23).
The rounds spiral slightly, so check the offset by eye before sewing each tier. Every marker should line up with the gap between two leaves of the next tier up. Shift a marker 1 st if needed.
To sew each leaf: put the base ch-2 point on the marker with the tip pointing down toward the bottom pole. Whipstitch through the back loops of the edging and into the cover along the top 0.4 in (1.0 cm) of both sides. Leave the lower part of the leaf free so it lies like a scale. If you like, tack the tip with one hidden stitch so it stays flat.
Tension: pull each stitch just snug. Pulling too hard puckers the cover and makes the leaf base cup.
Size checkpoint: after all 4 tiers, the ornament measures about 3.5 in (8.9 cm) across. Tier 4 tips stop about 0.25 in (0.6 cm) short of the pole and frame a small cream center. Tier 1 bases tuck under the edge of the cap.
Push the cap back into the neck through the 12-st opening, adding a drop of glue if it is loose. Thread the silver cord through the ring and knot it.
Border: Leaf Edging and Vein
Edging gauge: same as the main gauge, 5 sc = 1 in (2.5 cm). Work 1 sc in each Round 1 stitch.
Round 2 (edging, same color as the leaf):
Ch 1. Sc in each of the 8 sts of Side A, then (sc, ch 2, sc) in the tip ch-2 sp. Sc in each of the 8 sts of Side B, then (sc, ch 2, sc) in the base ch-2 sp. Sl st to the first sc.
Round 2 total: 20 sc + 2 ch-2 sps.
Per side: 10 sc. That is 8 sc worked 1-per-stitch into Round 1, plus 2 extra point sc (1 at the tip, 1 at the base). Two sides × 10 = 20. The point sc are counted once each, on their own side, not twice.
Why the math works: along the long sides, the edge sits on the tops of the Round 1 stitches, so 1 sc per stitch lies flat. The points need extra fabric to turn the corner, and the (sc, ch 2, sc) groups add exactly that. This keeps both points sharp without ruffling the sides. The edging adds about 1/8 in (0.3 cm) all around, which brings the leaf from 1.5 × 0.8 in (3.8 × 2.0 cm) to 1.75 × 1 in (4.4 × 2.5 cm).
Vein: do not cut the yarn. Insert the hook in the base ch-2 sp and work 8 surface slip stitches along the foundation chain, one into each chain, ending at the tip. This makes the raised braided center line. Fasten off with a 10 in (25.4 cm) tail.
Final Blocking
- Before sewing, pin each leaf flat to the right size: 1.75 × 1 in (4.4 × 2.5 cm).
- Pull both points out with a pin so they are sharp.
- Mist lightly with water and let the leaves dry completely.
- After assembly, gently press each leaf against the curve of the ball with your fingers.
- Hold a steam iron 1 in (2.5 cm) above the ornament and give it a short burst of steam. Do not touch the plastic ball with the iron.
- Let the ornament dry while hanging.
Final Quality-Control Checklist
- 4 tiers × 8 leaves = 32 leaves, alternating blue and cream
- Every leaf has 20 sc + 2 ch-2 points, with matching sides of 10
- Vein is centered and runs from base to tip
- Each tier is offset by half a leaf from the tier above
- Cover is snug, with no plastic showing between leaves
- Cap is secure, and the cord knot is tight
- All tails are woven in under the leaves
Troubleshooting
- Leaves curl: the edging is too tight. Use a hook 0.25 mm larger for Round 2 and re-block.
- Points are blunt: make sure you worked the ch 2 at each point and pinned the points while blocking.
- Plastic shows through the cover: your gauge is loose. Go down a hook size, or work one fewer even round.
- Tier offset drifts: move the markers by eye. The spiral shift matters more than exact stitch numbers.
- Bottom center is too large: sew Tier 4 one round lower (Rnd 8, 48 sts, same spacing).
- Cap wobbles: tighten the Rnd 23 drawstring, or add a drop of glue.
Care
Spot clean with a damp cloth and let it air dry. Store the ornament in a box with tissue so the leaves do not get crushed.
Final Notes
The measurement chain is simple. A leaf of 1.5 × 0.8 in (3.8 × 2.0 cm) after Round 1 becomes 1.75 × 1 in (4.4 × 2.5 cm) after the edging. The 48-st cover measures 9.6 in (24.4 cm) around and fits snugly on a 3 in (7.6 cm) ball. Four tiers of 8 leaves, spaced 4 rounds (0.8 in / 2.0 cm) apart, cover the ball and give an ornament about 3.5 in (8.9 cm) across. Check the first leaf, and the rest will fall into place.
Happy crocheting!