

The Golden Fan Diamond is a lacy motif set on point. It has a soft butter-yellow center and a crisp cream border. The center starts from a tiny ring at the bottom point. Seven spokes of double crochet fan out from it and open into a shell. Above the shell, a solid peak narrows to a single point at the top.
The cream border frames the fan with rounded chain arches and finishes each corner with a round open loop. The two colors look warm and vintage. The motif suits holiday tables, gift toppers, and window ornaments.
This pattern uses US crochet terms. The finished motif measures 5 in (12.7 cm) from point to point, both across and from top to bottom, after blocking.
To make it, you crochet the yellow center in turned rows into a ring, building the fan first and then the peak. Then you work two rounds of cream border around the whole diamond. You’ll have one piece and no seams.
Finished Size and Construction
- Finished size: 5 in x 5 in (12.7 cm x 12.7 cm), point to point, blocked
- Skill level: Easy+ (you need to be comfortable working into a ring and into chain spaces)
- Terminology: US crochet terms
- Yarn weight: Super fine (#1) fingering-weight cotton, or size 3 crochet thread
- Hook: 2.5 mm (US B/1 or C/2)
- Number of pieces: 1
- Layout: One square motif turned 45 degrees so it sits as a diamond
- Piece size: 5 in (12.7 cm) point to point
- Size before border: 3.5 in (8.9 cm) wide x 3.25 in (8.3 cm) tall, blocking to about 3.5 in (8.9 cm) tall
- Border depth: about 0.75 in (1.9 cm) on each side
Materials
Yarn: Use a smooth, mercerized cotton in fingering weight. Mercerized cotton shows the stitches clearly and blocks to sharp points. Cotton blends work too. Avoid fuzzy yarns, because they blur the open spaces.
- Color A – Pale Yellow (center): 5 g, about 17 m
- Color B – Cream (border): 4 g, about 14 m
These quantities include a margin of about 25% for your gauge swatch, yarn tails, and small tension differences.
Tools:
– 2.5 mm crochet hook
– Tapestry needle
– Scissors
– Rust-proof pins
– Blocking mat or folded towel
– Spray bottle
– Ruler or tape measure
Abbreviations (US Terms)
- ch – chain
- sl st – slip stitch
- sc – single crochet
- dc – double crochet
- sp – space
- st(s) – stitch(es)
- tch – turning chain
- RS – right side
Special stitch – dc3tog (double crochet 3 together):
1. Yarn over, insert the hook in the next st, yarn over and pull up a loop, yarn over and draw through 2 loops. Repeat from * to * in each of the next 2 sts. You now have 4 loops on the hook.
2. Yarn over and draw through all 4 loops.
You’ve turned 3 sts into 1 st.
Gauge and Checkpoints
Gauge: 15 dc = 2 in (5.1 cm), and 3 dc rows = 1 in (2.5 cm).
Since this is a single motif, the motif works as its own gauge test. Measure it at each checkpoint below and adjust before you add the border.
- After Row 1: the half-circle fan is 1.25 in (3.2 cm) wide.
- After Row 3: the fan is 2.5 in (6.4 cm) wide.
- After Row 5: the widest point is 3.5 in (8.9 cm). The height from the bottom of the ring to the top of Row 5 is 2.25 in (5.7 cm).
- After Row 8: the total height is 3.25 in (8.3 cm).
- After the border: the motif is about 4.75 in (12.1 cm) unblocked and 5 in (12.7 cm) blocked.
If the motif is too big: go down to a 2.25 mm hook. Also make sure your chain spaces aren’t loose.
If the motif is too small: go up to a 2.75 mm hook. Pull up each dc loop to its full height.
Being off by 0.125 in (0.3 cm) is fine, because blocking evens that out.
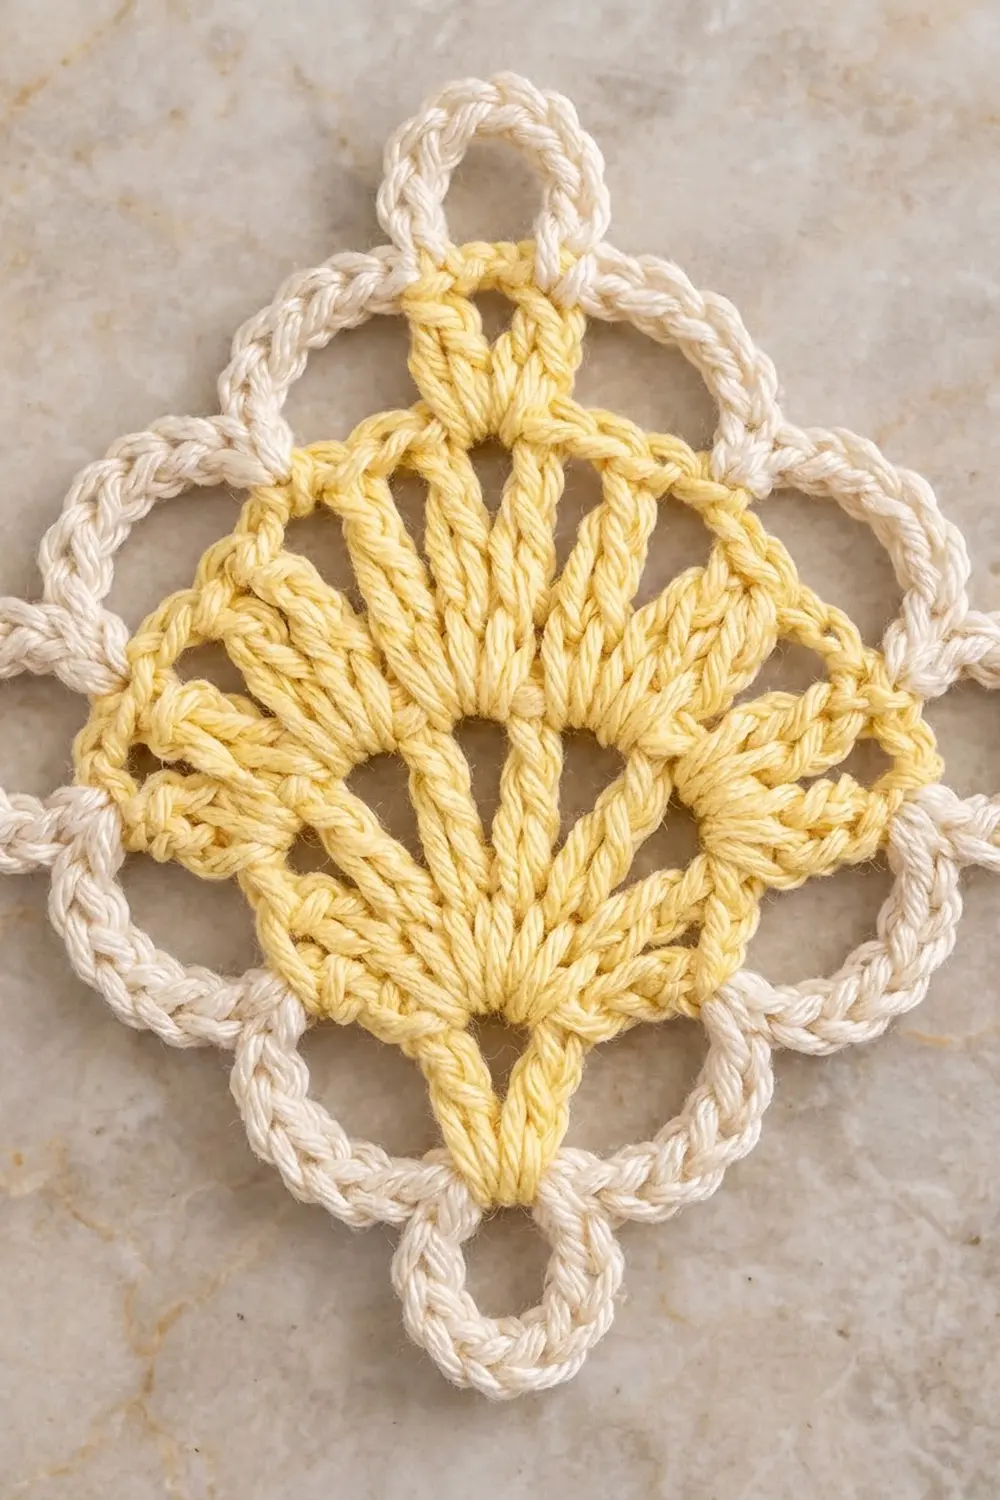
Yellow Center
The center is worked in turned rows into a ring. The ring becomes the bottom point.
Foundation: With Color A, ch 6 and sl st to the first ch to form a ring.
Row 1 (RS): Ch 4 (this counts as dc + ch 1). [Dc, ch 1] 5 times into the ring, then dc into the ring. Work the stitches across the top half of the ring only, so the bottom stays free. Turn.
(7 dc, 6 ch-1 sps)
Row 2: Ch 3 (counts as dc), dc in the first dc, ch 1. [2 dc in the next dc, ch 1] 5 times. Finish with 2 dc in the 3rd ch of the tch. Skip all ch-1 sps. Turn.
(14 dc in 7 pairs, 6 ch-1 sps)
Row 3: Ch 3 (counts as dc), dc in the next dc. [Ch 2, skip the ch-1 sp, dc in each of the next 2 dc] 6 times. The last dc goes in the top of the tch. Turn.
(14 dc, 6 ch-2 sps)
Each pair of dc is one spoke. Row 3 makes the spokes taller and opens up the spaces between them.
Row 4: Ch 3 (counts as dc), dc in the next dc. [Ch 3, skip the ch-2 sp, dc in each of the next 2 dc] 6 times. Turn.
(14 dc, 6 ch-3 sps)
Row 5: Ch 3 (counts as dc), dc in the next dc. [2 dc in the next ch-3 sp, dc in each of the next 2 dc] 6 times. Turn.
(26 dc: 2 + 6 x 4)
This solid row closes the fan and forms the widest line of the diamond. The two ends of this row are the left and right points. Checkpoint: 3.5 in (8.9 cm) wide.
Row 6: Sl st in each of the first 5 sts. Ch 3; this sits on the 5th st and counts as the first dc. Dc in each of the next 17 sts, and leave the last 4 sts unworked. Turn.
(18 dc; 4 sts are skipped at each end)
Row 7: Sl st in each of the first 5 sts. Ch 3 (counts as dc), dc in each of the next 9 sts, and leave the last 4 sts unworked. Turn.
(10 dc; 4 sts are skipped at each end)
Row 8: Sl st in each of the first 4 sts, ch 2, then dc3tog over the next 3 sts. Leave the last 3 sts unworked.
(1 peak cluster)
The peak covers sts 4–7, which are the center of the 10 sts. That means the top point sits exactly on the center line.
Fasten off and weave in the ends. Checkpoint: 3.25 in (8.3 cm) tall and 3.5 in (8.9 cm) wide.
The center is now a rounded fan below the widest row and a stepped triangle above it. The border arches bridge the steps, so the outline becomes a straight-sided diamond.
Border
Border gauge: One ch-5 arch covered with 6 sc spans about 0.9 in (2.3 cm). One ch-6 corner loop covered with 9 sc adds about 0.4 in (1.0 cm) to each end of a side.
Round 1: Anchor Arches
Each side of the diamond gets exactly 3 arches. To do that, each side uses 2 anchor points between its corners:
- Upper sides: the outermost dc of Row 7 and the outermost dc of Row 6
- Lower sides: the end post of Row 3 and the end post of Row 1
The four corners are:
- Top: the Row 8 peak
- Left and right: the two ends of Row 5
- Bottom: the free bottom of the ring
Work Round 1 like this:
- Join Color B with a sl st in the top of the Row 8 cluster. Ch 1. Work (sc, ch 6, sc) in the same st. This is the top corner.
- Right upper side: ch 5, sc in the outermost dc of Row 7, ch 5, sc in the outermost dc of Row 6, ch 5.
- Right corner: (sc, ch 6, sc) in the outermost st of Row 5.
- Right lower side: ch 5, sc around the end post of Row 3, ch 5, sc around the end post of Row 1, ch 5.
- Bottom corner: (sc, ch 6, sc) around the free bottom of the ring.
- Left lower side: ch 5, sc around the end post of Row 1, ch 5, sc around the end post of Row 3, ch 5.
- Left corner: (sc, ch 6, sc) in the outermost st of Row 5.
- Left upper side: ch 5, sc in the outermost dc of Row 6, ch 5, sc in the outermost dc of Row 7, ch 5. Sl st to the first sc.
(16 sc, 12 ch-5 arches, 4 ch-6 corner loops)
Each side has 2 corner sc, 2 sc in between, and 3 arches. All four sides are the same.
Round 2: Covered Arches and Corner Loops
- Sl st into the top ch-6 loop. Ch 1, then work 9 sc into the same loop.
- [6 sc in the next ch-5 arch] 3 times.
- 9 sc in the next ch-6 corner loop, then [6 sc in the next ch-5 arch] 3 times. Repeat from * to * 2 more times.
- Sl st to the first sc. Fasten off.
You work from loop to loop, so the Round 1 sc are covered and not worked into.
(108 sc total: 18 sc per side, plus 9 sc in each corner loop counted separately; 4 x 18 + 4 x 9 = 108)
Why the Math Works
The 18 sc on each side don’t include any corner stitches, and the 9 corner sc are counted only once, in the corner loops. That means nothing is counted twice.
Every side has the same 3 arches, so all four sides measure the same. That keeps the diamond square.
Each side is about 2.7 in (6.9 cm) of covered arches plus about 0.4 in (1.0 cm) of corner loop at each end, for about 3.5 in (8.9 cm) in total. A square measuring 3.5 in (8.9 cm) on a side measures about 5 in (12.7 cm) from point to point, which matches the finished size.
Six sc in a ch-5 arch is one more stitch than the number of chains. That extra stitch lets each arch curve outward without cupping. Nine sc in a ch-6 loop crowds the loop just enough that it stands up as a round, open ring.
Final Blocking
- Weave in all remaining tails and secure them through at least 2 in (5.1 cm) of stitches.
- Mark a 5 in (12.7 cm) square turned on point on your mat, or measure as you pin.
- Spray the motif until it is evenly damp, but not dripping.
- Pin the 4 corner loops first, exactly 5 in (12.7 cm) apart from top to bottom and from left to right.
- Pin the center of each covered arch so all three arches on a side line up.
- Gently open the spoke spaces with your fingertip, so each ch space shows clearly.
- Leave it to dry completely, at least 6 hours, before you unpin.
Final Quality-Control Checklist
- Row 1 has 7 dc and 6 ch-1 sps.
- Rows 2–4 each have 14 dc in 7 pairs.
- Row 5 has 26 dc.
- Rows 6 and 7 have 18 dc and 10 dc.
- Row 8 has a single peak cluster on the center line.
- Round 1 has 16 sc, 12 ch-5 arches, and 4 ch-6 loops.
- Round 2 has 108 sc.
- Each side has 3 arches.
- The motif measures 5 in (12.7 cm) from point to point both ways.
- The motif lies flat with no cupping or ruffling.
- No tails show on the RS.
Troubleshooting
The fan cups at the ring: Your Row 1 chains are too tight. Loosen the ch-1 sps, or open the foundation ring a little.
The peak sits off-center: Count the sl sts in Rows 6–8 again. Each row must skip the same number of sts at both ends.
The border ruffles: Your chains are too loose. Try ch 4 arches with 5 sc each, and keep the same count on all four sides.
The border pulls in: Your chains are too tight. Go up a hook size for the border only.
The corner loops lie flat instead of round: Make sure you really worked 9 sc into each loop and that you didn’t skip any.
The sides come out uneven: Check that every side has exactly 3 arches.
Care
Hand wash in cool water with mild soap and press out the water in a towel. Dry flat and re-pin to 5 in (12.7 cm) if needed.

Final Notes
Here is the measurement chain in short:
- A ring and 5 fan rows give a width of 3.5 in (8.9 cm).
- The stepped peak brings the height to 3.25 in (8.3 cm), which blocks to 3.5 in (8.9 cm).
- Two border rounds add about 0.75 in (1.9 cm) on each side.
- The blocked motif measures 5 in x 5 in (12.7 cm x 12.7 cm) from point to point.
If you check the stitch counts at Rows 1, 5, and 8, the border will fit evenly.
Happy crocheting!