

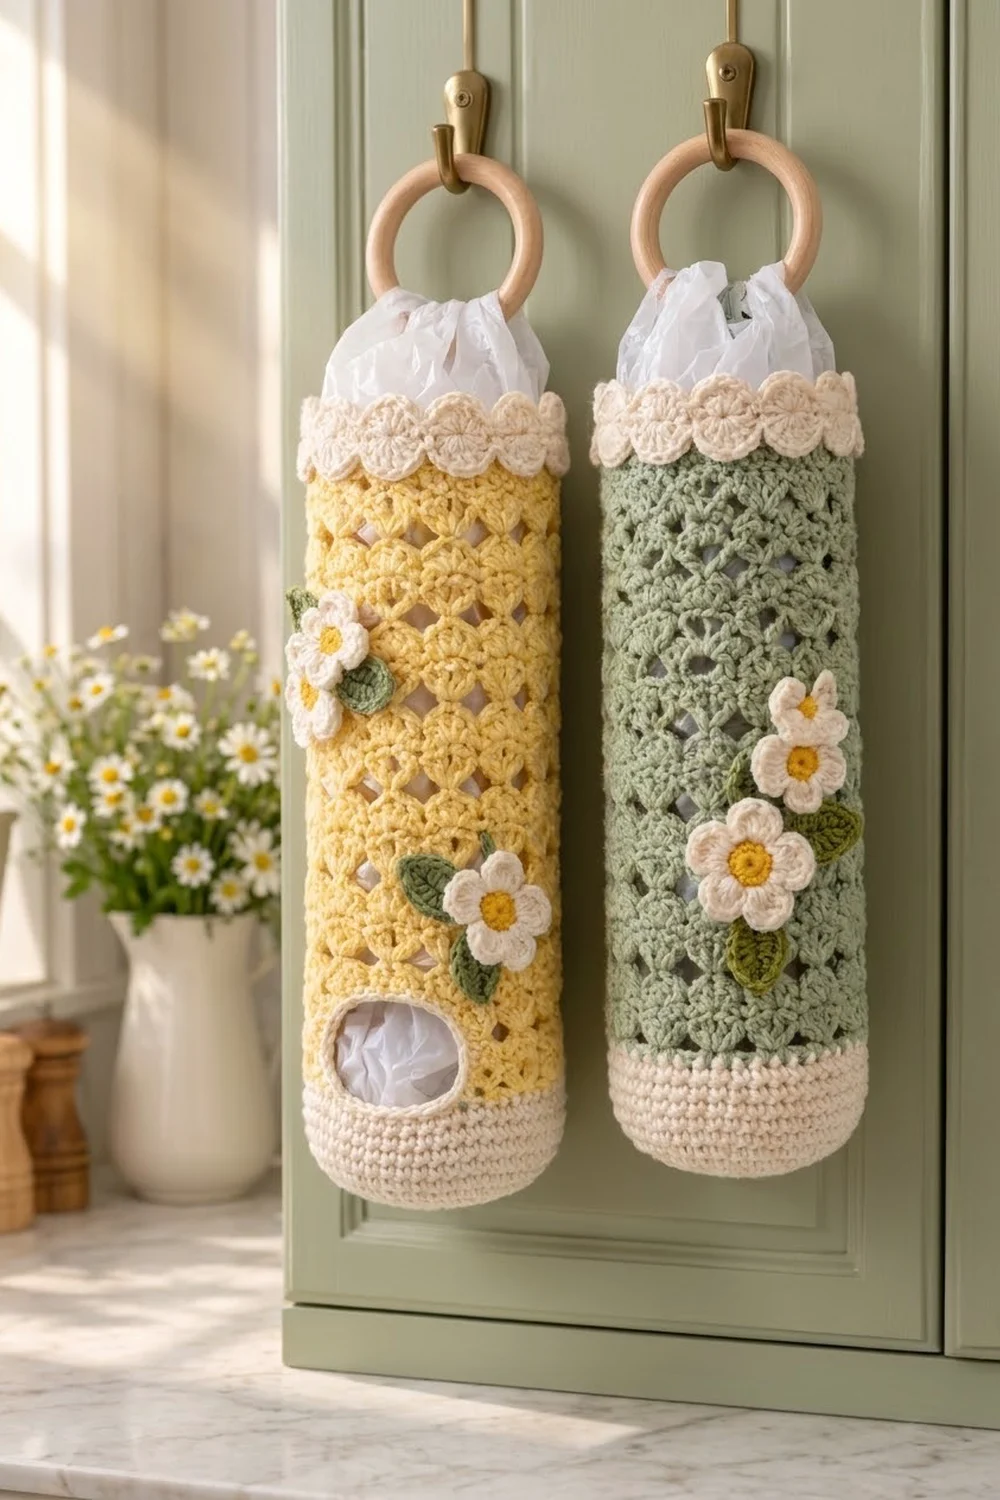
This cheerful bag holder turns a messy pile of plastic grocery bags into something you’re happy to hang on a cabinet. Stuff the bags in at the top and pull them out one at a time through the oval opening near the bottom.
The body is a light, open shell stitch in butter yellow (or soft sage green), with a sturdy cream base and a cream scalloped band at the top. Three little cream daisies with yellow centers and green leaves give it a fresh cottage-kitchen look. A natural wooden ring at the back lets it hang from any hook or knob.
The pattern uses US crochet terms. The finished holder measures 15 in (38.1 cm) tall without the ring and 7.5 in (19.1 cm) wide when flattened. The base is about 4.75 in (12.1 cm) across.
You start with a flat circle base and turn it up into solid side walls. Then you switch to the shell body, working 2 short rows to make the dispensing opening and closing it with a chain. The cream scalloped top band comes next. Finally, you add the hanging tab, the ring and the appliqués.
Finished Size and Construction
- Finished size: 15 in (38.1 cm) tall × 7.5 in (19.1 cm) wide flat; base 4.75 in (12.1 cm) across
- Skill level: Easy-intermediate
- Terminology: US crochet terms
- Yarn weight: Worsted (#4) cotton
- Hook: US H-8 (5 mm)
- Number of pieces: 1 main holder, plus 1 hanging tab, 3 flowers and 3 leaves
- Layout: One seamless tube worked in the round from the bottom up
- Body size before top border: 13.5 in (34.3 cm) tall
- Top border depth: 1.5 in (3.8 cm)
- Dispensing opening: About 2.75 in (7.0 cm) wide × 1.25 in (3.2 cm) tall
- Wooden ring: 3 in (7.6 cm) outer diameter
Materials
Use a smooth, mercerized or combed worsted-weight cotton. Cotton holds the tube’s shape, stands up to repeated tugging, and gives clear stitch definition on the shells. The amounts below assume about 170 m per 100 g.
- Butter yellow (main body; also flower centers): 90 g / 153 m
- Cream (base, top band, petals, opening edging, tab): 60 g / 102 m
- Sage green (leaves): 10 g / 17 m
- Sage colorway: Replace the 90 g of body yellow with 90 g / 153 m of sage green. You still need a small amount of yellow for the flower centers.
Tools:
– US H-8 (5 mm) crochet hook
– 3 in (7.6 cm) wooden ring
– Stitch marker
– Tapestry needle
– Scissors
– Measuring tape
– Rolled towel or a 4.75 in (12.1 cm) cardboard tube for blocking
All quantities include a margin of roughly 15% for your gauge swatch and weaving in ends.
Abbreviations (US Terms)
- ch – chain
- sl st – slip stitch
- sc – single crochet
- hdc – half double crochet
- dc – double crochet
- inc – 2 sc in the same stitch
- BLO – back loop only
- MR – magic ring
- st(s) – stitch(es)
- rnd(s) – round(s)
- RS / WS – right side / wrong side
Special stitch: Shell. Work 5 dc in the same stitch. The center dc of a shell is its 3rd dc.
Pattern A (shells over sc): Shells are worked into the sc of the round below, and sc go into the center dc of each shell below.
Pattern B: Same as Pattern A, but offset by half a repeat. Every round has 10 sc + 10 shells = 60 sts.
Gauge and Checkpoints
- Single crochet: 16 sc × 16 rnds = 4 in (10.2 cm)
- Shell pattern: 2 repeats (12 sts) = 3 in (7.6 cm), and 8 shell rounds = 5 in (12.7 cm). One shell round is about 0.625 in (1.6 cm) tall.
Make the base first and use it as your test piece. Checkpoints:
- Base Rnd 10: flat circle about 4.75 in (12.1 cm) across.
- End of Rnd 19: cream walls 2.25 in (5.7 cm) tall; tube 7.5 in (19.1 cm) wide when flattened.
- Body Rnd 8: shell section 5 in (12.7 cm) tall.
- Body Rnd 18: total height 13.5 in (34.3 cm).
- Finished: 15 in (38.1 cm) tall.
If your base is wider than 5 in (12.7 cm), go down half a hook size. If it’s narrower than 4.5 in (11.4 cm), go up half a size. Keep the stitch count at 60. The shell repeat needs a multiple of 6 stitches.

Base and Cream Walls
Work in continuous joined rounds with cream, using the 5 mm hook. Join each round with a sl st to the first sc and ch 1. The ch 1 does not count as a stitch.
Rnd 1: 6 sc in MR. (6)
Rnd 2: Inc in each st around. (12)
Rnd 3: Sc in next st, inc 6 times. (18)
Rnd 4: Sc in next 2 sts, inc 6 times. (24)
Rnd 5: Sc in next 3 sts, inc 6 times. (30)
Rnd 6: Sc in next 4 sts, inc 6 times. (36)
Rnd 7: Sc in next 5 sts, inc 6 times. (42)
Rnd 8: Sc in next 6 sts, inc 6 times. (48)
Rnd 9: Sc in next 7 sts, inc 6 times. (54)
Rnd 10: Sc in next 8 sts, inc 6 times. (60)
Checkpoint: the circle lies flat and measures 4.75 in (12.1 cm) across.
Rnd 11: Sc in BLO of each st around. (60) This makes a crisp fold line where the base turns up into the walls.
Rnds 12–19: Sc in each st around. (60 each round)
On the final sl st of Rnd 19, pull through with yellow and fasten off cream.
Checkpoint: the walls are 2.25 in (5.7 cm) tall and the tube is 7.5 in (19.1 cm) wide when flattened.
Shell Body with Dispensing Opening
Use yellow (or sage) for the whole body.
Body Rnd 1 (Pattern A): Ch 1, sc in first st, skip 2, shell in next st, skip 2, sc in next st 9 times, skip 2, shell in next st, skip 2, sl st to first sc. (10 sc + 10 shells = 60)
For the opening, number the repeats 1–10 starting from the join. Each repeat is 1 sc followed by 1 shell.
Body Row 2 (RS, Pattern B in rows):
1. Ch 3 (counts as dc), 2 dc in first sc (half shell).
2. Sc in center dc of next shell, shell in next sc 7 times.
3. Sc in center dc of shell 8, 3 dc in sc 9 (half shell). Turn.
This leaves shell 9, sc 10 and shell 10 unworked: 11 sts at the bottom of the opening. (49 sts: 3 + (7 × 6) + 1 + 3)
Body Row 3 (WS, Pattern A in rows):
1. Ch 1, sc in first dc.
2. Skip 2 dc, shell in next sc, skip 2 dc, sc in next dc 8 times. The last sc goes into the top of the turning ch-3. Turn.
(49 sts: 8 shells + 9 sc)
Body Rnd 4 (RS, Pattern B, closing round):
1. Ch 3 (counts as dc), 2 dc in first sc.
2. Sc in center dc of next shell, shell in next sc 7 times.
3. Sc in center dc of 8th shell, shell in last sc.
4. Ch 9, sl st to top of beginning ch-3.
(51 sts + 9 ch = 60)
Why the ch-9 works: in a normal Pattern B round, the gap would hold sc + shell + sc + the 2 dc that close the starting half shell, which is 1 + 5 + 1 + 2 = 9 sts. The chain stands in for exactly those positions.
Body Rnd 5 (Pattern A):
1. Ch 1, sc in top of beginning ch-3 (this is the center of the first shell).
2. Shell in next sc, sc in center dc of next shell across to the edge shell. Sc in its center dc.
3. Across the chain: shell in ch 1, skip 2 ch, sc in ch 4, skip 2 ch, shell in ch 7.
4. Skip ch 8 and 9, sl st to first sc.
(10 sc + 10 shells = 60)
Body Rnd 6 (Pattern B): Ch 3 (counts as dc), 2 dc in first sc, sc in center dc of next shell, shell in next sc 9 times, sc in center dc of last shell, 2 dc in first sc, sl st to top of ch-3. (60)
Body Rnd 7 (Pattern A): Ch 1, sc in top of ch-3, shell in next sc, sc in center dc of next shell 9 times, shell in last sc, sl st to first sc. (60)
Body Rnds 8–18: Alternate the rounds: even-numbered rounds repeat Rnd 6, odd-numbered rounds repeat Rnd 7. Rnd 18 is a Pattern B round. (60 each round)
On the final sl st, pull through with cream and fasten off yellow.
Checkpoint: the body (18 rounds) is 11.25 in (28.6 cm) tall, and the total height is 13.5 in (34.3 cm).
Opening Edging
Join cream at the right bottom corner of the opening.
1. Sc in each of the 11 unworked Rnd 1 sts.
2. Work 3 sc up the side: 2 sc in the dc row-end and 1 sc in the sc row-end.
3. Sc in the underside of each of the 9 chains.
4. Work 3 sc down the other side.
5. Sl st to first sc.
(26 sc) Fasten off. The opening measures about 2.75 in × 1.25 in (7.0 × 3.2 cm).
Border (Scalloped Top Band)
Border gauge: same as the body. 1 sc round = 0.25 in (0.6 cm), and 1 shell round = 0.625 in (1.6 cm). Use cream.
Top Rnd 1 (conversion round): Ch 1, sc in each st around, counting the ch-3 as a st. (60 worked one per existing stitch + 0 added = 60) That gives 30 sts across the front half and 30 across the back.
Top Rnd 2 (Pattern A): Ch 1, sc in first st, skip 2, shell in next st, skip 2, sc in next st 9 times, skip 2, shell in next st, skip 2, sl st to first sc. (10 scallops; 5 per half; 60)
Top Rnd 3 (Pattern B): Ch 3 (counts as dc), 2 dc in first sc, sc in center dc of next shell, shell in next sc 9 times, sc in center dc of last shell, 2 dc in first sc, sl st to top of ch-3. (10 scallops; 60) Fasten off.
Why the math works: 60 sts ÷ 6 sts per repeat = 10 even scallops, with no leftover stitches. Every round from base Rnd 10 to the top stays at 60, so the tube never flares or narrows. The border depth is 0.25 + 0.625 + 0.625 = 1.5 in (3.8 cm), which brings the total to 13.5 + 1.5 = 15 in (38.1 cm).
Hanging Tab and Ring
- With cream, ch 7. Sc in 2nd ch from hook and across. (6)
- Rows 2–16: Ch 1, turn, sc in each st. (6 each row)
- Check that the tab measures 1.5 in × 4 in (3.8 × 10.2 cm).
- Fold the tab over the wooden ring so each leg is 2 in (5.1 cm) long.
- Sew both legs to the inside of the top band, directly opposite the opening. Stitch down 1.25 in (3.2 cm) of each leg so the ring sits about 0.75 in (1.9 cm) above the scallops.
Flowers (Make 3)
Rnd 1: With yellow, 10 sc in MR, sl st to first sc. Fasten off.
Rnd 2: Join cream. (Hdc, 3 dc, hdc) in next st, sl st in next st 5 times. (5 petals)
Fasten off and leave a 10 in (25.4 cm) tail. Each flower measures 1.75 in (4.4 cm) across.
Leaves (Make 3)
With sage green, ch 7.
1. Sc in 2nd ch from hook, hdc in next, dc in next 2, hdc in next.
2. Work (sc, ch 2, sc) in last ch for the tip.
3. Rotate and work along the other side of the chain: hdc in next, dc in next 2, hdc in next, sc in next.
4. Sl st to first sc.
Each leaf is 1.75 in (4.4 cm) long.
Appliqué Placement
Tuck one leaf partly behind each flower, angled outward, and sew both in place through the shell stitches.
– Flower 1: upper left, around Body Rnds 14–15
– Flower 2: center right, around Rnds 9–10
– Flower 3: lower right, just above and beside the opening, around Rnds 5–6
Final Blocking
- Weave in all ends on the inside.
- Slide a rolled towel or a 4.75 in (12.1 cm) tube inside the holder.
- Mist it evenly with water until it’s damp, not soaked.
- Shape the shells so the fans open evenly, and pin the top scallops into rounded curves.
- Gently round out the opening.
- Press each flower flat with your fingers and lift the petal edges slightly.
- Let it dry completely standing upright.
- Check the measurements: 15 in (38.1 cm) tall and 7.5 in (19.1 cm) wide when flattened.
Final Quality-Control Checklist
- Every round from base Rnd 10 to the top has 60 stitches.
- The base lies flat with a crisp BLO fold.
- The shells alternate cleanly, and no fans are stacked directly on top of each other.
- The opening edging has 26 sc and doesn’t pucker.
- The top band has 10 even scallops.
- The ring is centered at the back and sewn securely.
- The flowers and leaves are sewn through both legs of the stitches.
- All ends are woven in on the inside.
Troubleshooting
- Base cups or ruffles: Your tension is too tight (cupping) or too loose (ruffling). Change hook size and redo the base.
- Tube leans or spirals: Join every round and keep the joins stacked, not drifting.
- Shells look crowded: Make sure you skip exactly 2 stitches on each side of every shell.
- Opening is too small: Check that the closing chain has 9 chains and that both edge stitches are full shells.
- Bags fall through the shells: Use a tighter tension or go down one hook size.
- Ring tilts forward: Sew the tab legs lower inside the band.
Care
Hand wash in cool water and lay flat or stand upright to dry. Remove the wooden ring before washing, or keep it dry while you wash the holder.
Final Notes
Here’s the measurement chain:
– Base: 4.75 in (12.1 cm) across at 60 sts
– Cream walls: 2.25 in (5.7 cm)
– Shell body: 11.25 in (28.6 cm), bringing the height to 13.5 in (34.3 cm)
– Scalloped border: 1.5 in (3.8 cm), bringing the finished height to 15 in (38.1 cm), with a 7.5 in (19.1 cm) flat width
Keep 60 stitches and your gauge steady, and every section will line up. Happy crocheting!