

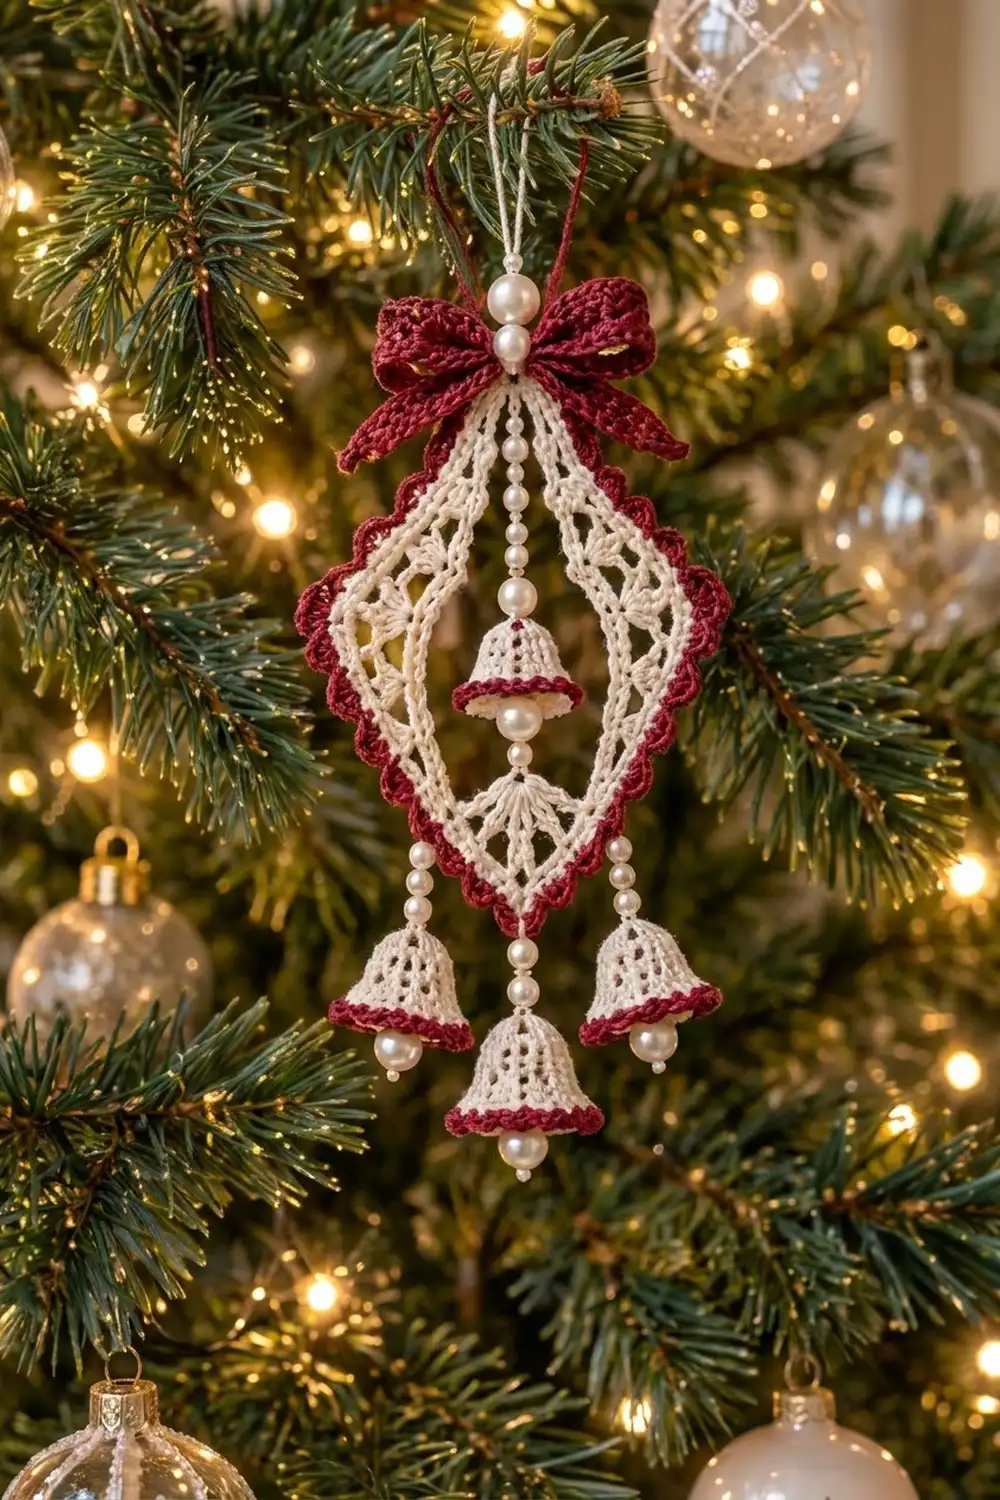
This heirloom-style Christmas ornament is a diamond of cream thread lace with an almond-shaped window in the middle. A burgundy scalloped border runs around the outside, a small burgundy bow sits on the top point, and four little bells hang from strands of pearl beads, one inside the window and three below the frame.
The colors are classic: warm cream and deep burgundy, with white or ivory pearls. It looks like a vintage tree ornament, but the construction is simple. Everything uses basic stitches worked in steel-hook thread. The pattern uses US crochet terms.
The lace frame measures about 5 in (12.7 cm) tall and 3.5 in (8.9 cm) wide. Including the bow and the hanging bells, the ornament is about 8 in (20.3 cm) long.
You start the frame with a chain ring that becomes the open window. Then you work five cream rounds outward, adding stitches at four corners to form the diamond, and finish with two burgundy border rounds. Next you make four small bells and a two-part bow. Last, you string the pearls and assemble everything.
Finished Size and Construction
- Finished frame size: 5 in (12.7 cm) tall x 3.5 in (8.9 cm) wide
- Overall length with bow and bells: about 8 in (20.3 cm)
- Skill level: Intermediate (thread crochet)
- Terminology: US
- Yarn weight: Size 10 crochet cotton thread
- Hook: 1.5 mm (US steel 8)
- Number of pieces: 1 lace frame, 4 bells, 1 bow loop strip, 1 bow tail strip
- Layout: One ornament. The bow is at the top point, one bell hangs inside the window, and three bells hang below the frame.
- Frame size before border: 4.5 in (11.4 cm) tall x 3.1 in (7.9 cm) wide
- Border depth: about 0.25 in (0.6 cm)
- Window opening: about 2.25 in (5.7 cm) tall x 1.25 in (3.2 cm) wide
Materials
Thread: Use size 10 mercerized cotton. Mercerized cotton holds crisp lace and takes starch well. Avoid fuzzy or acrylic thread, because the mesh will blur and the points won’t keep their shape.
- Cream (Color A): 5 g, about 30 m
- Burgundy (Color B): 4 g, about 24 m
These quantities include a generous margin for gauge swatches and the beading strands.
Tools and notions:
- 1.5 mm (US steel 8) crochet hook
- 16 cream or ivory 4 mm pearl beads, plus a few spares
- 6 cream or ivory 6 mm pearl beads (4 bell clappers, 1 for the bow center, 1 above the bow)
- Beading needle or very fine tapestry needle that fits through the bead holes
- 4 locking stitch markers
- Scissors
- Fabric stiffener or spray starch
- Foam blocking board and rust-proof pins
- Clear-drying fabric glue (optional, for securing knots)
Abbreviations (US Terms)
- ch: chain
- sl st: slip stitch
- sc: single crochet
- dc: double crochet
- sk: skip
- sp(s): space(s)
- st(s): stitch(es)
- BLO: back loop only
- rnd(s): round(s)
Special stitches
- Point fan: (3 dc, ch 2, 3 dc) in the same corner space.
- Scallop: sk 1 st, 5 dc in next st, sk 1 st, sl st in next st. Each scallop uses 4 stitches.
Counting rule: In this pattern, a ch-1 space counts as 1 stitch. Corner ch-2 spaces are NOT counted in the per-side numbers. “Per side” means every stitch between two corner ch-2 spaces, and that already includes the half-corner stitches at each end of the side.
Gauge and Checkpoints
Gauge: 10 dc and 4 dc rounds = 1 in (2.5 cm), worked in size 10 thread with a 1.5 mm hook.
Make the frame through Rnd 3 first and check it before you go on. Thread gauge changes a lot from one crocheter to the next.
Checkpoints:
- After Rnd 1: Lay the ring flat as a diamond. Each side should be about 1.5 in (3.8 cm).
- After Rnd 3: Each side is 20 sts and should be about 2 in (5.1 cm).
- After Rnd 5: The frame should be about 4.5 in (11.4 cm) tall x 3.1 in (7.9 cm) wide, and each side (27 sts) should be about 2.7 in (6.9 cm).
- After the border: The frame should be about 5 in (12.7 cm) tall x 3.5 in (8.9 cm) wide.
If your frame is too big: go down to a 1.25 mm hook, or tighten your dc by pulling up shorter loops.
If your frame is too small: go up to a 1.75 mm hook.
Don’t change the stitch counts. The diamond shape depends on them.

Lace Frame
The frame is worked in joined rounds with Color A. The right side faces you throughout, and you don’t turn.
Foundation: Ch 56 and sl st to the first ch to form a ring. Make sure the chain isn’t twisted. Place markers in ch 1 (top point), ch 15 (right corner), ch 29 (bottom point), and ch 43 (left corner). There are 13 chains between each pair of marked chains.
Rnd 1: Ch 5 (counts as dc + ch 2), dc in the top marked ch.
– [Dc in each of next 13 ch, (dc, ch 2, dc) in next marked ch] 3 times.
– Dc in each of the last 13 ch, sl st to 3rd ch of beginning ch-5.
– Count: 60 dc and 4 corner ch-2 sps; 15 dc per side (13 + 2 half-corner dc).
Rnd 2 (mesh): Sl st into the ch-2 sp. Ch 5 (counts as dc + ch 2), dc in same sp.
– Dc in next dc, (ch 1, sk 1 dc, dc in next dc) 7 times, (dc, ch 2, dc) in next corner sp. Repeat from * 2 more times.
– Dc in next dc, (ch 1, sk 1 dc, dc in next dc) 7 times, sl st to 3rd ch of beginning ch-5.
– Count per side: 1 half-corner dc + 8 dc + 7 ch-1 sps + 1 half-corner dc = 17 sts (10 dc and 7 ch-1 sps).
– Round total: 68 sts (40 dc and 28 ch-1 sps), plus 4 corner ch-2 sps.
Rnd 3 (solid, sharpening the points): Sl st into the ch-2 sp. Ch 3 (counts as dc), (dc, ch 2, 2 dc) in same sp. This is the top point.
– Dc in each of next 17 sts (every dc and every ch-1 sp). Work (dc, ch 2, dc) in the right corner sp.
– Dc in next 17 sts, then (2 dc, ch 2, 2 dc) in the bottom point sp.
– Dc in next 17 sts, then (dc, ch 2, dc) in the left corner sp.
– Dc in next 17 sts, sl st to top of beginning ch-3.
– Count per side: 2 (point half) + 17 + 1 (side-corner half) = 20 dc.
– Round total: 80 dc.
Each side of the diamond runs from one sharp point to one blunt corner, so all four sides have the same count.
Rnd 4 (lace with point fans): Sl st in next dc and into the ch-2 sp. Ch 3 (counts as dc), (2 dc, ch 2, 3 dc) in same sp. This completes the first point fan.
– Dc in next 2 dc, (ch 1, sk 1 dc, dc in next dc) 9 times, (dc, ch 2, dc) in the side-corner sp.
– Dc in next 2 dc, (ch 1, sk 1, dc in next) 9 times, then work a point fan in the bottom sp.
– Repeat from * once.
– Dc in next 2 dc, (ch 1, sk 1, dc in next) 9 times, sl st to top of beginning ch-3.
– Each side uses exactly 20 sts of Rnd 3 (2 + 18).
– Count per side: 3 (fan half) + 11 dc + 9 ch-1 sps + 1 (corner half) = 24 sts.
– Round total: 96 sts (60 dc and 36 ch-1 sps).
Rnd 5 (solid): Sl st in next 2 dc and into the ch-2 sp. Ch 3, (dc, ch 2, 2 dc) in same sp.
– Work dc in every dc and ch-1 sp along each side (24 per side).
– Work (dc, ch 2, dc) in each side-corner sp and (2 dc, ch 2, 2 dc) in the bottom point sp.
– Sl st to top of beginning ch-3 and fasten off Color A.
– Count per side: 2 + 24 + 1 = 27 dc.
– Round total: 108 dc.
Check the Rnd 5 measurement now: about 4.5 in (11.4 cm) x 3.1 in (7.9 cm).
Border
Border gauge: 10 sc = 1 in (2.5 cm). This matches the dc width, so the edge lies flat.
Rnd 6: Join Color B with a sl st in the top point ch-2 sp. Ch 1, (sc, ch 2, sc) in the same sp.
– Sc in each dc along the side (27), then work (sc, ch 2, sc) in each corner sp.
– Repeat around and sl st to the first sc.
– Count per side: 1 + 27 + 1 = 29 sc.
– Round total: 116 sc, plus 4 corner ch-2 sps.
Rnd 7 (scallops): Sl st into the top ch-2 sp and ch 3 (counts as dc). Work 4 dc in the same sp to make the first corner scallop.
– Sl st in the first sc of the side, then work 7 scallops (sk 1, 5 dc in next, sk 1, sl st in next).
– Work 5 dc in the next corner sp.
– Repeat from * around, ending with the 7th scallop of the last side. Sl st to top of beginning ch-3 and fasten off.
– Count per side: 1 sl st + 7 scallops (28 sts) = 29 sts. Each scallop ends with its own sl st, so each side has 8 sl sts.
– Round total: 32 scallops (28 on the sides + 4 at the corners), 160 dc and 32 sl sts.
Why the math works: A scallop uses 4 stitches. Each side of Rnd 6 has 29 sc, which is 1 + (4 x 7): one opening sl st plus seven full scallops. Nothing is left over and nothing is short, so the corner scallop always lands in the ch-2 space. That keeps all four points crisp.
Bells (Make 4)
Rnd 1: With Color A, make a magic ring. Ch 3 (counts as dc), 7 dc in the ring, pull the ring tightly closed, sl st to top of ch-3. Count: 8 dc.
Rnd 2 (conversion): Ch 4 (counts as dc + ch 1), (dc in next dc, ch 1) 7 times, sl st to 3rd ch of beginning ch-4.
– Count: 8 dc (1 per existing st) + 8 ch-1 sps added = 16 sts.
Rnd 3: Ch 3 (counts as dc), dc in each ch-1 sp and dc around, sl st to top of ch-3. Count: 16 dc.
Rnd 4 (flare): Ch 3 (counts as dc), 2 dc in next dc, (dc in next dc, 2 dc in next dc) 7 times, sl st to top of ch-3. Fasten off Color A. Count: 24 dc.
Rnd 5: Join Color B. Ch 1, sc in each dc, sl st to first sc. Count: 24 sc.
Rnd 6: Ch 1, sc BLO in each sc, sl st to first sc. Fasten off. Count: 24 sc.
Each bell is about 0.9 in (2.3 cm) tall and 0.75 in (1.9 cm) across the rim.
Bow
Bow loop strip: With Color B, ch 33.
- Row 1: Dc in 4th ch from hook and in each ch across. Count: 30 dc + turning ch = 31 sts.
- Row 2 (top edge): Ch 1, sc in first st, (ch 3, sk 1, sc in next) 15 times. Count: 16 sc and 15 ch-3 loops.
- Row 3 (bottom edge): Rotate the strip and work the same edging into the 31 foundation chains. Fasten off.
The strip is about 3.1 in (7.9 cm) long. Fold both ends to the center, overlapping by 2 sts, and wrap the center tightly with Color B several times. The finished bow is about 1.6 in (4.1 cm) wide and 0.75 in (1.9 cm) tall.
Bow tails: With Color B, ch 17.
- Row 1: Dc in 4th ch from hook and across. Count: 14 dc + turning ch = 15 sts.
- Row 2: Ch 1, sc in first st, (ch 3, sk 1, sc in next) 7 times. Fasten off.
The tail strip is about 1.5 in (3.8 cm) long. Fold it in half into an upside-down V and stitch the fold behind the bow’s center wrap. Sew a 6 mm pearl over the center wrap.
Assembly and Beading
Block the frame (see below) before assembly. Beads are much easier to place on a stiff frame.
Window bell:
1. Cut 12 in (30.5 cm) of Color A and thread it on the beading needle.
2. Tie it to the inner top point, which is the top marked ch of the foundation ring.
3. String 3 pearls (4 mm). Pass the thread down through the center of a bell’s top, string one 6 mm pearl as the clapper, then string 2 more 4 mm pearls.
4. Tie the thread to the inner bottom point. Keep the strand straight but not stretched, then weave in the ends.
Center hanging bell:
1. Cut 12 in (30.5 cm) of Color A.
2. Tie it to the bottom point of the border, at the center dc of the corner scallop.
3. String 5 pearls (4 mm), pass down through a bell top, and string one 6 mm clapper.
4. Knot below the clapper and add a dot of glue. The clapper should peek just below the burgundy rim.
Side bells: On each lower side, count up from the bottom point to the 4th sl st of Rnd 7. Attach a strand there in the same way, using 3 pearls (4 mm), a bell, and one 6 mm clapper. Both side bells should hang level with each other.
Bow and hanger:
1. Sew the bow to the top point.
2. Cut 8 in (20.3 cm) of Color A, thread one 6 mm pearl to the middle, and fold the thread in half.
3. Knot the two ends to the top point behind the bow. This makes a hanging loop about 4 in (10.2 cm) long, with the pearl sitting just above the bow.
Final Blocking
- Draw a diamond 5 in (12.7 cm) tall and 3.5 in (8.9 cm) wide on paper. Cover it with plastic wrap on your blocking board.
- Soak the frame in fabric stiffener, or dampen it and spray it with heavy starch.
- Pin the top and bottom points first, then the two side corners.
- Pin the window open into an almond shape about 2.25 in (5.7 cm) x 1.25 in (3.2 cm).
- Pin each scallop so it curves outward evenly.
- Shape the bells over a pencil tip and stiffen them as well.
- Let everything dry completely, usually overnight, before you unpin.
Final Quality-Control Checklist
- Stitch counts per side: Rnd 1 = 15, Rnd 2 = 17, Rnd 3 = 20, Rnd 4 = 24, Rnd 5 = 27, Rnd 6 = 29
- 7 scallops on each side and 1 scallop at each corner, 32 in total
- Frame measures 5 in (12.7 cm) x 3.5 in (8.9 cm)
- Window is centered and symmetrical
- All 4 bells have 24 rim stitches and look the same
- Side bells hang level, and the center bell hangs lowest
- All knots are glued and the ends are woven in
Troubleshooting
- The points are rounded: You may have put too few dc in the point corners on Rnds 3 and 5. Each point gets 2 dc on both sides of the ch-2.
- The frame ruffles: Your tension is loose. Go down a hook size.
- The frame cups: You may have skipped a ch-1 space when working Rnd 3 or Rnd 5. Recount the 17 or 24 sts per side.
- A scallop runs off the corner: The side count for Rnd 6 is not 29. Fix Rnd 6 first.
- The bell flares too much: Work Rnd 4 more tightly, or use 20 dc with (dc in next, 2 dc in next) only 4 times.
- The window strand sags: Retie it shorter after blocking.
Care
Dust the ornament gently, or hand-wash it in cool water if needed. Re-starch it and dry it flat, pinned to the template. Store it flat in tissue paper.
Final Notes
The measurements build on each other. A 15-stitch side after Rnd 1 grows to 27 stitches after Rnd 5, which gives a frame of 4.5 in (11.4 cm) x 3.1 in (7.9 cm). The 29-stitch border side divides exactly into seven scallops and finishes at 5 in (12.7 cm) x 3.5 in (8.9 cm). The beaded bells bring the full ornament to about 8 in (20.3 cm). If you check each step, the diamond stays sharp and even.
Happy crocheting!