

The Frosted Chime Bell Ornament is a small lace frame with a 3D bell hanging inside it. A scalloped blue oval surrounds an open center, and a cream bell with a tiny clapper sways in the middle. The piece is light and airy, and once it’s lightly stiffened it holds its shape on a tree branch or in a window.
The palette is quiet and wintry: a soft medium blue for the frame and a warm cream for the bell. The style is classic thread-lace, with shells, picots and a raised crown fan at the top, but in sport-weight cotton so it works up quickly.
This pattern uses US crochet terms. The finished ornament measures about 4 in (10.2 cm) wide and 5 in (12.7 cm) tall, not counting the hanging loop, which adds about 1.5 in (3.8 cm).
The construction is simple. First you work the frame in joined rounds around a chain ring: a single crochet base, a double crochet mesh, a shell round and a picot outline. Next you add a hanging loop. Then you crochet the bell top-down in continuous rounds, make a tiny clapper, and hang both inside the frame.
Finished Size and Construction
- Finished size: 4 in (10.2 cm) wide × 5 in (12.7 cm) tall, plus a 1.5 in (3.8 cm) loop
- Skill level: Intermediate
- Terminology: US crochet terms
- Yarn weight: Sport (#2) mercerized cotton
- Hook: 3.0 mm (US C/2–D/3)
- Number of pieces: 1 ornament (frame, bell and clapper assembled into one piece)
- Layout: One frame with the bell hanging from the top center of the inner opening
- Inner opening: about 2 × 3 in (5.1 × 7.6 cm)
- Size before border: 3 × 4 in (7.6 × 10.2 cm)
- Border depth: 0.5 in (1.3 cm) per side
- Bell: 1.4 in (3.6 cm) tall, 1.6 in (4.1 cm) across the rim
Materials
Yarn: Choose a smooth mercerized cotton in sport weight, about 155 m (170 yd) per 50 g. Mercerized cotton gives crisp stitch definition and takes stiffener well. Avoid fuzzy or very stretchy fibers, because the shells and picots will lose their shape.
- Color A, Medium Blue (frame and loop): 8 g, about 25 m (27 yd)
- Color B, Cream (bell, clapper and hanging chain): 4 g, about 12 m (13 yd)
These quantities include a margin for your gauge swatch and weaving in ends.
Tools:
– 3.0 mm crochet hook
– Tapestry needle
– Locking stitch marker
– Small pinch of fiberfill or yarn scraps (for the clapper)
– Fabric stiffener or heavy spray starch
– Blocking board or thick cardboard, rust-proof pins, plastic wrap
– Scissors and a ruler or tape measure
Abbreviations (US Terms)
- ch: chain
- sl st: slip stitch
- sc: single crochet
- dc: double crochet
- tr: treble crochet
- inc: 2 sc in the same stitch
- rev sc: reverse single crochet (crab stitch)
- MR: magic ring
- sp(s): space(s)
- st(s): stitch(es)
- rep: repeat
Special stitches:
- Picot: Ch 3, then sl st into the front loop and one vertical strand of the sc just made.
- Shell: 7 dc worked into the same ch-1 space.
- Crown fan: 9 tr worked into the same ch-1 space. The beginning ch-4 counts as the first tr.
- Reverse sc: Working left to right (right-handed), insert the hook into the next stitch to the right, yarn over, pull up a loop, yarn over and pull through both loops.
Gauge and Checkpoints
Gauge: 12 sc and 14 rows = 2 in (5.1 cm) with a 3.0 mm hook. That works out to 6 sc and 7 rows per 1 in (2.5 cm).
Make one frame as your test piece before committing to a batch. Measure it at each checkpoint:
- After Round 1: The ring of 48 sc measures 8 in (20.3 cm) around. Laid flat and squeezed into an oval, it gives an opening of about 2 × 3 in (5.1 × 7.6 cm).
- After Round 2: The frame measures about 3 × 4 in (7.6 × 10.2 cm) when gently shaped into an oval.
- After Round 4: The frame measures about 4 × 5 in (10.2 × 12.7 cm).
- Bell after Round 10: about 1.4 in (3.6 cm) tall and 1.6 in (4.1 cm) across the rim.
If your piece is too big: Go down to a 2.75 mm hook, or tighten your chain foundation. A loose foundation ring is the most common reason a frame comes out oversized.
If your piece is too small: Go up to a 3.25 mm hook. Make sure your bell still fits inside the opening with at least 0.2 in (0.5 cm) of clearance on each side.
Part 1: The Frame (Color A)
Work in joined rounds with the right side facing. Don’t turn. Every round begins at the top center of the oval, so the crown fan lands at the top.
Foundation: Ch 48 and join with a sl st into the first ch to form a ring. Make sure the chain isn’t twisted.
Round 1: Ch 1, sc in the same ch as the join and in each ch around. Join with a sl st to the first sc. (48 sc)
Place a marker in the first sc. It marks the top center, where the bell will hang later.
Round 2: Ch 3 (counts as a dc), dc in the next sc, ch 1. Dc in each of the next 2 sc, ch 1. Rep from * 23 times. Join with a sl st to the top of the beginning ch-3. (48 dc and 24 ch-1 sps, 72 sts total)
The ch-1 gaps create the light mesh band seen around the opening. They also give the round enough extra length to lie flat around the curve.
Round 3 (Shell Round): Sl st in the next dc and into the first ch-1 sp. This is the top center.
- Crown: Ch 4 (counts as a tr) and work 8 tr in the same sp. (crown fan of 9 tr)
- Sc in the next ch-1 sp.
- Work a shell (7 dc) in the next ch-1 sp, sc in the next ch-1 sp. Rep from * 11 times.
- Join with a sl st to the top of the beginning ch-4.
Count: 1 crown fan (9 tr), 11 shells (77 dc) and 12 sc, for 98 sts total. Every one of the 24 ch-1 sps is used once: 1 for the crown, 1 for the sc after it, then 2 for each of the 11 repeats (1 + 1 + 22 = 24).
Shells are counted clockwise from the crown:
- Top: the crown fan
- Right side: shells 1–5
- Bottom: shell 6
- Left side: shells 7–11
That is 1 + 5 + 1 + 5, for 12 scallops in all, with the right and left sides matching.
Checkpoint: Your scallops should lie flat. If they ruffle, your dc are too tall or too loose. If they cup, your shells are too tight.
Part 2: Border (Color A)
The border is Round 4 of the frame plus the hanging loop. Round 3 shaped the scallops. Round 4 outlines them with sc and adds a picot to each tip.
Border gauge: The outline round adds about 0.15 in (0.4 cm). Together with the 0.35 in (0.9 cm) shell round, the border depth is 0.5 in (1.3 cm) on every side.
Round 4 (Picot Outline): Ch 1.
- Crown: Sc in the same st as the join and in each of the next 3 tr (4 sc). Sc in the 5th tr and make a picot. Sc in each of the last 4 tr. Sl st in the next sc of Round 3. (9 sc, 1 picot, 1 sl st)
- Each shell: Sc in each of the next 3 dc, sc in the 4th (center) dc and make a picot, sc in each of the next 3 dc, sl st in the next sc of Round 3. (7 sc, 1 picot, 1 sl st) Rep from * 11 times.
The last sl st lands in the final sc of Round 3, right beside your starting point. Fasten off and weave in the end.
Counts by section:
- Top (crown): 9 sc, 1 picot, 1 sl st
- Right side (5 shells): 35 sc, 5 picots, 5 sl sts
- Bottom (1 shell): 7 sc, 1 picot, 1 sl st
- Left side (5 shells): 35 sc, 5 picots, 5 sl sts
- Total: 86 sc, 12 picots, 12 sl sts
Why the math works: Round 4 places exactly one sc on each tr or dc from Round 3: 9 for the crown plus 11 × 7 = 77 for the shells, which equals 86. The 12 sl sts land on the 12 sc between the scallops. Nothing is added or skipped, so the outline follows the scallops without pulling them tight or making them wavy. The picot sits on the center stitch of each scallop, so every scallop stays symmetrical.
Hanging Loop: With the right side facing, join Color A with a sl st into the crown picot.
- Ch 20 and sl st into the same picot to form a loop.
- Ch 1 and work 28 sc over the ch-20 loop, packing the stitches snugly.
- Sl st into the picot. Fasten off and weave in the end.
The covered loop stands about 1.5 in (3.8 cm) tall. The 28 sc are worked around the chain, not into it, so they pack tightly and make a firm loop that won’t stretch.
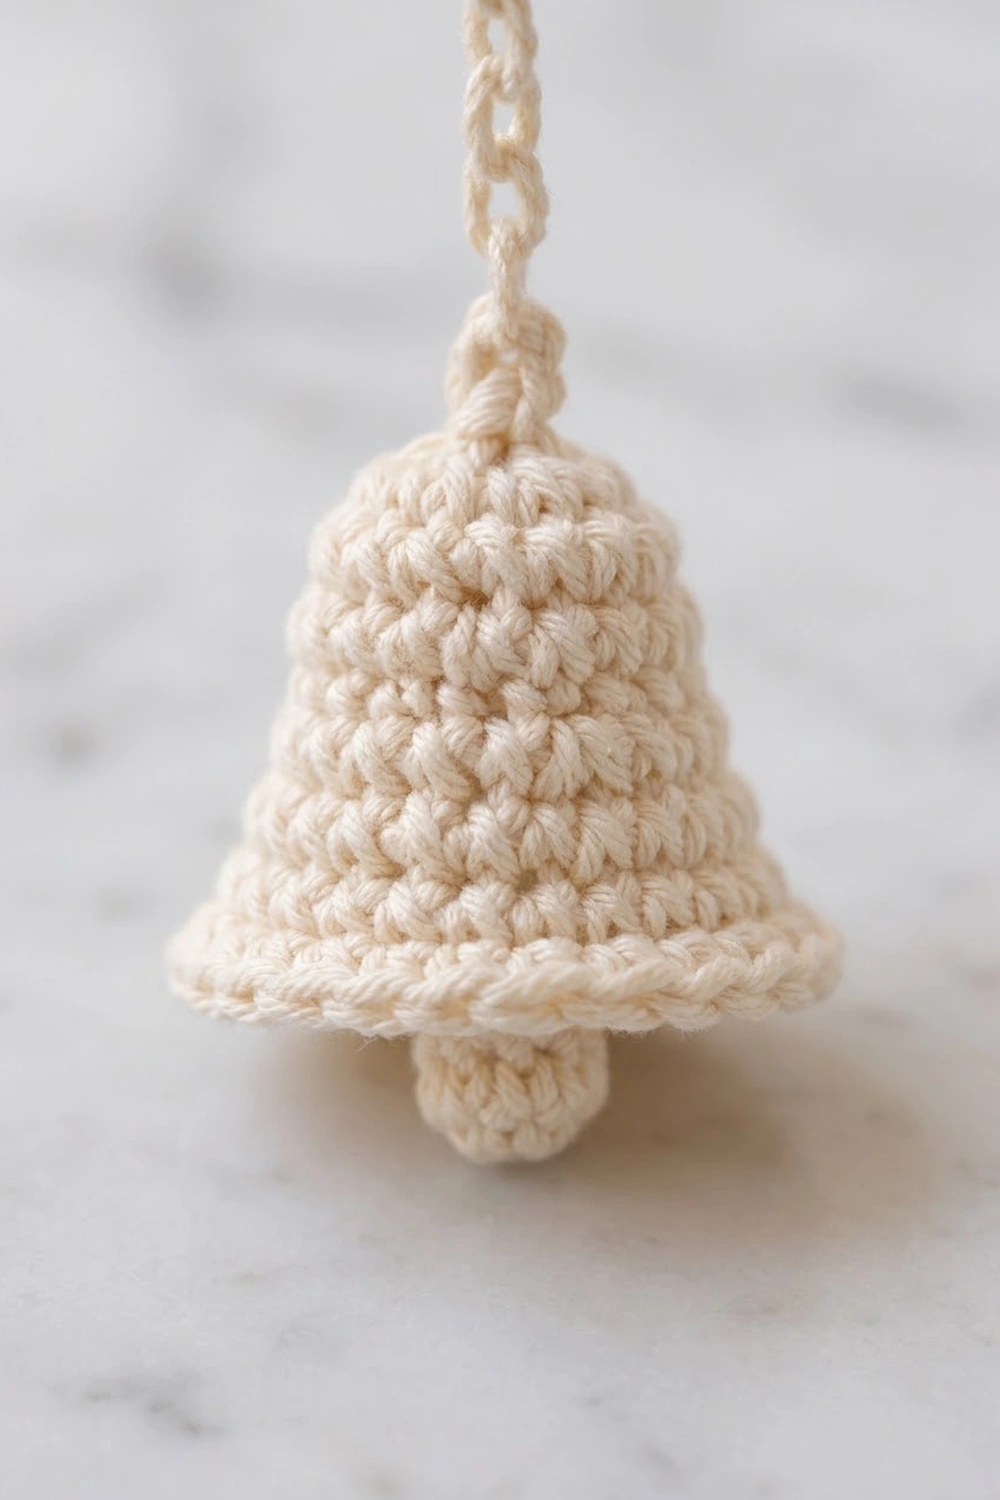
Part 3: The Bell (Color B)
Work in continuous spiral rounds. Don’t join. Mark the first stitch of each round.
Round 1: Make a MR and work 6 sc into it. Leave a 6 in (15.2 cm) starting tail on the outside. (6)
Round 2: Inc in each st around. (12)
Round 3: Sc in each st around. (12)
Round 4: Sc in the next 3 sts, inc. Rep 3 times. (15)
Round 5: Sc in each st around. (15)
Round 6: Sc in the next 4 sts, inc. Rep 3 times. (18)
Round 7: Sc in the next 5 sts, inc. Rep 3 times. (21)
Round 8: Sc in the next 6 sts, inc. Rep 3 times. (24)
Round 9 (Flare): Sc in the next 3 sts, inc. Rep 6 times. (30)
Rounds 1–5 form the narrow, rounded top of the bell. Rounds 6–8 widen the sides gradually. Round 9 doubles the number of increases so the bottom flares outward.
Round 10 (Rolled Rim): Sl st in the next st. Ch 1 and work rev sc in each st around. Join with a sl st to the first rev sc. (30 rev sc) Fasten off and weave in the end.
The reverse sc twists over itself and makes the thick, ridged rim seen at the bottom of the bell.
Checkpoint: Rim circumference is 5 in (12.7 cm), so the bell measures about 1.6 in (4.1 cm) across when you view it from the front. The bell is about 1.4 in (3.6 cm) tall.
Hanging Chain: Pull the starting tail up through the center of the magic ring so it comes out at the top of the bell. Using this tail and your hook, ch 5 and fasten off, leaving an 8 in (20.3 cm) tail. The chain is about 0.6 in (1.5 cm) long.
Part 4: The Clapper (Color B)
Round 1: Make a MR and work 6 sc into it. (6)
Round 2: Sc in each st around. (6)
Push a tiny pinch of fiberfill inside. Cut the yarn, leaving a 10 in (25.4 cm) tail. Thread the tail through the front loops of all 6 stitches, pull to close, and secure. The clapper is a firm ball about 0.3 in (0.8 cm) across.
Part 5: Assembly
- Attach the clapper: Thread the clapper tail onto a needle. Pass it up through the inside of the bell and out at the center top. Adjust it so the clapper sticks out 0.2 in (0.5 cm) below the rim. Knot the tail securely at the top of the bell, then run it into the hanging chain.
- Hang the bell: Thread the bell’s chain tail onto the needle. Sew the end of the ch-5 to the marked top-center sc of Round 1, and stitch it to the back of the sc so the join is hidden.
- Check the fit: With the frame laid flat, the bell should be centered left to right. The clapper should sit about 0.8 in (2.0 cm) above the bottom inner edge of the opening.
Final Blocking
- Make an oval template. Draw a 2 × 3 in (5.1 × 7.6 cm) oval on a piece of cardboard for the inner opening. Draw a 4 × 5 in (10.2 × 12.7 cm) oval around it for the outer edge, keeping the two ovals centered. Cover the cardboard with plastic wrap.
- Wet the piece. Soak the frame in diluted fabric stiffener, or spray it heavily with starch. Gently squeeze out the excess. Don’t wring.
- Pin the opening. Pin Round 1 to the inner oval, starting at the top center and the bottom center, then the two sides.
- Pin the scallops. Put one pin in each picot and stretch the scallops out to the outer oval. Check that the crown fan stands upright and that the left and right sides match.
- Stiffen the bell. Dip the bell separately and slip it over a pencil tip or a small cone wrapped in plastic. Shape the flared rim with your fingers and let the clapper hang free.
- Set the loop. Pin the hanging loop straight up from the crown.
- Dry completely. Leave everything for 12–24 hours before unpinning. Hang the bell back in place if you removed it to block.
Final Quality-Control Checklist
- Round 1 has exactly 48 sc and the ring isn’t twisted
- Round 2 has 48 dc and 24 ch-1 spaces
- Round 3 has 1 crown fan, 11 shells and 12 sc
- Round 4 has 12 picots, each centered on its scallop
- The frame measures 4 × 5 in (10.2 × 12.7 cm) after blocking
- The hanging loop is firm, upright and about 1.5 in (3.8 cm) tall
- The bell has 30 stitches at the rim and a fully rolled rev sc edge
- The clapper shows 0.2 in (0.5 cm) below the rim
- The bell hangs straight, centered and clear of the frame sides
- All ends are woven in and invisible from the front
Troubleshooting
The frame ruffles after Round 3. Your shells are too loose. Go down a hook size for Round 3 only, or shorten the height of your dc.
The frame cups or curls after Round 3. The foundation ring is too tight. Remake the foundation chain with a hook one size larger, then switch back for Round 1.
The opening looks round, not oval. This is normal before blocking. The oval shape comes from pinning to the template, so pin the top and bottom first and stretch them apart.
The bell touches the sides of the opening. Your bell is oversized. Remake it with a hook 0.25 mm smaller, or skip Round 5 to shorten it.
The rim flips upward. Your reverse sc is too tight. Work it more loosely, or use a hook one size larger for Round 10.
The clapper hides inside the bell. Loosen the knot at the top and let more tail out until the clapper shows below the rim.
Picots are lopsided. Count again so the picot sits on the 4th dc of each shell and the 5th tr of the crown.
Care
Spot clean with a damp cloth and re-stiffen if needed. Store flat in tissue paper, away from humidity, so the blocked shape holds from season to season.

Final Notes
Every measurement in this ornament builds on the one before it. The 48-stitch ring sets an 8 in (20.3 cm) opening that blocks to 2 × 3 in (5.1 × 7.6 cm). The mesh round brings the frame to 3 × 4 in (7.6 × 10.2 cm). The 0.5 in (1.3 cm) border brings it to a finished 4 × 5 in (10.2 × 12.7 cm). The 1.4 in (3.6 cm) bell, with its 5 in (12.7 cm) rim, hangs inside with room to swing. Check your gauge first, count stitches at each checkpoint, and block carefully, and every ornament will come out the same size.
Happy crocheting!