

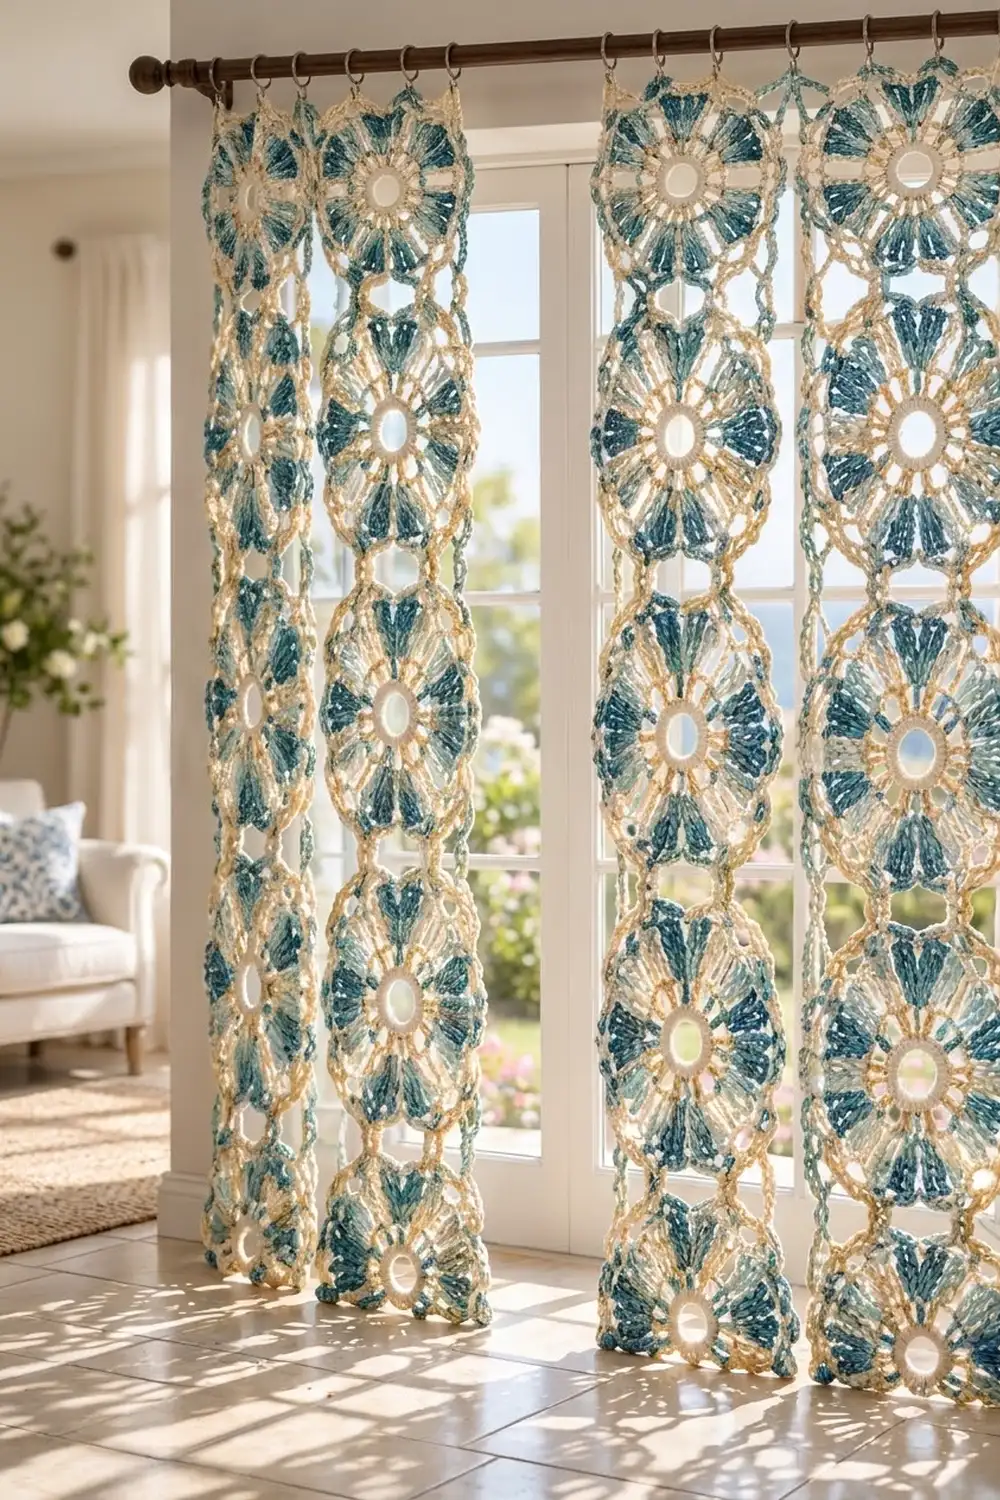
These lace curtains look like sunlight on shallow water. Each panel is a grid of round mandala motifs. Every motif has a cream center ring, eight aqua-to-teal fans, sand-colored spokes, and a scalloped teal edge. Light passes through the center hole of each motif and through the open chain loops, so the panels filter the view without blocking it.
There are four colors: cream, sand, light aqua and deep teal. Together they give a relaxed coastal look that suits beach houses, sunrooms and white-washed living rooms. The pattern uses US crochet terms throughout.
Each finished panel is 18 in (45.7 cm) wide and 86 in (218.4 cm) long including the header. A pair covers 36 in (91.4 cm) of rod.
You make each motif in seven rounds and join it to its neighbors in the last round (join-as-you-go). Each panel is 3 motifs wide and 14 tall. A folded single-crochet header across the top forms the rod pocket.
Finished Size and Construction
- Panel size: 18 in x 86 in (45.7 cm x 218.4 cm)
- Skill level: Intermediate
- Terminology: US
- Yarn weight: DK / light (#3) mercerized cotton
- Hook: 3.5 mm (E-4)
- Pieces: 42 motifs per panel, 84 for the pair
- Layout: 3 columns x 14 rows per panel
- Motif size: 6 in (15.2 cm) across, measured tip to tip
- Size before border: 18 in x 84 in (45.7 cm x 213.4 cm)
- Border depth: a 2 in (5.1 cm) header on the top edge only. The sides and bottom keep their scallops.
Materials
Mercerized cotton holds its shape, has a slight sheen, and stretches less over a long drop than acrylic. Use a DK cotton of about 120 m per 50 g.
- Color A, cream: 1,150 m (1,258 yd), about 480 g
- Color B, sand: 1,200 m (1,312 yd), about 500 g
- Color C, light aqua: 900 m (984 yd), about 375 g
- Color D, deep teal: 2,250 m (2,461 yd), about 940 g
These amounts are for the pair and include about a 15% margin for swatching, tails and joining.
Tools:
– 3.5 mm (E-4) crochet hook
– Tapestry needle
– Stitch markers
– Rustproof pins and foam blocking mats
– Spray bottle
– Tape measure
Abbreviations (US Terms)
- ch – chain
- sl st – slip stitch
- sc – single crochet
- dc – double crochet
- tr – treble crochet
- dtr – double treble crochet
- sp – space
- st(s) – stitch(es)
- RS / WS – right side / wrong side
Special stitches
– V-st: (dc, ch 3, dc) in the same stitch or space.
– Standing sc: Start with a slip knot on the hook. Insert the hook into the stitch, yarn over, pull up a loop, yarn over and draw through both loops.
Gauge and Checkpoints
Gauge is 20 sc and 16 rows = 4 in (10.2 cm). The motif is the real test, so make one complete motif before you make the rest.
Measure the motif flat, without stretching, at each of these stages:
- After Round 1: ring 1.4 in (3.6 cm) across, center hole about 0.75 in (1.9 cm)
- After Round 2: 2.5 in (6.4 cm)
- After Round 4: 4.1 in (10.4 cm)
- After Round 5: 4.7 in (11.9 cm)
- After Round 6: 5.5 in (14.0 cm)
- After Round 7: 6 in (15.2 cm) tip to tip
If the motif is too big (over 6.25 in / 15.9 cm), go down 0.25 mm in hook size. If it is too small (under 5.75 in / 14.6 cm), go up 0.25 mm. Over 42 motifs, an error of 0.25 in (0.6 cm) per motif adds up to 3.5 in (8.9 cm) of extra length on each panel.
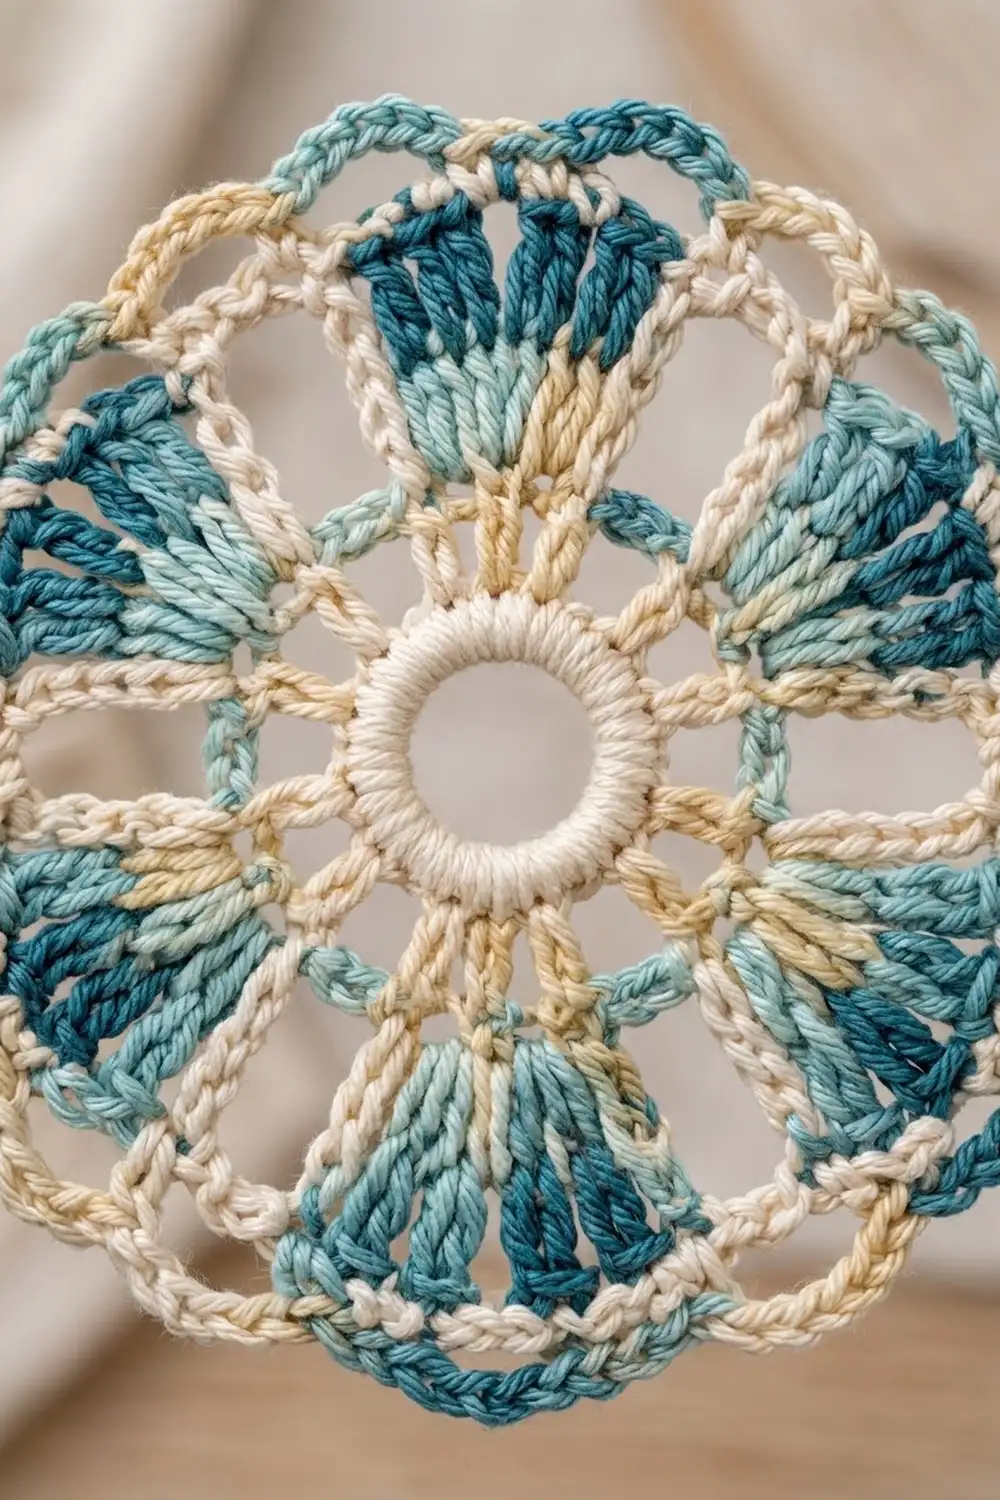
Motif (Make 84)
Work every round with the RS facing; do not turn. Fasten off at the end of each round and join the next color as stated.
Round 1 (A): Ch 16 and sl st to the first ch to form a ring. Ch 1 and work 32 sc into the ring. Pack the stitches tightly so they cover the chain completely. Join with a sl st to the first sc. (32 sc)
Round 2 (B): Join B with a sl st in any sc. Ch 4 (counts as tr), tr in the next sc, ch 5, skip 2 sc. Tr in each of the next 2 sc, ch 5, skip 2 sc; repeat from * 6 more times. Join to the top of the beginning ch-4. (16 tr in 8 pairs, 8 ch-5 sps)
The tr pairs are the bases of the sand spokes. The ch-5 spaces hold the fans.
Round 3 (C): Join C with a sl st in any ch-5 sp. Ch 3 (counts as dc) and work 6 dc in the same sp, then ch 2. Work 7 dc in the next ch-5 sp, ch 2; repeat from * 6 more times. Join to the top of the ch-3. (56 dc in 8 fans of 7, 8 ch-2 sps)
Round 4 (D): Join D with a sl st in the first dc of any fan. Ch 3 (counts as dc), dc in the same st, dc in each of the next 5 dc, 2 dc in the last dc of the fan, ch 3, skip the ch-2 sp. 2 dc in the first dc of the next fan, dc in each of the next 5 dc, 2 dc in the last dc, ch 3, skip the ch-2 sp; repeat from * 6 more times. Join. (72 dc in 8 fans of 9, 8 ch-3 sps)
The fans now flare and change from aqua at the base to teal at the tips.
Round 5 (B): Join B with a standing sc in the first dc of any fan. Ch 4, skip 3 dc, sc in the 5th (center) dc, ch 4, skip 3 dc, sc in the 9th dc. Ch 2, V-st in the next ch-3 sp, ch 2, then sc in the first dc of the next fan. Repeat from * around and end with ch 2 after the eighth V-st. Join to the first sc. (24 sc + 16 dc = 40 sts, plus 16 ch-4 sps, 16 ch-2 sps and 8 V-st ch-3 sps)
Each V-st sits directly above a tr pair, so the sand spokes run from the ring out to the edge.
Round 6 (A): Hold the motif so a V-st sits at top center. Join A with a standing sc in the ch-3 sp of that V-st. Ch 8, sc in the center sc of the next fan, ch 8, sc in the ch-3 sp of the next V-st; repeat from * around and end with ch 8 after the last fan. Join to the first sc. (16 sc, 16 ch-8 loops)
Number the loops 1 to 16 in the order you worked them. Loop 1 is the first loop after the top V-st.
Round 7 (D): Join D with a standing sc in Loop 1. Work 2 more sc, ch 4 and 3 sc in Loop 1. Work (3 sc, ch 4, 3 sc) in the next loop; repeat from * around. Join to the first sc. (96 sc, 16 ch-4 tips)
Tip numbers match the loop numbers. If you crochet right-handed, rounds move counterclockwise, which puts the tips here:
- Top: Tips 16 and 1
- Left side: Tips 4 and 5
- Bottom: Tips 8 and 9
- Right side: Tips 12 and 13
Left-handed crocheters should mirror left and right.
Make All Pieces
For the pair you need 84 motifs, 42 per panel. Every motif uses all four colors:
- A: Rounds 1 and 6, x 84
- B: Rounds 2 and 5, x 84
- C: Round 3, x 84
- D: Rounds 4 and 7, x 84. Only the first motif is worked fully separately; every later motif is joined while you work its Round 7.
Work Rounds 1–6 of all 84 motifs first (batch-making). This gives the same tension throughout and lets you weave in tails in long sessions.
Layout for each panel (C = column, R = row):
      C1   C2   C3
R1    O -- O -- O    <- header edge
R2    O -- O -- O
R3    O -- O -- O
...   (repeat)
R14   O -- O -- O    <- bottom scallops
Joining
Join each new motif during its Round 7. Work the panel row by row from right to left, starting at R1-C3 (top right) with the RS facing.
Joined tip: Work 3 sc in the loop, then ch 2. Sl st into the matching ch-4 tip of the neighboring motif, ch 2, and work 3 sc in the same loop to finish it. The ch-2, sl st, ch-2 sequence takes the place of the ch 4. The sl st is not counted, so each joined motif still has 96 sc and 16 tips.
Join a motif to the one on its right:
– New Tip 4 to the right motif’s Tip 13
– New Tip 5 to the right motif’s Tip 12
Join a motif to the one above it:
– New Tip 1 to the upper motif’s Tip 8
– New Tip 16 to the upper motif’s Tip 9
A motif in an inner position joins on both edges, using four joined tips.
Tension: Make the joining slip stitches as loose as your normal chains. Tight joins pull the circles out of round and pucker the seams.
Size checkpoint: After 3 rows (9 motifs), lay the piece flat. It should measure 18 in x 18 in (45.7 cm x 45.7 cm). The finished body is 18 in x 84 in (45.7 cm x 213.4 cm).
Border (Top Header)
The header is worked only along the top edge. The side and bottom scallops are left as they are. Use Color A and the 3.5 mm hook. Gauge is 20 sc and 16 rows = 4 in (10.2 cm), which works out to 5 sc per inch.
Row 1 (RS, leveling row): Hold the panel top edge up with the RS facing. Join A with a standing dtr in Tip 14 of R1-C3. Then work:
ch 4, tr in Tip 15, ch 3, sc in Tip 16, ch 3, sc in Tip 1, ch 3, tr in Tip 2, ch 4, dtr in Tip 3.
For the next motif: ch 5 (bridge), dtr in Tip 14, then repeat the same sequence through Tip 3. Repeat from * once more for C1.
Each motif gives 6 sts + 20 ch = 26. The two ch-5 bridges add 10. Total: (3 x 26) + (2 x 5) = 88 sts.
Row 2 (WS, conversion row): Ch 1 and turn. Work 2 sc in the first st, sc in each st and ch across to the last st, and 2 sc in the last st. (88 worked one per st + 2 added = 90 sc)
Rows 3–15: Ch 1, turn, and sc in each sc across. (90 sc) Fasten off and leave a 100 in (254.0 cm) tail.
Finishing the pocket: Fold the band to the WS between Rows 8 and 9. Rows 2–8 face front and Rows 9–15 sit behind. Whipstitch Row 15 to the back of the Row 1/Row 2 seam, working one stitch for each sc. Leave both ends open for the rod.
Why the math works:
– Tips 14 and 3 are 56.25° either side of top center, so the 6 leveling stitches span about 5 in (12.7 cm) of each 6 in (15.2 cm) motif.
– The 1 in (2.5 cm) dip between neighboring motifs is bridged by the ch 5 (5 sts x 0.2 in).
– The extra sc at each end of Row 2 fills the last 0.5 in (1.3 cm) at each edge.
– 90 sc ÷ 5 sc per inch = 18 in (45.7 cm), which matches the motif grid.
– Height: Row 1 adds 0.25 in (0.6 cm). Rows 2–15 are 14 rows, or 3.5 in (8.9 cm), which fold to 1.75 in (4.4 cm). The header is therefore 2 in (5.1 cm) deep.
– Panel length: 84 in + 2 in = 86 in (218.4 cm).
Final Blocking
- Weave in all tails along the stitches of the same color, so nothing shows through the lace.
- Soak the panel in lukewarm water for 15 minutes, then press the water out. Do not wring it.
- Roll the panel in towels to remove more water.
- Lay it flat on the mats. Pin the header straight to 18 in (45.7 cm).
- Pin each motif to a 6 in (15.2 cm) circle, pinning every ch-4 tip and the center ring.
- Check that the columns are straight and the panel is 84 in (213.4 cm) from the motif tops to the bottom tips.
- Let it dry completely. Then hang it for 48 hours before hemming any rod or trim, so the cotton can settle.
Final Quality-Control Checklist
- Every motif has 32 / 16 / 56 / 72 / 40 / 16 / 96 stitches through Rounds 1–7.
- Each motif measures 6 in (15.2 cm) after blocking.
- All joins line up, with 2 joined tips on each joined edge.
- Header Row 1 has 88 sts, and Rows 2–15 have 90 sc.
- The panel measures 18 in x 86 in (45.7 cm x 218.4 cm).
- The rod slides through the pocket without catching.
- No tails show on the RS.
Troubleshooting
- Motif cups in Round 6: Your chains are too tight. Use ch 9 instead of ch 8, or work the chains loosely.
- Motif ruffles in Round 7: Use 2 sc on each side of the tip instead of 3, and check your hook size.
- Center hole closes up: Pack the 32 sc tightly on the chain ring and don’t add extra stitches.
- Seams pucker: Loosen the joining sl st, or add 1 ch on each side of it.
- Header flares or pulls in: Recount Row 2. It must have exactly 90 sc.
- Panel gets longer when hung: Cotton relaxes under its own weight. Block it again, then hang it for 48 hours before measuring.
Care
Hand wash in cool water with a mild detergent. Dry flat, pinned back to size, and never put it in the dryer.
Final Notes
Every measurement depends on the one before it:
- Gauge of 20 sc per 4 in (10.2 cm) gives a 6 in (15.2 cm) motif.
- 3 motifs across make 18 in (45.7 cm).
- 14 motifs down make 84 in (213.4 cm).
- The 90-stitch header keeps the 18 in width and adds 2 in (5.1 cm) of depth, for a finished panel of 86 in (218.4 cm).
Check the first motif, and the rest of the panel will come out to size.
Happy crocheting!