

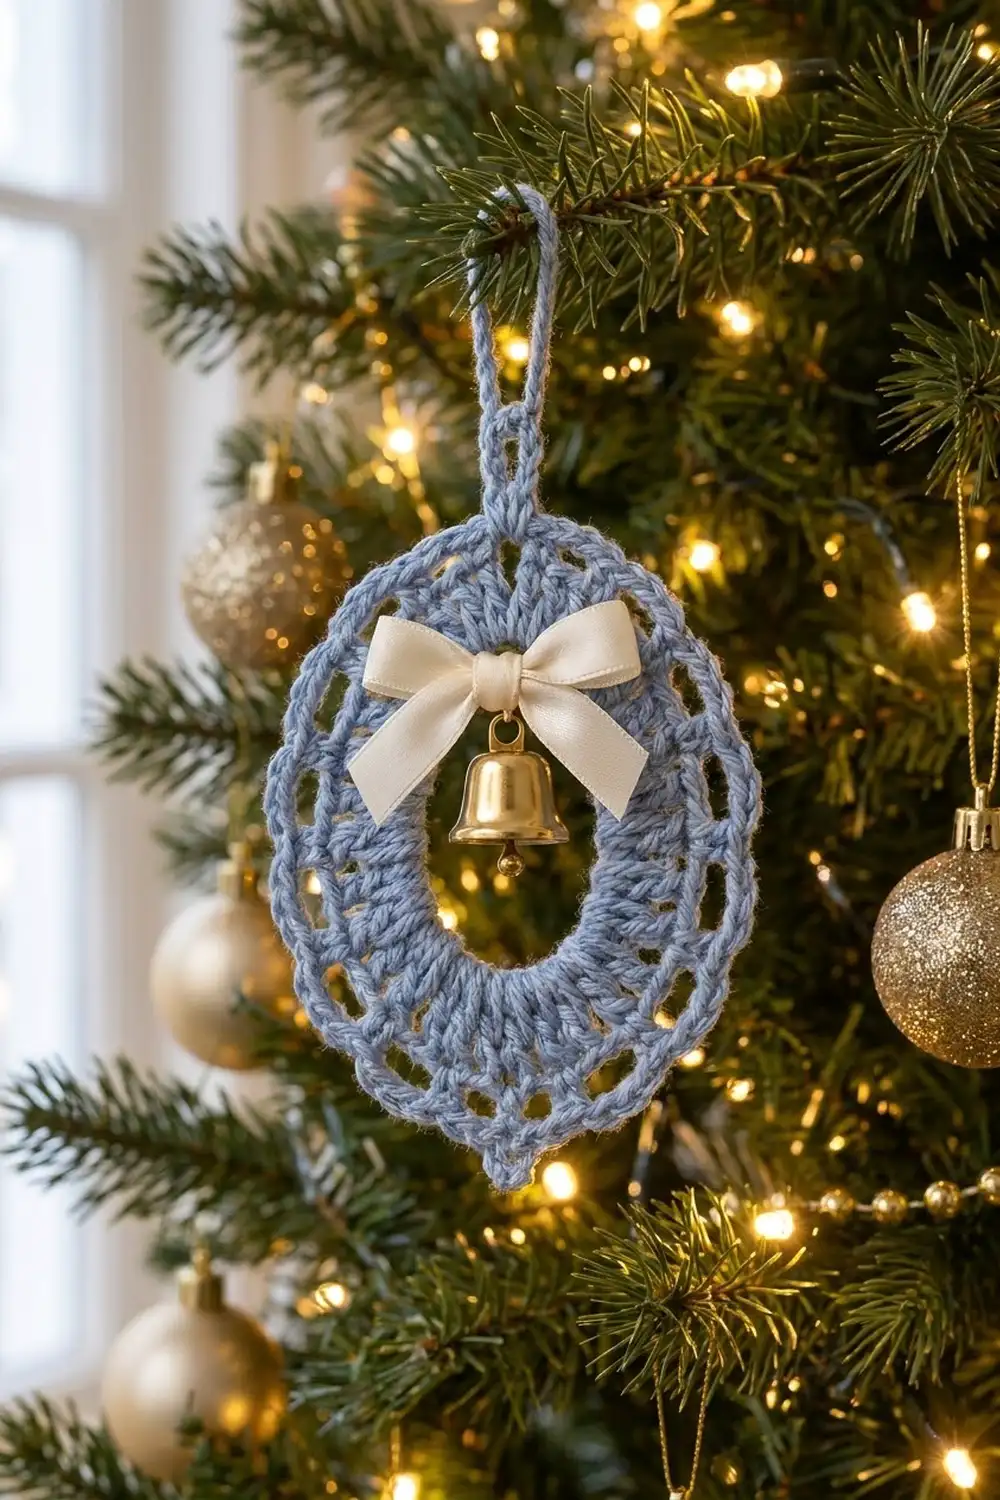
This little oval wreath looks like it came out of a snowy window display. The band of tall stitches is soft and dense. Around it sits a lacy ring of chain loops, and the edge ends in tiny picots. A cream satin bow and a small gold bell at the top center make it look festive.
The ornament uses one dusty-blue cotton yarn, so it is quick to make and easy to repeat. The blue, cream and gold look calm and wintry. It suits a traditional tree, a frosted-glass theme or a simple gift topper.
This pattern uses US crochet terms. The finished ornament measures 3.5 in (8.9 cm) wide by 4.25 in (10.8 cm) tall, not counting the hanging loop. The loop adds about 1 in (2.5 cm), for a total hanging height of 5.25 in (13.3 cm).
You start with a chain ring and work one dense round of double crochet into it. The next round uses taller stitches at the top and bottom, which turns the circle into an oval. Two edging rounds follow: chain loops, then picot scallops, with the hanging loop worked into the final round. Last, you sew on the bow and bell.
Finished Size and Construction
- Finished size: 3.5 in (8.9 cm) wide × 4.25 in (10.8 cm) tall, plus a 1 in (2.5 cm) hanging loop
- Skill level: Easy (advanced beginner)
- Terminology: US crochet terms
- Yarn weight: DK / light worsted (weight 3), cotton or cotton blend
- Hook: 3.5 mm (US E-4)
- Number of pieces: 1
- Layout: One oval motif, taller than it is wide, with the hanging loop at the top center
- Piece size: 3.5 in × 4.25 in (8.9 cm × 10.8 cm)
- Size before the edging (after Round 2): 2.75 in × 3.5 in (7.0 cm × 8.9 cm)
- Edging depth (Rounds 3–4): 0.375 in (1.0 cm) on every side
- Center opening after blocking: about 1.25 in × 1.75 in (3.2 cm × 4.4 cm)
Materials
Yarn advice: Choose a smooth, mercerized or matte cotton in DK weight. Cotton shows the stitches clearly, holds the oval after blocking and doesn’t fuzz. Avoid fluffy or brushed yarns, because they blur the picots and fill in the center opening.
Yarn (per ornament):
– Light dusty blue: about 10 g / 24 m (26 yd)
Trims (per ornament):
– Cream satin ribbon: 0.375 in (1.0 cm) wide, 8 in (20.3 cm) long
– Gold jingle bell: 0.5 in (1.3 cm)
Tools:
– 3.5 mm (US E-4) crochet hook
– Tapestry needle
– Sewing needle and cream or blue sewing thread
– Scissors
– Stitch marker
– Rustproof pins and a blocking mat or folded towel
– Spray bottle with water
– Optional: clear fabric glue or fray check for the ribbon ends
The yarn quantity includes about a 20% margin for the gauge swatch, the weaving tails and small tension differences.
Abbreviations (US Terms)
- ch – chain
- sl st – slip stitch
- sc – single crochet
- dc – double crochet
- tr – treble crochet
- sk – skip
- sp – space
- st(s) – stitch(es)
- rep – repeat
Special stitch – picot: Ch 3, then sl st into the 3rd ch from the hook (the first of those 3 chains). This makes a small round bump.
Gauge and Checkpoints
The ornament is small, so the ornament itself is your gauge swatch. Work Rounds 1 and 2, then measure before you go on.
- Foundation chain: 32 ch, laid flat without stretching, measures about 5 in (12.7 cm).
- After Round 1: the ring is about 2.25 in (5.7 cm) across and still nearly circular.
- After Round 2: about 2.75 in (7.0 cm) wide × 3.5 in (8.9 cm) tall. This is the key checkpoint.
- After Round 3: about 3 in (7.6 cm) wide × 3.75 in (9.5 cm) tall.
- After Round 4: about 3.5 in (8.9 cm) wide × 4.25 in (10.8 cm) tall, before blocking.
If your piece is too big: If it is more than 0.25 in (0.6 cm) too large after Round 2, go down to a 3.25 mm (US D-3) hook, or check whether your double crochets are loose.
If your piece is too small: If it is more than 0.25 in (0.6 cm) too small, go up to a 3.75 mm (US F-5) hook. A tight foundation chain is the most common cause, so you can also chain with the next hook size up.
If the shape stays round instead of oval: Make sure you worked treble crochet, not double crochet, at the top and bottom of Round 2.

Pattern
Foundation Ring
Ch 32. Sl st into the first ch to form a ring, without twisting the chain.
(32 ch)
The join is the top center of the ornament. Place a stitch marker there.
Round 1 – Dense Band
Ch 3 (counts as the first dc), dc in the same ch. Work 2 dc in each remaining ch around. Sl st into the top of the beginning ch-3 to join.
(64 dc)
The two stitches at the join are the top center. Move your marker into the first dc. The stitches will look crowded on the inside edge. That is normal, because the crowding makes the solid, ridged band.
Checkpoint: about 2.25 in (5.7 cm) across.
Round 2 – Oval Shaping Round
This round turns the 64 stitches into 32 pairs. Each pair is one stitch plus one ch-1 space, and each pair uses 2 stitches from Round 1. Trebles at the top and bottom stretch those areas. Doubles on the sides keep the width narrower.
- Ch 5 (counts as 1 tr and ch-1 sp), sk next dc. (Pair 1 – top center)
- [Tr in next dc, ch 1, sk next dc] 2 times. (Pairs 2–3)
- [Dc in next dc, ch 1, sk next dc] 11 times. (Pairs 4–14 – right side)
- [Tr in next dc, ch 1, sk next dc] 5 times. (Pairs 15–19 – bottom)
- [Dc in next dc, ch 1, sk next dc] 11 times. (Pairs 20–30 – left side)
- [Tr in next dc, ch 1, sk next dc] 2 times. (Pairs 31–32)
- Sl st into the 4th ch of the beginning ch-5 to join.
(32 sts: 10 tr + 22 dc; 32 ch-1 sps)
Count check: 32 pairs × 2 stitches from Round 1 = 64. That uses every stitch.
Section totals:
– Top: 5 tr (Pairs 31, 32, 1, 2, 3)
– Right side: 11 dc
– Bottom: 5 tr
– Left side: 11 dc
Checkpoint: 2.75 in (7.0 cm) wide × 3.5 in (8.9 cm) tall. The piece should now clearly look like an oval.
Border (Edging)
The lacy outer ring and the picot edge act as this ornament’s border. Each one has the same number of repeats as Round 2, so the spacing stays even.
Edging gauge: In Round 3, each ch-3 loop spans about 0.3 in (0.8 cm) of the outer edge. Rounds 3 and 4 together add 0.375 in (1.0 cm) on every side.
Round 3 – Chain-Loop Round
- Sl st into the next ch-1 sp. This is the space after Pair 1.
- Ch 1, sc in the same sp.
- [Ch 3, sc in next ch-1 sp] 31 times.
- Ch 3, then sl st into the first sc to join.
(32 sc; 32 ch-3 loops)
Each ch-3 loop arches over one stitch from Round 2. The last loop you made sits over Pair 1, which is the top center.
Loops per section:
– Top: 5
– Right side: 11
– Bottom: 5
– Left side: 11
– Total: 32
Checkpoint: 3 in (7.6 cm) wide × 3.75 in (9.5 cm) tall.
Round 4 – Picot Scallops and Hanging Loop
- Sl st into the first ch-3 loop, which sits over Pair 2.
- Ch 1. In the same loop work (2 sc, picot, 2 sc).
- In each of the next 30 loops, work (2 sc, picot, 2 sc).
- Top-center loop (loop 32, over Pair 1): Work 2 sc. Ch 14, then sl st into the last sc made to form the hanging loop. Work 18 sc into the ch-14 loop, then sl st into the same sc. Finish with 2 more sc in loop 32.
- Sl st into the first sc to join. Fasten off, leaving a 6 in (15.2 cm) tail.
(128 sc in the edge, 31 picots, 1 hanging loop with 18 sc)
Counts per section:
– Top: 20 sc, 4 picots and the hanging loop
– Right side: 44 sc, 11 picots
– Bottom: 20 sc, 5 picots
– Left side: 44 sc, 11 picots
Totals check: 20 + 44 + 20 + 44 = 128 sc. That is 32 loops × 4 sc. The picots are 4 + 11 + 5 + 11 = 31, with the hanging loop taking the place of the 32nd picot.
Why the math works: Every round keeps a 1:1 count with the round before it. Round 1’s 64 stitches become 32 pairs, the 32 pairs become 32 loops, and the 32 loops become 32 scallops. Nothing is added or skipped unevenly, so the edging lies flat.
The oval shape comes only from stitch height in Round 2, not from changing the count. That lets the edging follow the curve without rippling or cupping. Because the hanging loop sits in the loop over Pair 1, it lines up exactly with the foundation join at the top center.
Checkpoint: 3.5 in (8.9 cm) wide × 4.25 in (10.8 cm) tall.
Bow and Bell
- Thread the bell onto a 6 in (15.2 cm) strand of blue yarn.
- Bring both ends through the band at the top center, just under the top of the Round 1 stitches. The bell should hang about 0.5 in (1.3 cm) down into the opening.
- Tie the ends securely at the back and weave them in.
- Tie the 8 in (20.3 cm) ribbon into a small bow about 1.25 in (3.2 cm) wide. Trim the tails at an angle and seal them if you like.
- Sew the knot of the bow to the front of the band at the top center, directly above the bell, using a few small stitches of sewing thread.
Final Blocking
- Weave in all yarn ends before blocking. Keep the bow and bell off, or cover them, while the piece is damp.
- Lightly mist the ornament until it is damp all the way through.
- Pin the top and bottom centers 4.25 in (10.8 cm) apart.
- Pin the left and right centers 3.5 in (8.9 cm) apart.
- Ease the center opening into an oval about 1.25 in × 1.75 in (3.2 cm × 4.4 cm).
- Pin each picot outward so it points straight away from the center.
- Shape the hanging loop into a neat upright oval.
- Let it dry completely, usually 4–6 hours. Unpin it and attach the bow and bell if you haven’t already.
Final Quality-Control Checklist
- [ ] Round 1 has 64 dc.
- [ ] Round 2 has 10 tr and 22 dc, in sections of 5 / 11 / 5 / 11.
- [ ] Round 3 has 32 ch-3 loops.
- [ ] Round 4 has 128 sc, 31 picots and 1 hanging loop.
- [ ] The hanging loop is centered above the foundation join.
- [ ] The finished size is 3.5 in × 4.25 in (8.9 cm × 10.8 cm).
- [ ] The edging lies flat, with no ruffling or cupping.
- [ ] The bell hangs freely and is centered under the bow.
- [ ] The bow is level and sewn on firmly.
- [ ] All ends are hidden.
Troubleshooting
The ornament cups like a bowl. Your Round 3 chains are probably too tight. Try ch 4 loops, or loosen your chains.
The edge ruffles. Your chain loops are too loose, or you put extra sc in some loops. Count 4 sc per loop.
It stays round, not oval. Check that you used tr, not dc, in the top and bottom sections of Round 2. Block it firmly to the measurements.
The hanging loop is off-center. You may have started Round 3 in the wrong space. The last ch-3 loop of Round 3 must sit over the beginning ch-5 of Round 2.
The foundation ring twisted. Undo it and chain again. A twist can’t be fixed later.
The bell pulls the top down. Use a lighter bell, or anchor it through both Round 1 and Round 2.
Care
Spot clean with cool water and mild soap, then reshape and dry flat. Store the ornament flat in tissue paper so the picots and bow keep their shape.
Final Notes
Here is the full measurement chain. The 32-ch foundation measures about 5 in (12.7 cm). Round 1 makes a 2.25 in (5.7 cm) ring. Round 2 stretches it to 2.75 × 3.5 in (7.0 × 8.9 cm). Round 3 brings it to 3 × 3.75 in (7.6 × 9.5 cm), and Round 4 finishes it at 3.5 × 4.25 in (8.9 × 10.8 cm).
The stitch counts run 64 → 32 → 32 → 32 scallops. If you check your size after Round 2, the rest falls into place. Make one for the tree, tie one onto a gift, or stitch a few in different blues.
Happy crocheting!