

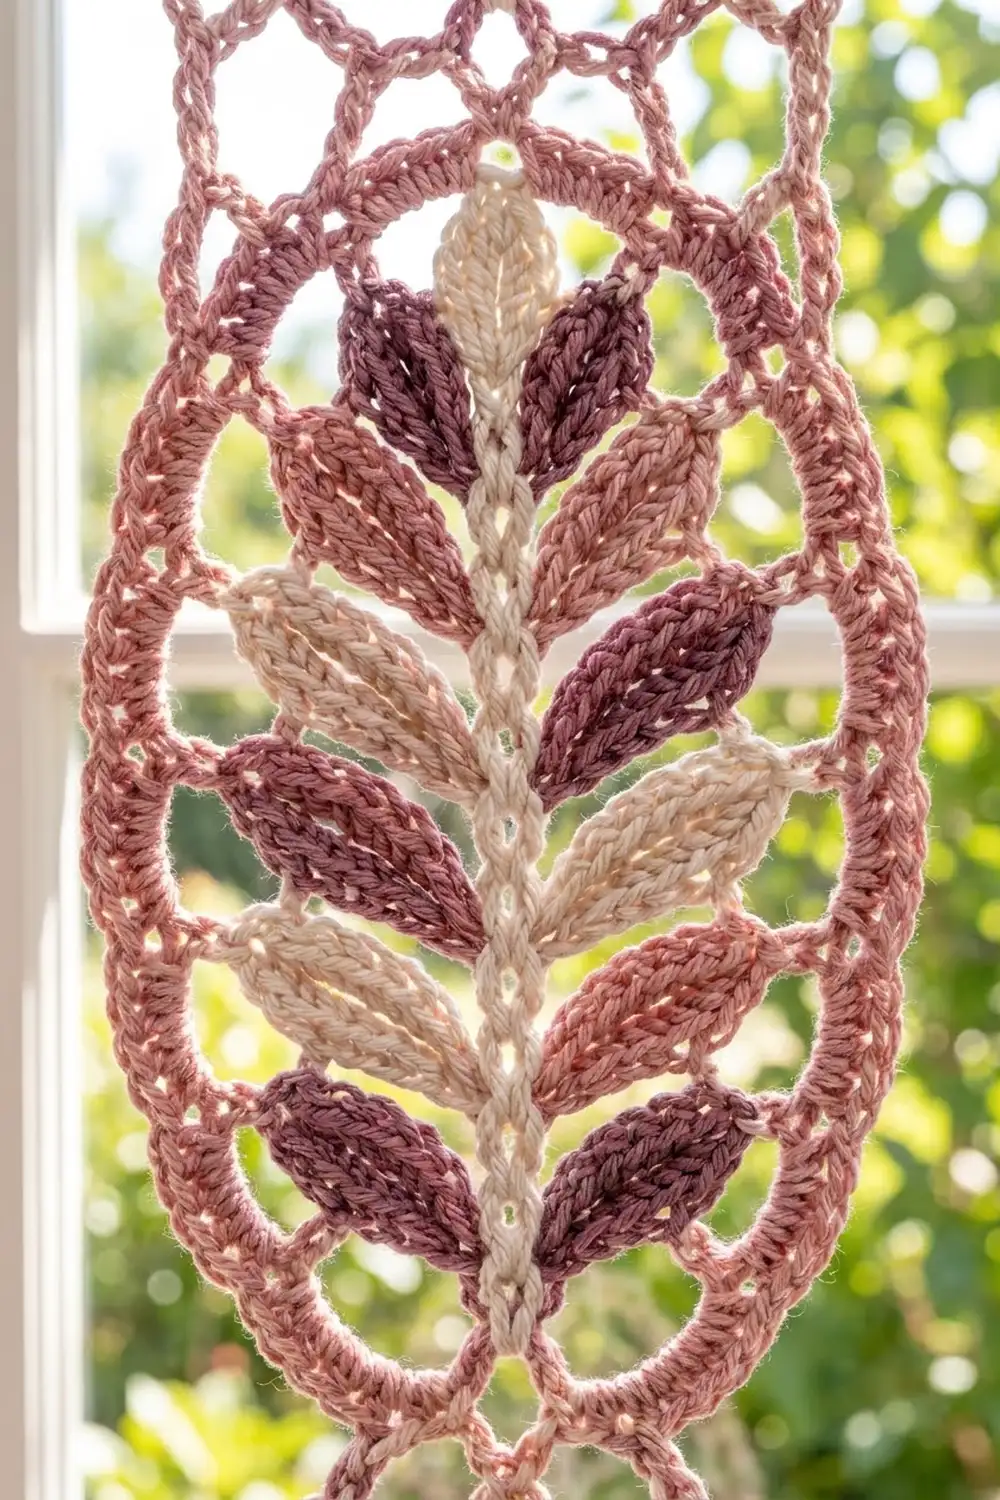
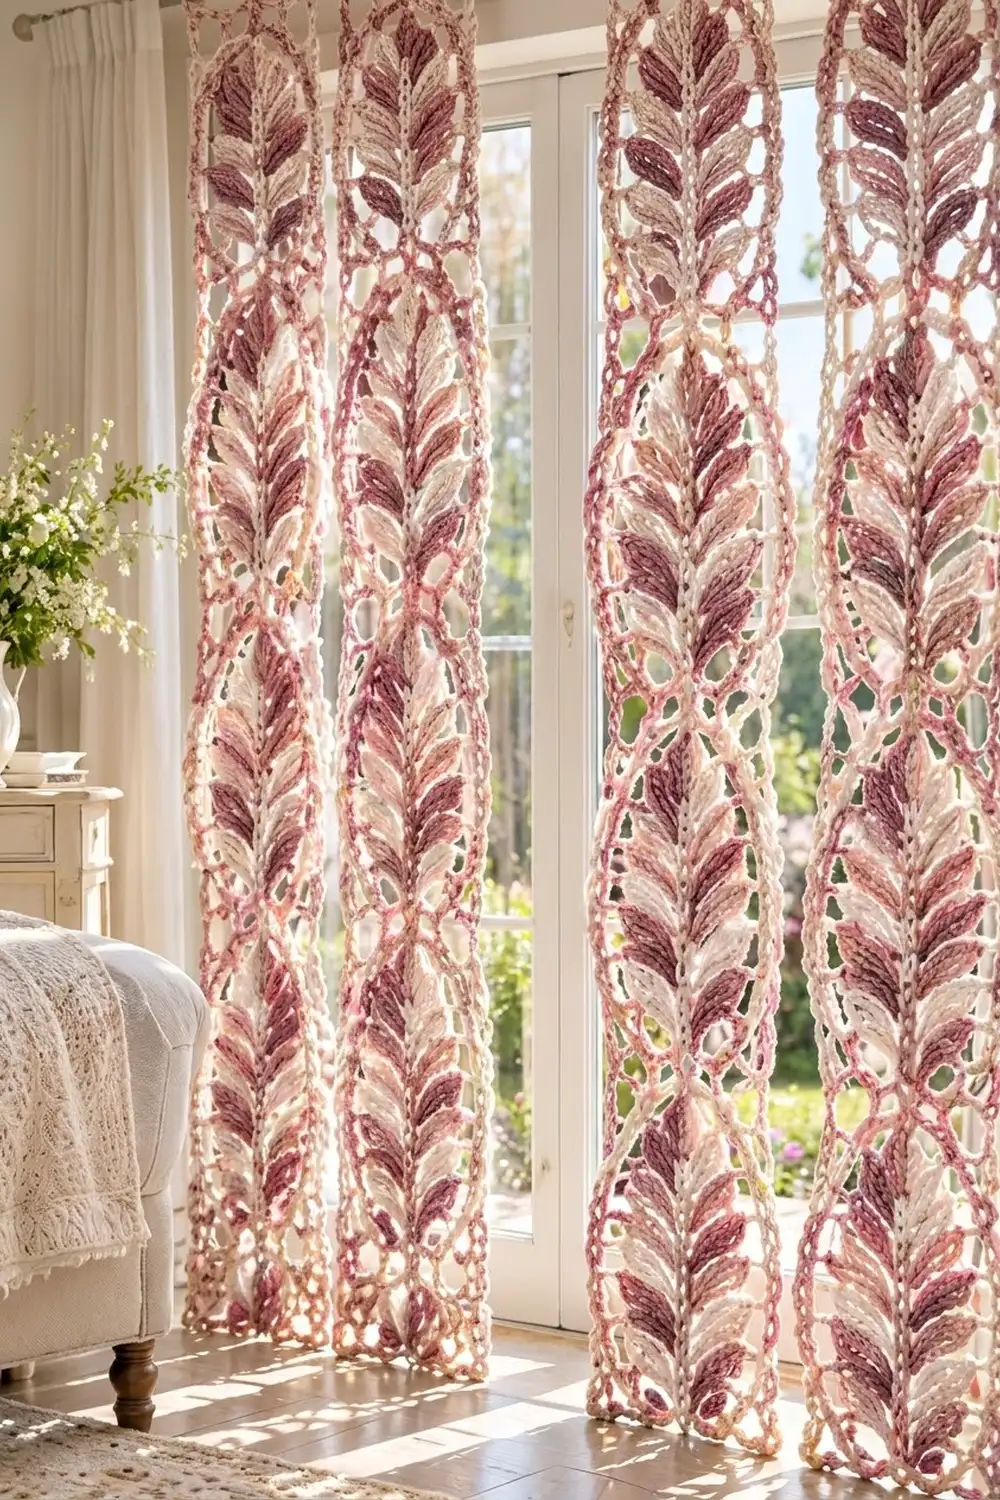
The Rosewood Leaf panel is a full-length lace curtain made from oval leaf motifs. Each motif has a cream spine cord with pointed leaves angled upward on both sides. The leaves are deep mauve, dusty rose, and cream, and a dusty rose chain frame turns the cluster into an airy egg shape.
The motifs are joined tip to tip into vertical strips, and the strips are joined at their widest points. Diamond-shaped windows form between them, so light comes through while the leaves stay bold.
This pattern uses US crochet terms. One finished panel measures 26 in (66.0 cm) wide by 83 in (210.8 cm) long after the border. The photo shows a pair, so make two panels for a door or window like the one pictured.
Each motif is worked in four steps: a single crochet spine, three color passes of leaves, a framing round, and an outer loop round. You join each motif to its neighbors while working that last round, and a three-round border finishes the panel.
Finished Size and Construction
- Finished panel: 26 in x 83 in (66.0 cm x 210.8 cm)
- Skill level: Intermediate
- Terminology: US crochet terms
- Yarn weight: DK (light #3) cotton
- Hook: 4.0 mm (G-6)
- Pieces per panel: 36 motifs
- Layout: 4 motifs wide x 9 motifs tall
- Motif size: 6 in x 9 in (15.2 cm x 22.9 cm)
- Size before border: 24 in x 81 in (61.0 cm x 205.7 cm)
- Border depth: 1 in (2.5 cm) on every edge
Materials
Use a smooth, mercerized or combed DK cotton, about 115 m per 50 g. Cotton keeps the leaves crisp, resists sagging better than acrylic, and blocks well. Choose three shades with clear contrast so the leaves read from across the room.
Per panel:
- Color A, deep mauve: 150 g / 345 m
- Color B, dusty rose: 300 g / 690 m (frames, loops, and border)
- Color C, cream: 150 g / 345 m
For the pair shown, double every amount. These quantities include a margin of about 15% for gauge differences and swatching.
Tools:
- 4.0 mm (G-6) crochet hook
- Tapestry needle
- Locking stitch markers (at least 6)
- Measuring tape
- Blocking mats or a large padded surface (blocking a strip at a time is fine)
- Rustproof pins
- Spray bottle
- Clip curtain rings for hanging
Abbreviations (US Terms)
- ch: chain
- sl st: slip stitch
- sc: single crochet
- hdc: half double crochet
- dc: double crochet
- tr: treble crochet
- sp: space
- RS / WS: right side / wrong side
- rnd: round
Special stitches:
- Leaf-9: Insert hook in the indicated spine stitch, yarn over, pull up a loop, ch 10. Working back toward the spine, start in the 2nd ch from the hook: sc, hdc, dc in next 2 ch, tr, dc in next 2 ch, hdc, sc (9 sts). Sl st in the same spine stitch.
- Leaf-8: Same method, but ch 9, then work sc, hdc, dc in next 2 ch, tr, dc, hdc, sc (8 sts). Sl st in the same spine stitch.
- Leaf-7: Same method, but ch 8, then work sc, hdc, dc, tr, dc, hdc, sc (7 sts). Sl st in the same spine stitch.
- Leaf tip: The first sc of each leaf, at the outer end of the leaf.
- Join loop: In place of a ch-5 loop: ch 2, sl st around the matching ch-5 loop of the finished motif, ch 2. This counts as 5 chains.
Gauge and Checkpoints
Gauge: 18 sc = 4 in (10.2 cm) with a 4.0 mm hook.
Make one complete motif before anything else, and check it at each stage:
- Spine: 30 sc measures about 6.75 in (17.1 cm).
- Leaf-9: About 2 in (5.1 cm) from base to tip.
- After Frame Rnd 1: About 4.5 in x 8.25 in (11.4 cm x 21.0 cm), measured lightly stretched.
- After Frame Rnd 2: 6 in x 9 in (15.2 cm x 22.9 cm), measured from loop tip to loop tip after a light steam.
If your motif is too big, go down half a hook size. If it is too small, go up half a size. Also check your frame chains. Tight chains shrink the motif and cup it, and loose chains make it floppy. A difference of 0.25 in (0.6 cm) per motif adds up to 2.25 in (5.7 cm) over the panel’s length, so fix it now.
Motif (Make 36 per Panel)
Spine
With C, ch 31.
Row 1: Sc in 2nd ch from hook and in each ch across. (30 sc) Fasten off and leave a 4 in (10.2 cm) tail.
Lay the spine vertically with the last sc worked at the bottom. Count the sc from the bottom up: sc 1 is at the bottom and sc 30 is at the top. Right-side leaves are worked into the sc tops along one long edge. Left-side leaves are worked into the foundation chain along the other edge.
Place markers at sc 4, 8, 12, 16, 20, and 24. These are leaf levels 1 to 6.
Leaf Passes
Work each color pass from the bottom of the spine to the top. Between leaves, carry the yarn up the WS by slip stitching loosely into the back bump of each spine stitch. Keep these sl sts relaxed so the spine stays straight.
Leaf sizes by level:
- Level 1: Leaf-8
- Levels 2, 3, and 4: Leaf-9
- Level 5: Leaf-8
- Level 6: Leaf-7
- Top leaf: Leaf-7, worked straight up from sc 30
After each leaf, nudge it upward to about a 30-degree angle above horizontal. Frame Rnd 1 locks this angle in place.
Pass A (deep mauve, 5 leaves): Join A at sc 1 on the WS. Work these leaves in order:
- Left level 1 (Leaf-8)
- Right level 3 (Leaf-9)
- Left level 4 (Leaf-9)
- Right level 6 (Leaf-7)
- Top leaf (Leaf-7) in sc 30
Fasten off.
Pass B (dusty rose, 4 leaves): Join B at sc 1. Work these leaves in order:
- Right level 1 (Leaf-8)
- Left level 2 (Leaf-9)
- Right level 4 (Leaf-9)
- Left level 5 (Leaf-8)
Fasten off.
Pass C (cream, 4 leaves): Join C at sc 1. Work these leaves in order:
- Right level 2 (Leaf-9)
- Left level 3 (Leaf-9)
- Right level 5 (Leaf-8)
- Left level 6 (Leaf-7)
Fasten off.
Leaf count: Each side has 6 leaves totaling 50 sts (8 + 9 + 9 + 9 + 8 + 7). Both sides together are 100 sts, and the top leaf adds 7, for 107 leaf sts. Every level now has one leaf on each side in different colors, and the top leaf is A.
Weave in ends along the WS of the spine.
Frame Rnd 1 (Tip Chain)
With RS facing, join B with sc in the bottom end of the spine. Work counterclockwise (up the right side, then down the left):
- Ch 7, then sc in the right level 1 leaf tip.
- Work (ch 5, sc in the next right leaf tip) 5 times, ending at right level 6.
- Ch 6, then sc in the top leaf tip.
- Ch 6, then sc in the left level 6 leaf tip.
- Work (ch 5, sc in the next left leaf tip) 5 times, ending at left level 1.
- Ch 7, then sl st in the first sc.
Count: 14 sc + 76 ch = 90 sts.
The chains are 7 + 25 + 6 + 6 + 25 + 7 = 76. Do not fasten off.
Frame Rnd 2 (Outer Loops)
This round makes 26 ch-5 loops:
- B loop: the bottom tip loop
- T loop: the top tip loop
- 12 side loops on each side
Number the side loops 1 to 12 from the top on each side. Each side has 11 anchors between the tips: the 6 leaf-tip sc plus the 5 “midpoints.” A midpoint is the 3rd ch of each ch-5 space between two leaf tips.
- B loop: (Sc, ch 5, sc) in the bottom sc.
- Right side, going up: Work (ch 5, sc in the next anchor) 11 times, then ch 5. These are right loops 12 down to 1.
- T loop: (Sc, ch 5, sc) in the top-leaf sc.
- Left side, going down: Work (ch 5, sc in the next anchor) 11 times, then ch 5. These are left loops 1 to 12.
- Sl st in the first sc and fasten off.
Count: 26 sc + 130 ch = 156 sts, which is 26 loops.
Loops 6 and 7 on each side sit on either side of the midpoint between leaf levels 3 and 4, at the widest part of the oval. These are the side-joining loops.
Make All Pieces
Each panel needs 36 motifs in identical colors. For the pair, make 72. Work the first motif of each strip on its own, and join every motif after that one while you work its Frame Rnd 2.
Layout (one panel, R = row, C = column):
     C1   C2   C3   C4
R1   [ ]--[ ]--[ ]--[ ]    <- top
      |    |    |    |
R2   [ ]--[ ]--[ ]--[ ]
      |    |    |    |
...  (rows 3 to 8 repeat)
      |    |    |    |
R9   [ ]--[ ]--[ ]--[ ]    <- bottom
| = T loop joined to B loop. — = loops 6 and 7 joined.
Joining (Join-As-You-Go)
Work Column 1 from the top down, then Columns 2, 3, and 4.
Vertical join: On every motif below Row 1, replace its T loop with a join loop into the B loop of the motif above.
Side join: On every motif in Columns 2 to 4, replace left loops 6 and 7 with join loops. Join left loop 6 to the neighbor’s right loop 6, and left loop 7 to the neighbor’s right loop 7. Both sides are numbered from the top, so the joined loops sit at the same height.
Stitch logic: A join loop is ch 2, sl st, ch 2, which uses the same 5 positions as a ch-5 loop. Every motif still has 156 sts and 26 loops, and joining adds nothing to any count.
Tension: Slip stitch around the whole loop, not into a single chain, so the motifs can shift slightly while blocking. Check that no loop is twisted before you sl st.
Size checkpoint: Each joined motif adds exactly one motif width or height, because the loops meet apex to apex. Two joined motifs should measure 12 in (30.5 cm) side to side, or 18 in (45.7 cm) top to bottom. The finished grid should measure 24 in x 81 in (61.0 cm x 205.7 cm).
Border
Use B throughout.
Border gauge: Four consecutive Rnd 1 border loops cover about 3.75 in (9.5 cm) of motif edge.
Perimeter loops (free loops on the outer edge only):
- Top edge: 4 motifs x 11 loops (left loops 1 to 5, T, right loops 1 to 5) = 44 loops.
- Bottom edge: 4 motifs x 11 loops (left loops 8 to 12, B, right loops 8 to 12) = 44 loops.
- Each long side: 98 loops. The outer edge has 9 motifs x 12 loops = 108. Subtract 5 loops at the top, which belong to the top edge, and 5 at the bottom, which belong to the bottom edge.
- Total: 284 loops.
You can check the total another way. 36 motifs x 26 loops = 936. Joining uses 64 loops (24 T/B pairs) and 108 loops (27 side pairs of 2). The 24 interior diamonds hold 480 loops (20 each). That leaves 936 − 64 − 108 − 480 = 284.
Notches: A notch is a V-shaped valley where two motifs meet along an edge. There are 3 on the top, 3 on the bottom, and 8 on each long side, for 22 in all.
Rnd 1: Join with sc in any perimeter loop. Work (sc, ch 4) in each perimeter loop. At each notch, ch 1 instead of ch 4. Join to the first sc.
| Edge | Sc | Ch-4 sps | Ch-1 sps |
|---|---|---|---|
| Top | 44 | 41 | 3 |
| Each side | 98 | 90 | 8 |
| Bottom | 44 | 41 | 3 |
| Total | 284 | 262 | 22 |
Rnd 2: Sl st into the first ch-4 sp. Work (sc, ch 4) in each ch-4 sp. In each ch-1 sp, sl st only. Join.
Count: 262 loops. Top 41, each side 90, bottom 41.
Rnd 3: Work (2 sc, ch 3, sl st in the 3rd ch from hook, 2 sc) in each ch-4 sp. Pass over the notch sl sts. Join and fasten off.
Count: 1,048 sc and 262 picots.
- Top: 164 sc + 41 picots
- Each side: 360 sc + 90 picots
- Bottom: 164 sc + 41 picots
Why the math works:
- A sc plus ch-4 spans about the same distance as one ch-5 motif loop, so one border loop per motif loop lies flat.
- The ch-1 notches keep the valleys from bridging over, so the scalloped outline stays intact.
- Each border edge starts from exactly the free loops on that edge, with nothing added at the seams.
- No extra corner stitches are needed, because each corner motif’s own curve already turns the corner.
- Rnd 3 packs 4 sc into each ch-4 sp to firm up the edge and bring the border to 1 in (2.5 cm).
Final Blocking
- Weave in all remaining ends. Weave along spines or along sc, never through open chain loops.
- Soak the panel in cool water for 15 minutes, then press out the water. Do not wring it.
- Roll the panel in towels to remove excess moisture.
- Lay it flat to 26 in x 83 in (66.0 cm x 210.8 cm), working one strip section at a time if your space is limited.
- Pin each motif’s T and B tips in a straight vertical line, then pin loops 6 and 7 level across the rows.
- Pin out each border picot and ease the leaves back to their upward angle.
- Let it dry completely, at least 24 hours.
Final Quality-Control Checklist
- Every motif has 30 spine sc, 13 leaves, a 90-st Frame Rnd 1, and a 156-st Frame Rnd 2.
- Leaf colors follow the pass order on every motif.
- All 24 vertical joins and all 27 horizontal join pairs are secure and untwisted.
- Panel before the border: 24 in x 81 in (61.0 cm x 205.7 cm).
- Border Rnd 1 has 284 sc and Rnd 3 has 262 picots.
- Finished panel: 26 in x 83 in (66.0 cm x 210.8 cm), within 0.5 in (1.3 cm).
Troubleshooting
- Leaves flop downward: Your Frame Rnd 1 chains are too long. Re-count them, or tighten your chain tension.
- The motif cups: The frame chains are too tight. Go up half a hook size for the frame rounds only.
- The spine curves: Your carried sl sts are too tight. Rework them more loosely.
- The diamonds look uneven: Check whether you joined loop 6 to loop 7 by mistake. Unpick and rejoin matching numbers.
- The border ruffles: Make sure you used ch 1 at every notch, and that Rnd 3 has 4 sc per space, not more.
- The panel grows in length while hanging: Use mercerized cotton and re-block. Clip rings spaced every 3 in (7.6 cm) spread the weight.
Care
Hand wash in cool water with a mild detergent and dry flat to shape. To freshen between washes, give the panel a light steam while it hangs.
Final Notes
Every measurement depends on the one before it:
- 18 sc = 4 in (10.2 cm) gives a 6.75 in (17.1 cm) spine.
- The spine and leaves give a 6 in x 9 in (15.2 cm x 22.9 cm) motif.
- 36 motifs give 24 in x 81 in (61.0 cm x 205.7 cm).
- A 1 in (2.5 cm) border brings the panel to 26 in x 83 in (66.0 cm x 210.8 cm).
Check each stage before moving on, and the second panel will match the first.
Happy crocheting!