

The Winter Bow Teardrop Ornament is a small, lacy piece with a vintage feel. A cream teardrop frame holds four tiny flowers on fine chain strands. A dusty blue bow sits at the tip, and a rounded blue scallop edge finishes the outline.
The two colors are soft cream and muted denim blue, which give a frosty, heirloom look. The ornament looks pretty on a tree, tied to a gift or hung in a window. All instructions use US crochet terms.
The finished ornament measures 5 in (12.7 cm) wide by 6 in (15.2 cm) tall, not counting the hanging loop. With the loop it is 7.25 in (18.4 cm) tall.
Construction is simple. You chain a ring and work four cream rounds outward. A corner at the top makes the point, and increases across the bottom make the curve. Next, you make four flowers and hang them inside the opening on chain strands. Finally, you add the blue scallop border, the hanging loop and a crocheted bow.
Finished Size and Construction
- Finished size: 5 in × 6 in (12.7 cm × 15.2 cm), without the loop
- Height with loop: 7.25 in (18.4 cm)
- Skill level: Intermediate
- Terminology: US crochet terms
- Yarn weight: Super fine (#1), fingering-weight mercerized cotton
- Hook: 2.5 mm
- Number of pieces: 1 finished ornament (a frame with 4 flowers and 1 bow attached)
- Layout: Single standalone motif, nothing to join
- Inner opening: 2.25 in × 3.25 in (5.7 cm × 8.3 cm)
- Size before border (after Rnd 4): 4.25 in × 5.25 in (10.8 cm × 13.3 cm)
- Border depth: 3/8 in (1.0 cm) on every edge
Materials
Choose a smooth, mercerized cotton in fingering weight. Mercerized cotton shows the lace clearly, holds a crisp point and blocks flat. Avoid fuzzy or very stretchy yarns, because the flower strands will sag.
Yarn:
– Cream: 10 g, about 34 m (frame, flowers, hanging loop)
– Denim blue: 5 g, about 17 m (scallop border, bow)
These quantities include a margin of about 40%, so small leftovers will usually be enough.
Tools:
– 2.5 mm crochet hook
– Tapestry needle
– Scissors
– 2 stitch markers
– Rust-proof pins and a blocking board or foam mat
– Ruler or tape measure
– Optional: light spray starch
Abbreviations (US Terms)
- ch – chain
- sl st – slip stitch
- sc – single crochet
- hdc – half double crochet
- dc – double crochet
- sk – skip
- sp – space
- st(s) – stitch(es)
- beg – beginning
- Rnd – round
Special stitches:
- Petal: (hdc, 2 dc, hdc) all in the same stitch.
- Scallop: 5 dc in the same stitch.
Gauge and Checkpoints
Gauge: 28 sc and 32 rows = 4 in (10.2 cm) in sc. One finished flower = 1 in (2.5 cm) across.
Make one flower first and use it as your test piece. If it measures 1 in (2.5 cm), your tension suits the frame too.
Measure each stage with the piece laid flat and gently shaped, but not stretched.
| Stage | Width | Height |
|---|---|---|
| Inner opening (foundation ring) | 2.25 in (5.7 cm) | 3.25 in (8.3 cm) |
| After Rnd 2 | 3.25 in (8.3 cm) | 4.25 in (10.8 cm) |
| After Rnd 3 | 4 in (10.2 cm) | 5 in (12.7 cm) |
| After Rnd 4 | 4.25 in (10.8 cm) | 5.25 in (13.3 cm) |
| After Rnd 5 (finished) | 5 in (12.7 cm) | 6 in (15.2 cm) |
A difference of up to 1/4 in (0.6 cm) is fine, because blocking evens it out.
If your piece is too big: go down to a 2.25 mm hook, or chain more firmly.
If your piece is too small: go up to a 2.75 mm hook.
Check the flatness after Rnd 2. If the bottom curve cups upward, your stitches are too tight for the increases, so use a larger hook. If it ripples, use a smaller hook.
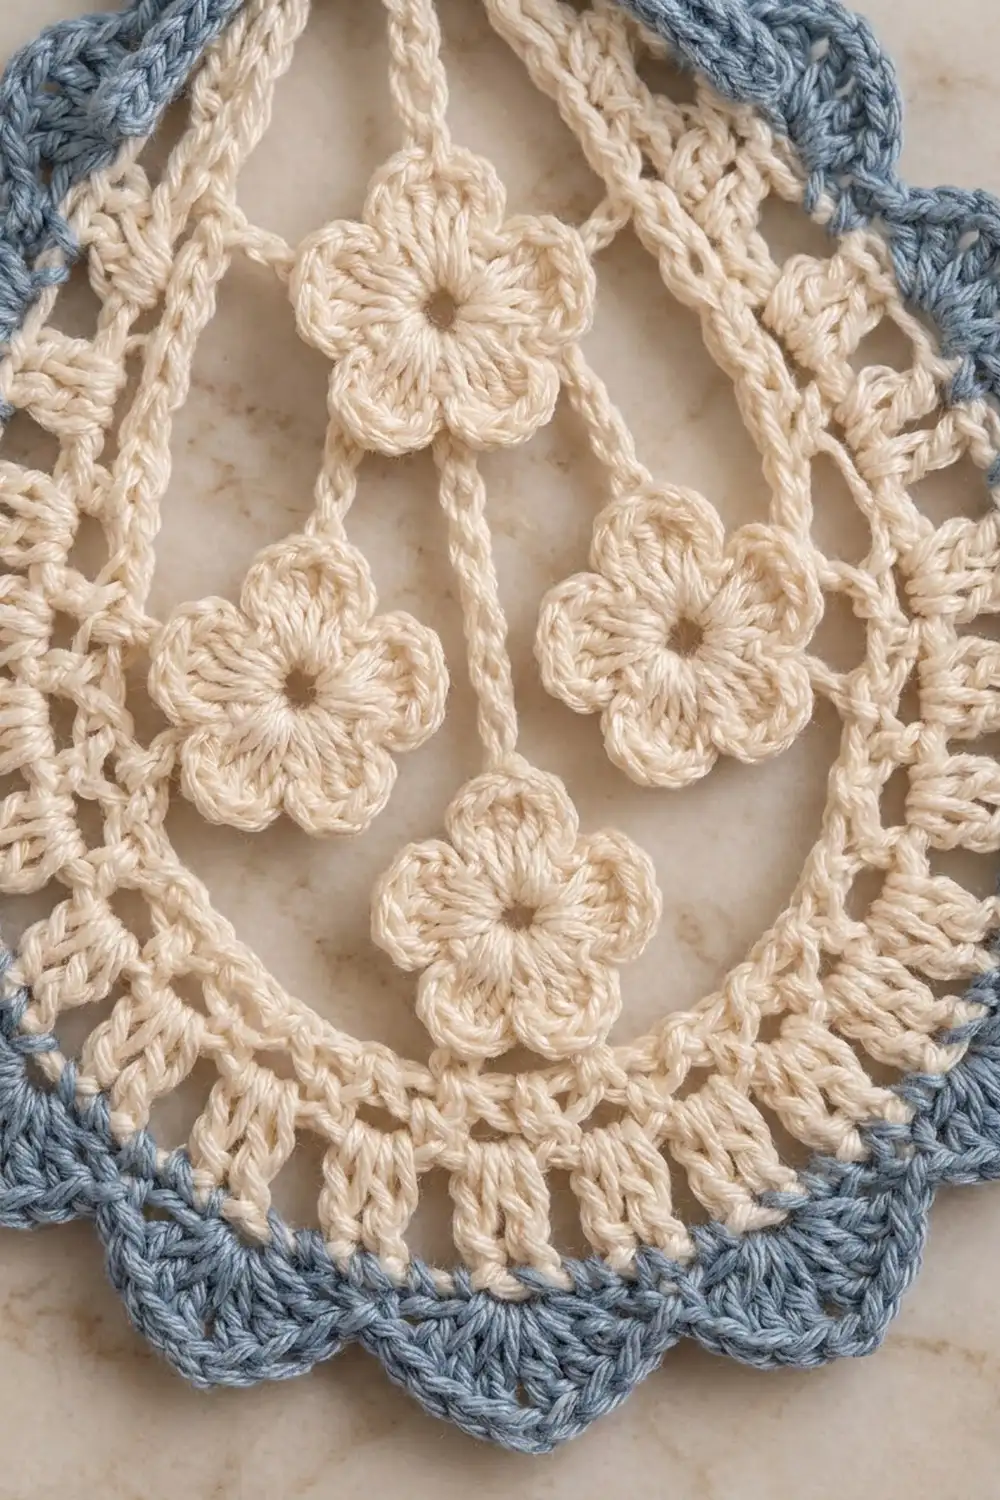
Frame
The frame is worked in joined rounds and is not turned. The right side faces you throughout.
Foundation: With cream, ch 58. Sl st in the first ch to form a ring, taking care not to twist the chain.
Rnd 1: Ch 1, sc in the same ch as the join and in each ch around. Sl st in the first sc. (58 sc)
Number the stitches as follows:
– St 1 is the top point. Place a marker in it.
– Sts 2–16 are the right side (15 sts).
– Sts 17–43 are the bottom curve (27 sts).
– Sts 44–58 are the left side (15 sts).
Check: 1 + 15 + 27 + 15 = 58.
Rnd 2 (shaping round): Work this round in sections.
- Point: Ch 5 (counts as dc and ch 2), dc in the same st as the join (st 1). This makes the top corner.
- Right side: Dc in each of the next 15 sts.
- Bottom curve: [Dc in next st, 2 dc in next st, dc in next st] 9 times. This works 27 sts into 36 dc.
- Left side: Dc in each of the next 15 sts.
- Sl st in the 3rd ch of the beg ch-5.
(68 dc and 1 ch-2 point sp)
This round works 1 stitch into each of the 58 existing stitches, plus 10 extra stitches: 1 at the point and 9 across the bottom. The increases sit symmetrically, so the left and right halves mirror each other. The teardrop shape now shows clearly.
Rnd 3 (mesh round): Sl st in the point ch-2 sp.
- Point: Ch 5 (counts as dc and ch 2), dc in the same sp.
- Right side: [Ch 1, sk next st, dc in next st] 8 times. This uses 16 sts: the point dc plus the 15 right-side dc.
- Bottom curve: [Ch 1, dc in next st, ch 1, sk next st, dc in next st] 12 times. This uses all 36 sts.
- Left side: Ch 1, dc in next st, [ch 1, sk next st, dc in next st] 7 times, ch 1, sk the last st (the point dc).
- Sl st in the 3rd ch of the beg ch-5.
(42 dc, 41 ch-1 sps and 1 ch-2 point sp)
Count the dc by section: 2 at the point, 8 on the right, 24 on the bottom and 8 on the left, for 42. The sides stay straight, and the bottom adds 12 dc to keep the curve flat.
Rnd 4 (trim round): Sl st in the point ch-2 sp, ch 1.
- Point: 3 sc in the ch-2 sp.
- Right side: Sc in the next dc (the point dc), then [sc in next ch-1 sp, sc in next dc] 8 times. This makes 17 sc.
- Bottom curve: Sc in next ch-1 sp, sc in next dc. Then [sc in next ch-1 sp, 2 sc in next dc] 22 times. Then sc in next ch-1 sp, sc in next dc. This makes 70 sc.
- Left side: [Sc in next ch-1 sp, sc in next dc] 8 times, sc in the last ch-1 sp, sc in the beg-ch dc. This makes 18 sc.
- Sl st in the first sc. Fasten off the cream.
(108 sc)
This round works 84 positions 1-per-stitch (42 dc, 41 ch-1 sps and the point sp), plus 24 extra stitches (2 extra at the point and 22 across the bottom): 84 + 24 = 108. Mark the center sc of the 3 point sc. The border starts there.
Checkpoint: the frame should measure 4.25 in × 5.25 in (10.8 cm × 13.3 cm).
Flowers (Make 4)
With cream, make a magic ring.
Rnd 1: Ch 1, 10 sc in the ring. Pull the ring closed and sl st in the first sc. (10 sc)
Rnd 2: Petal in next sc, sl st in next sc. Repeat from * 4 more times. The last sl st lands on the joining st. (5 petals and 5 sl st junctions)
Fasten off and leave a 6 in (15.2 cm) tail on 2 of the flowers. Name them A (top), B (right), C (left) and D (bottom). B and C get the long tails.
Checkpoint: each flower should measure 1 in (2.5 cm) across.
Flower Strands
Each strand is worked into the free loop of the foundation chain on the inside edge of Rnd 1. Keep the chains relaxed but not loose.
Center strand (A and D):
- Join cream with a sl st in the foundation loop at st 1 (the top point).
- Ch 4. Sl st in any junction of Flower A.
- Working behind the flower, sl st loosely through the back of each of the next 5 Rnd 1 sc. You are now at the base of the opposite petal.
- Sl st in the hdc and the first dc of that petal.
- Ch 3. Sl st in a junction of Flower D, then work across the back of D the same way.
- Ch 3. Sl st in the foundation loop at st 30 (the bottom center).
- Fasten off.
Side strands (B and C):
- Join cream at st 1 again.
- Ch 9. Sl st in any junction of Flower B and fasten off.
- Use B’s tail to tack the tip of its outward petal to the foundation loop at st 13.
- Repeat for Flower C, tacking it at st 47.
St 47 mirrors st 13 across the center line.
The four flowers now sit in a diamond: A at the top, B and C side by side in the middle, and D at the bottom. A and D sit on a straight vertical strand. B and C hang on angled strands and touch the frame sides.
Border
Border gauge: each scallop uses 6 sts of Rnd 4 and measures about 7/8 in (2.2 cm) along the edge. The border adds 3/8 in (1.0 cm) on every side.
Rnd 5 (blue scallops): Join blue with a sl st in the marked center point sc. Ch 1, sc in the same st.
Sk 2 sts, scallop in next st, sk 2 sts, sc in next st. Repeat from * 17 more times. On the last repeat, replace the final sc with a sl st in the first sc.
(18 scallops: 90 dc and 18 sc)
Fasten off and weave in the ends.
Count by section: Starting from the point sc and going around, Rnd 4 contains:
– the center point sc
– 1 more point sc
– 17 right-side sc
– 70 bottom sc
– 18 left-side sc
– the 3rd point sc (just before the center)
Check: 1 + 1 + 17 + 70 + 18 + 1 = 108.
Why the math works:
– Each repeat uses exactly 6 sts, and 108 ÷ 6 = 18 repeats. The last repeat lands back on the starting sc.
– The scallop centers fall at positions 3, 9, 15 and so on up to 105. Each one has a mirror partner on the other half, because 108 − (3 + 6k) = 3 + 6(17 − k).
– Position 54 is the bottom center, and 54 = 6 × 9, so an sc sits exactly at the bottom center.
– This gives 9 scallops per half, mirrored on both sides.
– An sc also sits at the point, which leaves a neat anchor for the loop.
Hanging Loop and Bow
Loop:
- Join cream with a sl st in the blue point sc.
- Ch 20, sl st in the same st.
- Ch 1, work 26 sc into the loop, sl st in the first sc.
- Fasten off.
The loop stands 1.25 in (3.2 cm) tall.
Bow:
- With blue, ch 55.
- Sl st in the 2nd ch from the hook and in each ch across. (54 sl st) This makes a firm cord about 7 in (17.8 cm) long.
- Tie the cord in a bow with two loops of about 1/2 in (1.3 cm) each and two tails of about 1 in (2.5 cm).
- Knot each tail end, then weave the yarn ends back into the cord.
- Sew the knot of the bow to the front, centered over the top point on Rnds 2–4.
- Tack each loop down at one spot.
The finished bow spans about 1.75 in (4.4 cm).
Final Blocking
- Draw a teardrop 5 in × 6 in (12.7 cm × 15.2 cm) on paper and place it under plastic wrap on your board.
- Soak the ornament in cool water for 10 minutes, then press out the water in a towel. Do not wring it.
- Pin the top point and the bottom center first.
- Pin the widest point on each side so the width is 5 in (12.7 cm).
- Pin the tip of every scallop, working outward from the bottom center and alternating left and right.
- Straighten the center strand and pin Flowers A and D in a vertical line. Pin B and C level with each other.
- Shape the bow loops with your fingers.
- Spray lightly with starch if you want a stiffer ornament. Let it dry completely before unpinning.
Final Quality-Control Checklist
- The ornament measures 5 in × 6 in (12.7 cm × 15.2 cm).
- There are 18 scallops: 9 on each half, with an sc at the bottom center.
- The top point is sharp and centered under the loop.
- The mesh round shows 41 even ch-1 spaces with no gaps or bunching.
- The four flowers form a diamond, and B and C sit at the same height.
- The center strand hangs straight, neither slack nor pulling.
- The bow is centered and covers the point.
- All ends are woven in securely, and none show on the front.
Troubleshooting
The bottom curve cups: Your increases are too tight. Use a larger hook or relax your tension on Rnds 2–4.
The bottom curve ruffles: Your tension is too loose. Use a smaller hook.
The point looks rounded: Pull the ch-2 point corner snug on Rnds 2 and 3, then pin it sharply while blocking.
The flowers droop: Shorten the strands by 1 ch, or tack B and C at a second petal.
The scallops don’t come out even: Recount Rnd 4. It must have exactly 108 sc.
The bow flops forward: Add one more tack stitch behind each loop.
Care
Hand wash in cool water with a mild soap and lay flat to dry. If the ornament softens over time, re-block and starch it lightly.

Final Notes
Here is the measurement chain:
– The 58-chain ring makes a 2.25 in × 3.25 in (5.7 cm × 8.3 cm) opening.
– Rnd 2 (68 dc) brings the piece to 3.25 in × 4.25 in (8.3 cm × 10.8 cm).
– Rnd 3 (42 dc of mesh) brings it to 4 in × 5 in (10.2 cm × 12.7 cm).
– Rnd 4 (108 sc) brings it to 4.25 in × 5.25 in (10.8 cm × 13.3 cm).
– Rnd 5 (18 scallops) adds 3/8 in (1.0 cm) on every side, for a finished 5 in × 6 in (12.7 cm × 15.2 cm).
If your stitch counts and checkpoints match at each stage, the finished ornament will come out the right shape and size.
Happy crocheting!