

This hanging toilet paper holder keeps three spare rolls neatly on display. It has a soft cream backing strip with three deep red sleeves stacked down the front. Each sleeve has a raised heart, and a chunky red bow sits at the top, just under the hanging loop.
The palette is just two colors: cream and true red. The whole piece is worked in single crochet, so the fabric is dense and sturdy and the hearts stand out in clear relief. It looks cozy and a little romantic, and it suits Valentine’s Day or any red-and-white bathroom.
This pattern uses US crochet terms. The finished holder measures 4.5 in (11.4 cm) wide and 18.5 in (47.0 cm) long, not counting the hanging loop. It holds standard rolls about 4 to 4.5 in (10.2 to 11.4 cm) in diameter.
Construction is simple. You crochet a flat backing strip and add a one-round border and a loop. Then you work three flat red panels, sew a heart onto each one, and sew both short ends of each panel across the backing so it forms a sling. The bow goes on last.
Finished Size and Construction
- Finished size: 4.5 in x 18.5 in (11.4 cm x 47.0 cm), plus a 2 in (5.1 cm) hanging loop
- Skill level: Easy / advanced beginner
- Terminology: US crochet terms
- Yarn weight: Worsted (#4)
- Hook: 5.0 mm (US H-8)
- Number of pieces: 1 backing, 1 hanging loop, 3 sleeve panels, 3 heart appliqués, 1 bow (2 parts)
- Layout: 3 sleeves stacked vertically on 1 backing strip, bow at top
- Sleeve panel size: 4.5 in x 12 in (11.4 cm x 30.5 cm) flat
- Backing size before border: 4 in x 18 in (10.2 cm x 45.7 cm)
- Border depth: 0.25 in (0.6 cm), 1 round of sc
Materials
Pick a smooth worsted-weight yarn. Cotton or a cotton blend holds its shape well in a bathroom and washes easily. Soft acrylic works too and costs less. Choose a yarn with good stitch definition so the hearts show up clearly.
- Red: 180 g (about 360 m) for the sleeves, hearts, and bow
- Cream: 80 g (about 160 m) for the backing, border, and loop
These amounts include a safety margin of about 15 to 20 percent, so you can swatch and still have plenty for seaming.
Tools:
- 5.0 mm (US H-8) crochet hook
- Tapestry needle
- Stitch markers (at least 6)
- Scissors
- Measuring tape
- Rust-proof pins for blocking
- Spray bottle or steamer
Abbreviations (US Terms)
- ch – chain
- sc – single crochet
- sc2tog – single crochet 2 together
- sl st – slip stitch
- st(s) – stitch(es)
- rnd – round
- RS / WS – right side / wrong side
Special stitch – sc2tog: Insert the hook in the next st, yarn over, and pull up a loop. Insert the hook in the following st, yarn over, and pull up a loop (3 loops on the hook). Yarn over and pull through all 3 loops.
Turning chains: The ch 1 at the start of each row does not count as a stitch.
Gauge and Checkpoints
Gauge: 16 sc and 18 rows = 4 in (10.2 cm) in sc worked in rows.
Work one sleeve panel before anything else. It is the largest single piece, so it is the best gauge test. It should measure 4.5 in (11.4 cm) wide. After 27 rows it should measure 6 in (15.2 cm) long, and after all 54 rows it should measure 12 in (30.5 cm).
Checkpoints:
- Sleeve panel after Row 27: 18 sts, 6 in (15.2 cm) long
- Finished sleeve panel: 4.5 in x 12 in (11.4 cm x 30.5 cm)
- Backing after Row 81: 4 in x 18 in (10.2 cm x 45.7 cm)
- Backing after border: 4.5 in x 18.5 in (11.4 cm x 47.0 cm)
- Heart after edging: about 3.75 in (9.5 cm) wide and 3 in (7.6 cm) tall
- Bow: 3.5 in x 2 in (8.9 cm x 5.1 cm) before cinching
If your piece is too big, go down half a hook size (4.5 mm). If it is too small, go up half a hook size (5.5 mm). Fix width first by changing hook size. Fix length by checking your row gauge, and add or remove whole rows only if your rows are still off after changing the hook.
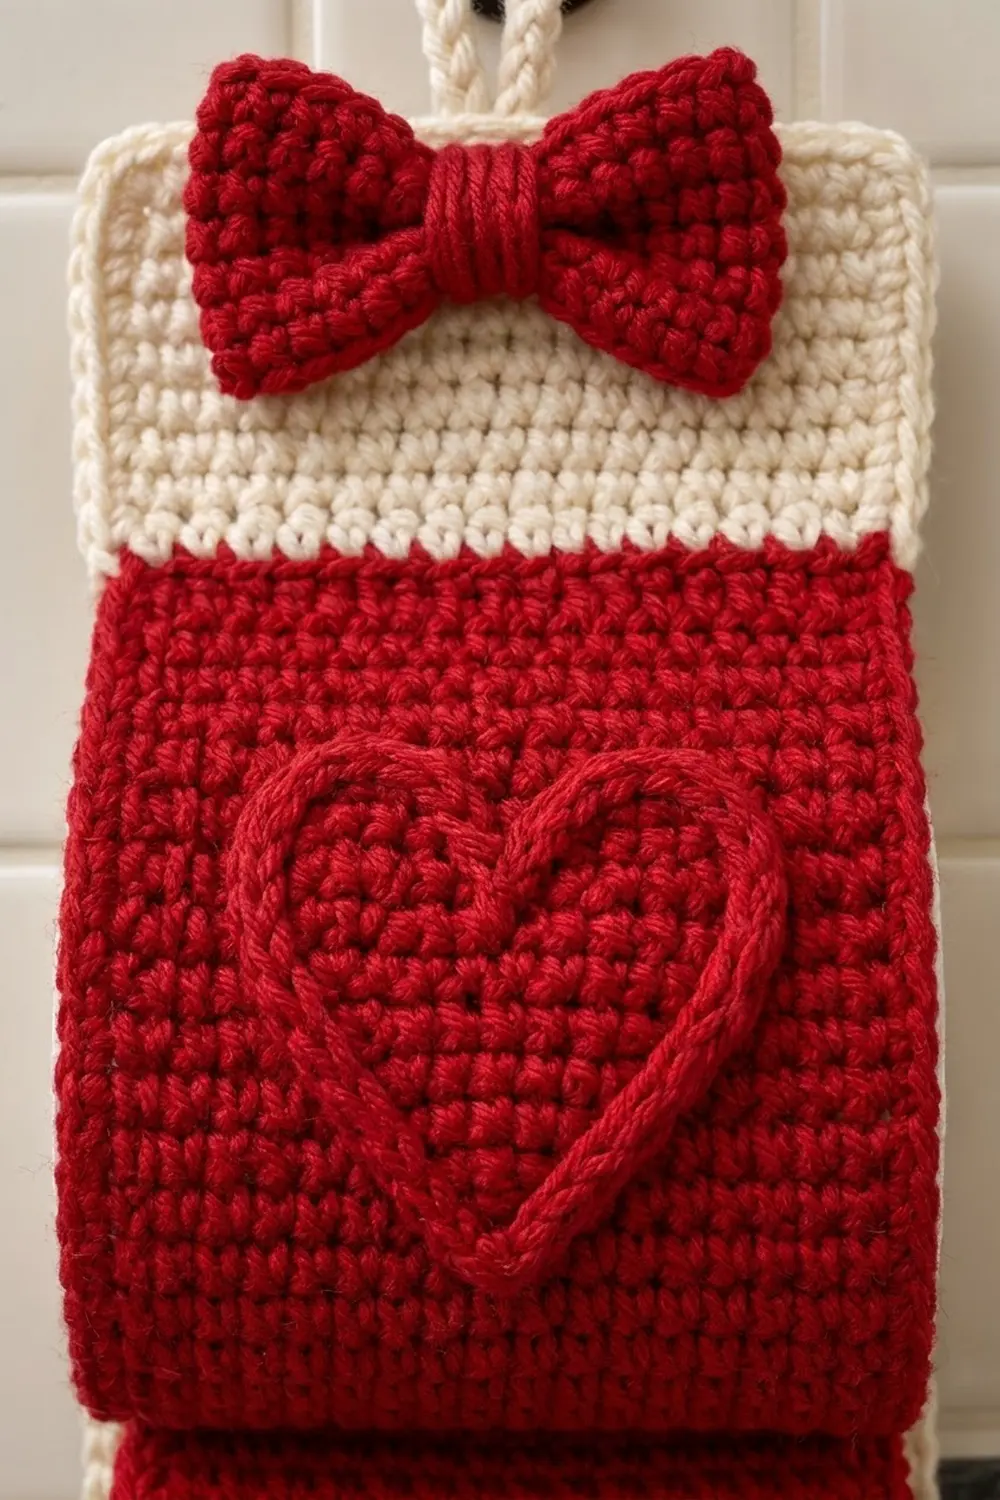
Sleeve Panels (Make 3)
With red, ch 19.
Row 1 (RS): Sc in 2nd ch from hook and in each ch across. Turn. (18 sc)
Rows 2–54: Ch 1, sc in each st across. Turn. (18 sc)
Fasten off and leave a 30 in (76.2 cm) tail for sewing.
Each panel is 18 sts wide and 54 rows long. Mark the foundation edge and the last-row edge. These two 18-st short edges get sewn to the backing. The long side edges stay free.
Heart Appliqués (Make 3)
Each heart is worked flat from the bottom point up. The two lobes are worked separately, and then a two-round edging forms the raised outline.
With red, ch 2.
Row 1: 3 sc in 2nd ch from hook. Turn. (3 sc)
Row 2: Ch 1, 2 sc in first st, sc in next st, 2 sc in last st. Turn. (5 sc)
Row 3: Ch 1, 2 sc in first st, sc in next 3 sts, 2 sc in last st. Turn. (7 sc)
Row 4: Ch 1, 2 sc in first st, sc in next 5 sts, 2 sc in last st. Turn. (9 sc)
Row 5: Ch 1, 2 sc in first st, sc in next 7 sts, 2 sc in last st. Turn. (11 sc)
Row 6: Ch 1, 2 sc in first st, sc in next 9 sts, 2 sc in last st. Turn. (13 sc)
Rows 7–9: Ch 1, sc in each st across. Turn. (13 sc)
First lobe:
Lobe Row 1: Ch 1, sc in next 6 sts. Turn and leave the rest unworked. (6 sc)
Lobe Row 2: Ch 1, sc2tog, sc in next 2 sts, sc2tog. Turn. (4 sc)
Lobe Row 3: Ch 1, sc2tog twice. (2 sc) Fasten off.
Second lobe: Skip the center (7th) st of Row 9. Join red in the 8th st.
Lobe Row 1: Ch 1, sc in same st and in next 5 sts. Turn. (6 sc)
Lobe Rows 2–3: Work as for the first lobe. (4 sc, then 2 sc) Do not fasten off.
Edging Rnd 1: Ch 1. Work down the outer side of the second lobe and the heart: 12 sc evenly (1 per row-end: 3 lobe rows plus 9 body rows). Work 3 sc in the base of Row 1 for the point. Work 12 sc up the other outer side. Work 2 sc in each of the 2 top sts of the first lobe (4 sc). Work 3 sc down the inner side of that lobe, sl st in the skipped center st, then work 3 sc up the inner side of the second lobe. Work 2 sc in each of its 2 top sts (4 sc). Join with sl st to the first sc. (41 sc plus 1 center sl st)
Edging Rnd 2: Working loosely, sl st in each sc around and skip the center sl st. (41 sl sts) Fasten off and leave a 20 in (50.8 cm) tail.
The slip stitch round sits on top of the edge like a cord. This gives the heart its raised outline.
Attach the heart: Center a heart on the RS of each sleeve panel, halfway between its two short edges. The point should face the foundation edge. Pin it in place and whipstitch through the outer loops of Rnd 1 so the slip stitch cord stays visible.
Backing Strip
With cream, ch 17.
Row 1: Sc in 2nd ch from hook and in each ch across. Turn. (16 sc)
Rows 2–81: Ch 1, sc in each st across. Turn. (16 sc)
Do not fasten off. Continue with the border below. The backing should measure 4 in x 18 in (10.2 cm x 45.7 cm).
Make All Pieces
- Red: 3 sleeve panels (18 sc x 54 rows), 3 hearts, 1 bow body, 1 bow center band
- Cream: 1 backing (16 sc x 81 rows), 1 hanging loop
Layout on the backing (Row 1 at the bottom, Row 81 at the top):
Rows 65–81  | cream top section + bow  (about 3.8 in / 9.7 cm)
Rows 44–64  | Sleeve C  (edges sewn on Row 64 and Row 44)
Rows 23–43  | Sleeve B  (edges sewn on Row 43 and Row 23)
Rows  2–22  | Sleeve A  (edges sewn on Row 22 and Row 2)
Row   1     | cream bottom edge
Place a marker at each sewing row: 2, 22, 23, 43, 44, and 64. Each sleeve spans 20 rows of backing, about 4.4 in (11.2 cm).
Border
The border goes around the backing only, in cream. It is worked before the sleeves are attached.
Border gauge: same as the body, 16 sc = 4 in (10.2 cm). One round of sc adds 1 st to each side, which is 0.25 in (0.6 cm).
Border Rnd 1: Ch 1 and turn so you are working across the top of Row 81.
- Top edge: 3 sc in first st, sc in next 14 sts, 3 sc in last st.
- Left side: Sc in each of the 79 row-ends between the corners. Skip the row-ends of Rows 81 and 1, since the corner groups cover them.
- Bottom edge: Working into the foundation ch, 3 sc in first ch, sc in next 14 ch, 3 sc in last ch.
- Right side: Sc in each of the 79 row-ends between the corners.
Join with sl st to the first sc. (198 sc)
Counts per side, counting the center st of each corner group as the corner: top and bottom have 18 sts each, and the long sides have 83 sts each.
Why the math works: Each short edge has 16 existing sts. Working 3 sc into each end st adds 2 sts per end, giving 20 sts per short edge, or 18 counted from corner center to corner center. The long side has 81 row-ends. The 79 middle row-ends get 1 sc each, and the 2 end rows sit under the corner groups, which adds 2 corner centers for 83 per side. The total is 4 x 3 (corners) + 2 x 14 + 2 x 79 = 198, which matches 2 x 18 + 2 x 83 − 4 shared corners = 198. The bordered width is 16 + 1 + 1 = 18 sts, or 4.5 in (11.4 cm). That is exactly the width of each sleeve panel.
Fasten off.
Hanging loop: With cream, ch 29. Sc in 2nd ch from hook and in each ch across. (28 sc, 7 in / 17.8 cm long) Fasten off. Fold the strip in half. Sew 1.5 in (3.8 cm) of each end to the WS of the backing at top center. This leaves a 2 in (5.1 cm) loop above the top edge.
Joining
Method: Whipstitch with the red tail of each panel.
Stitch-to-stitch logic: Each panel short edge has 18 sts. Each backing row, counted across the bordered width, also has 18 positions: 1 border sc at the left row-end, the 16 body sts, and 1 border sc at the right row-end. Sew one panel st to one backing position all the way across, with no skipping and no doubling.
Order for each sleeve, starting with Sleeve A:
- Lay the backing RS up with the top at the top.
- Place the panel RS down, with its last-row edge along marked Row 22 and the panel body lying upward over the backing. Whipstitch across all 18 sts.
- Flip the panel down so the RS and heart face out.
- Bring the foundation edge down and tuck it under so it lies along marked Row 2. Whipstitch across all 18 sts. The panel now bows out from the backing and forms a sling.
- Repeat for Sleeve B (Rows 43 and 23) and Sleeve C (Rows 64 and 44).
The heart lands at the front of the curve. A roll slides into each sling from the side.
Tension: Keep your sewing snug but not tight. Pulled seams pucker the backing and make it shorter. Check that the backing still lies flat after each seam.
Size checkpoint: After joining, the backing should still measure 18.5 in (47.0 cm) long. Each empty sleeve should hang with about 12 in (30.5 cm) of fabric between its two seams.
The Bow
Bow body: With red, ch 15. Row 1: Sc in 2nd ch from hook and in each ch across. Turn. (14 sc) Rows 2–9: Ch 1, sc in each st across. Turn. (14 sc) Fasten off. It should measure 3.5 in x 2 in (8.9 cm x 5.1 cm).
Center band: With red, ch 5. Row 1: Sc in 2nd ch from hook and across. Turn. (4 sc) Rows 2–10: Ch 1, sc across. Turn. (4 sc) It should measure 1 in x 2.2 in (2.5 cm x 5.6 cm). Leave a long tail.
Pinch the bow body at its center and wrap the band tightly around the pinch. Sew the band ends together at the back. Sew the bow to the cream top section, centered over Rows 70–78.
Final Blocking
- Weave in all ends and hide them inside seams or on the WS of the backing.
- Lay the holder flat with the sleeves spread out naturally.
- Pin the backing to 4.5 in x 18.5 in (11.4 cm x 47.0 cm).
- Mist it lightly or hover steam over it. Don’t press the hearts flat.
- Shape the bow loops with your fingers.
- Let it dry completely before hanging, about 6 to 12 hours.
Final Quality-Control Checklist
- Backing measures 4.5 in x 18.5 in (11.4 cm x 47.0 cm)
- Border has 198 sc with clean, square corners
- All 6 seams run straight across a single row
- Hearts are centered, point down, with the outline raised
- Bow is centered and secure
- Loop is firmly sewn and lies flat on the back
- Each sleeve holds a roll without sagging or straining
Troubleshooting
Backing curls or waves: Your tension changed between rows. Block it firmly, or rework it with even tension.
Sleeve too tight for the roll: Add 2 to 4 rows to the panel, about 0.5 to 0.9 in (1.3 to 2.3 cm).
Sleeve sags: Remove 2 to 4 rows, or move the bottom seam up 1 row.
Heart outline lies flat: Work Edging Rnd 2 looser, or use a hook one size larger for that round only.
Heart cups or ripples: Your increase rows were too tight. Rework Rows 2–6 with a slightly looser tension.
Border corners round off: Make sure you work 3 sc into each corner st.
Care
Hand wash in cool water with mild soap, gently press out the water, and dry flat. Reshape the hearts and bow while damp.

Final Notes
The measurement chain is simple. The gauge of 16 sc x 18 rows = 4 in (10.2 cm) gives a 4 in x 18 in (10.2 cm x 45.7 cm) backing. One round of border takes it to 4.5 in x 18.5 in (11.4 cm x 47.0 cm), which matches the 18-st panel width exactly. Three 18-st panels sewn stitch-for-stitch across that width form three even sleeves, each spanning 20 rows. A heart on each sleeve and a bow on top finish the piece. Check your gauge on the first panel, and every piece after it will fit.
Happy crocheting!