

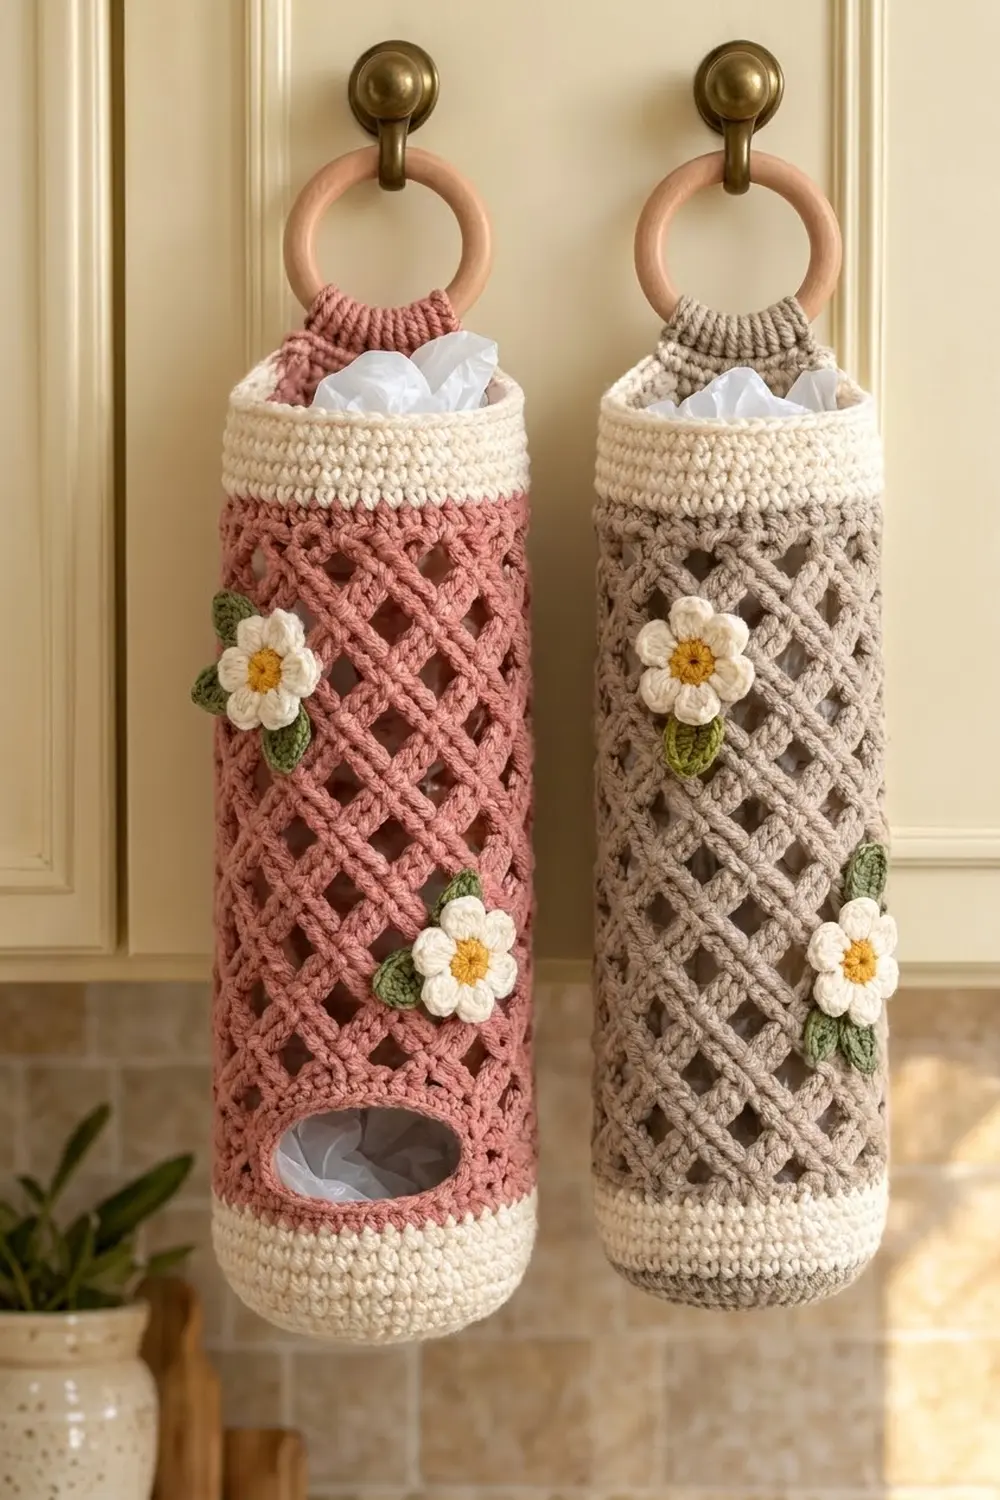
This hanging bag holder keeps loose grocery bags tidy and easy to reach. It is a tall, rounded tube. The base cup and top band are solid cream, and the middle is an open diamond trellis in dusty rose. Bags go in through the open top, and you pull them out one at a time through an oval opening just above the base.
The holder hangs from a 3 in (7.6 cm) wooden ring. A tapered strap in the main color rises from the back of the rim and wraps around the ring. Two small cream flowers with mustard centers and green leaves are sewn onto the trellis. The look is soft farmhouse, and the holder is practical too.
The pattern uses US crochet terms. The body measures about 4.75 in (12.1 cm) across and 15.75 in (40.0 cm) tall. With the strap and ring, it hangs about 20.75 in (52.7 cm) long. To make a matching second holder, switch the main color to taupe.
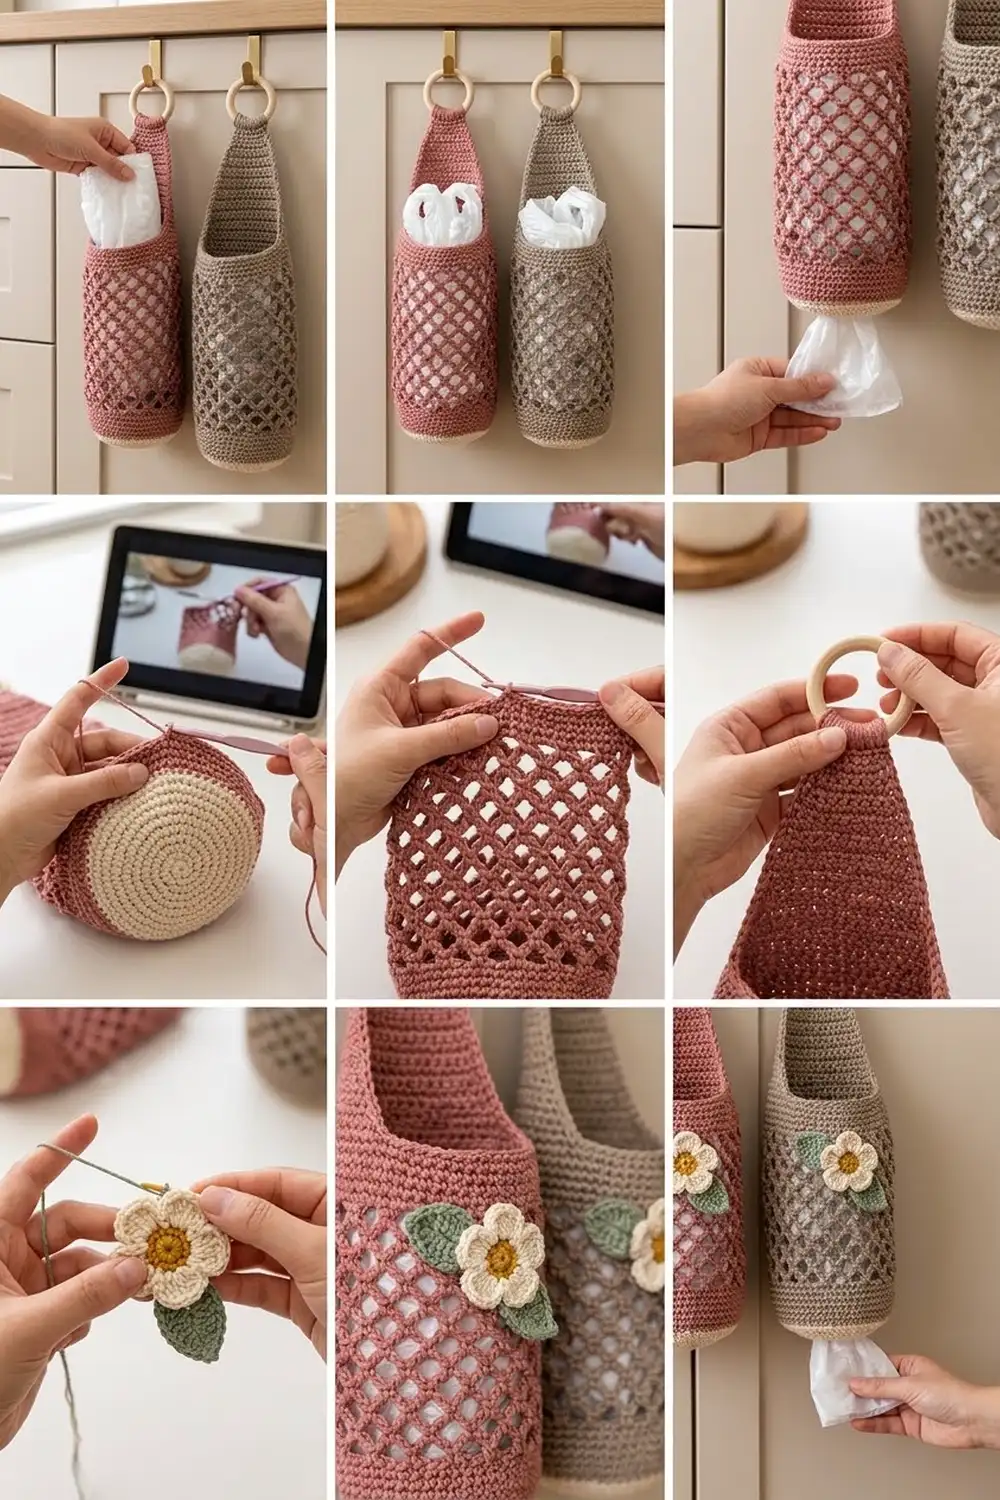
You work the holder in one piece from the bottom up: a flat base, solid walls with the dispenser opening, the trellis, a solid top band, and the strap. Then you add a short edging and the flower appliqués.
Finished Size and Construction
- Finished size: 4.75 in (12.1 cm) diameter x 15.75 in (40.0 cm) tall body; 20.75 in (52.7 cm) long including strap and ring
- Skill level: Easy-intermediate
- Terminology: US
- Yarn weight: Worsted (#4) cotton
- Hook: 5.0 mm (H-8)
- Number of pieces: 1 tube-shaped body, plus 2 flowers and 4 leaves as appliqués
- Layout: One vertical tube; dispenser opening at center front; strap at center back
- Piece size: 60 sts around = 15 in (38.1 cm) circumference
- Size before border: 15.75 in (40.0 cm) body; strap 2 in (5.1 cm) from rim to ring
- Border depth: 2 rounds, about 0.4 in (1.0 cm)
Materials
Choose a smooth worsted cotton. Cotton holds its shape when the holder is full and stands up to daily use. These amounts assume yarn with about 80 m per 50 g.
- Main color (MC), dusty rose or taupe: 60 g, 96 m
- Cream (CC1): 50 g, 80 m
- Mustard (CC2): 5 g, 8 m
- Sage green (CC3): 5 g, 8 m
Tools:
- 5.0 mm (H-8) crochet hook
- 3 in (7.6 cm) wooden ring
- Tapestry needle
- 4 stitch markers
- Measuring tape and scissors
The quantities include about a 20% margin for your swatch and differences in tension.
Abbreviations (US Terms)
- ch: chain
- sc: single crochet
- hdc: half double crochet
- dc: double crochet
- sl st: slip stitch
- BLO: back loop only
- sc2tog: single crochet 2 together
- rev sc: reverse single crochet
- st(s): stitch(es)
- sp: space
- rnd(s): round(s)
- MC / CC: main color / contrast color
Reverse single crochet (rev sc): If you’re right-handed, work from left to right. Insert the hook into the next stitch to the right, yarn over, and pull up a loop. Yarn over again and pull through both loops. This makes a corded edge.
Trellis loop: A ch-5 anchored with a sc. As you stack rounds of these loops, they form the diamond lattice.
Gauge and Checkpoints
Gauge: 16 sc and 18 rnds = 4 in (10.2 cm) in sc worked in the round.
Trellis gauge: 3 trellis rnds = 2 in (5.1 cm), measured with the tube hanging under its own weight.
Make the base (Rnds 1–10) first and use it as your test piece. Laid flat, it should measure 4.75 in (12.1 cm) across. If it comes out bigger, go down one hook size. If it comes out smaller, go up one hook size. A ruffled base means your tension is loose, and a cupped base means it is tight.
Checkpoints:
- After Rnd 5: base is about 2.4 in (6.1 cm) across
- After Rnd 10: base is 4.75 in (12.1 cm) across
- After Rnd 28: wall is 4 in (10.2 cm) tall
- After Rnd 43: wall is 14 in (35.6 cm) tall
- After Rnd 51: wall is 15.75 in (40.0 cm) tall
Base (CC1, Cream)
Work in joined rounds. End each round with a sl st to the first sc, then ch 1. The ch 1 does not count as a stitch.
Rnd 1: 6 sc in a magic ring. (6)
Rnd 2: 2 sc in each st. (12)
Rnd 3: Sc 1, 2 sc in next around. (18)
Rnd 4: Sc 2, 2 sc in next around. (24)
Rnd 5: Sc 3, 2 sc in next around. (30)
Rnd 6: Sc 4, 2 sc in next around. (36)
Rnd 7: Sc 5, 2 sc in next around. (42)
Rnd 8: Sc 6, 2 sc in next around. (48)
Rnd 9: Sc 7, 2 sc in next around. (54)
Rnd 10: Sc 8, 2 sc in next around. (60)
Lower Wall (CC1, Cream)
Rnd 11: Sc in BLO of each st. (60) This makes the ridge where the base turns up into the wall.
Rnds 12–18: Sc in each st. (60)
The cream band is about 1.75 in (4.4 cm) tall. Change to MC on the last sl st of Rnd 18.
Solid Section and Dispenser Opening (MC)
Rnds 19–20: Sc in each st. (60)
Now you work back and forth in rows over 48 sts. The 12 sts you skip form the bottom edge of the opening.
Row 21: Ch 1, sc in the same st as the join and in the next 47 sts. Turn. (48)
Rows 22–25: Ch 1, sc across, turn. (48)
At the end of Row 25, don’t turn.
Closing chain: Ch 12, then sl st to the first sc of Row 25.
Rnd 26: Ch 1, sc in each of the 48 sc and in each of the 12 ch. (60)
Rnds 27–28: Sc in each st. (60)
The opening is 3 in (7.6 cm) wide and about 1.1 in (2.8 cm) tall. The solid MC section is about 2.25 in (5.7 cm) tall, so the wall should now measure 4 in (10.2 cm).
Opening edging: Join MC at a bottom corner of the opening and work all the way around it:
- 1 sc in each of the 12 skipped sts along the bottom
- 1 sc in each of the 5 row ends up the side
- 1 sc in each of the 12 ch across the top
- 1 sc in each of the 5 row ends down the other side
Sl st to the first sc. (34) Fasten off. The edging firms the opening into a smooth oval.
Trellis Section (MC)
Rnd 29 (setup): Ch 1, sc in the first st, ch 5, skip 3 sts, sc in next st 14 times, ch 5, skip 3, sl st to the first sc. (15 sc, 15 ch-5 loops)
Check: 15 sc + (15 x 3 skipped) = 60 sts used.
Rnds 30–43: Sl st in the first 2 ch of the next loop, ch 1, sc in the same ch-5 sp, ch 5, sc in next ch-5 sp 14 times, ch 5, sl st to the first sc. (15 sc, 15 ch-5 loops)
Each sc sits at the center of a loop from the round below. That shifts the loops half a repeat every round, and the shift is what forms the diamonds. Rnds 29–43 make 15 trellis rounds, which is 10 in (25.4 cm). The wall should now be 14 in (35.6 cm) tall. Fasten off MC.
Top Band (CC1, Cream)
Rnd 44 (conversion): Join CC1 in any sc. Ch 1, sc in the sc, 3 sc in the next ch-5 sp around. Sl st to the first sc.
Count: 15 sc (1 in each existing sc) + 45 sc (3 in each of 15 loops) = 60.
Rnds 45–51: Sc in each st. (60)
The top band is about 1.75 in (4.4 cm) tall, and the body should measure 15.75 in (40.0 cm). Fasten off.
Strap (MC)
Flatten the tube so the opening is at center front. Mark the 24 sts at the center back of Rnd 51. The other 36 sts form the open front rim, where you load the bags.
Row 1: Join MC in the first marked st. Ch 1, sc across 24 sts, turn. (24)
Row 2: Ch 1, sc2tog, sc to last 2 sts, sc2tog, turn. (22)
Row 3: Repeat Row 2. (20)
Row 4: Repeat Row 2. (18)
Row 5: Repeat Row 2. (16)
Row 6: Repeat Row 2. (14)
Row 7: Repeat Row 2. (12)
Row 8: Repeat Row 2. (10)
Row 9: Repeat Row 2. (8)
The tapered section is 2 in (5.1 cm) tall.
Rows 10–17: Ch 1, sc across, turn. (8)
These rows make a 1.75 in (4.4 cm) tab that will wrap around the ring. Fasten off and leave a 12 in (30.5 cm) tail.
Flowers (Make 2)
Rnd 1 (CC2): 10 sc in a magic ring. Sl st to the first sc. (10) Change to CC1.
Rnd 2 (CC1): (Sc, hdc, dc) in next st, (dc, hdc, sc) in next st 5 times. Sl st to join. (5 petals, 30 sts)
Each flower is about 1.5 in (3.8 cm) across.
Leaves (Make 4)
With CC3: Ch 7. Starting in the 2nd ch from the hook, work sl st, sc, hdc, dc, hdc, sc. (6) Ch 1, rotate, and work down the other side of the chain: sc, hdc, dc, hdc, sc, sl st. (6)
Each leaf has 12 sts and is about 1.25 in (3.2 cm) long.
Border
Border gauge: 1 sc per stitch along the rim and across the top of the strap; 1 sc per row end along the strap sides.
Work the border before you fold the strap.
Rnd 1 (CC1): Join at the front rim, right next to the strap, and sc around in this order:
- 36 sc across the front rim
- 17 sc up the first side of the strap, 1 per row
- 8 sc across the top of Row 17
- 17 sc down the second side
Sl st to the first sc. (36 + 17 + 8 + 17 = 78)
Rnd 2: Ch 1, rev sc in each st. (78) Fasten off.
Why the math works: The front rim keeps a 1:1 stitch count, so it stays at 9 in (22.9 cm), which is 36 ÷ 4. It won’t flare or pull in. Sc rows run 4.5 per inch, slightly more than the 4 sts per inch along the rim. That gives the strap edges a little extra length, and the rev sc takes it up. You don’t need extra corner stitches because Row 17 gets sewn down.
Attach the ring: Fold Rows 10–17 over the ring toward the inside. Whipstitch the top of Row 17 to the back of Row 9 through both layers.
Attach the appliqués:
- Sew 2 leaves behind each flower, with the tips showing at about 10 and 4 o’clock.
- Sew one flower on the left side, 1.5 in (3.8 cm) below the top band.
- Sew the other flower on the right side, 5 in (12.7 cm) below the top band.
Stitch through the trellis bars, not the open diamonds.
Final Blocking
- Lightly mist the holder with water.
- Slide a 4.75 in (12.1 cm) diameter form inside, such as a rolled towel.
- Gently stretch the trellis lengthwise until the body measures 15.75 in (40.0 cm).
- Shape the opening into an even oval.
- Flatten the flowers and spread the petals.
- Let everything dry completely before you remove the form.
Final Quality-Control Checklist
- The base lies flat at 4.75 in (12.1 cm) across.
- The Rnd 11 ridge is clean all the way around.
- The opening is centered at the front, and its edging has 34 sts.
- Every trellis round has exactly 15 loops.
- Rnd 44 has exactly 60 sts.
- The strap is centered at the back and tapers evenly from 24 to 8 sts.
- The ring is enclosed securely, with the seam hidden inside.
- The flowers are sewn down firmly and all ends are woven in.
- The body is 15.75 in (40.0 cm), and the total hanging length is 20.75 in (52.7 cm).
Troubleshooting
- Base ruffles: You may have an extra increase. Recount each round.
- Base cups: Your tension is too tight. Go up one hook size.
- Trellis spirals: Always sl st to the center of the first loop before you start a round.
- Trellis too short: Loosen your chains, or add one trellis round.
- Opening sags: Rework the edging more firmly.
- Rim flares: Check that Rnd 44 has exactly 60 sts.
- Strap twists: Rejoin it at the exact center back, opposite the opening.
Care
Hand wash in cool water and reshape while damp. Lay flat to dry, and keep the wooden ring as dry as you can.
Final Notes
The 60-stitch base sets every measurement in this pattern. At 4 sts per inch, 60 sts make a 15 in (38.1 cm) circumference and a 4.75 in (12.1 cm) diameter. The body height adds up from 1.75 in (4.4 cm) of cream, 2.25 in (5.7 cm) of solid MC, 10 in (25.4 cm) of trellis, and 1.75 in (4.4 cm) of cream, for 15.75 in (40.0 cm) total. The 2 in (5.1 cm) strap and 3 in (7.6 cm) ring bring the hanging length to 20.75 in (52.7 cm). If you hit each checkpoint, the holder will finish at the right size.
Happy crocheting!