

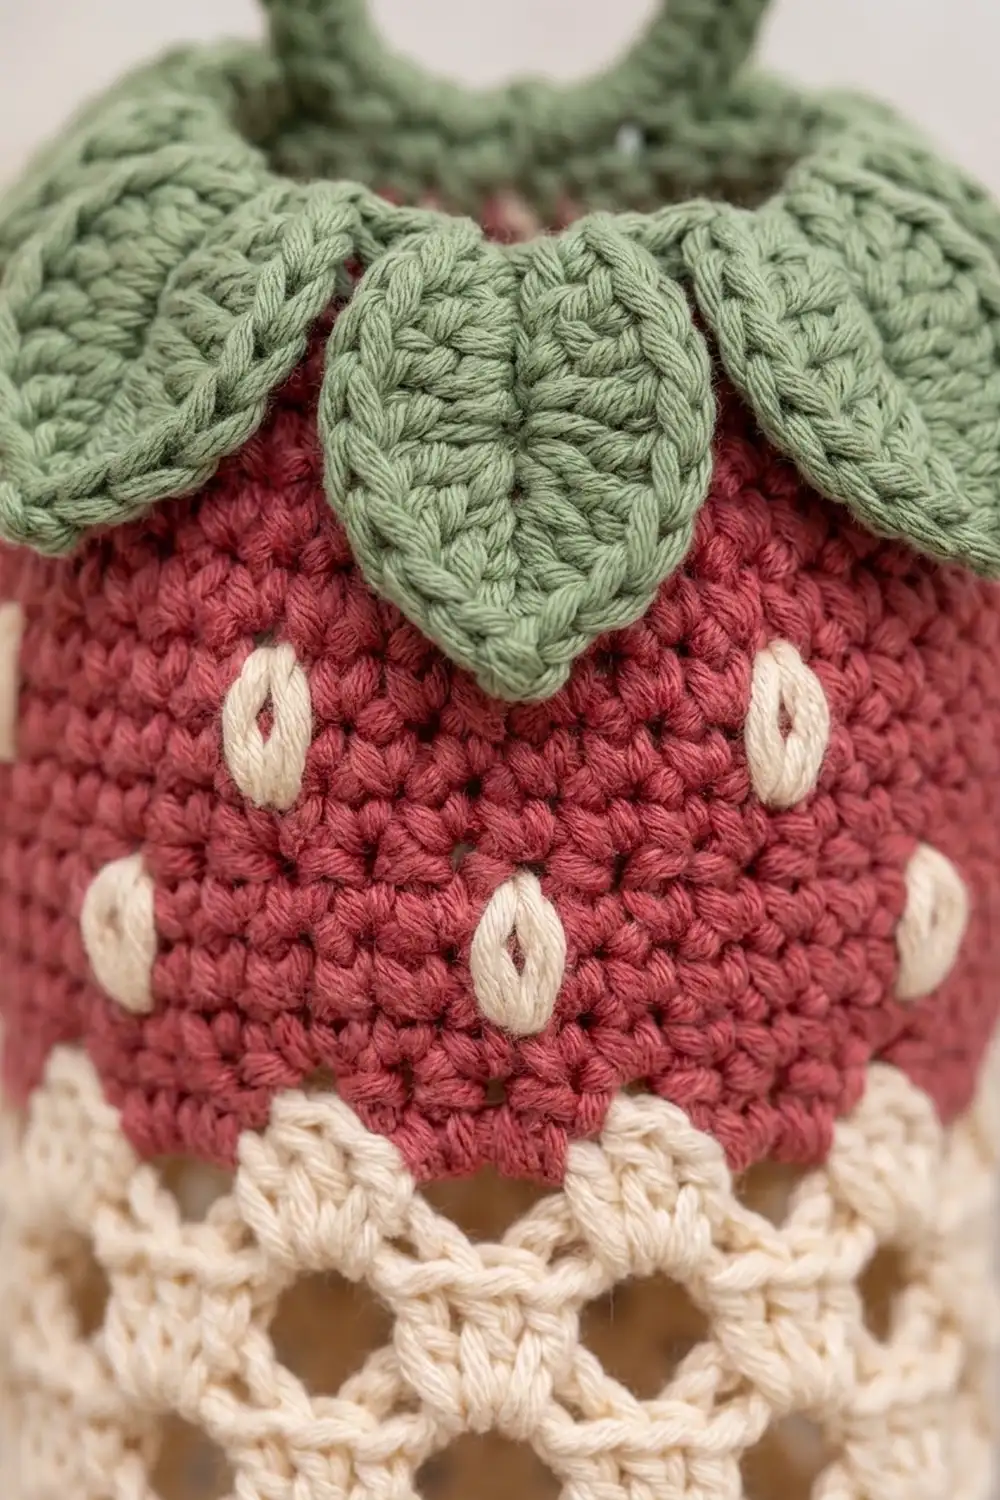
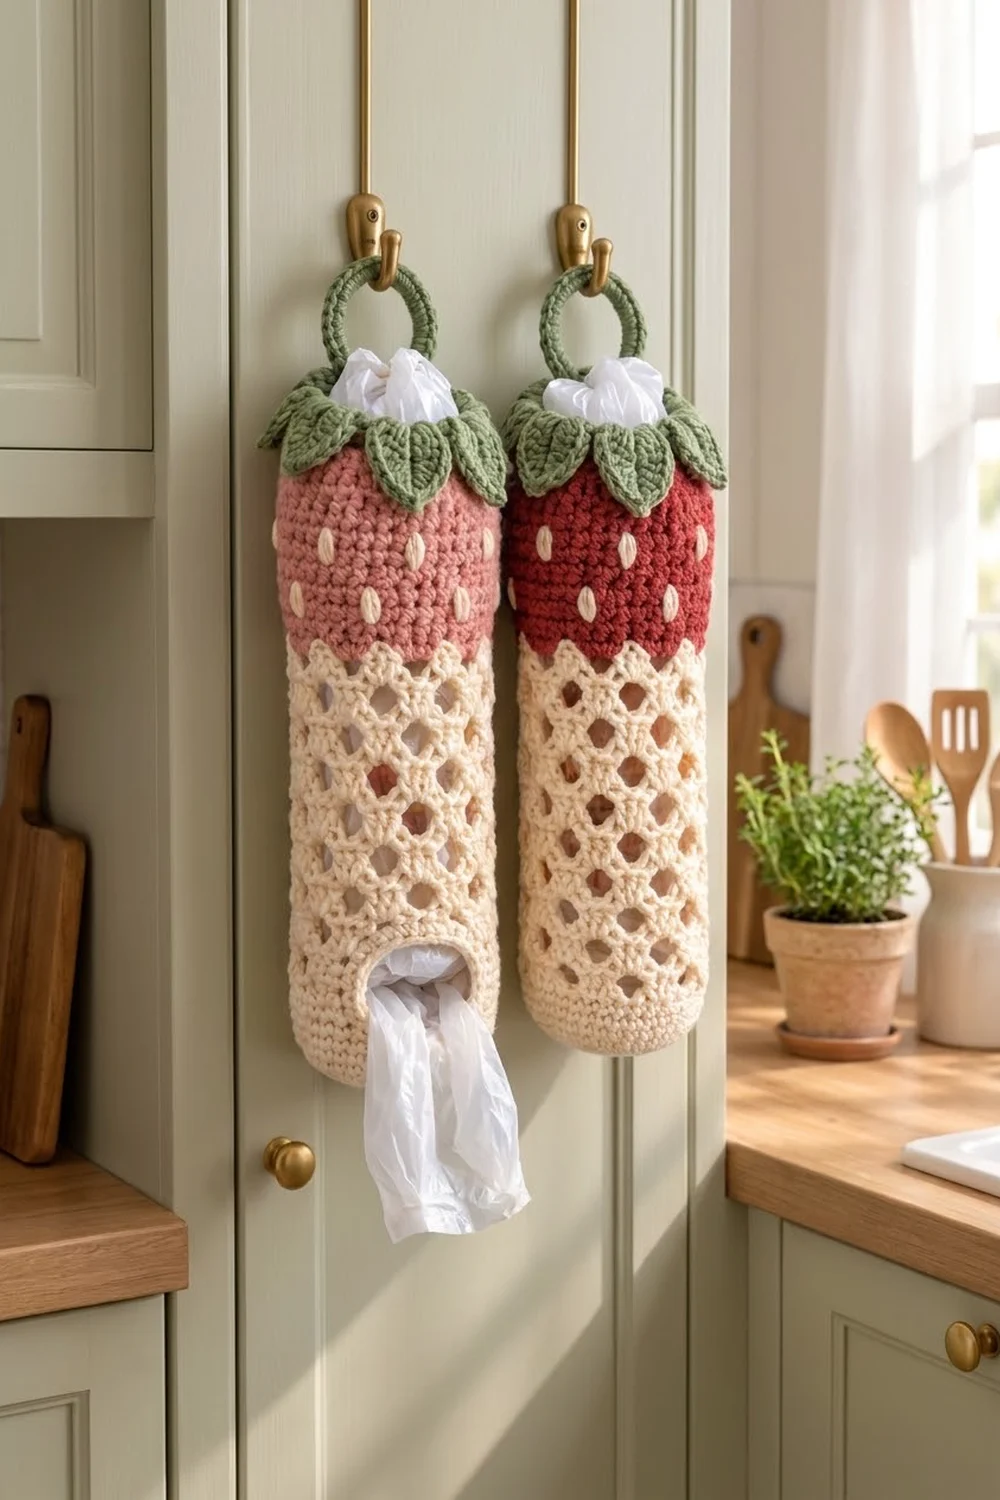
This strawberry plastic bag holder turns a kitchen chore into a little decoration. A cream base and open lattice body hold a stash of grocery bags. The solid berry top is dotted with cream “seeds,” and a ring of green leaves frames the opening. A covered green ring hangs it from a hook.
The colors are cream, sage green, and your choice of berry shade: soft dusty pink or deep strawberry red. Make one of each and hang them side by side. The style is cottage-kitchen and cheerful, and the construction is simple and practical.
This pattern uses US crochet terms. The finished holder measures about 5 in (12.7 cm) wide laid flat and 15.5 in (39.4 cm) tall, plus a 2.5 in (6.4 cm) hanging ring. The total hanging length is about 18 in (45.7 cm).
The body is worked in one piece from the bottom up in this order: an oval base, a short solid band with a front dispensing hole, a lattice mesh, and the berry top. Bags go in at the top and pull out through the hole. Ten leaves and a covered ring are made separately and sewn on.
Finished Size and Construction
- Finished size: 5 in (12.7 cm) wide flat x 15.5 in (39.4 cm) tall, plus ring
- Skill level: Easy / advanced beginner
- Terminology: US crochet terms
- Yarn weight: Worsted (#4) cotton or cotton blend
- Hook: 5 mm (H-8)
- Number of pieces: 12 (1 body, 10 leaves, 1 ring cover)
- Layout: One tubular body, with leaves evenly spaced around the rim and the ring centered at the back
- Body circumference: 40 sts = 10 in (25.4 cm)
- Size before border: 5 in (12.7 cm) wide x 15 in (38.1 cm) tall
- Border depth: about 0.5 in (1.3 cm)
Materials
Choose a smooth worsted-weight cotton or cotton blend. Cotton holds its shape when the holder is full of bags, and it wipes clean easily. Avoid very stretchy acrylic, which lets the mesh sag.
- Cream: 70 g (about 120 m), for the base, mesh, seeds, and hole edging
- Pink or red (berry color): 40 g (about 70 m), for the berry top
- Green: 20 g (about 35 m), for the rim, leaves, and ring cover
These quantities include a small safety margin.
Tools:
- 5 mm (H-8) crochet hook
- One 2 in (5.1 cm) plastic or metal ring (measured across the inside)
- Stitch marker
- Tapestry needle
- Scissors and measuring tape
Abbreviations (US Terms)
- ch: chain
- sl st: slip stitch
- sc: single crochet
- hdc: half double crochet
- dc: double crochet
- sc2tog: single crochet 2 together
- BLO: back loop only
- st(s): stitch(es)
- rnd(s): round(s)
- rev sc: reverse single crochet (crab stitch). Work from left to right: insert the hook in the next stitch to the right, yarn over, pull up a loop, yarn over, and pull through both loops.
Special stitch – trellis loop: a ch-5 loop anchored by a sc worked into the center of a loop from the previous round. Stacked rounds of these loops form diamond-shaped openings.
Gauge and Checkpoints
Gauge: 16 sc and 18 rnds = 4 in (10.2 cm), worked in the round.
Mesh gauge: 10 trellis loops around = 10 in (25.4 cm) circumference. 5 mesh rnds = 3 in (7.6 cm) tall, measured while hanging.
Use the base and the solid band as your gauge swatch.
Checkpoints:
- After Rnd 4, the oval base measures about 4.25 x 1.75 in (10.8 x 4.4 cm).
- After Rnd 13, the solid band is 2 in (5.1 cm) tall and 5 in (12.7 cm) wide when flat.
- After the mesh, the body is about 11 in (27.9 cm) tall.
- After the berry top, the body is 15 in (38.1 cm) tall.
If your base is too big, go down one hook size. If it is too small, go up one size. Mesh height varies more than sc gauge. If the mesh is short, add 1–2 mesh rounds; if it is long, leave 1–2 out. Every mesh round has 10 loops, so changing the number of rounds never affects the stitch math.
Pattern
Join each round with a sl st to the first sc unless the pattern says otherwise. The ch 1 at the start of a round does not count as a stitch.
Base (Cream)
Rnd 1: Ch 12. Work 3 sc in the 2nd ch from the hook, then sc in each of the next 9 ch, and 3 sc in the last ch. Rotate the work and sc along the opposite side of the chain in each of the next 9 ch. Join. (24 sts)
The round begins at End A: 3 end sts + 9 side sts + 3 end sts + 9 side sts.
Rnd 2: Ch 1. 2 sc in each of the next 3 sts, then sc in each of the next 9 sts; repeat from * once. Join. (30 sts)
Rnd 3: Ch 1. (sc in next st, 2 sc in next st) 3 times, sc in next 9 sts; repeat from * once. Join. (36 sts)
Rnd 4: Ch 1. Sc in next 2 sts, 2 sc in next st, sc in next 3 sts, 2 sc in next st, sc in next 2 sts, then sc in next 9 sts; repeat from * once. Join. (40 sts)
The stitches are now arranged as 11 end + 9 side + 11 end + 9 side = 40. Sts 32–40 form the front side.
Solid Band and Dispensing Hole (Cream)
Rnd 5: Ch 1. Sc in the BLO of each st around. Join. (40 sts) This round turns the walls upward.
Rnd 6: Ch 1. Sc in each st around. Join. (40 sts)
Row 7 (RS): Ch 1, sl st in the first st. Ch 1, then sc in each of the next 28 sts (sts 2–29). Leave sts 30–40 and st 1 unworked; these 12 sts are centered on the front. Turn. (28 sts)
Rows 8–11: Ch 1, sc in each of the 28 sts, turn. After Row 11, which is a RS row, do not turn. (28 sts per row)
Rnd 12: Ch 12, then join with a sl st to the first sc of Row 11 to bridge the gap. Ch 1, sc in the same st and in each of the next 27 sts, then sc in each of the 12 ch. Join. (40 sts: 28 sc + 12 sc worked into the ch)
Rnd 13: Ch 1. Sc in each st around. Join. (40 sts)
The hole is 12 sts (3 in / 7.6 cm) wide and 5 rows tall.
Lattice Mesh (Cream)
Mesh Rnd 1 (setup): Ch 1, sc in the first st. Ch 5, skip 3 sts, sc in the next st; repeat from * 8 more times. Ch 2, skip the last 3 sts, and dc in the first sc. (10 sc, 10 loops)
The ch 2 plus the dc counts as the 10th loop and leaves your hook at the center of that loop.
Mesh Rnds 2–14: Ch 1, sc around the post of the joining dc. Ch 5, sc in the next ch-5 loop; repeat from * 8 more times. Ch 2, dc in the first sc. (10 loops)
Mesh Rnd 15: Ch 1, sc around the post of the joining dc. Ch 5, sc in the next loop; repeat from * 8 more times. Ch 5, sl st in the first sc. (10 sc, 10 ch-5 loops) Fasten off the cream.
When gently stretched lengthwise, the body measures about 11 in (27.9 cm).
Berry Top (Pink or Red)
Rnd 1 (conversion): Join the berry color in any sc of Mesh Rnd 15. Ch 1, sc in the same sc, and work 3 sc in the next ch-5 loop. Sc in the next sc, 3 sc in the next loop; repeat from * 8 more times. Join. (40 sts: 10 sc worked 1 per existing sc + 30 sc worked into the 10 loops)
The cream loops arch up into the berry color and form the pointed lattice edge.
Rnds 2–16: Ch 1. Sc in each st around. Join. (40 sts)
Rnd 17: Ch 1. Sc in next 2 sts, sc2tog; repeat from * 9 more times. Join. (30 sts)
Rnd 18: Ch 1. Sc in each st around. Join. (30 sts) Fasten off.
The berry section is 18 rnds, or 4 in (10.2 cm), tall. The top opening measures 3.75 in (9.5 cm) across when flat.
Seeds (Cream)
Thread the tapestry needle with cream. Each seed is a straight stitch the height of 1 round, worked twice through the same holes for a plump oval.
- Rnds 3 and 11: sts 1, 9, 17, 25, 33
- Rnds 7 and 15: sts 5, 13, 21, 29, 37
That gives 20 seeds in a staggered layout. Knot the ends on the inside.
Leaves (Make 10, Green)
Ch 8.
Side 1: Sl st in the 2nd ch from the hook. Then sc in the next ch, hdc in the next ch, dc in each of the next 2 ch, hdc in the next ch, and sc in the last ch. (7 sts)
Base: Ch 2. Rotate to work along the opposite side of the chain.
Side 2: Sc in the first ch, hdc in the next ch, dc in each of the next 2 ch, hdc in the next ch, sc in the next ch, and sl st in the last ch. (7 sts)
Tip: Ch 2, then sl st in the tip sl st. Fasten off, leaving a 10 in (25.4 cm) tail.
Each leaf has 14 sts plus 2 ch-2 points and measures about 1.75 x 0.75 in (4.4 x 1.9 cm).
Ring Cover (Green)
Attach the green to the ring with a sl st. Work 36 sc over the ring, packing them tightly so the ring doesn’t show through. Join to the first sc. Fasten off, leaving a 12 in (30.5 cm) tail. The covered ring measures 2.5 in (6.4 cm) across.
Border
Border gauge: 2 rnds = about 0.5 in (1.3 cm).
Top Rim (Green)
Border Rnd 1: Join the green in any st of Berry Rnd 18. Ch 1, sc in each st around. Join. (30 sts)
Border Rnd 2: Ch 1. Rev sc in each st around. Join and fasten off. (30 sts)
Why the math works: The rim has 30 sts and there are 10 leaves, so each leaf gets exactly 3 sts. Rev sc is worked 1 per stitch, so the rim neither flares nor gathers.
Hole Edging (Cream)
Join the cream at a bottom corner of the hole. Ch 1, then sc evenly around the hole:
- Bottom edge: 12 sc, 1 in each unworked st of Rnd 6
- Side 1: 5 sc, 1 in each row end of Rows 7–11
- Top edge: 12 sc, 1 in the base of each ch from Rnd 12
- Side 2: 5 sc, 1 in each row end
Join. (34 sts: 12 + 5 + 12 + 5) Fasten off.
Why the math works: Each edge gets 1 sc per existing stitch or row end, so the opening lies flat. The edging softens the corners, so the finished hole looks like an oval about 3 x 1 in (7.6 x 2.5 cm).
Assembly
- Pin the leaves around Border Rnd 1, 1 leaf every 3 sts, with the tips pointing down over the berry top. Let neighboring leaves overlap slightly.
- Sew each leaf base to the rim with its tail.
- Center the ring at the back of the holder, opposite the hole. Sew its lower edge to the inside of the rim across 4 sts so it stands upright.
- Weave in all the ends.
Final Blocking
- Lightly mist the holder until it is damp.
- Fill it with plastic bags or a rolled towel to shape a smooth tube.
- Hang it by the ring and let the mesh settle to about 9 in (22.9 cm).
- Flatten each leaf with your fingers so the tips curve outward.
- Let it dry completely, about 24 hours.
- Check the size: 5 in (12.7 cm) wide when flat and 15.5 in (39.4 cm) tall, not counting the ring.
Final Quality-Control Checklist
- The base lies flat and has 40 sts.
- The hole is centered on the front, opposite the ring.
- Every mesh round has exactly 10 loops.
- The conversion round has 40 sts, and the lattice points are even.
- Rnd 17 has 30 sts.
- There are 20 staggered seeds.
- There are 10 leaves, 1 every 3 rim sts.
- The ring is secure and stands upright.
- All the ends are woven in on the inside.
Troubleshooting
The base cups into a bowl: Go up a hook size for Rnds 1–4.
The base ruffles: Recount the stitches. Each end should have 3, 6, 9, then 11 sts.
The mesh spirals: Work each sc into the center of the loop.
The mesh is too floppy: Use ch-4 loops instead, and keep 10 loops per round.
The lattice points are uneven: Work exactly 3 sc into each loop on the conversion round.
The ring tilts forward: Sew it across all 4 sts and tack it higher up the back of the rim.
Care
Hand wash in cool water with mild soap. Reshape the holder and let it dry hanging, and spot clean between washes.
Final Notes
Here is the measurement chain. 40 sts around makes a 10 in (25.4 cm) tube that is 5 in (12.7 cm) wide when flat. The solid band adds 2 in (5.1 cm), the mesh adds 9 in (22.9 cm), and the berry top adds 4 in (10.2 cm), for a total of 15 in (38.1 cm). The rim brings the body to 15.5 in (39.4 cm), and the ring brings the hanging length to about 18 in (45.7 cm).
Check your counts at Rnd 4, Rnd 12, each mesh round, the conversion round, and Rnd 17. If all of those are right, your strawberry will be too.
Happy crocheting!