

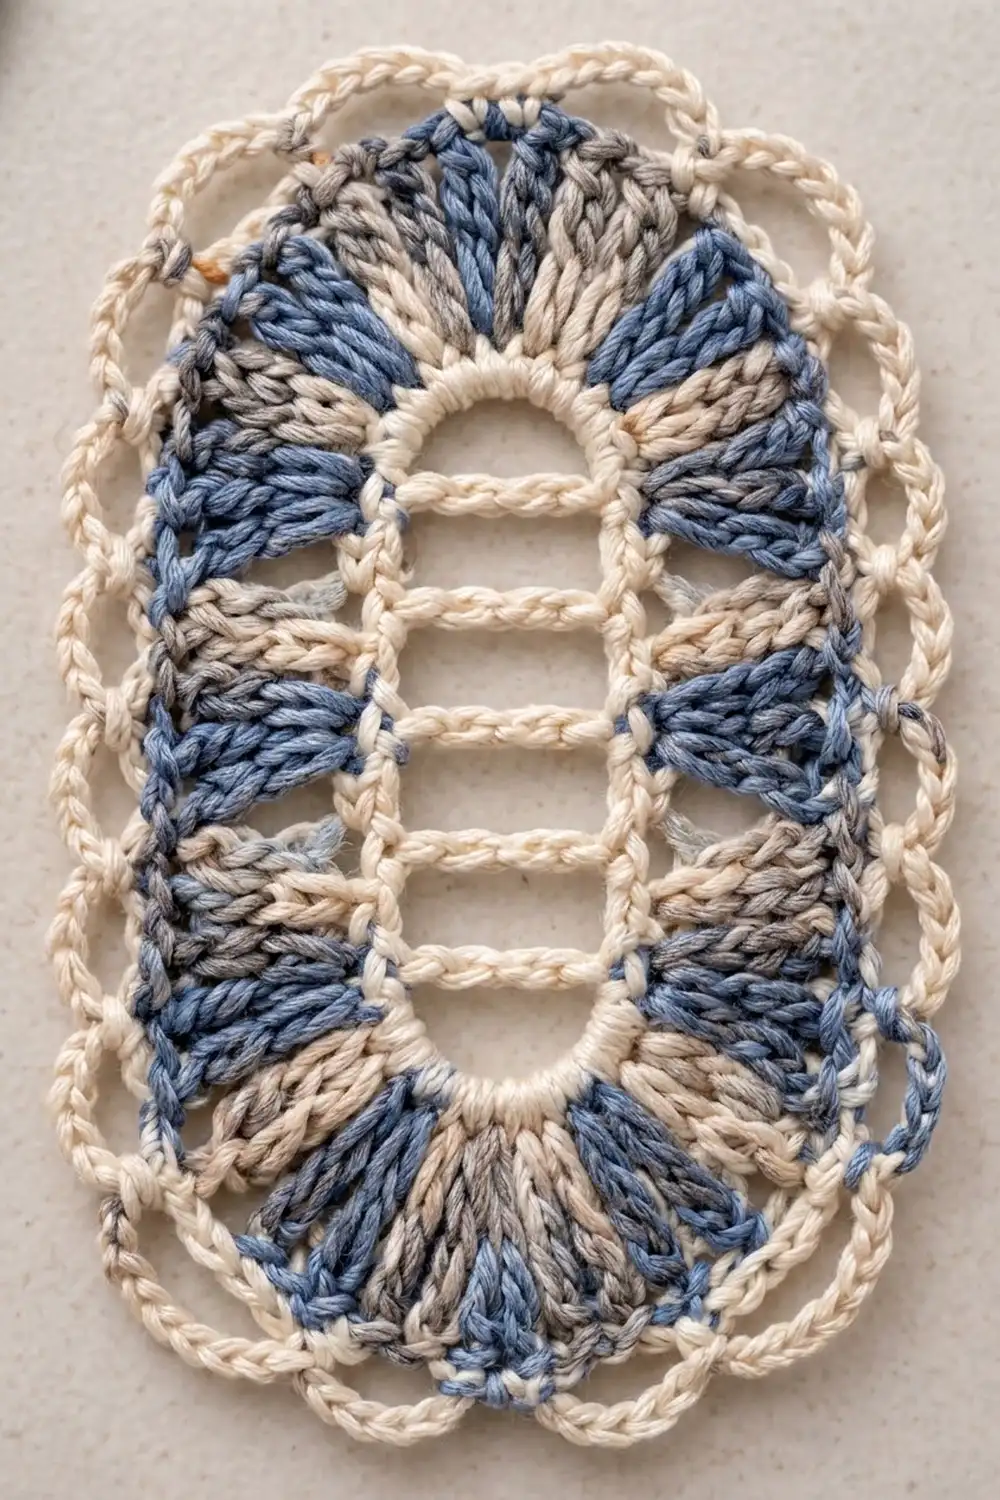
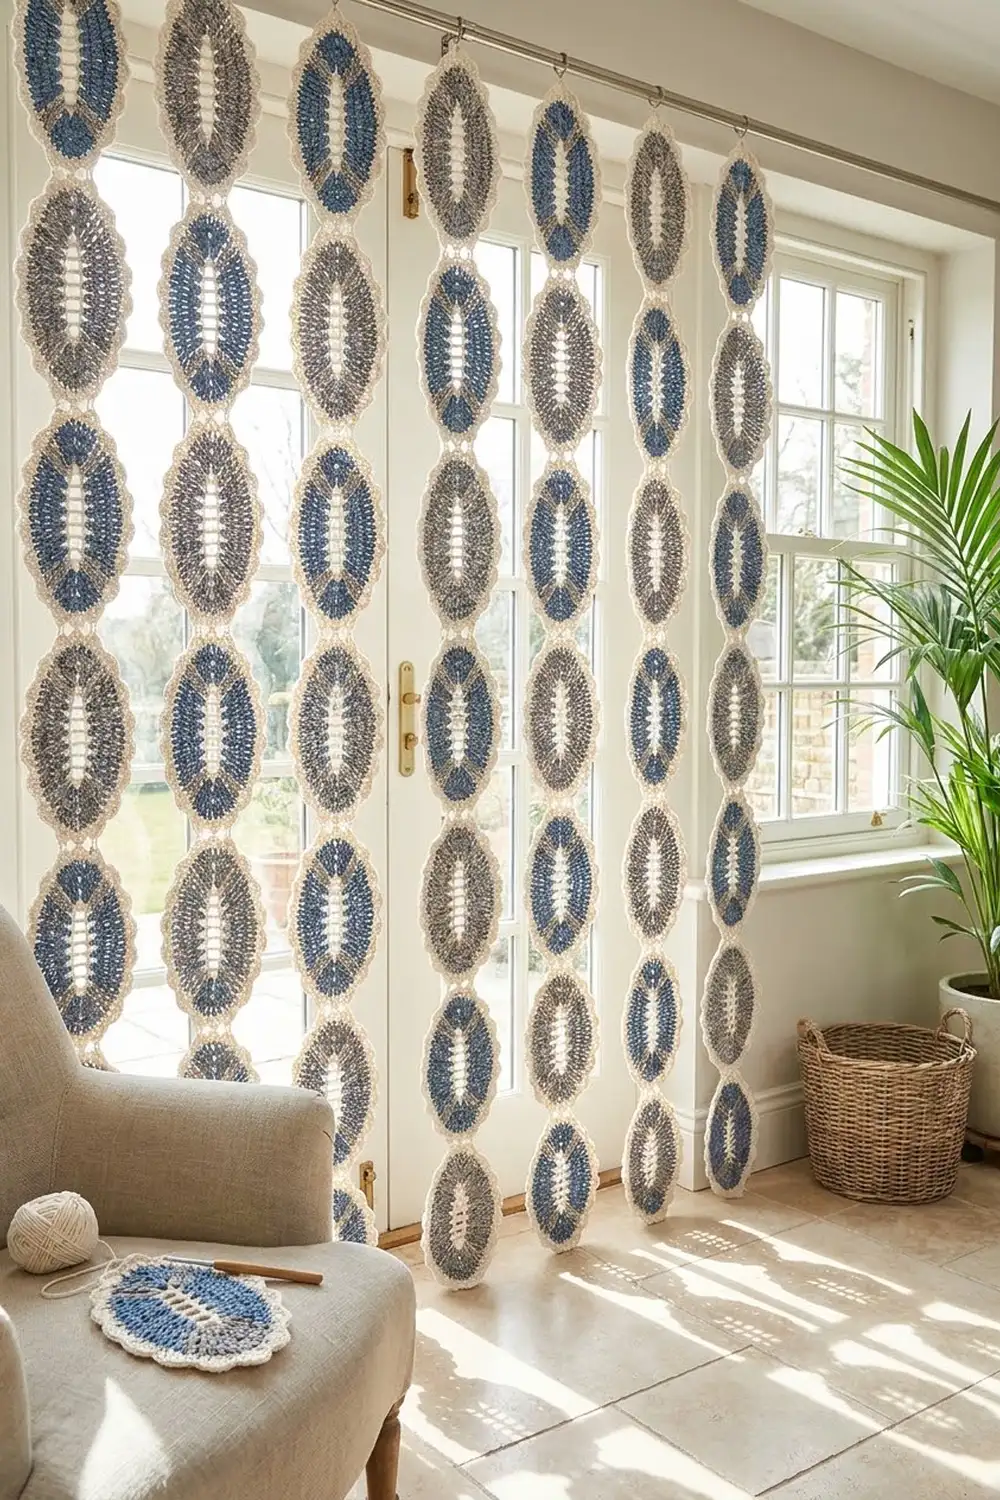
This curtain is built from tall oval motifs linked tip to tip into long vertical strips. Each oval has an open center crossed by five cream bars, like a little ladder. Around the center is a ring of wedges in denim blue and heathered taupe-gray. A cream chain-loop edge finishes every motif and gives each strip a soft, lacy outline against the light.
The colors are cream, denim blue and taupe-gray, for a calm, coastal look. The curtain is airy and open, so light and breeze pass straight through, but the strips still read as a curtain.
The pattern uses US crochet terms. One motif measures 5.0 in x 8.3 in (12.7 cm x 21.1 cm). A strip of 9 motifs measures 5.0 in x 74.7 in (12.7 cm x 189.7 cm), plus a 2.0 in (5.1 cm) hanging tab. One panel is 3 separate strips and is about 17 in (43.2 cm) wide on the rod.
The construction is easy to follow. Work a small ladder in rows, then crochet five rounds around it to make the oval. Each new motif joins to the one before it during its last round. Finish each strip with a folded hanging tab.
Finished Size and Construction
- Finished motif: 5.0 in x 8.3 in (12.7 cm x 21.1 cm)
- Skill level: Intermediate
- Terminology: US crochet terms
- Yarn weight: DK (#3) cotton
- Hook: 4.0 mm (G-6)
- Number of pieces: 27 motifs per panel (3 strips x 9 motifs)
- Layout: 3 vertical strips, not joined to each other, hung about 1 in (2.5 cm) apart
- Strip size before border: 5.0 in x 74.7 in (12.7 cm x 189.7 cm)
- Border depth: 2.0 in (5.1 cm) folded hanging tab at the top of each strip
- Total drop from rod: about 76.7 in (194.8 cm)
Materials
Choose a smooth, mercerized or combed DK cotton with clear stitch definition. Cotton holds the oval shape after blocking and won’t stretch longer while hanging. Avoid fuzzy or very stretchy yarns, because they blur the ladder bars and lengthen over time.
For one panel (3 strips of 9 motifs), assuming about 115 m per 50 g:
- Color A, cream: 200 g (460 m)
- Color B, denim blue: 100 g (230 m)
- Color C, heathered taupe-gray: 100 g (230 m)
These amounts include a margin of roughly 15–20 percent for your test motif, yarn tails and tension differences. One motif uses about 6 g (14 m) of A, 3 g (7 m) of B and 3 g (7 m) of C.
Tools:
- 4.0 mm (G-6) crochet hook
- Tapestry needle
- Stitch markers (at least 3)
- Scissors
- Measuring tape
- Blocking mats and rustproof pins
- Spray bottle
Abbreviations (US Terms)
- ch – chain
- sl st – slip stitch
- sc – single crochet
- tr – treble crochet
- sk – skip
- sp – space
- st(s) – stitch(es)
- rep – repeat
Special technique, color change: Work the last stitch in the old color until 2 loops remain on the hook. Drop the old color and pull the new color through to finish the stitch. Carry the unused color along the top of the round below and work over it so no strands show.
Gauge and Checkpoints
Gauge: 18 sc and 20 rows = 4 in (10.2 cm) with the 4.0 mm hook. One tr is about 0.7 in (1.8 cm) tall.
Make one complete motif before starting the rest. It is your real gauge swatch, and every later measurement depends on it. Measure it flat, without stretching:
- Ladder (Rows 1–9): 1.3 in x 3.8 in (3.3 cm x 9.7 cm)
- After Round 2: 2.1 in x 5.4 in (5.3 cm x 13.7 cm)
- After Round 3: 3.5 in x 6.8 in (8.9 cm x 17.3 cm)
- After Round 4: 3.9 in x 7.2 in (9.9 cm x 18.3 cm)
- After Round 5: 5.0 in x 8.3 in (12.7 cm x 21.1 cm)
If your motif is too big, switch to a 3.75 mm hook. If it is too small, switch to a 4.5 mm hook. If the width is right but the length is off, the problem is your tr height. Change how far you pull up each loop instead of changing hooks. If Round 3 cups, your tr are too short. If the ends of the oval ruffle, they are too loose.
Motif
Make 27. Work every motif with the right side facing, and don’t turn after the ladder.
Ladder (Color A)
Ch 7.
Row 1 (bar): Sc in 2nd ch from hook and in each ch across, turn. (6 sc)
Row 2 (opening): Ch 4 (counts as tr), ch 4, sk next 4 sc, tr in last sc, turn. (2 tr, 1 ch-4 sp)
Row 3 (bar): Ch 1, sc in first tr, 4 sc in ch-4 sp, sc in top of turning ch, turn. (6 sc)
Rows 4–9: Rep Rows 2–3 three more times. Don’t turn at the end of Row 9, and don’t fasten off.
You now have 5 cream bars (Rows 1, 3, 5, 7 and 9) with 4 open rectangles between them, each framed by tr posts.
Round 1 (Color A)
Ch 1. Working down the side edge: sc in end of Row 9, [3 sc around post of next tr, sc in end of next sc row] 4 times. (17 sc on this side)
Ch 9 for the bottom arch. Don’t work into the foundation chain. The arch passes below Row 1 and leaves an open curve.
Working up the opposite side: sc in end of Row 1, [3 sc around post of next tr, sc in end of next sc row] 4 times. (17 sc)
Ch 9 for the top arch, passing above Row 9. Sl st to first sc.
Count: 34 sc and 2 ch-9 arches. Each side’s count already includes the sc at both bar ends.
Round 2 (Color A)
Ch 1, sc in each of next 17 sc, 11 sc in ch-9 arch, sc in each of next 17 sc, 11 sc in ch-9 arch, sl st to first sc. Fasten off.
Count: 17 + 11 + 17 + 11 = 56 sc.
The center opening is now a smooth cream oval with arched ends and five bars across it.
Round 3 (Colors B and C)
This round makes the wedges. Change color every 5 stitches all the way around: 5 tr in B, then 5 tr in C, and so on. Carry the color you’re not using.
Join B with a sl st in the first sc of Round 2 (the first stitch of a long side). Ch 4 (counts as first tr).
Side 1: Tr in each of next 16 sc. (17 tr)
End 1: 2 tr in each of next 5 sc, 3 tr in next sc, 2 tr in each of next 5 sc. (23 tr)
Side 2: Tr in each of next 17 sc. (17 tr)
End 2: 2 tr in each of next 5 sc, 3 tr in next sc, 2 tr in each of next 5 sc. (23 tr)
Sl st to top of ch-4. Fasten off both colors.
Count: 17 + 23 + 17 + 23 = 80 tr. That makes 16 color blocks of 5 stitches (8 in B, 8 in C). Since 80 divides evenly by 10, the last C block sits next to the first B block, so the colors alternate all the way around. On the ends, the doubled stitches spread each block into a fan-shaped wedge. On the sides, the blocks stay as straight bands.
Round 4 (Color A)
Join A with a sl st in top of the ch-4. Ch 1.
Side 1: Sc in same st and in each of next 16 tr. (17 sc)
End 1: Sc in next 3 tr, 2 sc in next tr, sc in next 4 tr, 2 sc in next tr, sc in next 5 tr, 2 sc in next tr, sc in next 4 tr, 2 sc in next tr, sc in next 3 tr. (23 stitches worked + 4 extra = 27 sc)
Side 2: Sc in each of next 17 tr. (17 sc)
End 2: Work as End 1. (27 sc)
Sl st to first sc. Don’t fasten off.
Count: 17 + 27 + 17 + 27 = 88 sc. The 4 increases on each end are spaced evenly around the curve, at stitches 4, 9, 15 and 20 of the 23. This keeps the curve smooth.
Round 5: Loop Edge (Color A)
First motif of each strip only: Ch 1, sc in first sc, *ch 5, sk next 3 sc, sc in next sc; rep from * 20 more times, ch 5, sk last 3 sc, sl st to first sc. Fasten off.
Count: 22 ch-5 loops (88 sc ÷ 4 = 22).
Loop 8 (from sc 29 to sc 33) sits at the center of End 1. Loop 19 (from sc 73 to sc 77) sits at the center of End 2. Mark both. Loop 8 is the top tip loop and Loop 19 is the bottom tip loop.
Make All Pieces
Make 27 motifs in total and work Rounds 1–4 on all of them. Work Round 5 as written for the first motif of each strip. For the other 8 motifs in each strip, use the joining version of Round 5 below.
Per motif: A 6 g, B 3 g, C 3 g.
Per panel (27 motifs): A 162 g, B 81 g, C 81 g, plus about 5 g of A for the 3 tabs.
Layout (T = tab, M = motif; each column is one strip and is not joined to its neighbors):
 Strip 1   Strip 2   Strip 3
   T         T         T
   M1        M1        M1
   M2        M2        M2
   M3        M3        M3
   M4        M4        M4
   M5        M5        M5
   M6        M6        M6
   M7        M7        M7
   M8        M8        M8
   M9        M9        M9
Joining
You join the motifs as you go, tip to tip, during Round 5.
Joining Round 5 (motifs 2–9 of each strip): Ch 1, sc in first sc, [ch 5, sk next 3 sc, sc in next sc] 7 times. For Loop 8: ch 2, sl st through Loop 19 of the previous motif from front to back, ch 2, sk next 3 sc, sc in next sc. Continue [ch 5, sk next 3 sc, sc in next sc] 13 times, ch 5, sk last 3 sc, sl st to first sc. Fasten off.
Stitch logic: The joined loop still counts as one loop, because ch 2 + sl st + ch 2 replaces the ch 5. That means every motif keeps its 22 loops (7 + 1 + 14). Only one loop connects each pair of motifs. This lets the strip hang straight, and the ovals can pivot slightly without puckering.
Tension advice: Work the ch 2 on each side of the joining sl st at the same tension as your other chains. If you pull too tight, the strip gets shorter and the tips pucker. If you work too loosely, the motifs sag apart.
Before you join, keep the right sides of both motifs facing you and line up their long edges so the strip doesn’t twist.
Size checkpoint: Each motif adds 8.3 in (21.1 cm). After 3 motifs, the strip measures 24.9 in (63.2 cm). A finished strip of 9 measures 74.7 in (189.7 cm).
Border: Hanging Tab
The loop round already finishes the edge of every motif, so the strips don’t get a border all the way around. Instead, each strip gets one cream tab at the top.
Border gauge: Same as the main gauge, 18 sc and 20 rows = 4 in (10.2 cm).
Row 1: With the right side facing, join A in the top tip loop (Loop 8) of Motif 1. Ch 1, 5 sc in the loop, turn. (5 sc)
Rows 2–20: Ch 1, sc in each sc across, turn. (5 sc per row)
Fasten off, leaving a 10 in (25.4 cm) tail. Fold the tab to the back and whipstitch Row 20 to the base of Row 1.
Why the math works: A ch-5 loop is about 1.1 in (2.8 cm) long. At 18 sc per 4 in, 5 sc also measure 1.1 in (2.8 cm), so the tab sits flat on the loop without gathering. At 20 rows per 4 in, 20 rows measure 4.0 in (10.2 cm). Folded in half, that makes a 2.0 in (5.1 cm) loop that fits a rod up to 1 in (2.5 cm) thick.
Leave the bottom tip loop (Loop 19) of Motif 9 free.
Final Blocking
- Weave in all ends along stitches of the same color before blocking.
- Soak each strip in cool water for 10 minutes, then roll it in a towel to press out the water. Don’t wring it.
- Lay one strip flat on the mats, right side up.
- Pin the ladders first. Pin each opening into a neat rectangle and each bar straight.
- Pin each motif to 5.0 in (12.7 cm) at its widest point.
- Pin each motif to 8.3 in (21.1 cm) long, measured from tip loop to tip loop, keeping the strip in a straight line.
- Pin out every ch-5 loop into a rounded scallop.
- Let the strip dry completely, at least 24 hours, before unpinning.
- Repeat for the other strips, matching them to the first one.
Final Quality-Control Checklist
- Every motif has 5 bars, 4 openings and 2 arched ends.
- Round 3 shows 16 alternating wedges, with no carried yarn showing through.
- Every motif has 22 loops, and the joined loops are the same height as the others.
- Each strip has 9 motifs and measures 74.7 in (189.7 cm).
- All three strips are within 0.5 in (1.3 cm) of each other in length.
- Each tab is 5 sc wide, folded and sewn securely.
- No strip twists when you hold it by its tab.
Troubleshooting
The ladder bars sag. Your tr are too loose. Work the ladder more tightly, or go down half a hook size for Rows 1–9 only.
The oval ends ruffle after Round 3. Your tr are too tall. Pull up less on each loop, and check that you worked exactly 23 tr on each end.
The motif cups. Round 3 or Round 4 is too tight. Loosen your tension, or go up half a hook size for those rounds.
Carried yarn shows. Lay the carried strand along the top of Round 2 and keep it slightly slack.
The tip loops don’t line up. Recount Round 4. Each side needs 17 sc and each end needs 27 sc, or Loops 8 and 19 drift off center.
The strips hang at different lengths. Re-block the longest strip, or redo one tab with fewer rows.
Care
Hand wash in cool water with mild soap, press out the water and dry flat, pinning back to size if needed. Don’t hang the strips while they’re wet, because wet cotton stretches under its own weight.
Final Notes
Here is how the measurements build on each other. The ladder sets the center at 1.3 in x 3.8 in (3.3 cm x 9.7 cm). Five rounds bring each motif to 5.0 in x 8.3 in (12.7 cm x 21.1 cm). Nine motifs make a 74.7 in (189.7 cm) strip. The 2.0 in (5.1 cm) tab brings the total drop to 76.7 in (194.8 cm). If your first motif matches these numbers, the rest of the curtain will too.
Happy crocheting!