

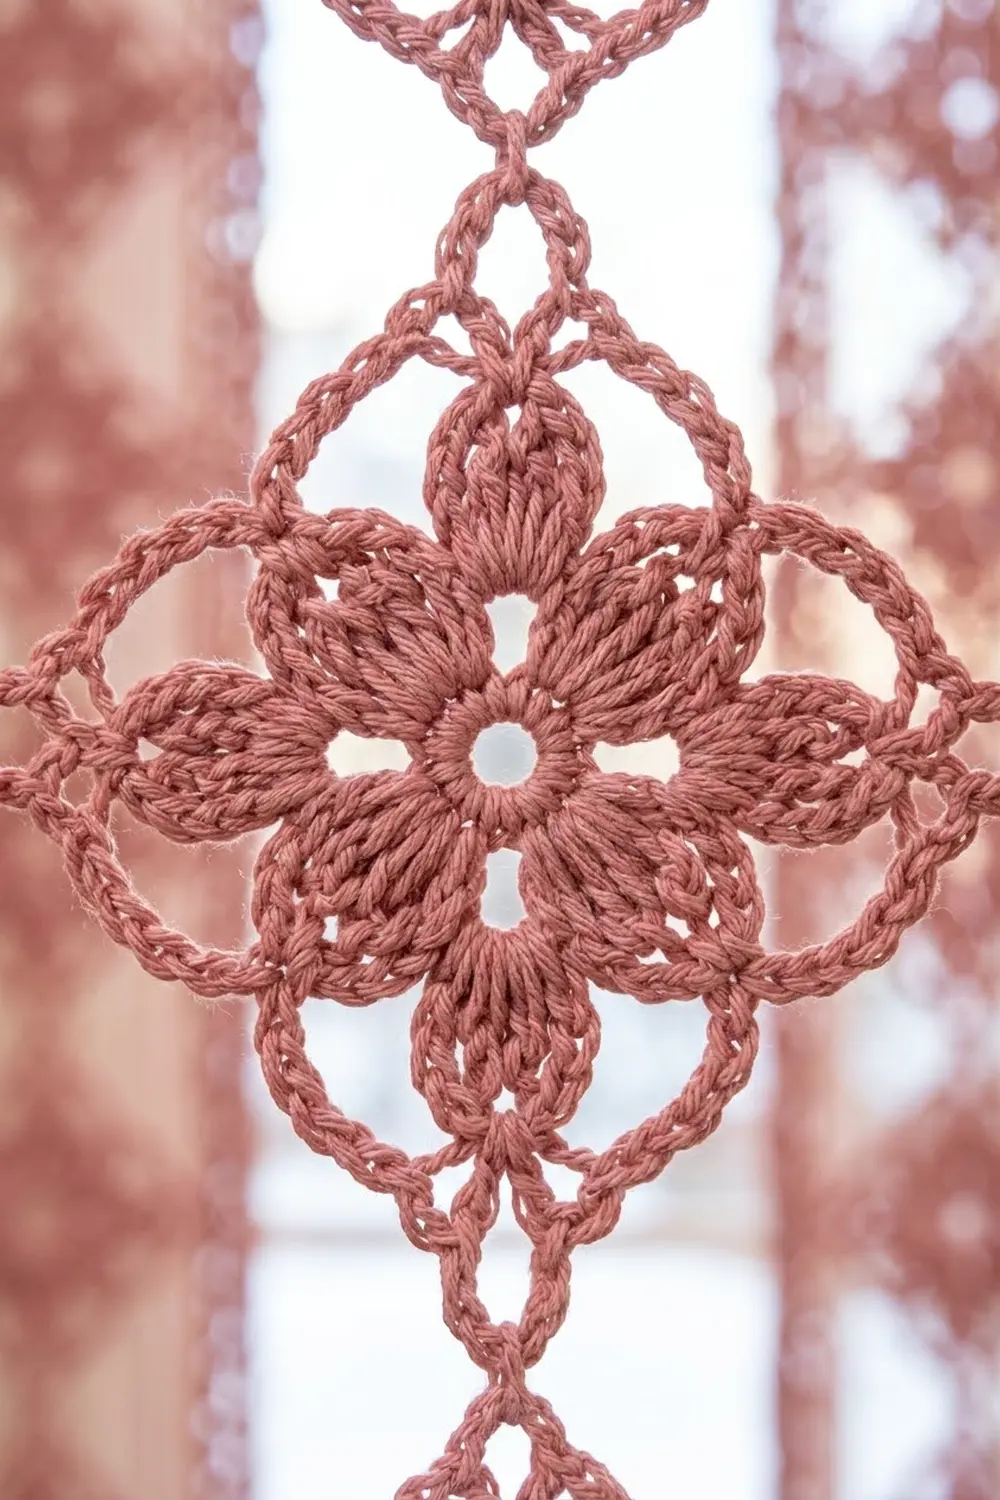
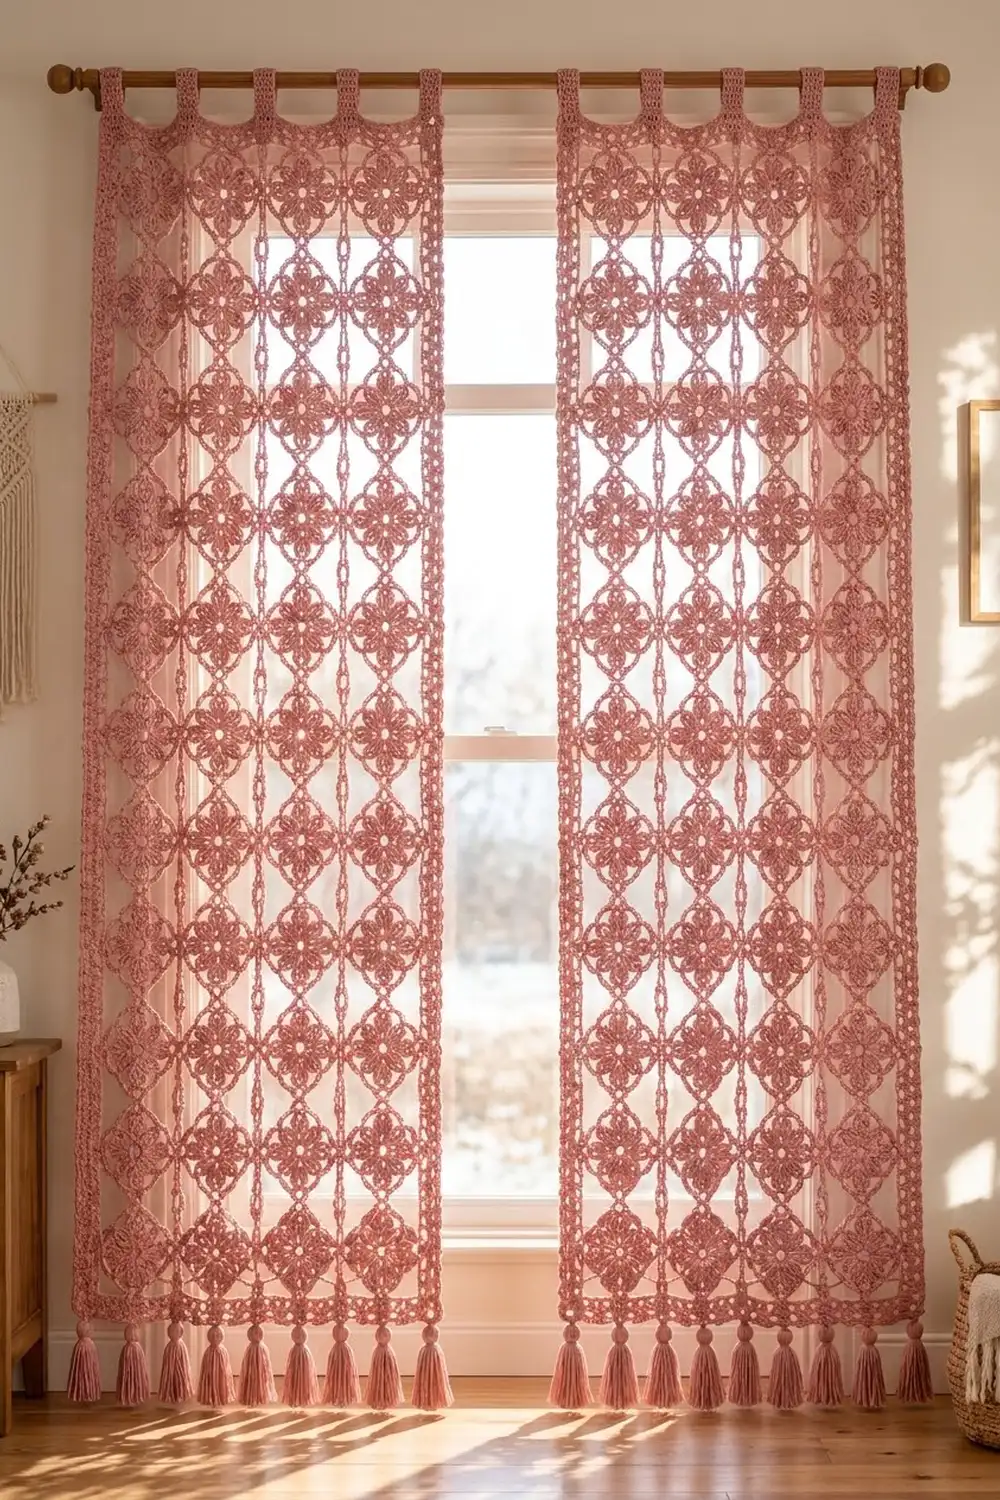
The Rose Lattice Curtain is an airy, lace-like window panel built from small diamond flower motifs. Each motif has eight ribbed petals around an open centre and a light rope-textured frame. The motifs are joined only at their points, so light comes through the open diamonds between them and the curtain looks like a lattice of roses.
The whole curtain is worked in one soft dusty rose color. It looks romantic and slightly vintage, and it suits a cozy holiday window as well as a cottage-style bedroom all year. This pattern uses US crochet terms throughout.
One panel measures 26 1/2 in wide x 71 1/2 in long (67.3 cm x 181.6 cm) after the border, not counting the tabs and tassels. The photo shows a pair, so make two identical panels.
Construction is simple. You make 70 motifs per panel and join each one to its neighbors on the last round. Then a three-round border straightens the zigzag edges. Tabs are worked off the top edge, and tassels are added along the bottom.
Finished Size and Construction
- Finished panel size: 26 1/2 in x 71 1/2 in (67.3 cm x 181.6 cm), plus tabs and tassels
- Skill level: Intermediate
- Terminology: US crochet terms
- Yarn weight: DK (light worsted, weight 3)
- Hook: 4.0 mm (G-6)
- Number of pieces: 70 motifs per panel (140 for a pair)
- Layout: 5 motifs wide x 14 motifs tall, joined tip to tip
- Motif size: 5 in (12.7 cm) tip to tip; each side about 3 1/2 in (8.9 cm)
- Size before border: 25 in x 70 in (63.5 cm x 177.8 cm)
- Border depth: 3/4 in (1.9 cm) on every side
Materials
Yarn: Use a smooth DK cotton or cotton blend with good stitch definition, about 225 m per 100 g. Cotton keeps the petals crisp and hangs well in a window. Avoid fuzzy yarns, because they blur the open lattice.
- Dusty rose: 500 g / 1125 m per panel (1000 g / 2250 m for a pair)
Tools:
– 4.0 mm (G-6) crochet hook
– Tapestry needle
– Scissors
– Stiff card 4 1/2 in (11.4 cm) tall, for the tassels
– Rust-proof pins and a blocking mat or large towel
– Spray bottle
– Tape measure
The quantities include roughly a 20% margin for gauge differences, tassels and swatching.
Abbreviations (US Terms)
- ch – chain
- sl st – slip stitch
- sc – single crochet
- dc – double crochet
- tr – treble crochet
- st(s) – stitch(es)
- sp – space
- rep – repeat
- RS – right side
Special stitches
- 5-tr cluster (petal): *Yarn over twice, insert hook in the stitch, pull up a loop, [yarn over, pull through 2 loops] twice; rep from * 4 more times in the same stitch (6 loops on hook). Yarn over and pull through all 6 loops.
- Beginning petal: Ch 4 (counts as the first tr), then make a 4-tr cluster in the same stitch, the same way as above but with 4 repeats (5 loops on hook).
- Notch spoke: Ch 12, sl st through both joined tip loops at the bottom of the notch, then sl st in each of the 12 ch back up. The last sl st sits on the border line and counts as 1 st.
- Corner spoke: Ch 8, sl st in the 11th (center) sc of the corner motif’s outer side, then sl st in each of the 8 ch back up. The last sl st counts as 1 st and is the corner stitch.
Gauge and Checkpoints
Make one complete motif first and wet block it. This single test piece sets the size of the whole curtain.
- After Rnd 1: ring is about 1 in (2.5 cm) across.
- After Rnd 2: flower is about 2 1/2 in (6.4 cm) across.
- After Rnd 3: about 4 in (10.2 cm) across.
- After Rnd 4 (blocked): 5 in (12.7 cm) tip to tip, each side about 3 1/2 in (8.9 cm).
Border gauge: 12 ch = 2 1/2 in (6.4 cm), and 26 sc = 5 in (12.7 cm).
If your motif is too big, go down a half size (3.75 mm). If it is too small, go up to 4.5 mm. A difference of 1/4 in (0.6 cm) per motif adds up to 3 1/2 in (8.9 cm) over the 14-motif length, so it is worth fixing before you go on.
Motif (Make 70 per Panel)
Rnd 1: Make a magic ring. Ch 3 (counts as dc), 15 dc in the ring, sl st in the top of the beginning ch-3. Pull the ring snug, but leave a small open center. (16 dc)
Rnd 2: Make a beginning petal in the same st, ch 4, skip next dc. Make a 5-tr cluster in the next dc, ch 4, skip next dc; rep from * 6 more times. Sl st in the top of the beginning petal. (8 petals, 8 ch-4 sps)*
The tall clusters make the long, ribbed petals.
Rnd 3: Ch 1, sc in the top of the same petal. Ch 7, sc in the top of the next petal; rep from * 6 more times. Ch 7, sl st in the first sc. (8 sc, 8 ch-7 loops)*
These loops arch away from the petals and form the open frame.
Rnd 4 (frame and points): Ch 1. In the first sc work (sc, ch 8, sc) for the corner, then 9 sc in the next ch-7 loop, sc in the next sc for the side middle, and 9 sc in the next ch-7 loop. *In the next sc work (sc, ch 8, sc), 9 sc in the next loop, sc in the next sc, 9 sc in the next loop; rep from * 2 more times. Sl st in the first sc and fasten off.
Count: 12 sc worked into the 8 sc of Rnd 3 (the 4 corner sc each take 2, the 4 side sc each take 1), plus 72 sc in the loops, makes 84 sc and 4 ch-8 tip loops.
Per side: corner sc + 9 + 1 + 9 + corner sc = 21 sc, which includes that side’s 2 corner sc. The center (11th) sc of each side is the side-middle sc.
The ch-8 loops make the small round loops at the four points. Weave in the ends as you go.
Make All Pieces
Each panel needs 70 motifs in dusty rose (140 for a pair). Make the first motif completely. Every motif after that is joined on Rnd 4.
Layout per panel, 5 columns x 14 rows (each ◆ is one motif, joined to its neighbors at the tips):
◆ ◆ ◆ ◆ ◆   Row 1 (top)
◆ ◆ ◆ ◆ ◆   Row 2
◆ ◆ ◆ ◆ ◆   Rows 3–13 repeat the same pattern
◆ ◆ ◆ ◆ ◆   Row 14 (bottom)
Joining
Use join-as-you-go at the tips. Work Rnd 4 as written until you reach a corner that touches a finished motif. There, work (sc, ch 4, sl st into the neighbor’s ch-8 tip loop, ch 4, sc).
This keeps the tip loop at 8 ch, so joined and free tips are the same size. Do not join the sides. Each motif touches up to 4 neighbors, one at each tip.
- The left tip joins the right tip of the motif on the left.
- The top tip joins the bottom tip of the motif above.
Work row by row from the top left. Because the motifs meet only at their points, each group of 4 motifs leaves an open diamond the size of one motif.
Tension: Keep the ch-4 parts of the joining loop relaxed. If they are tight, the columns pull together and the lattice ripples.
Size checkpoint: After the first full row, the strip should measure 25 in (63.5 cm) from the outer left tip to the outer right tip (5 x 5 in). After 14 rows, the panel should measure 70 in (177.8 cm) long.
Border
The outer edge zigzags. Between every two outer tips there is a V-shaped notch 2 1/2 in (6.4 cm) deep, and each corner has a triangular gap. Rnd 1 bridges these gaps with chains, holding them in place with slip-stitch spokes. Rnds 2 and 3 firm up that edge into a straight band.
Border gauge: 12 ch = 2 1/2 in (6.4 cm), and 26 sc = 5 in (12.7 cm).
Rnd 1 (straightening round): With RS facing, join with sc in the free top tip loop of the top-left motif.
Along each side, work the following:
– *Ch 12, notch spoke, ch 12, sc in the next outer tip loop; rep from * to the last tip of the side.
– Ch 12, corner spoke, ch 12, sc in the first tip loop of the next side.
Continue around. After the final corner spoke, ch 12 and sl st in the first sc.
Count between corner stitches:
– Top and bottom: 5 tip sc + 4 notch spokes + 10 x 12 ch = 129 sts
– Long sides: 14 tip sc + 13 notch spokes + 28 x 12 ch = 363 sts
– Total: 2 x 129 + 2 x 363 + 4 corner sts = 988 sts
Why the math works: Every gap along the edge (tip to notch, or tip to corner) is 2 1/2 in (6.4 cm), and 12 ch at border gauge is exactly that length. So each motif adds 26 sts per 5 in (12.7 cm) of edge, which matches the sc gauge of the next rounds. A notch spoke of 12 ch reaches the 2 1/2 in depth. A corner spoke of 8 ch reaches the center of the corner motif’s outer side, about 1 3/4 in (4.4 cm) in.
Rnd 2: Ch 1. Sc in each st and in each ch, and work 3 sc in each corner st. Sl st in the first sc.
Count: 988 sts worked 1 each, plus 8 extra corner sc, makes 996 sts. That is 131 between corner centers on the top and bottom, and 365 on the long sides.
Rnd 3: Ch 1. Sc in each st, and work 3 sc in each corner-center sc. Sl st in the first sc.
Count: 996 + 8 = 1004 sts. That is 133 between corner centers on the top and bottom, and 367 on the long sides. Do not fasten off yet.
Tabs (6): Sl st to the top-left corner-center sc. You now work across the 133 top sts.
- Skip the first 2 sts.
- Join a tab on the next 9 sts.
- Skip the next 15 sts and work a tab on the next 9 sts. Do this 5 more times.
- 2 sts remain at the end.
Check: 2 + 9 + 5 x (15 + 9) + 2 = 133.
To make each tab:
– Row 1: Sc in 9 sts, turn. (9 sc)
– Rows 2–18: Ch 1, sc in each st, turn. (9 sc)
The tab is now about 4 in (10.2 cm) long and 1 3/4 in (4.4 cm) wide. Fold it to the back and sew the last row to the back of border Rnd 2. This makes a 2 in (5.1 cm) loop.
Tassels (11): Wrap the yarn 25 times around the 4 1/2 in (11.4 cm) card. Tie the loops at the top, cut the bottom, wrap the neck 1/2 in (1.3 cm) below the top, and trim the tassel to 4 in (10.2 cm).
Attach the tassels along the bottom edge on Rnd 3:
– 1 tassel at each bottom corner-center sc.
– 9 tassels at sts 15, 28, 41, 54, 67, 80, 93, 106 and 119, counting from the first st after the bottom-left corner center.
These sts sit directly below the bottom tips and spokes, so the tassels are spaced 2 1/2 in (6.4 cm) apart.
Final Blocking
- Weave in all ends securely along the frame stitches.
- Soak the panel in cool water for 15 minutes, then press the water out gently. Don’t wring it.
- Lay it flat on towels or mats and measure 26 1/2 in x 71 1/2 in (67.3 cm x 181.6 cm).
- Pin the outer corners and straight edges first.
- Pin every motif tip so each open diamond is square and even.
- Shape the petals with your fingers so they lie flat and point outward.
- Comb the tassels straight and let everything dry completely before unpinning.
Final Quality-Control Checklist
- Every motif has 16 dc, 8 petals and 84 sc.
- All tip loops are 8 ch, whether joined or free.
- The grid is 5 x 14 with no skipped joins.
- Border counts are 988, 996 and 1004.
- The panel blocks to 26 1/2 in x 71 1/2 in (67.3 cm x 181.6 cm).
- There are 6 even tabs and 11 tassels spaced 2 1/2 in (6.4 cm) apart.
- Both panels of a pair match within 1/2 in (1.3 cm).
Troubleshooting
- Petals cup or ruffle: Your clusters are too tall for your tension. Go down a hook size for Rnd 2 only.
- Frame pulls inward: Make sure there are 9 sc in each ch-7 loop, not fewer.
- Lattice ripples: The joining chains are tight. Redo them with relaxed ch-4s.
- Border edge is wavy: Your chains are too long. Measure 12 ch against 2 1/2 in (6.4 cm) and adjust.
- Border edge puckers: Your chains are too short. Loosen them or use a larger hook for Rnd 1 only.
- Spokes sag: Pull each sl st firmly on the way back up.
Care
Hand wash cool with mild soap, then reshape and dry flat. Don’t hang the panel while it is wet, because the cotton will stretch.
Final Notes
The measurement chain is simple. One motif measures 5 in (12.7 cm) tip to tip. A 5 x 14 grid measures 25 in x 70 in (63.5 cm x 177.8 cm). A 3/4 in (1.9 cm) border brings the panel to 26 1/2 in x 71 1/2 in (67.3 cm x 181.6 cm). Check your first motif and your first joined row carefully, and everything after that follows.
Happy crocheting!