

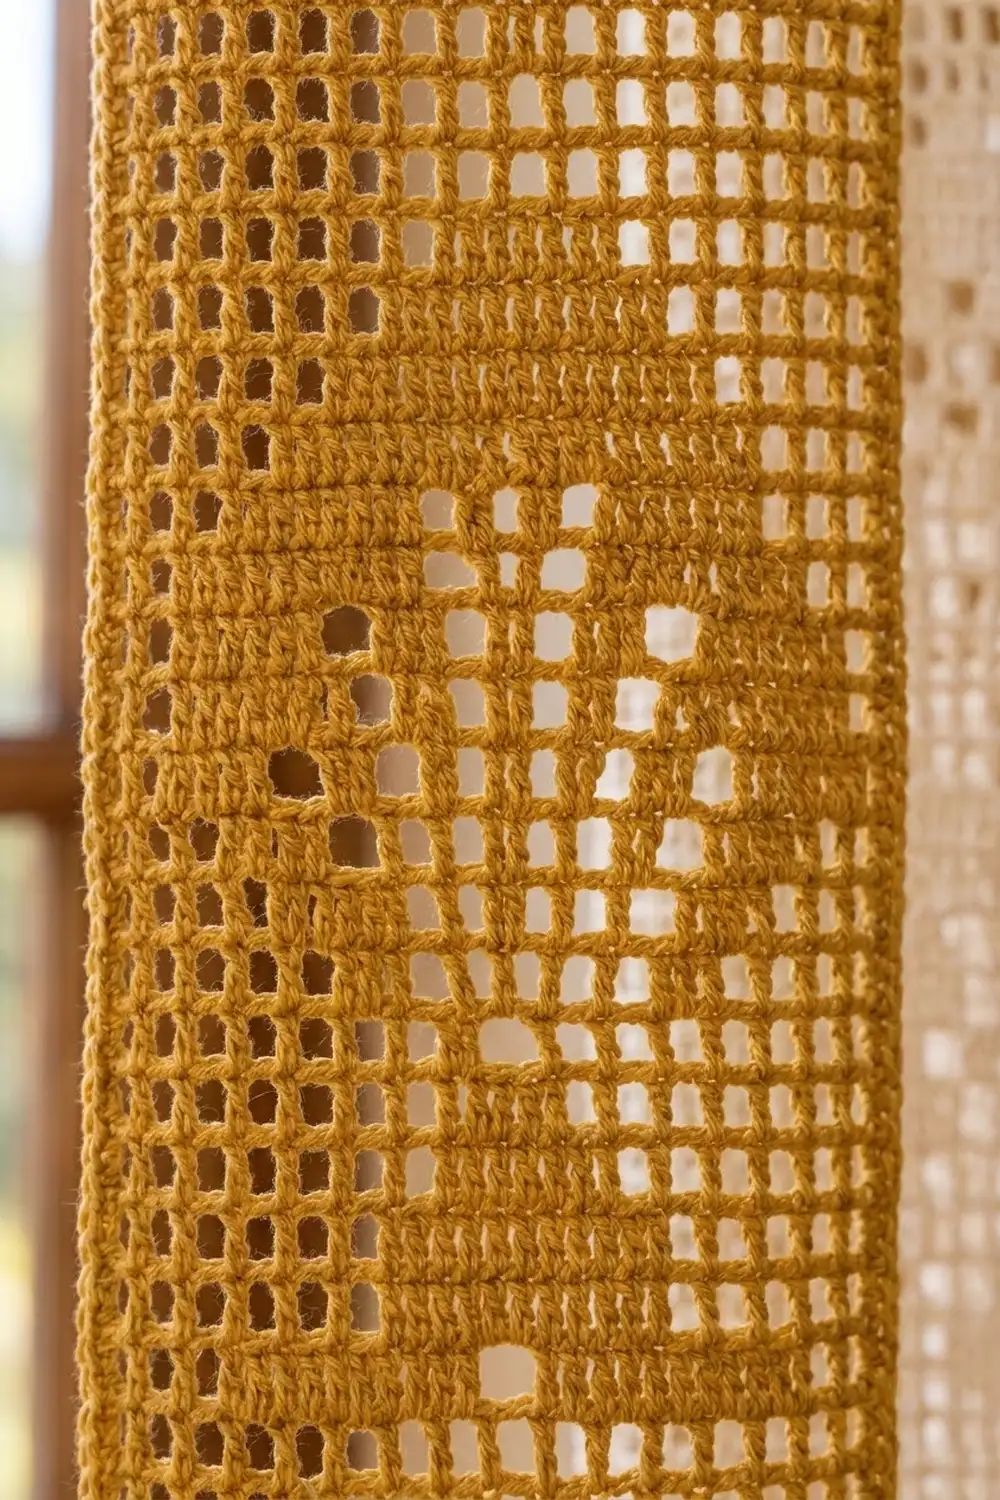
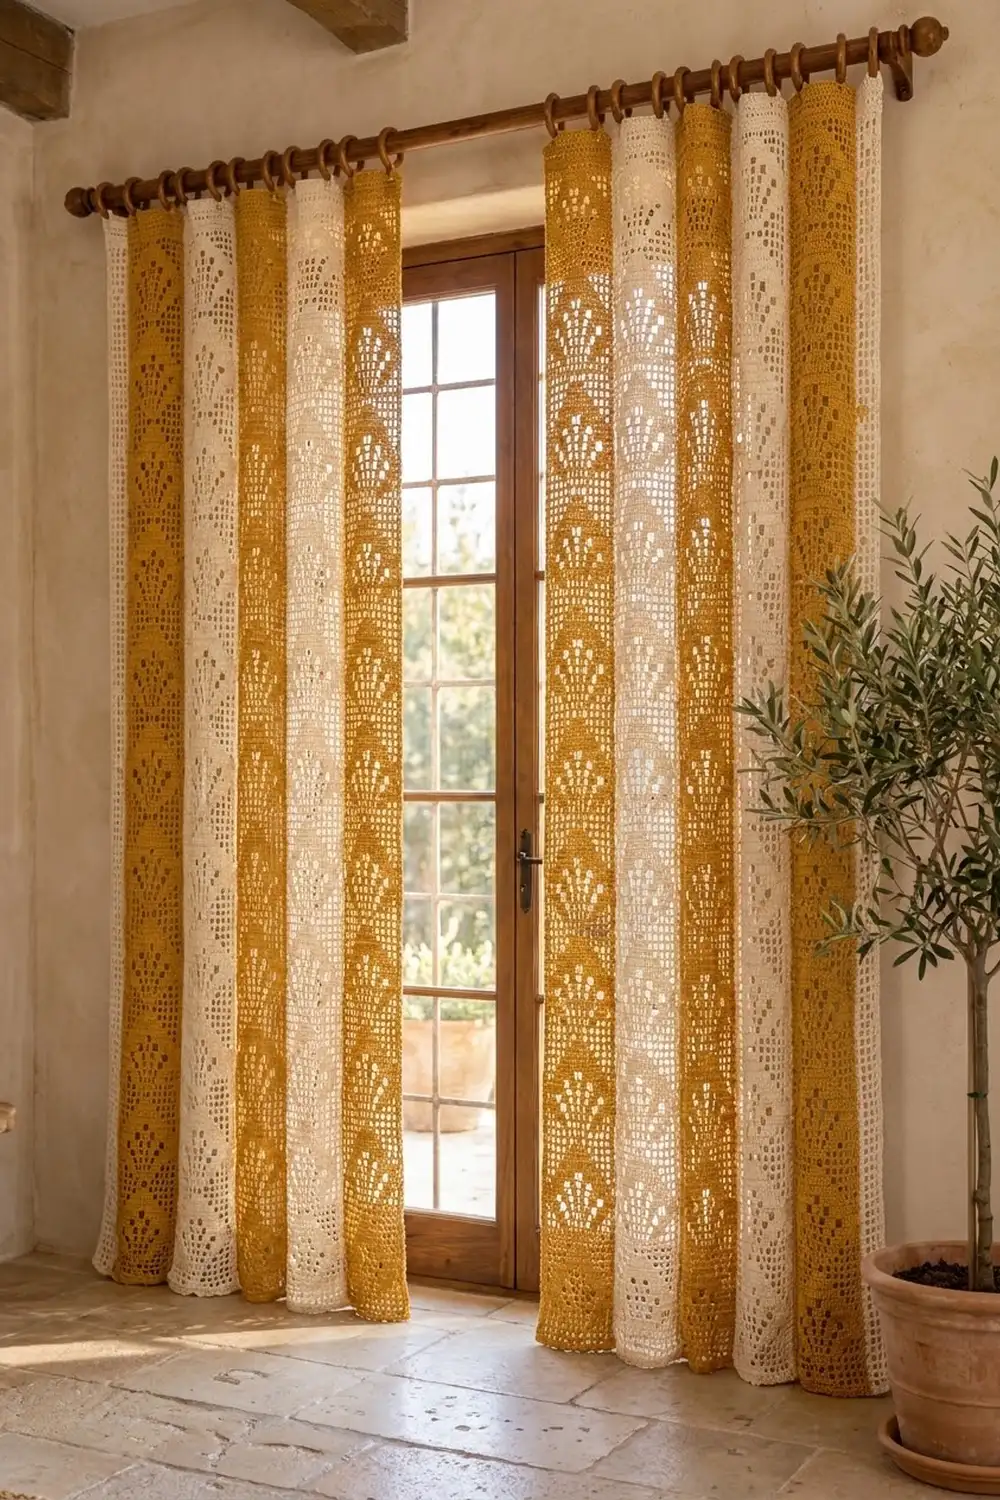
The Sunfan Filet Strip Curtain is a floor-length window panel made of narrow filet crochet strips. Each strip carries a column of fan motifs that open upward. When the light comes through, the open mesh glows and the solid fans show up as soft silhouettes.
The sample uses two colors, warm mustard gold and natural cream, in alternating strips. Each side of the window has five strips in the order mustard, cream, mustard, cream, mustard. The strips are not sewn together. Each one hangs from its own wooden rings, so the curtain moves a little in a breeze and is easy to take down and wash.
This pattern uses US crochet terms. Each finished strip measures 8.1 in (20.6 cm) wide by 84.5 in (214.6 cm) long after the border. Five strips make one curtain side about 40.5 in (102.9 cm) wide.
Each strip is worked flat, from the bottom up, in rows of filet mesh. You follow a 20-row fan repeat written out square by square. A two-round single crochet border neatens the edges, and three rings are sewn to the solid top band of each strip.
Finished Size and Construction
- Finished strip size: 8.1 in × 84.5 in (20.6 cm × 214.6 cm)
- Strip size before border: 7.6 in × 84 in (19.3 cm × 213.4 cm)
- Border depth: 0.25 in (0.6 cm) on every edge
- Skill level: Intermediate (reading filet rows, keeping counts over long lengths)
- Terminology: US crochet terms
- Yarn weight: Sport weight (#2) mercerized cotton
- Hook: 3.0 mm
- Number of pieces: 10 separate strips (6 mustard, 4 cream)
- Layout: two curtain sides of 5 strips each, hung side by side and not seamed
- Width of one curtain side: 40.5 in (102.9 cm)
- Mesh: 19 squares wide × 210 rows tall per strip
Materials
Yarn advice: Choose a smooth, mercerized sport-weight cotton or a cotton-linen blend. Mercerized cotton gives crisp, open squares and resists stretching when the strips hang. Avoid fuzzy or very soft yarns, because they blur the fan edges.
- Color A, Mustard gold: 750 g / about 2,250 m (6 strips)
- Color B, Natural cream: 500 g / about 1,500 m (4 strips)
One strip uses roughly 115 g / 342 m. The quantities above include a margin of about 10% for gauge differences and swatching. Buy all of each color from one dye lot.
Tools:
– 3.0 mm crochet hook
– Tapestry needle
– Locking stitch markers (at least 4)
– Measuring tape
– Rust-proof pins and a long blocking surface (foam mats or a towel on a clean floor)
– Spray bottle
– 30 wooden curtain rings, 1.5 in (3.8 cm) inner diameter (3 per strip)
– Curtain rod wide enough for both curtain sides
Abbreviations (US Terms)
- ch – chain
- dc – double crochet
- sc – single crochet
- sk – skip
- st(s) – stitch(es)
- sp – space
- RS / WS – right side / wrong side
Special filet terms:
– Edge dc: the first stitch of every row. Ch 3 counts as this dc.
– Block (B): 3 sts ending in a dc. Over a block, dc in each of the next 3 sts. Over a space, 2 dc in the ch-2 sp, then dc in the next dc.
– Space (S): ch 2, sk the next 2 sts (or the ch-2 sp), dc in the next dc.
– B3 means 3 blocks in a row and S8 means 8 spaces in a row.
Every row is 1 edge dc plus 19 squares × 3 sts, which is 58 sts. Count the ch-3 and the chains as stitches.
Gauge and Checkpoints
Gauge: 10 filet squares = 4 in (10.2 cm) wide, and 10 rows = 4 in (10.2 cm) tall. One square is 0.4 in × 0.4 in (1.0 cm × 1.0 cm).
Test one piece first. Treat the first part of your first strip as your swatch. Work Rows 1–23, which are the bottom band plus one fan repeat. Then pin the piece flat, mist it, and let it dry.
Checkpoints:
1. After Row 1: the foundation row measures 7.6 in (19.3 cm) wide.
2. After Row 23: the piece measures 7.6 in × 9.2 in (19.3 cm × 23.4 cm).
3. After Row 103 (bottom band + 5 repeats): 41.2 in (104.6 cm) long.
4. After Row 210: 84 in (213.4 cm) long, before the border.
5. After the border: 8.1 in × 84.5 in (20.6 cm × 214.6 cm).
Too big? Go down to a 2.75 mm hook. Too small? Go up to a 3.25 mm hook. If only the height is off, adjust how tightly you pull up the first loop of each dc rather than changing hooks. Taller loops make taller rows. Small errors add up over 210 rows: being off by 0.02 in (0.1 cm) per row changes the length by about 4.2 in (10.7 cm). Check row height carefully.
Strip Pattern (Make 1 – Repeat for All Strips)
Foundation and Bottom Band
Foundation: Ch 60.
Row 1 (RS): Dc in the 4th ch from the hook (the skipped 3 ch count as the edge dc), then dc in each remaining ch. Turn. (58 sts = B19)
Rows 2–3: Ch 3 (counts as edge dc), work B19 across, with the last dc in the top of the turning ch. Turn. (58 sts each row)
The bottom band is now 3 rows, or 1.2 in (3.0 cm) of solid fabric.
Fan Repeat (20 rows)
Work the 20 rows below 10 times in total, for strip Rows 4–203. Begin every row with ch 3 (edge dc) and end with a dc in the top of the turning ch. Every row has 58 sts. The squares in each row add up to 19. Repeat Row 1 is Row 4 of the strip.
- Repeat Row 1: S19
- Repeat Row 2: S8, B3, S8 (base)
- Repeat Row 3: S8, B3, S8
- Repeat Row 4: S9, B1, S9 (stem)
- Repeat Row 5: S8, B3, S8 (spokes split)
- Repeat Row 6: S7, B1, S1, B1, S1, B1, S7
- Repeat Row 7: S6, B1, S2, B1, S2, B1, S6
- Repeat Row 8: S5, B1, S1, B1, S1, B1, S1, B1, S1, B1, S5 (five spokes)
- Repeat Row 9: S4, B1, S2, B1, S1, B1, S1, B1, S2, B1, S4
- Repeat Row 10: S3, B1, S2, B1, S2, B1, S2, B1, S2, B1, S3
- Repeat Rows 11–13: S2, B2, S2, B2, S1, B1, S1, B2, S2, B2, S2 (spoke tips thicken)
- Repeat Row 14: S3, B1, S3, B1, S1, B1, S1, B1, S3, B1, S3 (tips taper)
- Repeat Row 15: S9, B1, S9 (center tip)
- Repeat Row 16: S19
- Repeat Row 17: S9, B1, S9 (diamond)
- Repeat Row 18: S8, B3, S8
- Repeat Row 19: S9, B1, S9
- Repeat Row 20: S19
The fan is 13 squares wide, from square 4 to square 16, or 5.2 in (13.2 cm). That leaves 3 open squares of mesh on each side. Each repeat is 8 in (20.3 cm) tall.
Tip: Place a marker in the first stitch of each Repeat Row 1. You can then count repeats at a glance: there should be 10 markers when you finish.
Top Band
Rows 204–210: Ch 3, B19 across. Turn. (58 sts each row)
The top band is 7 rows, or 2.8 in (7.1 cm) of solid fabric. It is the firm area that carries the rings. Do not fasten off; go straight into the border.
Row count check: 3 (bottom band) + 200 (10 repeats × 20 rows) + 7 (top band) = 210 rows = 84 in (213.4 cm).
Make All Pieces
Make 10 strips in total:
– Color A (mustard): 6 strips
– Color B (cream): 4 strips
Every strip uses exactly the same stitch pattern and counts. Only the color changes.
Layout, viewed from inside the room:
LEFT SIDE                          RIGHT SIDE
[A] [B] [A] [B] [A]   | window |   [A] [B] [A] [B] [A]
 1   2   3   4   5                  6   7   8   9   10
Each side measures 5 × 8.1 in = 40.5 in (102.9 cm) wide when the strips hang edge to edge.
Joining (Hanging the Strips)
These strips are not seamed together. Each one hangs on its own, which keeps the light, airy look shown in the sample. Finish the Border on each strip (next section) before you attach the rings.
Method: Sew 3 rings to the top edge of each strip, using a 24 in (61.0 cm) length of matching yarn.
Stitch-to-stitch logic: After the border, the top edge has 62 sc, counted from corner sc to corner sc.
– Ring 1: sew over the corner sc and the next sc (sts 1–2).
– Ring 2: sew over the center sts 31–32.
– Ring 3: sew over sts 61–62 (the last sc and the corner sc).
Stitch around each ring about 8 times, catching both the border and the top row of the solid band. This spreads the weight over the solid fabric instead of the open mesh.
Tension advice: Pull the sewing yarn snug, but not so tight that the top edge puckers. The edge should stay straight and flat between rings.
Size checkpoint: Hang one strip for 24 hours before sewing rings onto the rest. Cotton filet usually drops up to 1 in (2.5 cm) under its own weight. If yours drops more, work 2 or 3 fewer rows in the top band of the remaining strips. Do not remove fan rows.
Border
Each strip is bordered on its own, so each border’s starting counts come from 1 strip’s own edge counts. No seams are involved and no extra stitches are added for joins.
Border gauge: 2 sc per dc row end along the long sides, and 1 sc per stitch along the short ends. Two sc rounds measure 0.25 in (0.6 cm) deep.
Corner rule: Each corner is a group of 3 sc. The middle sc of the group is the corner stitch. The side counts below include both corner stitches of that side.
Round 1 (RS): Ch 1. Work along the top edge as follows: 3 sc in the first st, sc in each of the next 56 sts, 3 sc in the last st. Rotate the strip. Work 2 sc around the post of each row-end edge dc down the long side (420 sc). Work 3 sc in the first foundation ch, sc in each of the next 56 foundation ch, then 3 sc in the last foundation ch. Work 420 sc up the second long side. Sl st to the first sc.
– Short sides: 1 corner + 1 + 56 + 1 + 1 corner = 60 sc each
– Long sides: 1 corner + 1 + 420 + 1 + 1 corner = 424 sc each
– Round total: 964 sc, which is 2 × 60 + 2 × 424 − 4 shared corners.
Round 2 (RS): Ch 1. Sc in each sc around, working 3 sc in each corner sc. Sl st to the first sc. Fasten off.
– Round total: 964 (1 sc per existing sc) + 8 (2 extra at each of 4 corners) = 972 sc
– Short sides: 62 sc each, including corners
– Long sides: 426 sc each, including corners
Why the math works: A dc row end is 0.4 in (1.0 cm) tall, and 2 sc fill that height without ruffling. So 210 rows × 2 = 420 sc covers exactly 84 in (213.4 cm). Along the ends, 1 sc per stitch keeps the 58-stitch width at 7.6 in (19.3 cm). The 2 extra sc at each corner on every round let the corners turn flat. With 0.25 in (0.6 cm) of border on each side, the strip becomes 7.6 + 0.5 = 8.1 in (20.6 cm) wide and 84 + 0.5 = 84.5 in (214.6 cm) long.
If the short ends pull in, work Round 1 along them with a 3.25 mm hook. Keep the stitch counts the same.
Final Blocking
- Weave in all ends along solid blocks or the border, never across open spaces where they would show.
- Soak the strip in cool water with a little wool or fabric wash for 15 minutes.
- Gently press out the water. Roll the strip in a towel and press; do not wring.
- Lay the strip flat on a long blocking surface, folding it into sections if needed.
- Pin the long edges straight at 8.1 in (20.6 cm) apart, about every 6 in (15.2 cm).
- Pin the length to 84.5 in (214.6 cm). Do not stretch it longer, because hanging adds length on its own.
- Use your fingertips to square up the mesh, so each space is a neat 0.4 in (1.0 cm) square and the fan spokes line up.
- Let it dry completely, then unpin. Block all 10 strips to the same measurements.
Final Quality-Control Checklist
- Each strip has exactly 210 rows and 10 fan repeats.
- Every row has 58 sts, which is 19 squares.
- All fans sit centered, with 3 open squares on each side at the widest rows (Rows 11–13 of the repeat).
- The bottom band is 3 rows and the top band is 7 rows on every strip.
- Border Round 2 totals 972 sc: 62 on each short side and 426 on each long side.
- Every strip measures 8.1 in × 84.5 in (20.6 cm × 214.6 cm) after blocking.
- Each strip has 3 rings, sewn over sts 1–2, 31–32, and 61–62 of the top edge.
- You have 6 mustard and 4 cream strips, hung as A-B-A-B-A on each side.
Troubleshooting
The fan looks lopsided. One row has a square too many on one side. Count the squares in each row against the repeat; every row must total 19.
The mesh slants or the spaces look like rectangles. Your chains are tighter or looser than your dc. Practice keeping the ch-2 the same width as 2 dc.
The strip is getting narrower. You are probably missing the last dc in the turning ch. Mark the turning ch and count 58 sts on each row.
The strips hang at different lengths. Count the rows on each strip again, then hang them together and trim the difference from the top band only.
The border ruffles along the long sides. Change to a 2.75 mm hook for Round 1. Keep 2 sc per row end.
The border pulls the corners in. Check that each corner sc got 3 sc on both rounds.
Care
Hand wash in cool water with a mild detergent and dry flat. Re-block if needed. Avoid hanging wet strips, because the weight of the water stretches the mesh.
Final Notes
Every measurement follows from one number: a 0.4 in (1.0 cm) filet square. That gives 19 squares = 7.6 in (19.3 cm) of width and 210 rows = 84 in (213.4 cm) of length. The two-round border brings each strip to 8.1 in × 84.5 in (20.6 cm × 214.6 cm). Five strips hung edge to edge make a 40.5 in (102.9 cm) curtain side. Check your gauge early, count your 58 sts on every row, and hang one strip to test the drop before you finish the set.
Happy crocheting!