

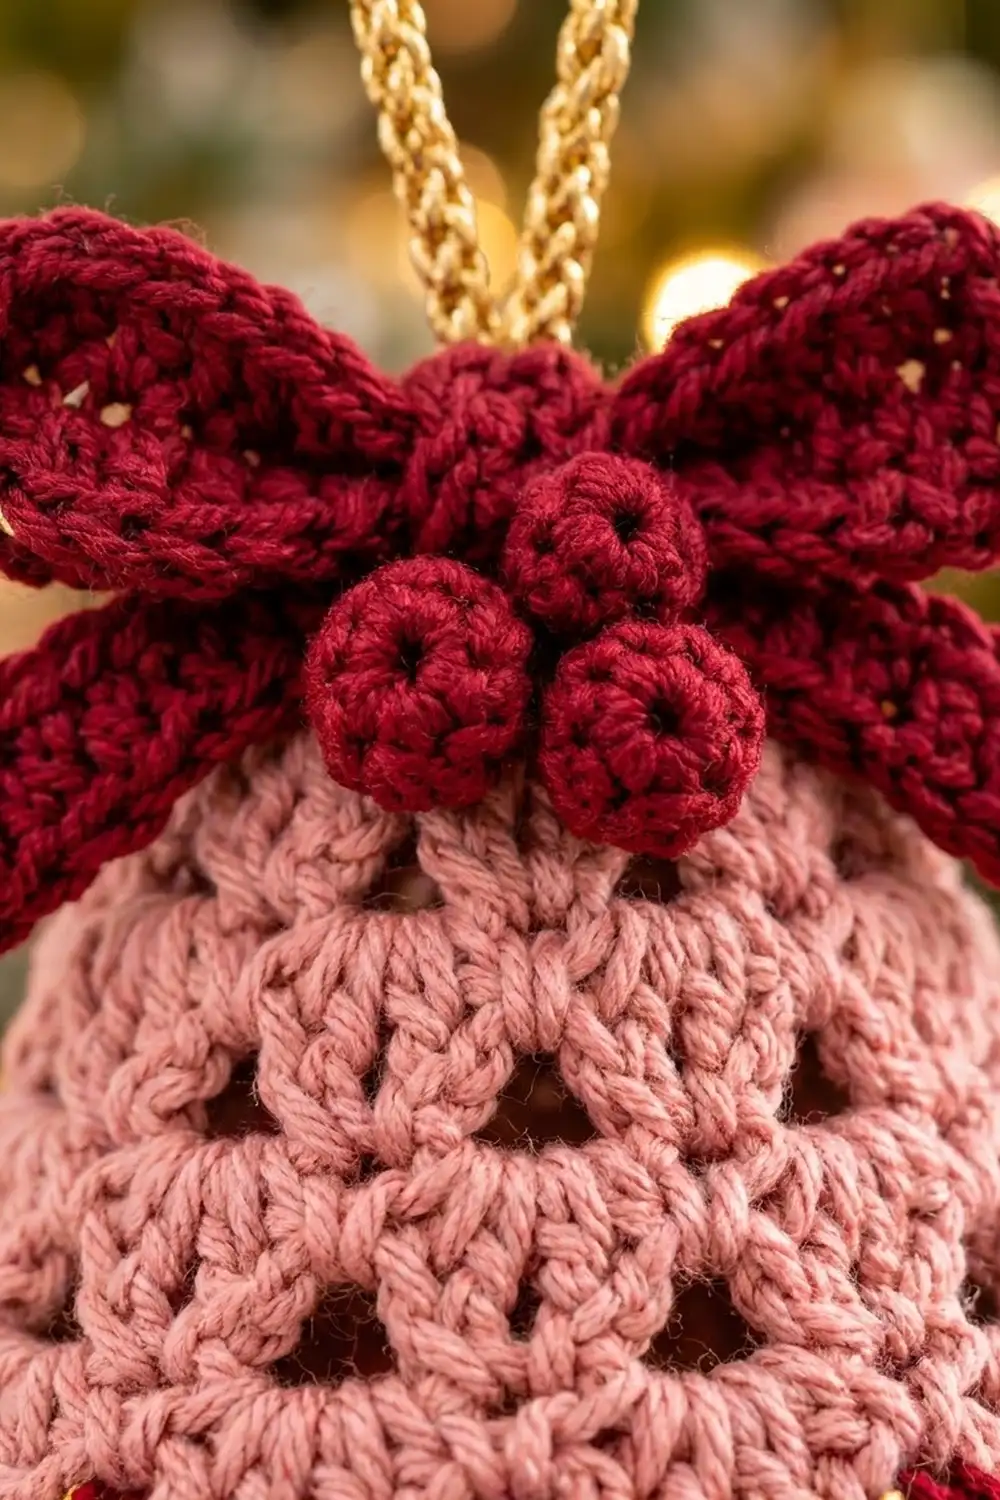
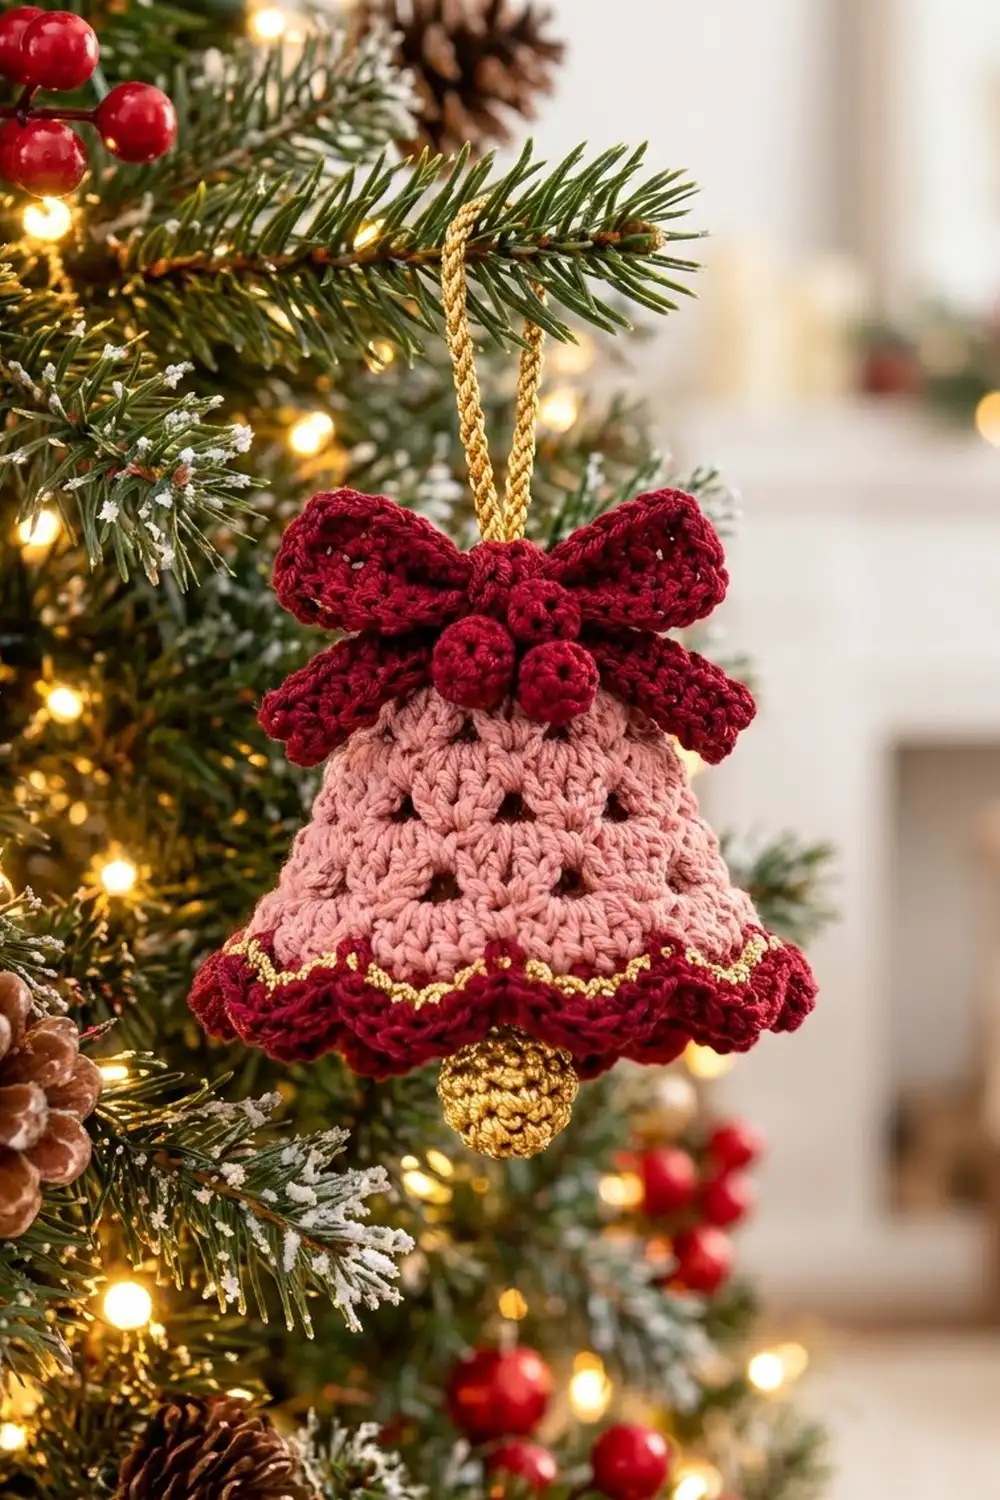
The Rosy Chime Bell is a small Christmas ornament with an open, lacy body and a lot of festive detail. The dusty-pink bell is worked in granny-style clusters, so little triangular eyelets run up the whole surface. At the bottom, a deep burgundy scalloped ruffle flares out. A thin line of metallic gold sits right above the ruffle.
On top there is a burgundy double bow with three round bobble “berries” at the center. A crocheted gold ball hangs below the hem as a clapper, and a gold cord makes the hanging loop. It is cozy and vintage-looking, and it suits a tree, a gift tag, or a door handle.
This pattern uses US crochet terms throughout. The finished bell measures about 4.5 in (11.4 cm) wide across the ruffle and 3.5 in (8.9 cm) tall from the top of the body to the bottom of the ruffle, not counting the bow, clapper, or loop.
The body is worked top-down in joined rounds from a chain ring, increasing by adding cluster groups. The ruffle and gold line go on next. You then make the bow pieces, bobbles, clapper, and loop separately and sew everything together.
Finished Size and Construction
- Finished size: 4.5 in (11.4 cm) wide x 3.5 in (8.9 cm) tall (bell plus ruffle)
- Skill level: Easy-Intermediate
- Terminology: US crochet terms
- Yarn weight: Fingering (#1 super fine) mercerized cotton, plus fingering-weight metallic gold
- Hook: 2.5 mm (US B/1 or C/2)
- Number of pieces: 1 ornament. That is 1 bell body plus small parts: 2 bow strips, 1 bow wrap, 3 bobbles, 1 clapper ball, 1 hanging loop
- Layout: Single standalone ornament, with no joined motifs
- Bell body size: 4 in (10.2 cm) flat width at the hem x 3 in (7.6 cm) tall
- Size before border: 4 in (10.2 cm) x 3 in (7.6 cm)
- Border (ruffle) depth: 0.5 in (1.3 cm), adding 0.25 in (0.6 cm) of flare on each side
Materials
Use a smooth mercerized cotton. It holds the eyelets crisply and takes starch well. Pick a gold that is metallic but soft enough to chain without fraying.
- Color A, dusty pink (bell body): 8 g / 32 m
- Color B, burgundy (ruffle, bow, bobbles): 10 g / 40 m
- Color C, metallic gold (gold line, clapper, loop): 4 g / 16 m
Tools:
- 2.5 mm crochet hook
- Tapestry needle
- Scissors
- Stitch marker
- A small amount of fiberfill or yarn scraps for stuffing
- Spray starch or fabric stiffener
- A cone-shaped form for blocking, such as a small funnel or a rolled cardstock cone
- Rust-proof pins
The quantities include a margin of about 20% for your gauge swatch and weaving in ends.
Abbreviations (US Terms)
- ch – chain
- sl st – slip stitch
- sc – single crochet
- dc – double crochet
- sp – space
- st(s) – stitch(es)
- inc – 2 sc in the same st
- dec – sc2tog (single crochet 2 together)
- rep – repeat
- MR – magic ring
Special stitch: granny group. A granny group is 3 dc worked into the same stitch or space, followed by ch 1. Each group counts as 4 sts: 3 dc plus 1 ch-1 sp.
Increase group. Work (3 dc, ch 1, 3 dc) in the same sp, then ch 1. This turns one sp into 2 granny groups.
Surface slip stitch. Hold the yarn behind the work. Insert the hook from front to back, pull up a loop, and draw it through the loop on the hook.
Gauge and Checkpoints
Gauge:
- 1 granny group = 0.5 in (1.3 cm) wide
- 3 rounds = 1 in (2.5 cm) tall
- 8 sc = 1 in (2.5 cm)
Test with the bell itself: work Rounds 1-3, lay the piece flat, and measure.
Checkpoints (measured flat, pressed gently):
- After Round 1: 1.5 in (3.8 cm) wide
- After Round 3: 2 in (5.1 cm) wide and 1 in (2.5 cm) tall
- After Round 5: 3 in (7.6 cm) wide
- After Round 6: 4 in (10.2 cm) wide and 2 in (5.1 cm) tall
- After Round 9: 4 in (10.2 cm) wide and 3 in (7.6 cm) tall
If your piece is too big, go down to a 2.25 mm hook and start again. If it is too small, go up to a 2.75 mm hook. Don’t add or remove groups to fix the size, because the ruffle math depends on exactly 16 groups at the hem.
Bell Body
Use Color A. Join every round with a sl st to the top of the beginning ch-3. The beginning ch-3 always counts as a dc. Keep the right side facing you the whole time and don’t turn.
Round 1: Ch 24 and sl st into the first ch to make a ring, making sure it isn’t twisted. Ch 3, then dc in each of the next 23 ch. Join. (24 dc)
Round 2: Ch 3, 2 dc in the same st as the join, ch 1, skip 2 sts. 3 dc in the next st, ch 1, skip 2 sts; rep from * 6 more times. Join. (8 groups: 24 dc + 8 ch-1 sps = 32 sts)*
Each group uses 3 sts of Round 1, and 8 x 3 = 24, so the round comes out even.
Round 3: Sl st in the next 2 dc and into the ch-1 sp. Ch 3, 2 dc in the same sp, ch 1. 3 dc in the next ch-1 sp, ch 1; rep from * 6 more times. Join. (8 groups: 32 sts)*
Round 4 (increase): Sl st to the ch-1 sp as before. Ch 3, 2 dc in the same sp, ch 1, 3 dc in the same sp, ch 1. Then 3 dc in the next sp, ch 1. Work an increase group in the next sp, then 3 dc in the next sp, ch 1; rep from * 2 more times. Join. (12 groups: 36 dc + 12 ch-1 sps = 48 sts)*
Round 5: Work as Round 3, with one granny group in each of the 12 sps. (12 groups: 48 sts)
Round 6 (increase): Sl st to the first sp. Ch 3, 2 dc in the same sp, ch 1, 3 dc in the same sp, ch 1. [3 dc in the next sp, ch 1] twice. Work an increase group in the next sp, then [3 dc in the next sp, ch 1] twice; rep from * 2 more times. Join. (16 groups: 48 dc + 16 ch-1 sps = 64 sts)*
Rounds 7-9: Work as Round 3, with one granny group in each of the 16 sps. (16 groups: 64 sts each round)
Fasten off. Leave a 12 in (30.5 cm) tail of Color A at the start of Round 1 for the top crossbar.
The straight rounds between increases make the body look like a bell: narrow at the top, then wider toward the hem. Diagonal rows of eyelets form where the ch-1 sps line up.
Border: Burgundy Ruffle and Gold Line
Border gauge: 8 sc = 1 in (2.5 cm). Each scallop is 0.5 in (1.3 cm) wide, and the ruffle is 0.5 in (1.3 cm) deep.
The bell is round, so there are no corners or sides. Every count below is for the full round.
Border Round 1 (conversion): Join Color B in any ch-1 sp of Round 9. Ch 1, sc in the same sp, then sc in each of the next 3 dc. *Sc in the next sp, sc in each of the next 3 dc; rep from * around. Join to the first sc.
Count: 48 sc worked one per dc + 16 sc worked one per ch-1 sp = 64 sc. At 8 sc per inch, that is 8 in (20.3 cm) around, which matches 16 groups x 0.5 in (1.3 cm). This round lies flat.
Border Round 2 (scallops): Ch 1, sc in the same st as the join (this sc sits above a ch-1 sp). *Skip 1 st, 5 dc in the next st, skip 1 st, sc in the next st; rep from * 14 more times. Skip 1 st, 5 dc in the next st, skip 1 st, and join to the first sc.
Count: 16 scallops x (5 dc + 1 sc) = 96 sts.
Border Round 3 (trim): Ch 1. *Sc in the sc, sc in the next 2 dc, 3 sc in the center dc, sc in the next 2 dc; rep from * 15 more times. Join and fasten off.
Count: 96 sts worked one per stitch + 32 extra sts (2 extra in each of the 16 center dc) = 128 sts, which is 8 per scallop.
Gold line: Using Color C, work surface slip stitch around Border Round 1, one in each sc, for 64 surface sl sts. Join and fasten off. The gold line will sit right where the pink body meets the burgundy ruffle.
Why the math works: Each granny group becomes exactly 4 sc. Each scallop uses exactly 4 sc. That gives one scallop per group (64 ÷ 4 = 16). Every scallop’s sc lands above a ch-1 sp and every 5-dc fan lands over the middle dc of a group, so the waves line up with the eyelet columns. Round 3’s extra stitches at each scallop point make the edge ruffle and add about 0.25 in (0.6 cm) of flare on each side.
Bow, Bobbles, Clapper, and Loop
Upper bow strip (Color B): Ch 53. Row 1: sc in the 2nd ch from the hook and in each ch across (52 sc). Rows 2-8: ch 1, turn, sc in each sc across (52 sc). Fasten off.
The strip should measure 6.5 in (16.5 cm) x 1 in (2.5 cm).
Lower bow strip (Color B): Ch 41. Row 1: sc in the 2nd ch from the hook and across (40 sc). Rows 2-6: ch 1, turn, sc across (40 sc). Fasten off.
The strip should measure 5 in (12.7 cm) x 0.75 in (1.9 cm).
Center wrap (Color B): Ch 9. Row 1: sc in the 2nd ch and across (8 sc). Rows 2-3: ch 1, turn, sc across (8 sc). Fasten off, leaving a long tail.
Bobbles (Color B, make 3):
- Rnd 1: 6 sc in MR (6)
- Rnd 2: inc in each st (12)
- Rnd 3: sc in each st (12)
- Rnd 4: dec 6 times (6)
Stuff each bobble lightly and close the hole. Each one is about 0.5 in (1.3 cm) across.
Clapper ball (Color C):
- Rnd 1: 6 sc in MR (6)
- Rnd 2: inc in each st (12)
- Rnd 3: sc, inc; rep from * 6 times (18)*
- Rnds 4-5: sc in each st (18)
- Rnd 6: sc, dec; rep from * 6 times (12)*
Stuff the ball, then work Rnd 7: dec 6 times (6). Close the hole, leaving an 8 in (20.3 cm) tail. The ball is about 0.75 in (1.9 cm) across.
Hanging loop (Color C, two strands held together): Ch 41. Sl st in the back bump of the 2nd ch from the hook and in each ch across (40 sl sts). This makes a firm 5 in (12.7 cm) cord.
Assembly:
- Thread the Color A tail across the top ring twice to make an X-shaped crossbar.
- Thread the clapper tail through the center of the crossbar and tie it off. Adjust the length so the middle of the ball hangs level with the bottom edge of the ruffle. That is a cord of about 3.25 in (8.3 cm).
- Fold the hanging loop in half and sew both ends to the crossbar from above. The loop should stand 2.5 in (6.4 cm) tall.
- Fold each short end of the upper strip in to the center, overlapping by 0.25 in (0.6 cm), and tack. The bow loops should be 3.25 in (8.3 cm) wide. Repeat with the lower strip for 2.5 in (6.4 cm) wide loops.
- Stack the upper loops on top of the lower loops. Pinch the centers and wrap the center piece around them, then sew its ends together at the back.
- Sew one bobble at the top of the wrap and two side by side just below it.
- Center the bow over the top ring, with the hanging loop coming up behind the knot. Sew the bow down all the way around the ring.
Final Blocking
- Weave in all ends before blocking.
- Spray the bell body evenly with starch until it is damp, but not dripping.
- Slide the bell over a cone form. Check that it is 4 in (10.2 cm) wide at the hem and 3 in (7.6 cm) tall.
- Pull each eyelet column straight so they run evenly up the bell.
- Pin the ruffle points out evenly. The finished width should be 4.5 in (11.4 cm).
- Shape the bow loops with your fingers and lightly mist them with starch.
- Let everything dry completely, then remove the bell from the form.
Final Quality-Control Checklist
- [ ] Round 9 has 16 groups (64 sts)
- [ ] Border Round 1 has 64 sc and Border Round 3 has 128 sts
- [ ] There are 16 even scallops, each centered over a granny group
- [ ] The gold line runs continuously, with no puckers
- [ ] The bell is 4.5 in (11.4 cm) wide x 3.5 in (8.9 cm) tall
- [ ] The clapper hangs centered and doesn’t twist
- [ ] The bow is level, and the three bobbles sit firmly in a triangle
- [ ] The hanging loop is secure and 2.5 in (6.4 cm) tall
- [ ] All ends are woven in
Troubleshooting
- The bell flares too early: You probably worked an extra increase group. Count your groups after Rounds 4 and 6.
- The eyelets spiral: Make sure each round starts in the first ch-1 sp and is joined to the top of the ch-3, not the next dc.
- The ruffle cups inward: Your sc may be too tight. Redo Border Round 1 with a slightly looser tension.
- The ruffle waves too much: Check that each scallop point has 3 sc, not more.
- The gold line puckers: Work the surface sl sts more loosely, or go up a hook size for that round only.
- The bell sags: Starch it again over the cone and let it dry fully.
Care
Spot clean with cool water and mild soap. Reshape the bell over its cone and let it air dry. Store it flat in a box so the bow and ruffle keep their shape.
Final Notes
The whole bell comes from a simple measurement chain. Gauge of 0.5 in (1.3 cm) per group gives 16 groups at the hem, which is 8 in (20.3 cm) around and 4 in (10.2 cm) flat. That becomes 64 sc, which becomes 16 scallops, and the ruffle brings the finished width to 4.5 in (11.4 cm). If you check your gauge on the first three rounds, everything after that falls into place.
Happy crocheting!