

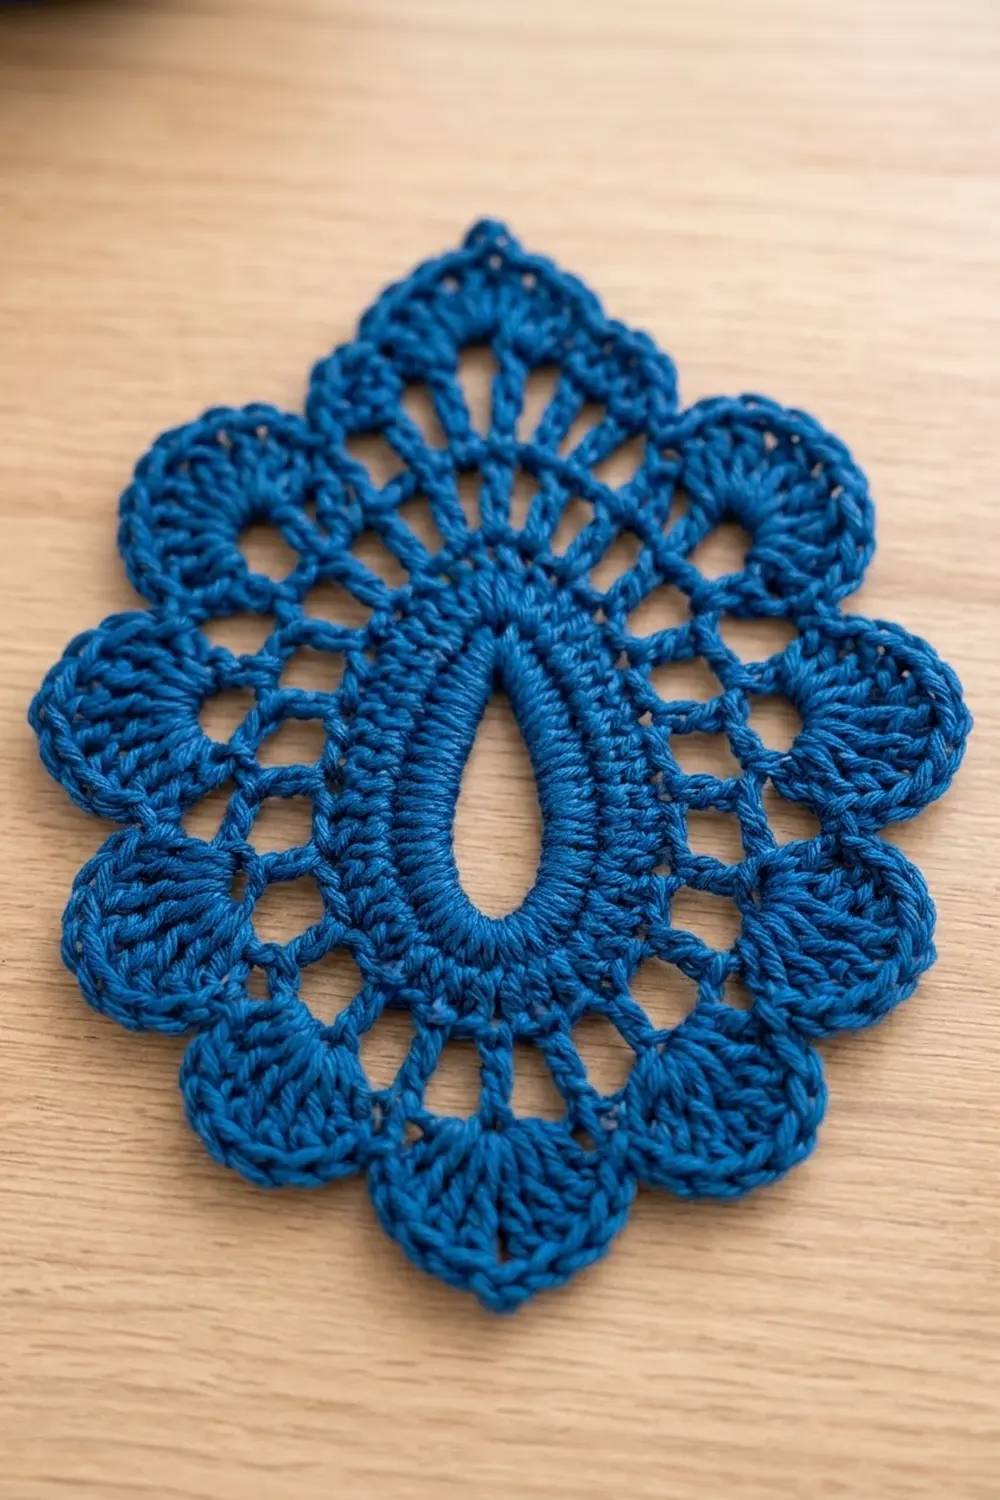
The Cobalt Paisley Teardrop is a single lace motif shaped like a classic paisley drop. It has an open teardrop window in the middle, a dense stitched band around it, a ring of airy spokes, and a scalloped edge that rises to a sharp point at the top.
The motif is worked in one color, a deep cobalt blue, so the texture does all the work. Light passes through the center window and the spoke gaps, while the solid scallops give the edge a firm frame. It looks elegant on its own as a coaster, a table accent, a sachet front, or an appliqué.
This pattern uses US crochet terms. The finished motif measures 5.75 in (14.6 cm) wide and 7 in (17.8 cm) tall after blocking.
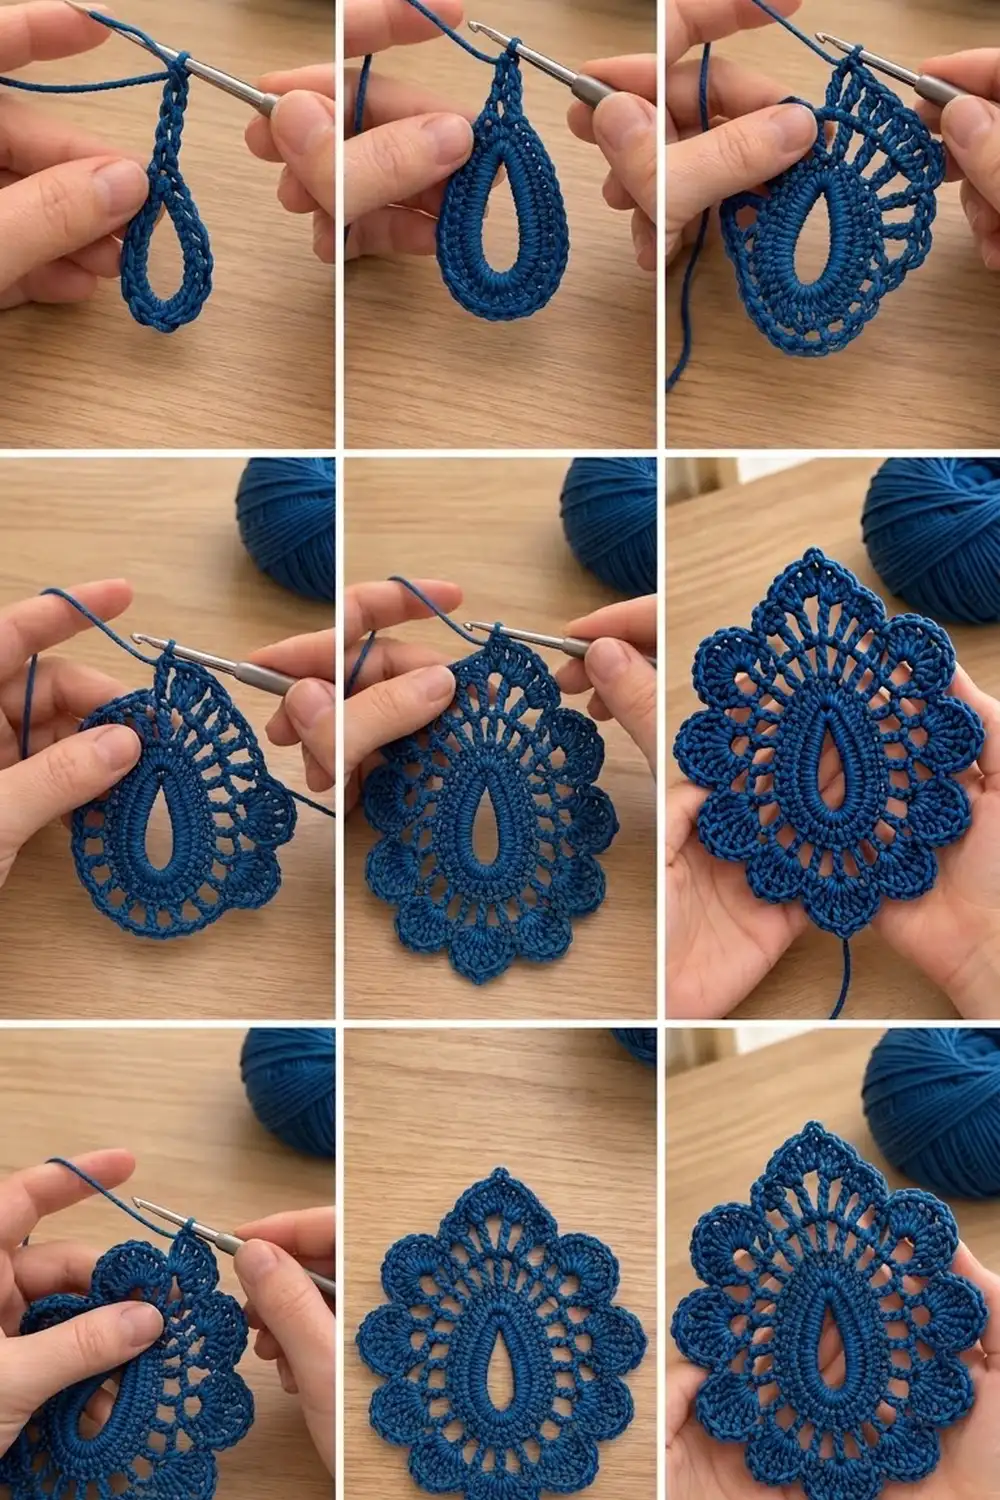
Construction is simple. You chain a ring for the teardrop window, then work 3 shaped rounds of short stitches to build the solid band, with taller stitches at the bottom so the shape fills out like a drop. A spoke round and a shell round follow. Two border rounds then finish the scallops, the top point, and the picot edge. The whole motif is worked in one piece without turning.
Finished Size and Construction
- Finished size: 5.75 in (14.6 cm) wide × 7 in (17.8 cm) tall
- Skill level: Intermediate
- Terminology: US crochet terms
- Yarn weight: DK (#3) cotton
- Hook: 4.0 mm (US G-6)
- Number of pieces: 1 (single motif)
- Layout: Point up, one top point scallop plus 7 rounded scallops
- Piece size: 5.75 in × 7 in (14.6 cm × 17.8 cm)
- Size before border (after Rnd 5): 4.75 in × 5.75 in (12.1 cm × 14.6 cm)
- Border depth: about 0.5 in (1.3 cm) at the sides and bottom, about 0.75 in (1.9 cm) at the top point
Materials
Yarn: Use a smooth, mercerized DK-weight cotton or cotton blend. Cotton holds the spoke and scallop shapes well, and blocks crisp and flat. Avoid fuzzy or very stretchy yarns, because they blur the teardrop window.
- Color A – Cobalt Blue: 15 g (about 35 m / 38 yd)
Tools:
- 4.0 mm (US G-6) crochet hook
- Tapestry needle
- Scissors
- Stitch marker
- Rustproof pins and a blocking mat
- Spray bottle with water
- Ruler or tape measure
The quantity includes a margin of about 25% for your gauge swatch, yarn tails, and one round of frogging.
Abbreviations (US Terms)
- ch – chain
- sl st – slip stitch
- sc – single crochet
- hdc – half double crochet
- dc – double crochet
- sp – space
- st(s) – stitch(es)
- beg – beginning
- sc2tog – single crochet 2 together: (insert hook in next st, yarn over, pull up a loop) twice, yarn over, pull through all 3 loops on hook
- sc3tog – single crochet 3 together: (insert hook in next st, yarn over, pull up a loop) 3 times, yarn over, pull through all 4 loops on hook
Special stitch – Picot: Ch 3, sl st in the 3rd ch from the hook. The picot is not counted as a stitch.
Counting notes: A beginning ch-3 counts as 1 dc. Chain spaces are never counted as stitches.
Gauge and Checkpoints
Reference gauge: 18 sc and 20 rows = 4 in (10.2 cm) in sc worked in rows.
Exact gauge matters less than the checkpoints below, but test one full motif before you make several for a project. Measure on a flat surface without stretching. Width is measured across the widest part, and height from the bottom curve to the top point.
| After | Width | Height |
|---|---|---|
| Rnd 3 | 2.75 in (7.0 cm) | 3.5 in (8.9 cm) |
| Rnd 4 | 3.75 in (9.5 cm) | 4.5 in (11.4 cm) |
| Rnd 5 | 4.75 in (12.1 cm) | 5.75 in (14.6 cm) |
| Rnd 6 | 5.5 in (14.0 cm) | 6.75 in (17.1 cm) |
| Rnd 7 (blocked) | 5.75 in (14.6 cm) | 7 in (17.8 cm) |
A tolerance of ±0.25 in (0.6 cm) is fine.
If your motif is too big: Go down one hook size, to 3.75 mm (US F-5). Also check that your chains in Rnd 4 aren’t loose.
If your motif is too small: Go up one hook size, to 4.5 mm (US 7).
If it cups: Your tension is tight on the spoke round, so loosen your chains.
If it ruffles: Your chains are too long, so tighten them slightly or go down a hook size.
Center Teardrop (Rnds 1–3)
Foundation: Ch 25. Sl st in the first ch to form a ring. The ring should be about 4.5 in (11.4 cm) around, and it forms the teardrop window, which ends up about 1 in × 1.75 in (2.5 cm × 4.4 cm) once worked. The joining ch is the top point of the drop.
Rnd 1: Ch 1. Work (sc, ch 2, sc) in the same ch as the join; this is the point. Then work into the chains as follows: sc in next 4 ch, hdc in next 4 ch, dc in next 8 ch, hdc in next 4 ch, sc in next 4 ch. Join with sl st to the first sc. (26 sts + ch-2 point sp)
The 8 dc fall at the bottom of the ring. Their height pushes the bottom curve outward, while the short sc near the point keep the top narrow. This creates the drop shape.
Rnd 2: Sl st in the ch-2 sp. Ch 1, (sc, ch 2, sc) in the ch-2 sp. Then sc in next 2 sts, [2 sc in next st, sc in next 2 sts] 7 times, 2 sc in next st, sc in next 2 sts. Join to the first sc. (36 sts + ch-2 point sp)
Check: the round works across all 26 sts (2 + 21 + 1 + 2 = 26) and adds 8 increases. That gives 34 sts, plus 2 point sc = 36.
Rnd 3: Sl st in the ch-2 sp. Ch 1, (sc, ch 2, sc) in the ch-2 sp. Then hdc in next 4 sts, [2 hdc in next st, hdc in next 2 sts] 9 times, 2 hdc in next st, hdc in next 4 sts. Join to the first sc. (48 sts + ch-2 point sp)
Check: the round works across all 36 sts (4 + 27 + 1 + 4 = 36) and adds 10 increases. That gives 46 sts, plus 2 point sc = 48. The increases are placed symmetrically, so the drop stays balanced.
Checkpoint: 2.75 in (7.0 cm) wide × 3.5 in (8.9 cm) tall. The band should be solid and lie flat.
Spoke Round (Rnd 4)
Rnd 4: Sl st in the ch-2 sp. Ch 3 (counts as dc), then (ch 3, dc) in the same sp; this is the point. Then [ch 1, dc in next st] 48 times, ch 1. Join with sl st to the top of the beg ch-3. (50 dc, 49 ch-1 sps + ch-3 point sp)
Every stitch of Rnd 3 gets one upright dc, which forms the radiating spokes. Keep the ch-1 spaces even so the gaps look like neat windows.
Checkpoint: 3.75 in (9.5 cm) × 4.5 in (11.4 cm).
Shell Base (Rnd 5)
The 49 ch-1 spaces divide into 7 groups of 7 spaces, one group for each rounded scallop. The top point uses the ch-3 sp.
Rnd 5: Sl st in the ch-3 sp. Ch 3 (counts as dc), then (2 dc, ch 3, 3 dc) in the same sp; this is the point shell.
Work the following group 7 times: sc in next ch-1 sp, ch 2, skip next ch-1 sp, 3 dc in each of the next 3 ch-1 sps, ch 2, skip next ch-1 sp, sc in next ch-1 sp.
Join to the top of the beg ch-3.
Count: Point shell = 6 dc + ch-3 sp. Each group = 2 sc + 9 dc + 2 ch-2 sps. Total: 69 dc, 14 sc, 14 ch-2 sps, 1 ch-3 sp (83 sts).
Check: 7 groups × 7 sps = 49 sps used, which matches Rnd 4 exactly. Where two groups meet, the last sc of one group and the first sc of the next sit side by side, and that pair forms the valley.
Checkpoint: 4.75 in (12.1 cm) × 5.75 in (14.6 cm). This is your size before the border.
Border (Rnds 6–7)
Border gauge: Each rounded scallop should measure about 1.5 in (3.8 cm) across at its base after Rnd 7. The border adds about 0.5 in (1.3 cm) at the sides and bottom, and about 0.75 in (1.9 cm) at the top point.
Scallop group for Rnd 6: 2 sc in ch-2 sp, hdc in next dc, dc in next 2 dc, 2 dc in each of next 3 dc, dc in next 2 dc, hdc in next dc, 2 sc in next ch-2 sp. (16 sts)
Rnd 6: Ch 3 (counts as dc). Dc in next 2 dc, (2 dc, ch 2, 2 dc) in ch-3 sp, dc in next 3 dc. Sc in next sc; this is a single valley.
Work a scallop group, then sc2tog over the next 2 sc (a valley). Repeat this 5 more times, for 6 groups in total, each followed by sc2tog.
Work 1 more scallop group, then sc in the last sc (single valley). Join to the top of the beg ch-3.
Count: Point = 10 dc + ch-2 tip. Plus 2 single-valley sc, 7 groups × 16 = 112 sts, and 6 sc2tog. Total: 10 + 2 + 112 + 6 = 130 sts + ch-2 tip sp.
Check: each group uses its 9 dc (1 + 2 + 3 + 2 + 1 = 9) and both ch-2 sps from Rnd 5.
Checkpoint: 5.5 in (14.0 cm) × 6.75 in (17.1 cm).
Rnd 7: Ch 1. Sc in the same st as the join and in the next 4 dc (5 sc). Work (sc, ch 2, sc) in the ch-2 tip, then sc in the next 5 dc. Sc in the next sc (single valley). Then:
- Group 1: Sc in next 8 sts, picot, sc in next 7 sts, then sc3tog over the last st of this group, the sc2tog, and the first st of the next group.
- Groups 2–6: [Sc in next 7 sts, picot, sc in next 7 sts, sc3tog over the last st of this group, the sc2tog, and the first st of the next group] 5 times.
- Group 7: Sc in next 7 sts, picot, sc in next 8 sts. Sc in the last sc (single valley). Join to the first sc.
Fasten off, leaving a 6 in (15.2 cm) tail.
Count by section:
- Point: 5 + 2 + 5 = 12 sc
- Single valleys: 2 sc
- Group 1: 15 sc + 1 sc3tog = 16
- Groups 2–6: (14 sc + 1 sc3tog) × 5 = 75
- Group 7: 15 sc
Total: 12 + 2 + 16 + 75 + 15 = 120 sts, plus the ch-2 tip and 7 picots.
Why the math works: Rnd 7 works over all 130 Rnd 6 sts. The 6 sc3tog decreases use 18 sts and turn them into 6 sts. The other 112 sts get 1 sc each. The tip sp adds 2 sc. That gives 112 + 6 + 2 = 120. The sc3tog pulls each valley inward, which deepens the scallop curve. The picot sits exactly at the center of each 16-st scallop, between its 8th and 9th sts. Groups 1 and 7 keep an extra sc on the side facing the point because their outer valleys are single sc, not decreases.
Checkpoint: 5.75 in (14.6 cm) × 7 in (17.8 cm).
Final Blocking
- Weave in both tails through the solid band and the scallops. Don’t weave them through the spokes, where they would show.
- Mist the motif with water until it is evenly damp. You can also soak it briefly and roll it in a towel.
- Lay the motif point up on a blocking mat.
- Pin the top point first, then the bottom center valley, so the height is 7 in (17.8 cm).
- Pin the widest scallop on each side so the width is 5.75 in (14.6 cm).
- Pin each picot and each valley, keeping the scallops symmetrical from side to side.
- Smooth the spokes so they radiate straight, and open the teardrop window with a fingertip.
- Let the motif dry completely before you unpin it.
Final Quality-Control Checklist
- Rnd 4 has 50 dc and 49 ch-1 sps.
- Rnd 5 has 7 groups of 9 dc, plus a 6-dc point shell.
- Rnd 6 has 130 sts, and Rnd 7 has 120 sts.
- There is 1 top point, 7 rounded scallops, and 7 picots.
- Both sides of the motif mirror each other.
- The teardrop window is open and centered.
- Spoke gaps are even, with no twisted chains.
- The motif lies flat, with no cupping or ruffling.
- Finished size is 5.75 in × 7 in (14.6 cm × 17.8 cm) ±0.25 in (0.6 cm).
- All tails are hidden and secure.
Troubleshooting
- The drop looks round, not pointed: Make sure Rnd 1 has dc only at the bottom, and that each point (sc, ch 2, sc) sits in the ch-2 sp.
- The motif cups after Rnd 4: Loosen your ch-1s, or try a bigger hook for Rnd 4 only.
- The motif ruffles after Rnd 4: Tighten your chains, and check that you worked 48 dc, not more.
- The groups don’t fit in Rnd 5: Recount the Rnd 4 spaces. You need exactly 49 ch-1 sps.
- The scallops look flat: Check the sc3tog in each valley in Rnd 7, and block the valleys pinned down firmly.
- One side looks longer: Compare your counts for Groups 1 and 7 in Rnd 7. Each should have 15 sc.
- The window closes up: Your foundation chain was too tight, so redo it with a larger hook.
Care
Hand wash in cool water with a mild detergent. Press out the water in a towel, then reshape and dry flat, re-pinning the point and scallops if needed.
Final Notes
The measurement chain keeps this motif on track. It measures 2.75 in × 3.5 in (7.0 cm × 8.9 cm) after the center band, then 3.75 in × 4.5 in (9.5 cm × 11.4 cm) after the spokes and 4.75 in × 5.75 in (12.1 cm × 14.6 cm) after the shell base. It reaches 5.5 in × 6.75 in (14.0 cm × 17.1 cm) after the scallops and finishes at 5.75 in × 7 in (14.6 cm × 17.8 cm) after the picot edge and blocking. The key counts are 26, 36, 48, 50 dc, 83, 130, and 120 sts. If you hit each checkpoint, the motif will come out true every time. If you want to use several motifs in a larger project later, block each one to the same final size first.
Happy crocheting!