

The Cobalt Bloom Table Runner is a light, lacy runner made from eight-petal flower motifs in one bold royal blue. Each flower has a crisp open center ring and fat, rounded petals with a soft ridge down the middle. Small ring fillers close the diamond-shaped gaps between the flowers. Chunky tassels hang from both short ends and spill over the table edge.
Using a single color keeps the look modern and graphic. The runner looks especially good on warm wood, which shows through the open flower centers and filler gaps. The style mixes boho and classic lace. It is easy to read and striking on a dining table or sideboard.
This pattern uses US crochet terms. The finished runner measures 15 in (38.1 cm) wide by 45 in (114.3 cm) long. Each end has 4 in (10.2 cm) tassels, for a total hanging length of 53 in (134.6 cm).
Construction is simple. Make one complete flower first. Join every flower after that to its neighbors at the petal tips on the last round (join-as-you-go). Then work small ring fillers into the gaps and tie 14 tassels to the short ends.
Finished Size and Construction
- Finished size: 15 in x 45 in (38.1 cm x 114.3 cm), without tassels
- Total length with tassels: 53 in (134.6 cm)
- Skill level: Easy-intermediate
- Terminology: US crochet terms
- Yarn weight: Worsted weight (#4) cotton
- Hook: 4.0 mm (G-6)
- Number of pieces: 27 flower motifs, 16 ring fillers, 14 tassels
- Layout: 3 motifs wide x 9 motifs long
- Motif size: 5 in (12.7 cm) across, petal tip to opposite petal tip
- Size before border: 15 in x 45 in (38.1 cm x 114.3 cm)
- Border depth: 0 in (0 cm) of solid border. The petal scallops form the edge, and the tassel edge adds 4 in (10.2 cm) at each short end.
Materials
Choose a smooth worsted cotton, either mercerized or soft matte. Cotton gives the petals clean definition, lies flat on the table, and holds up to washing after spills. Avoid fuzzy or very splitty yarns, which blur the petal ridges.
- Royal blue: 400 g, approximately 615 m (about 673 yd)
This total covers 27 motifs (about 10 g each), 16 fillers, 14 tassels, and joining tails. The quantity includes a margin of roughly 10 percent, so you should not run short even if your tension is a little loose.
Tools:
- 4.0 mm (G-6) crochet hook
- Tapestry needle
- Scissors
- Stiff card or tassel board, 4.25 in (10.8 cm) tall
- Rust-proof pins and a blocking surface
- Measuring tape
- Spray bottle
Abbreviations (US Terms)
- ch – chain
- sl st – slip stitch
- sc – single crochet
- hdc – half double crochet
- dc – double crochet
- tr – treble crochet
- sk – skip
- sp – space
- st(s) – stitch(es)
- rep – repeat
Special stitch – Joining tip (JT): Instead of the usual ch 2 at a petal tip, work ch 1, sl st into the ch-2 tip sp of the neighboring motif’s petal, ch 1. The JT takes the exact place of the ch-2 tip, so the petal’s stitch count does not change.
Gauge and Checkpoints
Make one full motif before anything else and measure it. Gauge for this pattern is measured round by round, not with a swatch.
- After Round 1: the sc ring measures 1.5 in (3.8 cm) across, with a center hole of about 0.75 in (1.9 cm).
- After Round 2: the chain loops measure about 3.5 in (8.9 cm) from loop tip to opposite loop tip.
- After Round 3: the finished flower measures 5 in (12.7 cm) from petal tip to opposite petal tip, lightly pressed flat.
If your motif is larger than 5 in (12.7 cm), go down to a 3.75 mm hook. If it is smaller, go up to a 4.5 mm hook. Being off by only 0.25 in (0.6 cm) per motif adds up to 2.25 in (5.7 cm) over the 9-motif length, so get this right before you continue.
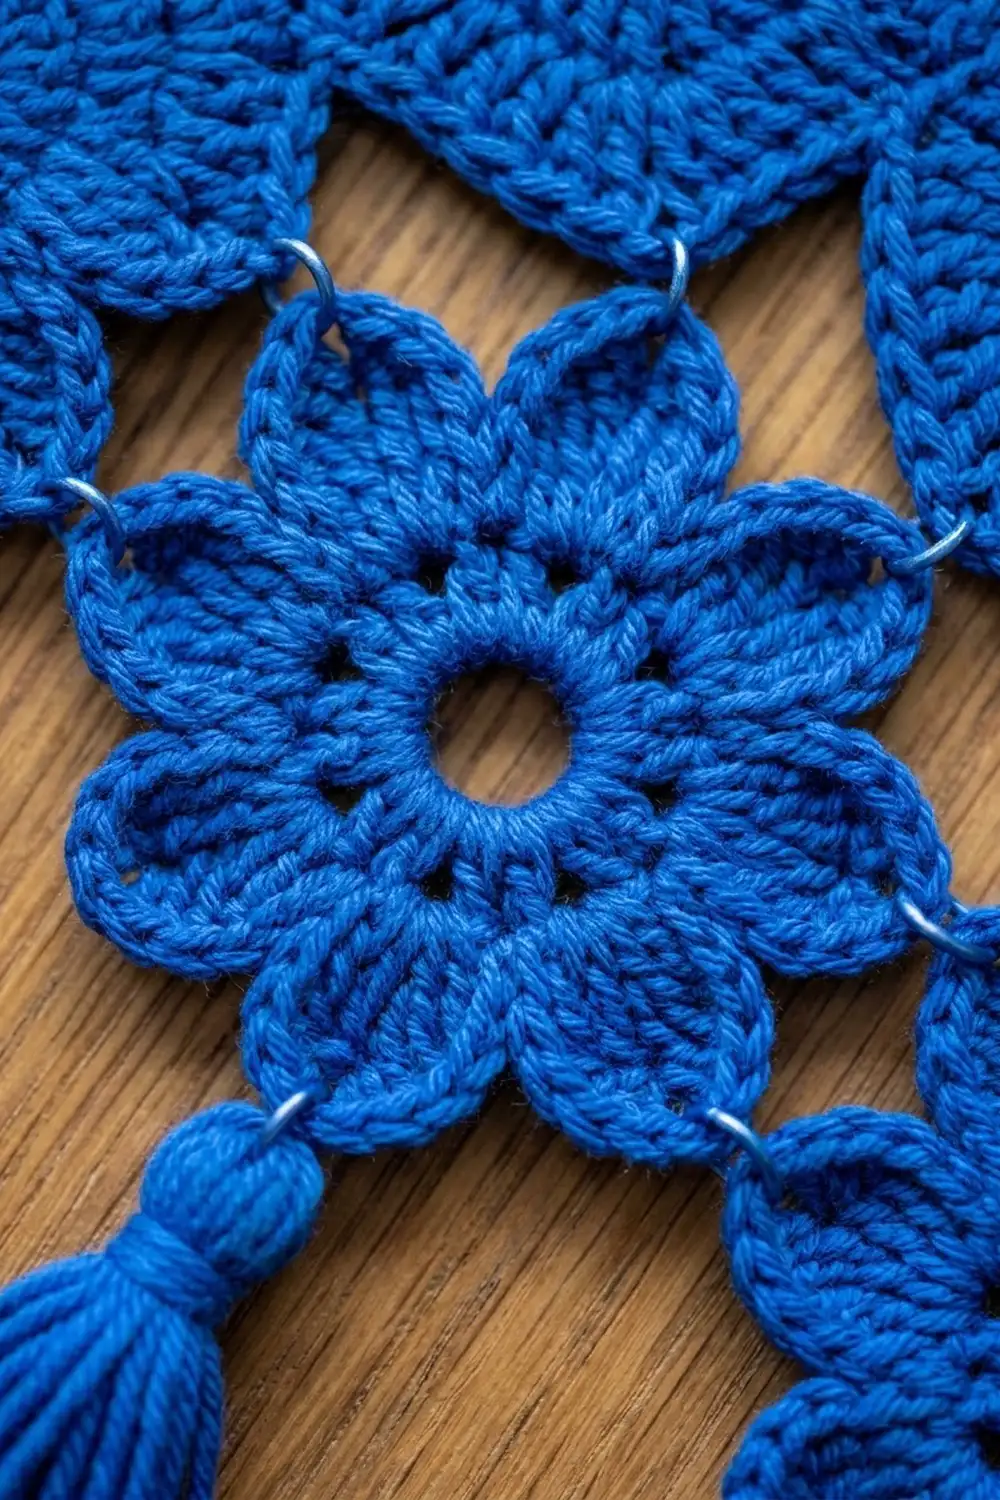
Flower Motif
Make Motif 1 completely on its own first. All later motifs use the same pattern, but some of their ch-2 tips in Round 3 become Joining tips.
Round 1 (center ring): Ch 12, sl st in first ch to form a ring. Ch 1, work 24 sc into the ring, covering the chain completely. Sl st in first sc to join. (24 sc)
Push the sc together evenly around the ring. This round makes the thick, rounded center ring with the open hole in the middle.
Round 2 (petal loops): Ch 1, sc in same st as join, ch 7, sk 2 sts, sc in next st; rep from * 6 more times, ch 7, sk 2 sts, sl st in first sc to join. (8 sc and 8 ch-7 loops)
Check the math: each repeat uses 3 sts of Round 1 (1 sc + 2 skipped), and 8 x 3 = 24.
Round 3 (petals): Sl st into first ch-7 loop. In the ch-7 loop work (sc, hdc, 2 dc, 2 tr, ch 2, 2 tr, 2 dc, hdc, sc); sl st in the next sc of Round 2; rep from * 7 more times, working the last sl st into the first sl st. Fasten off.
Each petal has 12 sts plus 1 ch-2 tip. (Round total: 96 sts, 8 ch-2 tips, 8 sl sts)
Packing 12 sts into a ch-7 loop makes each petal full and rounded. The covered chain shows as a soft ridge down the center of the petal. The ch-2 tip gives every petal a clean point for joining, fillers, and tassels.
Petal positions: Lay the motif with one petal pointing straight up. Name the petals by compass direction: N, NE, E, SE, S, SW, W, NW. You will join motifs through the N, E, S, and W tips. The diagonal tips (NE, SE, SW, NW) are used for fillers and tassels.
Make All Pieces
All pieces are royal blue.
- Flower motifs: 27 (about 10 g and 15.5 m each)
- Ring fillers: 16 (worked into the gaps after joining)
- Tassels: 14 (7 per short end)
Layout grid (3 wide x 9 long):
Row 1:  M1   M2   M3
Row 2:  M4   M5   M6
Row 3:  M7   M8   M9
Row 4:  M10  M11  M12
Row 5:  M13  M14  M15
Row 6:  M16  M17  M18
Row 7:  M19  M20  M21
Row 8:  M22  M23  M24
Row 9:  M25  M26  M27
A filler goes in each gap where 4 motifs meet. There are 2 gaps between each pair of rows and 8 such row boundaries, so 2 x 8 = 16 fillers.
Joining
Method: Join-as-you-go in Round 3, using the Joining tip (JT) at the N, E, S, and W tips only.
Stitch-to-stitch logic:
- M1: Work completely, with no joins.
- Rest of Row 1: Work the W petal tip as a JT into the E tip of the motif on the left.
- First motif of each new row: Work the N petal tip as a JT into the S tip of the motif above.
- All other motifs: Work the N tip as a JT into the S tip of the motif above, and the W tip as a JT into the E tip of the motif on the left.
Each joined tip uses exactly one ch-2 sp on each motif. No stitches are added at the seams, so motif centers sit 5 in (12.7 cm) apart in both directions. Leave the diagonal tips free for now.
Tension advice: Keep the JT chains as relaxed as a normal ch 2. A tight sl st pulls the tips together and buckles the petals. A loose one leaves a floppy hinge. Lay each new motif flat beside its neighbor before joining to make sure it is not twisted.
Size checkpoint: After Row 1, the strip should measure 15 in (38.1 cm) wide. After Row 3, the piece should measure 15 in x 15 in (38.1 cm x 38.1 cm). If you are more than 0.5 in (1.3 cm) off, check your hook size before continuing.
Ring Fillers
Each interior gap is a diamond framed by 4 free diagonal tips: SE of the upper left motif, SW of the upper right motif, NW of the lower right motif, and NE of the lower left motif.
Filler: Ch 5, sl st in first ch to form a ring. Ch 1, 3 sc in ring, ch 3, sl st in ch-2 tip sp of the next diagonal petal, ch 3; rep from * 3 more times. Sl st in first sc to join. Fasten off. (12 sc, 4 joins)
Work the joins clockwise around the gap so the ring sits centered. The fillers use 16 x 4 = 64 diagonal tips.
Border
This runner has no solid border. The petal tips form a scalloped edge, and the only edge finishing is the tassels on each short end. Border gauge is therefore the motif gauge: 1 motif = 5 in (12.7 cm) of edge.
Long sides (no stitches added): Each motif on a long side shows 3 outward tips (for example NE, E, and SE on the right side). 9 motifs x 3 tips = 27 scallop tips per long side. These stay free so the edge keeps its flower outline.
Short ends (tassel edge): Each end motif shows 3 outward tips (SW, S, and SE at the bottom; NW, N, and NE at the top). 3 motifs x 3 tips = 9 tips per short end. These 9 tips become 7 tassel points:
- 3 center tips (the S or N tip of each motif): 1 tassel each = 3 points
- 2 outer corner tips (at the bottom, SW of the left motif and SE of the right motif; mirrored at the top): 1 tassel each = 2 points
- 2 paired tips where neighboring motifs meet (SE of one motif + SW of the next): hold both tips together for 1 tassel = 2 points
Check: 3 + 2 + (2 x 2) = 9 tips, giving 7 tassel points. Two ends = 14 tassels.
Why the math works: The runner has 108 diagonal tips (27 motifs x 4). They split exactly: 64 used by fillers, 12 used by tassels (6 per end), and 32 left free as scallops on the long sides (16 per side). Every tip has a job, so nothing pulls or bunches.
Tassels (make 14)
- Wrap yarn 30 times around the 4.25 in (10.8 cm) card. Cut the yarn.
- Slide a 12 in (30.5 cm) tie strand under the wraps at the top and knot it tightly. Leave both ends long.
- Cut the wraps along the bottom edge.
- About 0.75 in (1.9 cm) below the top, wrap a separate 20 in (50.8 cm) strand around the bundle 6 times to form the head. Knot it, then use the needle to pull the ends down into the tassel.
- Trim the bottom evenly so the tassel is 4 in (10.2 cm) long in total.
Attaching: Thread the tie strand ends through the ch-2 tip sp (or through both tips for a paired point). Knot securely on the back and bury the ends inside the tassel head.
Final Blocking
- Weave in all ends, running each tail through 1 to 1.25 in (2.5 to 3.2 cm) of sts and back.
- Lay the runner on a blocking surface, right side up, with the tassels free.
- Mist evenly until damp but not dripping.
- Pin the 4 corner motifs first, to a rectangle of 15 in x 45 in (38.1 cm x 114.3 cm).
- Pin every outer petal tip along the long sides in a straight line. Then open each center ring into a round shape.
- Ease each filler ring so it sits centered in its gap.
- Let the runner dry completely, usually 12 to 24 hours.
- Unpin, comb the tassels with your fingers, and trim any stray strands.
Final Quality-Control Checklist
- 27 motifs, each 5 in (12.7 cm) across
- Every motif has a 24-sc center ring and 8 petals of 12 sts each
- All N/E/S/W joins are secure and flat, with no twisted motifs
- 16 fillers, each joined at 4 diagonal tips
- 27 free scallop tips on each long side
- 7 tassels per short end, all 4 in (10.2 cm) long
- Runner measures 15 in x 45 in (38.1 cm x 114.3 cm) after blocking
- All ends woven in and hidden
Troubleshooting
Center ring ruffles: The 24 sc are crowded. Loosen your tension in Round 1, or start with ch 13.
Petals cup forward: Your tr are tight. Go up one hook size for Round 3 only.
Petals look skinny with a hole in the middle: Your ch-7 loops are too loose. Chain more firmly, or make ch-6 loops and keep the same 12 petal sts.
Runner is narrower in some places: A JT was worked too tightly. Undo it and rework with a relaxed ch 1 on each side of the sl st.
Filler rings pucker the gap: Change ch 3 to ch 4 on each side of the filler joins.
Tassels look thin: Add 6 to 10 more wraps per tassel.
Care
Hand wash, or machine wash on a gentle cold cycle inside a laundry bag. Reshape and dry flat. Do not tumble dry, which can shrink the cotton and frizz the tassels.

Final Notes
The whole runner depends on one chain of measurements. Round 1 gives a 1.5 in (3.8 cm) ring, Round 2 reaches 3.5 in (8.9 cm), and Round 3 finishes at 5 in (12.7 cm). Three motifs make 15 in (38.1 cm) of width and nine motifs make 45 in (114.3 cm) of length. The 4 in (10.2 cm) tassels bring the total to 53 in (134.6 cm). Check each step and the runner will come out right.
Happy crocheting!