

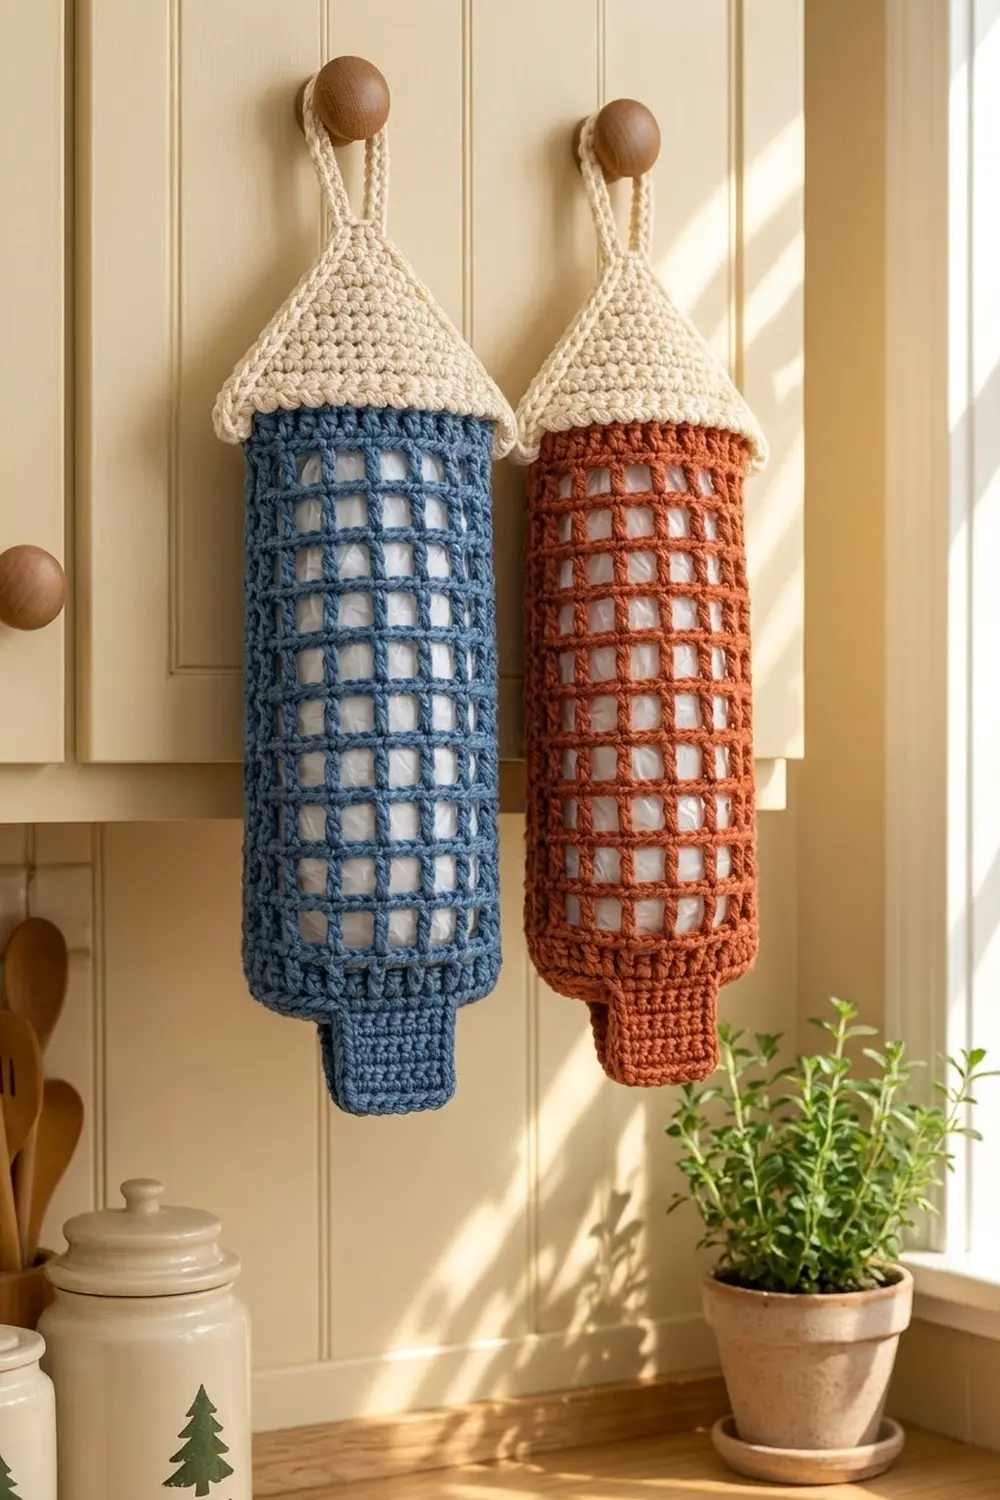
The Little Lighthouse is a hanging plastic bag holder. It has a tall open-mesh body, a cream peaked roof, a hanging loop at the top and a narrow solid spout at the bottom. You push bags in through the small opening under the loop and pull them out one at a time from the spout. When it is full of white bags, the mesh looks like a crisp checkerboard against the solid color.
The sample comes in two colorways: denim blue with a cream roof, and rust with a cream roof. Both use a sturdy bulky cotton. It gives clean, square mesh holes and a firm roof that keeps its triangle shape on a cabinet knob.
This pattern uses US crochet terms. The finished holder is 6 in (15.2 cm) wide across the mesh body, 7.3 in (18.5 cm) wide across the roof brim and about 20.2 in (51.3 cm) tall, plus a 3 in (7.6 cm) hanging loop.
The holder is one continuous piece. First you work the body from the bottom up as a tube of filet-style mesh with solid single crochet bands. Next you add the cream roof, decreasing only at the two side folds. Then you return to the starting chain and work the spout downward. A crab stitch edge finishes both openings.
Finished Size and Construction
- Finished size: 6 in (15.2 cm) wide body, 20.2 in (51.3 cm) tall, plus a 3 in (7.6 cm) loop
- Skill level: Easy to intermediate
- Terminology: US terms
- Yarn weight: Bulky (#5) cotton or cotton blend
- Hook: 6.0 mm (US J-10)
- Number of pieces: 1, worked in the round with no sewing
- Layout: One vertical tube, from the bottom: spout, mesh body, roof, loop
- Body size: 6 in (15.2 cm) wide flat, 14 in (35.6 cm) tall
- Size before border: 19.7 in (50.0 cm) tall, from the spout edge to the roof opening
- Border depth: about 1/4 in (0.6 cm) at each opening
Materials
Choose a smooth, firm bulky cotton or cotton blend of about 150 m per 100 g. Cotton keeps the mesh square and won’t stretch out when the holder is full. Avoid fluffy or very soft acrylic, because it lets the mesh sag.
- Main color (Denim Blue or Rust): 120 g, about 180 m
- Contrast color (Cream): 40 g, about 60 m
These amounts include a margin of about 20 percent, which leaves enough for checking gauge and ripping back if needed.
Tools:
- 6.0 mm (US J-10) crochet hook
- 4 locking stitch markers
- Tapestry needle
- Scissors
- Measuring tape
- Spray bottle and rustproof pins for blocking
- A rolled towel for shaping
Abbreviations (US Terms)
- ch – chain
- sl st – slip stitch
- sc – single crochet
- dc – double crochet
- sc2tog – single crochet 2 together (one decrease)
- sk – skip
- sp – space
- st(s) – stitch(es)
- FLO / BLO – front loop only / back loop only
- rep – repeat
- rnd(s) – round(s)
Special stitch – Crab stitch (reverse sc): Work from left to right (if you crochet right-handed). Insert the hook into the next stitch to the right, yarn over and pull up a loop, then yarn over and pull through both loops. This makes a corded, twisted edge.
Gauge and Checkpoints
- Single crochet: 12 sts and 14 rnds = 4 in (10.2 cm)
- Mesh: 6 mesh squares (12 sts) and 5 mesh rnds = 4 in (10.2 cm)
Each mesh square is one dc plus one ch-1 space. That makes it 2 sts wide and about 0.8 in (2.0 cm) tall. Single crochet and mesh both work up at 3 sts per inch, so the tube stays the same width in every section.
Test your gauge on the piece itself. Work Rnds 1–4 of the body, then flatten the tube. It should measure 6 in (15.2 cm) across. If it is wider, rip back and go down one hook size. If it is narrower, go up one hook size. Don’t add or remove stitches, because the roof and spout counts are based on 36.
Checkpoints:
- After Rnd 2: tube 6 in (15.2 cm) wide flat
- After 5 mesh rounds: mesh 4 in (10.2 cm) tall
- After 10 mesh rounds: mesh 8 in (20.3 cm) tall
- After Rnd 20: body 14 in (35.6 cm) tall
- After the roof: roof 3.1 in (7.9 cm) tall, brim 7.3 in (18.5 cm) wide
- After the spout: spout 2.6 in (6.6 cm) tall, 3 in (7.6 cm) wide
If your mesh rounds come out too short, pull up the first loop of each dc a little higher. If they come out too tall, keep the ch-1 snug and the dc compact.

Body (Main Color)
Work the body in joined rounds with the right side facing you. Don’t turn. Each round starts at one side fold of the flattened tube.
Foundation: With main color, ch 36. Sl st in the first ch to form a ring, taking care not to twist.
Rnd 1: Ch 1, sc in each ch around, sl st to first sc. (36 sc)
Rnd 2: Ch 1, sc in each st around, sl st to first sc. (36 sc)
These two rounds make the solid lower band, about 0.6 in (1.5 cm) tall.
Rnd 3 (mesh setup): Ch 4 (counts as dc + ch 1), sk next st, *dc in next st, ch 1, sk next st; rep from * 16 more times, sl st in 3rd ch of beginning ch-4. (18 dc + 18 ch-1 sps = 36 sts; 18 mesh squares)
Rnds 4–18: Ch 4 (counts as dc + ch 1), sk ch-1 sp, *dc in next dc, ch 1, sk ch-1 sp; rep from * 16 more times, sl st in 3rd ch of beginning ch-4. (36 sts; 18 mesh squares)
Stack each dc directly on top of the dc below so the holes line up in straight columns. You now have 16 mesh rounds, about 12.8 in (32.5 cm) tall.
Rnd 19: Ch 1, sc in each dc and in each ch-1 sp around, sl st to first sc. (18 + 18 = 36 sc)
Rnd 20: Ch 1, sc in each st around, sl st to first sc. (36 sc)
Fasten off. The body measures 6 in (15.2 cm) wide flat and 14 in (35.6 cm) tall.
Roof (Cream)
The roof starts with a brim that overhangs the body. After that it decreases only at the two side folds, so it flattens into a triangle.
Rnd 1 (FLO): Join cream at the side fold where you joined the body rounds. Working in front loops only of Rnd 20, ch 1, *sc in next 8 sts, 2 sc in next st; rep from * 3 more times, sl st to first sc. (36 worked 1-per-stitch + 4 added = 40 sc)
Rnd 2: Ch 1, *sc in next 9 sts, 2 sc in next st; rep from * 3 more times, sl st to first sc. (40 worked 1-per-stitch + 4 added = 44 sc)
Rnd 3 (BLO): Ch 1, sc in back loop of each st around, sl st to first sc. (44 sc)
The unworked front loops of Rnd 2 form a raised ridge along the edge of the brim. Flatten the piece so the round join sits at one fold. Place a marker in st 1 and another in st 23. Each face now has 22 sts.
Rnd 4: Ch 1, *sc2tog, sc in next 18 sts, sc2tog; rep from * once more, sl st to first st. (20 per face; 40 sts)
Rnd 5: Ch 1, *sc2tog, sc in next 16 sts, sc2tog; rep from * once more, sl st to first st. (18 per face; 36 sts)
Rnd 6: Ch 1, *sc2tog, sc in next 14 sts, sc2tog; rep from * once more, sl st to first st. (16 per face; 32 sts)
Rnd 7: Ch 1, *sc2tog, sc in next 12 sts, sc2tog; rep from * once more, sl st to first st. (14 per face; 28 sts)
Rnd 8: Ch 1, *sc2tog, sc in next 10 sts, sc2tog; rep from * once more, sl st to first st. (12 per face; 24 sts)
Rnd 9: Ch 1, *sc2tog, sc in next 8 sts, sc2tog; rep from * once more, sl st to first st. (10 per face; 20 sts)
Rnd 10: Ch 1, *sc2tog, sc in next 6 sts, sc2tog; rep from * once more, sl st to first st. (8 per face; 16 sts)
Rnd 11: Ch 1, *sc2tog, sc in next 4 sts, sc2tog; rep from * once more, sl st to first st. (6 per face; 12 sts)
In every round, the two sc2tog stitches at each fold sit side by side. This draws a clean diagonal roof line. The top opening is 2 in (5.1 cm) wide flat. Place a marker in the live loop and set the roof aside. You’ll finish it with the border and loop.
Spout (Main Color)
Rnd 1: Turn the holder upside down. Join main color at the side fold, in the free loops of the foundation chain. Ch 1, sc2tog around, sl st to first st. (18 sc2tog = 18 sts)
This sharp decrease round makes the square shoulders where the mesh body steps in to the spout.
Rnds 2–9: Ch 1, sc in each st around, sl st to first sc. (18 sc)
The spout is 3 in (7.6 cm) wide flat and 2.6 in (6.6 cm) tall. Don’t fasten off.
Border
The border is one round of crab stitch at each opening. It adds about 1/4 in (0.6 cm) of height at each end and stops the openings from stretching as bags are pulled through.
Border gauge: Work crab stitch 1 per stitch at the same 3 sts per inch as single crochet, so each edge keeps its width.
Spout border: Continuing from Rnd 9, ch 1, crab stitch in each st around, sl st to first st. (18 sts; 9 per flattened side) Fasten off.
Roof border: Put the marked roof loop back on your hook. Ch 1, crab stitch in each st around, sl st to first st. (12 sts; 6 per flattened side) Don’t fasten off.
Hanging loop: Ch 18, sl st in st 7 of the border round (at the opposite fold). Work 24 sc over the chain loop, then sl st in st 1 of the border round. Fasten off. The loop stands about 3 in (7.6 cm) above the roof, and the bag opening stays clear underneath it.
Why the math works: Both openings have even counts (18 and 12), so the stitches split evenly between the two flattened faces. One crab stitch per stitch adds no stitches and no width. The spout therefore stays 18 ÷ 3 ÷ 2 = 3 in (7.6 cm) wide, and the roof opening stays 12 ÷ 3 ÷ 2 = 2 in (5.1 cm) wide.
Final Blocking
- Weave in all ends through the sc bands rather than the mesh, where tails would show.
- Slide a rolled towel into the body so the tube is filled but not stretched.
- Lightly mist the whole piece with water.
- Flatten the holder so the round joins sit on one side fold.
- Use your fingers to straighten the mesh so every hole lines up vertically.
- Pin the roof brim to 7.3 in (18.5 cm) wide and press the two roof faces into a crisp triangle.
- Pin the spout to 3 in (7.6 cm) wide and square the shoulders.
- Let it dry completely before you remove the towel.
Final Quality-Control Checklist
- Body measures 6 in (15.2 cm) wide flat and 14 in (35.6 cm) tall
- 16 mesh rounds of 18 squares each, with straight columns
- Roof brim is 7.3 in (18.5 cm) wide with a visible ridge
- Roof decreases sit only at the two folds
- Top opening is 2 in (5.1 cm) wide and the loop is centered
- Spout is 3 in (7.6 cm) wide and 2.6 in (6.6 cm) tall before the border
- Total height is about 20.2 in (51.3 cm), plus the loop
- All ends are hidden in solid stitches
Troubleshooting
The mesh twists around the tube. You are probably joining into the wrong chain. Always join into the 3rd ch of the beginning ch-4.
The holes are rectangles, not squares. Adjust the height of your dc, or make the ch-1 slightly looser.
The roof bulges instead of folding flat. Check that the decreases sit exactly at the markers, and move the markers up every round.
The brim curls upward. Your tension in Rnd 1 is too tight. Redo the FLO round a little more loosely.
Bags come out in bunches. Work the spout border with a smaller hook to tighten the opening.
The loop stretches. Work the 24 sc over the chain firmly, or add a round of sl st along the loop.
Care
Hand wash in cool water and lay flat to dry, reshaping the roof while it is damp. Cotton can also go in the machine on a gentle cycle inside a mesh bag.
Final Notes
The measurement chain is simple. At 3 stitches per inch, 36 stitches make a 12 in (30.5 cm) tube that lies 6 in (15.2 cm) flat. Sixteen mesh rounds plus four sc rounds make a 14 in (35.6 cm) body. The roof grows to 44 stitches for a 7.3 in (18.5 cm) brim, then loses 4 stitches per round down to a 12-stitch opening. The spout halves the body to 18 stitches for a 3 in (7.6 cm) dispenser. The 2.6 in (6.6 cm) spout, 14 in (35.6 cm) body and 3.1 in (7.9 cm) roof add up to 19.7 in (50.0 cm), and the two borders bring the total to about 20.2 in (51.3 cm).
Check each stage against these numbers and your holder will hang straight and let bags out neatly.
Happy crocheting!