

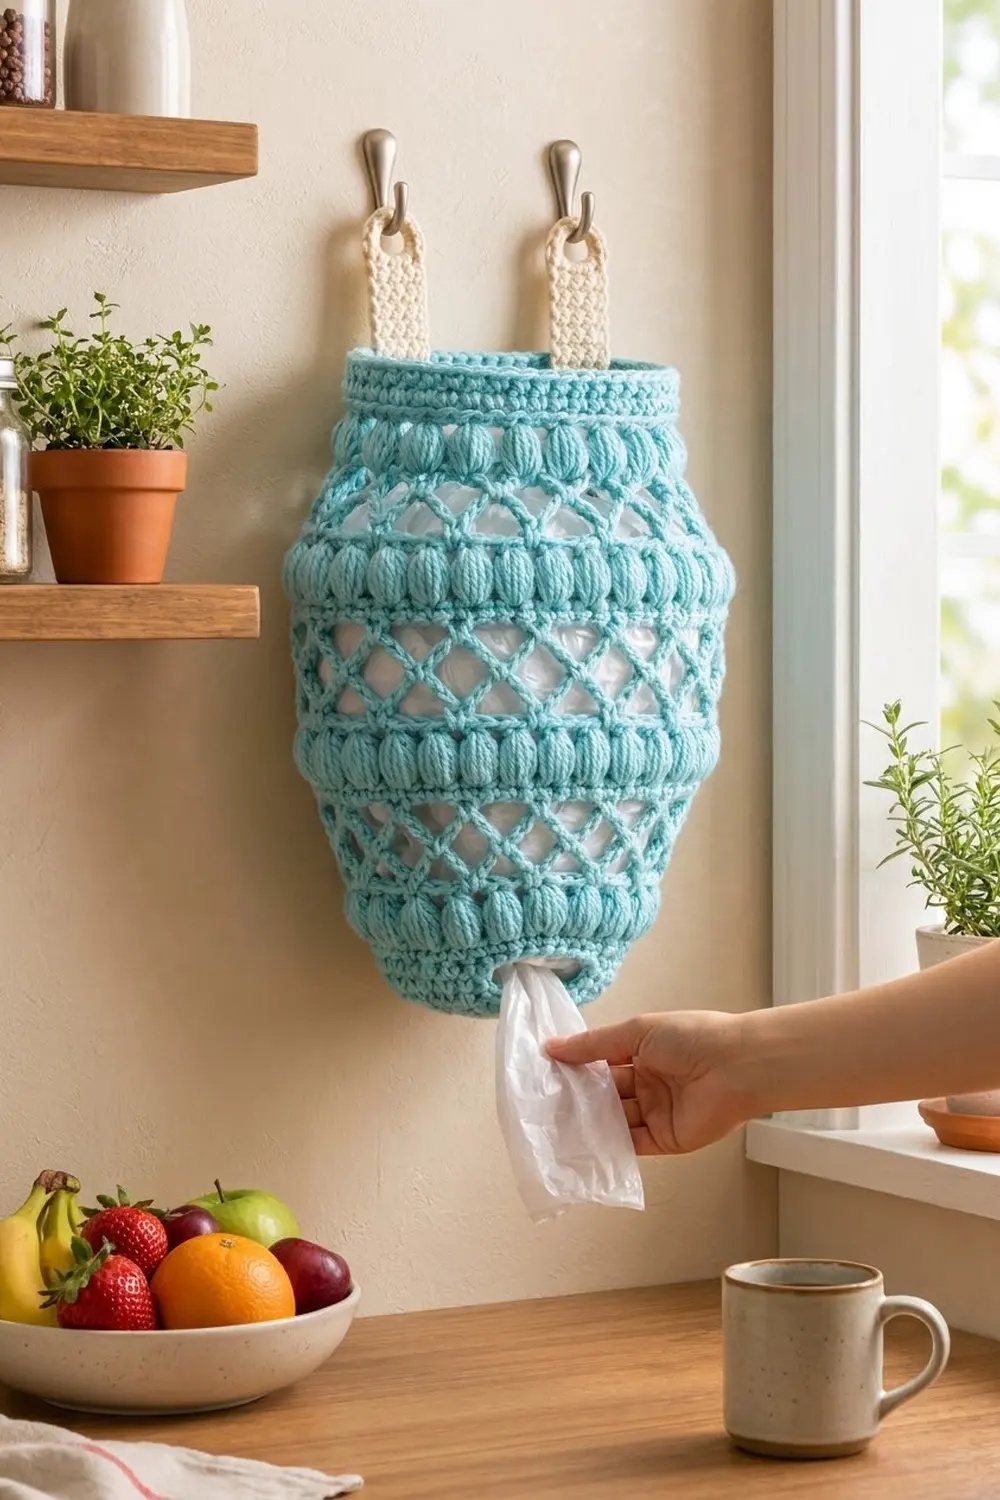
This holder keeps grocery bags tidy and easy to reach. Push bags in through the open top, then pull them out one at a time through the oval slot in the base. The body is shaped like a rounded jar: narrow at the bottom, wide in the middle and narrow again at the neck.
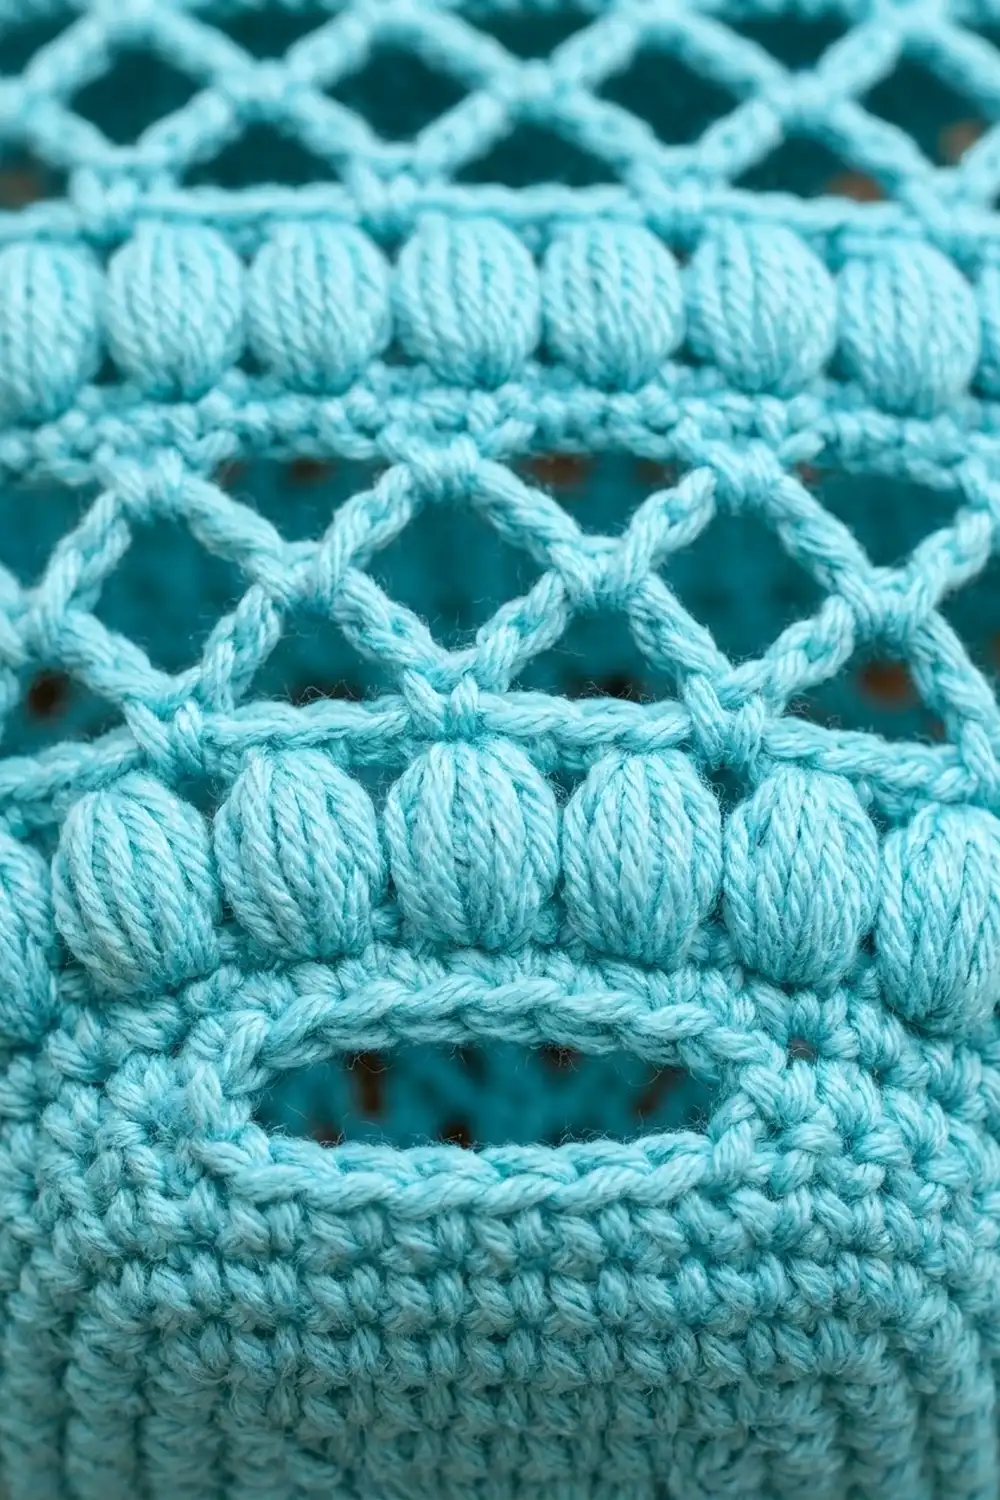
The design uses soft aqua cotton for the body and cream for two small hanging tabs. Raised puff-stitch bands alternate with open diamond-lattice mesh, so the piece looks textured and airy without being hard to make. The pattern uses US crochet terms throughout.
The finished holder is about 8 in (20.3 cm) wide at its widest point and 12 in (30.5 cm) tall from base to rim when flattened. The tabs add about 2 in (5.1 cm) above the rim.
You’ll work the body in one seamless piece from the bottom up. It starts with a chain ring that becomes the dispensing slot, then grows through the puff and mesh bands, and finishes with a solid rim. Finally, you’ll work two cream tabs in rows and sew them inside the back of the rim.
Finished Size and Construction
- Finished size (flat): 8 in (20.3 cm) wide at the widest point × 12 in (30.5 cm) tall
- Rim and base width (flat): 6 in (15.2 cm)
- Dispensing slot: about 3 in (7.6 cm) across when flattened
- Skill level: Intermediate
- Terminology: US
- Yarn weight: Worsted (#4)
- Hook: 5.0 mm (H-8)
- Number of pieces: 3 (1 body + 2 tabs)
- Layout: one tube-shaped body; tabs sewn to the inside back of the rim
- Body size before the rim: 8 in × 11 in (20.3 cm × 27.9 cm)
- Rim (border) depth: about 1 in (2.5 cm)
- Tab size: 1.25 in × 4.5 in (3.2 cm × 11.4 cm)
Materials
Choose a smooth worsted-weight cotton or cotton blend. Cotton holds its shape when the holder is stuffed with bags, and it shows off the puff stitches clearly. Acrylic also works but will stretch more.
- Aqua (body): 140 g, about 238 m (260 yd)
- Cream (tabs): 15 g, about 26 m (28 yd)
These quantities include a margin of roughly 15% for your gauge swatch and small differences in tension.
Tools:
– 5.0 mm (H-8) crochet hook
– Tapestry needle
– 4 stitch markers
– Scissors
– Measuring tape
– Rust-proof pins and a blocking surface
– A rolled towel or a stack of plastic bags for shaping
Abbreviations (US Terms)
- ch: chain
- sc: single crochet
- inc: 2 sc in the same stitch
- sc2tog: single crochet 2 together
- sl st: slip stitch
- sk: skip
- sp: space
- BLO: back loop only
- st(s): stitch(es)
- rnd(s): round(s)
Puff stitch (puff): (Yarn over, insert hook in the stitch, yarn over and pull up a loop to about 0.5 in / 1.3 cm tall) 4 times. You’ll have 9 loops on the hook. Yarn over and draw through all 9 loops. The ch 1 that follows locks the puff closed.
Gauge and Checkpoints
Gauge: 16 sc and 18 rnds = 4 in (10.2 cm) in sc worked in the round.
This pattern is a single item, so test your gauge on a small swatch first. Then use the body itself as your second test: work through Rnd 7 and measure before going further.
Checkpoints (measure the tube flattened):
– After Rnd 5 (48 sts): 6 in (15.2 cm) wide
– After Rnd 7 (56 sts): 7 in (17.8 cm) wide, about 2 in (5.1 cm) tall
– After Rnd 12 (64 sts): 8 in (20.3 cm) wide, about 4.25 in (10.8 cm) tall
– After Rnd 17: about 6.5 in (16.5 cm) tall
– After Rnd 22 (48 sts): 6 in (15.2 cm) wide, about 8.75 in (22.2 cm) tall
– After Rnd 27: about 11 in (27.9 cm) tall
– After Rnd 32: about 12 in (30.5 cm) tall
The mesh bands relax a little sideways, and the puff bands bulge slightly. Width readings within 0.25 in (0.6 cm) of the target are fine.
If your piece is too big, go down to a 4.5 mm hook. If it’s too small, go up to a 5.5 mm hook. Don’t change the stitch counts, because every band depends on them.
Body
Use aqua. Join every round with a sl st to the first st. The beginning ch 1 doesn’t count as a stitch. In every round that follows a puff round, work 1 sc into each puff and 1 sc into each ch-1 sp.
Base and Dispensing Slot
Foundation: Ch 24 and join with a sl st to form a ring, taking care not to twist the chain. This ring is the dispensing slot.
Rnd 1: Ch 1, sc in each ch around. (24 sts)
Rnd 2: Ch 1, (sc in next st, inc) 12 times. (36 sts)
Rnd 3: Ch 1, (sc in next 2 sts, inc) 12 times. (48 sts)
Rnds 1–3 form a flat ring around the slot. That ring becomes the base.
Rnd 4: Ch 1, sc in BLO of each st around. (48 sts) The unused front loops form a turning edge, so the work begins to rise into a bowl.
Rnd 5: Ch 1, sc in each st around. (48 sts)
Checkpoint: the piece is 6 in (15.2 cm) wide when flattened, and the slot is about 3 in (7.6 cm) across.
Puff Band A
Rnd 6: Ch 1, (puff in next st, ch 1, sk next st) 24 times, then sl st to the top of the first puff. (24 puffs + 24 ch-1 sps = 48 sts)
Rnd 7 (growth): Ch 1, (sc in next 5 sts, inc) 8 times. (56 sts)
Mesh Band 1
Rnd 8: Ch 1, sc in first st, (ch 5, sk 3, sc in next st) 13 times, ch 5, sk 3, sl st to the first sc. (14 ch-5 loops)
Rnd 9: Sl st in the first 3 ch of the next loop, ch 1, sc in the same loop, (ch 5, sc in next loop) 13 times, ch 5, sl st to the first sc. (14 ch-5 loops) The loops of this round sit offset from the loops of Rnd 8, which creates the diamond lattice.
Rnd 10 (conversion): Sl st in the first 2 ch of the next loop, ch 1, work 4 sc in each loop around. (14 loops × 4 sc = 56 sts)
Puff Band B
Rnd 11: Ch 1, (puff, ch 1, sk 1) 28 times. (28 puffs + 28 ch-1 sps = 56 sts)
Rnd 12 (growth): Ch 1, (sc in next 6 sts, inc) 8 times. (64 sts)
Checkpoint: 8 in (20.3 cm) wide.
Mesh Band 2
Rnds 13–14: Repeat Rnds 8–9, working the ch-5 repeat 15 times before the last ch 5. (16 ch-5 loops in each round)
Rnd 15 (conversion): Work 4 sc in each loop around. (16 loops × 4 sc = 64 sts)
Puff Band C (Widest)
Rnd 16: Ch 1, (puff, ch 1, sk 1) 32 times. (32 puffs + 32 ch-1 sps = 64 sts)
Rnd 17: Ch 1, sc in each puff and each ch-1 sp around. (64 sts)
Mesh Band 3
Rnds 18–19: Work as for Rnds 13–14. (16 ch-5 loops in each round)
Rnd 20 (conversion, shaping in): Work (4 sc in next loop, 3 sc in next loop) 8 times. (8 × 4 + 8 × 3 = 56 sts)
Puff Band D
Rnd 21: Ch 1, (puff, ch 1, sk 1) 28 times. (56 sts)
Rnd 22 (decrease): Ch 1, (sc in next 5 sts, sc2tog) 8 times. (48 sts)
Checkpoint: back to 6 in (15.2 cm) wide. This is the jar’s neck.
Mesh Band 4
Rnds 23–24: Repeat Rnds 8–9, working the ch-5 repeat 11 times before the last ch 5. (12 ch-5 loops in each round)
Rnd 25 (conversion): Work 4 sc in each loop around. (12 loops × 4 sc = 48 sts)
Puff Band E
Rnd 26: Ch 1, (puff, ch 1, sk 1) 24 times. (48 sts)
Rnd 27: Ch 1, sc in each puff and each ch-1 sp around. (48 sts)
Checkpoint: about 11 in (27.9 cm) tall and 6 in (15.2 cm) wide. That makes five puff bands and four lattice bands.
Hanging Tabs (Make 2)
Use cream. Work in rows.
Ch 6.
Row 1: Sc in the 2nd ch from the hook and in each remaining ch. (5 sts)
Rows 2–14: Ch 1, turn, sc in each st across. (5 sts)
Row 15 (hole): Ch 1, turn, sc in first st, ch 3, sk 3, sc in last st. (2 sc + one ch-3 sp)
Row 16: Ch 1, turn, sc in first st, 3 sc in the ch-3 sp, sc in last st. (5 sts)
Rows 17–18: Ch 1, turn, sc across. (5 sts)
Row 19: Ch 1, turn, sc2tog, sc in next st, sc2tog. (3 sts)
Row 20: Ch 1, turn, sc in each st across. (3 sts) This narrowing gives the tab its rounded top.
Edging: Ch 1, then sc evenly around the whole tab with 1 sc per row-end, 3 sc in each bottom corner and 1 sc in each st across the top and bottom. Sl st to the first sc and fasten off, leaving a 12 in (30.5 cm) tail.
Each tab measures 1.25 in × 4.5 in (3.2 cm × 11.4 cm). The hole is about 0.75 in (1.9 cm) across.
Border: Top Rim
Border gauge: 16 sc = 4 in (10.2 cm), the same as the body.
Continue in aqua from Rnd 27.
Rnds 28–32: Ch 1, sc in each st around. (48 sts in each round)
When the holder is flattened, each round has 24 sts across the front and 24 sts across the back. The tube folds at the sides instead of forming corners, so there are no corner stitches to add or count twice: 24 + 24 = 48.
Why the math works: 48 sc at 4 sc per inch gives a 12 in (30.5 cm) circumference, or 6 in (15.2 cm) flat. That exactly matches Rnd 27 and Puff Band E, so the rim sits straight without ruffling or pulling in. The five rounds add about 1 in (2.5 cm), bringing the total height to 12 in (30.5 cm).
Fasten off with an invisible join and weave in the end.
Attaching the Tabs
Flatten the body with the beginning-of-round seam at one side fold. Count the 24 back sts. Center tab 1 over back sts 3–7 and tab 2 over back sts 18–22. That leaves 2 sts at each fold and 10 sts, or 2.5 in (6.4 cm), between the tabs.
Slide each tab 2 in (5.1 cm) down inside the rim. Whipstitch around the overlapped part through the inner layer of the rim only, so the stitching stays hidden from the front. Keep the sewing firm but not tight, because these tabs carry the full weight of the bags.
Final Blocking
- Weave in all the ends before blocking.
- Soak the holder in cool water for 10 minutes, then press out the water gently. Don’t wring it.
- Roll it in a towel to remove the extra moisture.
- Stuff the body loosely with a rolled towel or plastic bags so it takes on the jar shape.
- Lay it flat and pin it to 8 in (20.3 cm) at the widest band and 6 in (15.2 cm) at the rim and base.
- Ease each mesh band so the diamonds open evenly, and pinch each puff upright.
- Pin the tabs straight and flat.
- Let it dry completely, then remove the stuffing.
Final Quality-Control Checklist
- 5 puff bands and 4 lattice bands, with even diamonds all the way around
- Stitch counts match: 48 / 56 / 64 / 64 / 56 / 48, with 48 at the rim
- The slot opens to about 3 in (7.6 cm) and the chain ring isn’t twisted
- The rim lies flat at 6 in (15.2 cm)
- The tabs are level, aligned and sewn securely through the rim
- All ends are woven in on the inside
Troubleshooting
Puffs look flat or loose: Pull each loop up to the same height and make sure you lock every puff with the ch 1.
Diamonds are lopsided: Check that Rnd 9 starts from the center of a loop and that you’ve counted the correct number of loops in each round.
The body flares at the rim: Your rim gauge is loose. Work Rnds 28–32 with a hook one size smaller.
The slot is too tight for bags: Remake the base with a ch 28 ring and work Rnd 2 as (sc in next st, inc) 12 times plus sc in the last 4 sts. That gives 40 sts. Then work Rnd 3 as (sc in next 4 sts, inc) 8 times for 48 sts. This keeps every later count the same.
Tabs stretch: Sew them through two rim rounds instead of one, or line them with a strip of felt.
Care
Hand wash in cool water and lay the holder flat to dry, reshaping it while it’s damp. Avoid the dryer, which can shrink cotton and flatten the puffs.
Final Notes
The measurement chain runs like this: a 24-st slot ring grows to a 48-st base, 6 in (15.2 cm) wide. The body widens to 56 sts at 7 in (17.8 cm), then 64 sts at 8 in (20.3 cm), and narrows back to 48 sts at 6 in (15.2 cm). The 48-st rim matches the neck, which brings the holder to 12 in (30.5 cm) tall. Check each stage as you go and the finished jar will hang neatly with its bags tucked inside.
Happy crocheting!