

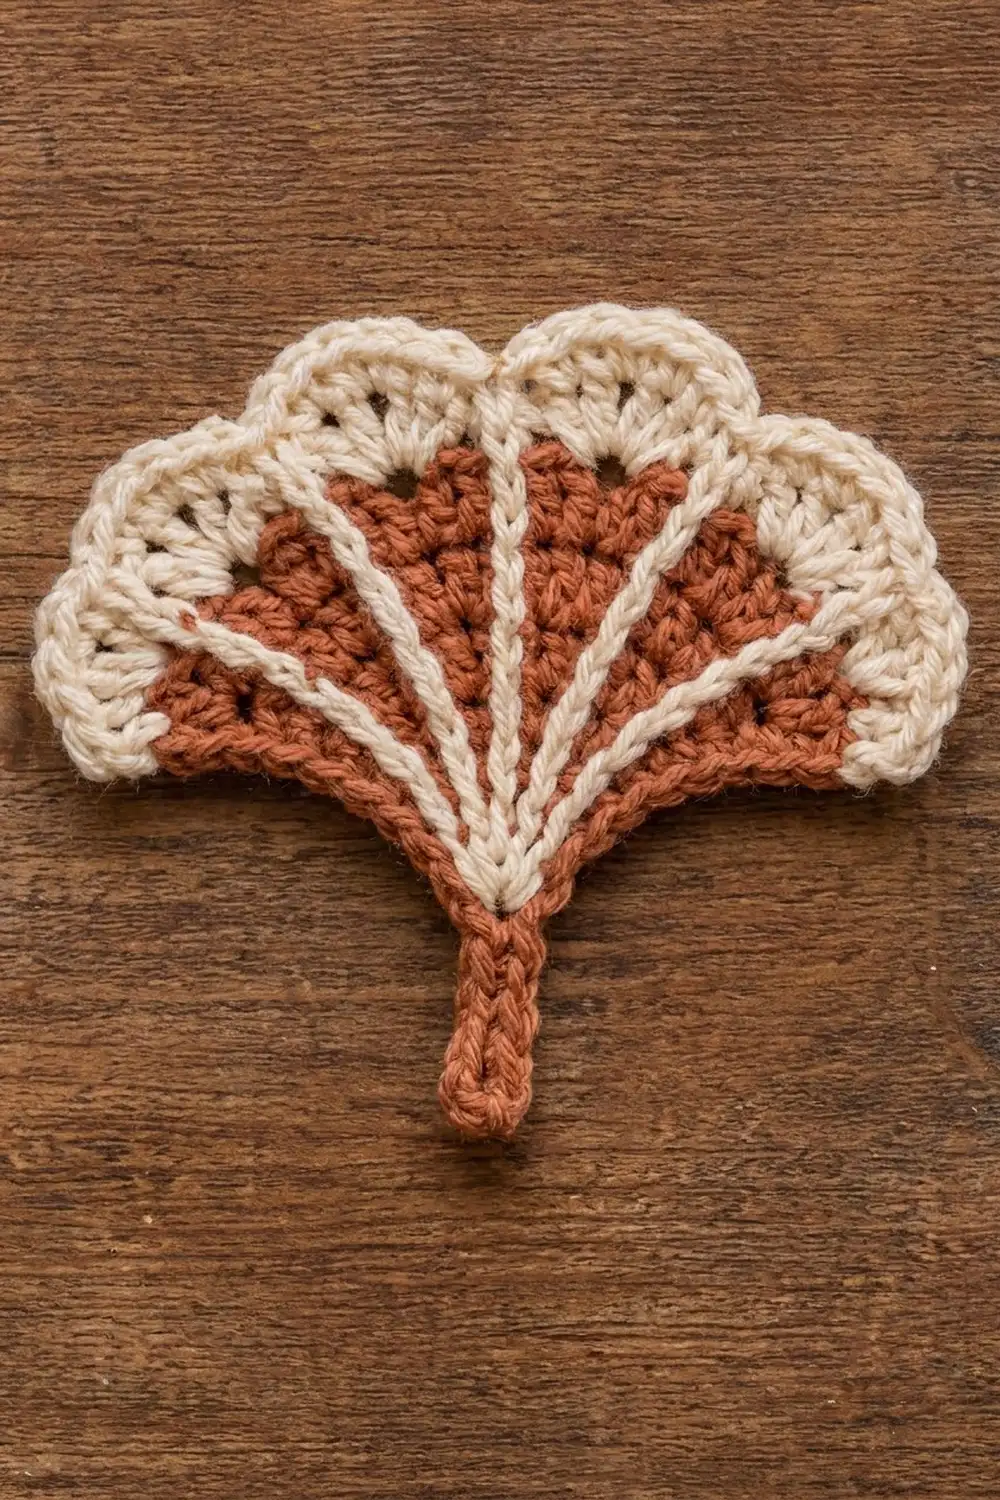
This ginkgo leaf is a small, graphic motif. It has a warm rust fan, seven crisp cream ribs that radiate from the base, and a soft cream edge of shell scallops. A small notch at the top center splits the leaf into two gentle lobes, as on a real ginkgo leaf. A short, sturdy rust stem finishes the shape.
The palette has two colors: terracotta rust for the leaf body and stem, and natural cream for the ribs and border. The style is calm and slightly vintage. It works well as an appliqué, ornament, coaster-style accent or bookmark charm.
This pattern uses US crochet terms. The finished leaf measures about 6 in (15.2 cm) wide and 4.5 in (11.4 cm) tall including the stem.
Construction is simple and logical:
– Work the fan body in 5 rows of double crochet, growing out from a single point.
– Add the cream ribs with surface slip stitch.
– Work two border rounds that form the scallops and the center notch.
– Attach a rust stem at the base.
Finished Size and Construction
- Finished size: about 6 in (15.2 cm) wide × 4.5 in (11.4 cm) tall, including the stem
- Skill level: Easy–Intermediate
- Terminology: US crochet terms
- Yarn weight: Worsted (#4), cotton or cotton blend
- Hook: 4.0 mm (G-6)
- Number of pieces: 1 (single motif)
- Layout: single leaf, not joined to anything
- Piece size: 6 in (15.2 cm) wide; the fan radius from the base to the scallop tips is 3 in (7.6 cm)
- Size before border: about 4.5 in (11.4 cm) wide, with a 2.25 in (5.7 cm) radius
- Border depth: about 0.75 in (1.9 cm)
- Stem length: about 1.5 in (3.8 cm)
Materials
Yarn: Use a smooth worsted-weight cotton or cotton blend with good stitch definition, about 200 m per 100 g. Cotton keeps the scallops crisp and the ribs sharp. Acrylic also works, but the leaf will be a little softer.
- Color A – Terracotta / Rust: 10 g, about 20 m (body and stem)
- Color B – Cream / Natural: 8 g, about 16 m (ribs and border)
These quantities include a margin of roughly 25% for your gauge swatch and weaving in ends.
Tools:
– 4.0 mm (G-6) crochet hook
– 8 locking stitch markers
– Tapestry needle
– Scissors
– Ruler or tape measure
– Blocking mat and rust-proof pins
– Spray bottle with water
Abbreviations (US Terms)
- ch – chain
- sl st – slip stitch
- sc – single crochet
- hdc – half double crochet
- dc – double crochet
- sc2tog – single crochet 2 together
- st(s) – stitch(es)
- rep – repeat
- RS – right side
Special stitches:
- Shell: 5 dc worked in the same stitch.
- Surface slip stitch (surface sl st): Hold the yarn at the back (WS) of the work. Insert the hook from front to back through a gap in the fabric, yarn over, and pull a loop through the fabric and through the loop on the hook. Move up a short step and repeat. The result is a raised chain-like line on the front.
Gauge and Checkpoints
Gauge: 16 dc and 9 dc rows = 4 in (10.2 cm) in Color A with a 4.0 mm hook.
Because this is one small motif, the leaf itself is your best test. Work Rows 1–5, then measure before adding the ribs or border.
Checkpoints:
– After Row 1: the fan is about 0.75 in (1.9 cm) from the base point to the top of the stitches.
– After Row 3: the radius is about 1.25 in (3.2 cm).
– After Row 5: the radius is 2.25 in (5.7 cm), and the body is about 4.5 in (11.4 cm) wide when laid flat.
– After the border: the radius is 3 in (7.6 cm), and the width is about 6 in (15.2 cm).
– After the stem: the total height is about 4.5 in (11.4 cm).
If your fan is too big: Go down a hook size to 3.75 mm (F-5).
If your fan is too small: Go up to 4.5 mm (7).
If the edge ruffles strongly: Your dc are probably short. Try a looser yarn over on the dc, or go up a hook size.
If the fan cups instead of lying flat: Your dc are tall compared with their width. Go down a hook size.
A very slight wave on the outer edge is normal at this stage. Blocking flattens it.
Leaf Body
Use Color A. The body is worked in turned rows. Every row is divided into 8 equal wedges, and the cream ribs will later sit on the 7 boundaries between them. All increases fall at the end of each wedge, so the boundaries stay straight.
Row 1 (RS): Ch 4. Work 7 dc in the 4th ch from the hook. Turn.
(8 sts; the skipped ch 3 counts as the first dc. Each st is 1 wedge.)
Row 2: Ch 3 (counts as dc). Dc in the same st, then 2 dc in each of the next 7 sts. Turn.
(16 sts: 8 wedges of 2 sts)
Row 3: Ch 3 (counts as dc). 2 dc in the next st. Dc in the next st, 2 dc in the next st; rep from * 7 times. Turn.
(24 sts: 8 wedges of 3 sts)
Row 4: Ch 3 (counts as dc). Dc in the next st, 2 dc in the next st. Dc in each of the next 2 sts, 2 dc in the next st; rep from * 7 times. Turn.
(32 sts: 8 wedges of 4 sts)
Row 5: Ch 3 (counts as dc). Dc in each of the next 2 sts, 2 dc in the next st. Dc in each of the next 3 sts, 2 dc in the next st; rep from * 7 times.
(40 sts: 8 wedges of 5 sts)
Fasten off, leaving a 4 in (10.2 cm) tail.
Each row adds exactly 8 sts, one per wedge. That is more than a flat half circle needs, so the fan opens to a little wider than 180 degrees. This extra width gives the leaf its drooping shoulders.
Checkpoint: Lay the fan flat. The radius should be 2.25 in (5.7 cm) and the width about 4.5 in (11.4 cm).
Mark the wedges: On Row 5, place a marker in the gap after sts 5, 10, 15, 20, 25, 30 and 35, counting from the turning chain. These 7 gaps are the rib lines. The center gap, after st 20, is also where the top notch goes.
Cream Ribs (Surface Slip Stitch)
Use Color B. Work with the RS facing you and the yarn held behind the work. The ribs go on before the border, so their ends will be covered by the edging.
- Start at the base ring. Insert the hook into the ring between the Row 1 stitches that line up with the first marker. Pull up a loop, leaving a 4 in (10.2 cm) tail behind.
- Follow the wedge boundary straight up toward the marker. Work 2 surface sl sts per dc row: one at mid-height of the row, and one in the gap at the top of the row.
- That makes 10 surface sl sts per rib (5 rows × 2).
- After the last sl st at the top of Row 5, pull the yarn to the back and fasten off.
- Repeat for all 7 marked gaps.
Tension tip: Keep the slip stitches about as loose as your dc are wide. If a rib puckers the fan, pull it out and redo it with a looser loop, or use a hook one size larger just for the ribs.
Checkpoint: You should have 7 evenly spaced cream ribs that all meet at the base. The fan should still lie flat at 4.5 in (11.4 cm) wide.
Weave all rib ends into the back of the rust fabric, staying within the same color.
Border
Border gauge: 4 sc = 1 in (2.5 cm), and the Round 2 shells stand about 0.5 in (1.3 cm) tall. Together, the two rounds add 0.75 in (1.9 cm) to the radius.
Work with the RS facing you, using Color B. The perimeter has four parts:
– the base point
– side edge A (the row ends of Rows 1–5)
– the top arc (the 40 sts of Row 5)
– side edge B
Round 1: Join Color B with a sl st in the base ring, then ch 1. Work the round as follows:
– Base: 1 sc in the base ring.
– Side A: 2 sc in each of the 5 row ends, for 10 sc.
– Top arc, first corner: 3 sc in the first st of Row 5.
– Top arc, first half: sc in each of the next 18 sts (sts 2–19).
– Notch: sc2tog over sts 20 and 21. This pulls in the center and starts the notch.
– Top arc, second half: sc in each of the next 18 sts (sts 22–39).
– Top arc, second corner: 3 sc in the last st (st 40).
– Side B: 2 sc in each of the 5 row ends, for 10 sc.
Sl st to the first sc to join.
(Total: 64 sc. Base 1 + side A 10 + top arc 43 + side B 10 = 64.)
Here is how the top arc reaches 43:
– 40 Row 5 sts worked 1 per st = 40
– plus 2 extra sts at each corner = +4
– minus 1 at the sc2tog = −1
– 40 + 4 − 1 = 43 sc
Round 2: Ch 1. Work the round as follows:
– Lower edge, first side: sc in the base sc, sc in each of the 10 side A sc, sc in the 1st corner sc, then sc in the center corner sc.
– First lobe: Skip 1 sc, shell in the next sc, skip 1 sc, sc in the next sc; rep from * 5 times. On the 5th repeat, replace the final sc with a sl st. That sl st lands exactly on the sc2tog and forms the notch.
– Second lobe: Skip 1 sc, shell in the next sc, skip 1 sc, sc in the next sc; rep from * 5 times. The final sc lands on the center sc of the second corner.
– Lower edge, second side: sc in the 3rd corner sc, then sc in each of the 10 side B sc.
Sl st to the first sc to join. Fasten off.
(Total: 10 shells (50 dc), 33 sc and 1 sl st.)
Why the math works:
– Each scallop repeat uses exactly 4 Round 1 sts.
– From the center corner sc to the notch there are 20 sts: the 3rd corner sc, the 18 arc sc and the notch st. 20 ÷ 4 = 5 shells, landing exactly on the notch.
– The second lobe mirrors this: 18 arc sc + 2 corner sc = 20 sts, so 5 shells land on the second corner center.
– Stitch check for the whole round: 13 sts before the first lobe + 20 + 20 + 11 sts after the second lobe = 64. That matches Round 1 exactly.
– The sides stay plain sc, so the shoulders stay smooth and the scallops sit only on the top arc, as on the real leaf.
Checkpoint: The radius from the base to the shell tips is 3 in (7.6 cm), and the width is about 6 in (15.2 cm).
Stem
Use Color A.
- Join Color A with a sl st in the base sc of Round 2.
- Ch 11. Hdc in the 3rd ch from the hook and in each of the next 8 ch, for 9 hdc.
- Sl st into the base sc again to secure the stem.
- Fasten off.
The stem should hang straight down from the center rib and measure about 1.5 in (3.8 cm).
Checkpoint: The total height from the stem tip to the top of the lobes is about 4.5 in (11.4 cm).
Weave in all remaining ends, keeping each color behind stitches of the same color.
Final Blocking
- Lightly mist the leaf with water until it is damp but not soaked.
- Lay it face up on the blocking mat.
- Pin the base point first, then pin the stem straight down, about 1.5 in (3.8 cm) long.
- Gently open the fan. Pin each shoulder corner so the width is 6 in (15.2 cm).
- Pin the tip of every shell, spacing the 5 scallops on each lobe evenly.
- Pin the center notch in the shallow dip. Don’t stretch it upward.
- Straighten the 7 cream ribs with your fingertips so they radiate evenly.
- Let the leaf dry completely, usually 6–12 hours, before unpinning.
Final Quality-Control Checklist
- Row 5 has exactly 40 sts in 8 wedges of 5.
- There are 7 cream ribs, each with 10 surface sl sts, all meeting at the base.
- Round 1 has 64 sc, including 43 across the top arc.
- Round 2 has 10 shells, 5 per lobe, with a sl st notch at the center.
- The sides are plain sc with no shells.
- The stem has 9 hdc, is about 1.5 in (3.8 cm) long, and is centered under the middle rib.
- The leaf is about 6 in (15.2 cm) wide and 4.5 in (11.4 cm) tall.
- All ends are woven into same-color stitches.
- The leaf lies flat after blocking.
Troubleshooting
The fan ruffles badly. Check that Row 5 has 40 sts, not more. If the count is right, use a smaller hook for Rows 4–5.
The ribs are crooked. You drifted off the wedge boundary. Use the markers from Row 5 as targets, and check each row’s boundary stitch before slipping through.
The ribs pucker the fabric. Your surface sl sts are too tight. Redo them more loosely or with a larger hook.
The shells don’t land on the notch. Recount Round 1. Each half of the top arc must have 18 sc between the corner group and the sc2tog.
The notch is invisible. Make sure you worked the sc2tog in Round 1 and the sl st (not an sc) in Round 2. Pin the dip firmly when blocking.
The stem curls. Steam or mist it and pin it straight. You can also work the hdc into the back bump of the chain.
Rust shows through the cream border. Pull the Color B join snug and work the first sc over the rust tail.
Care
Hand wash in cool water with mild soap, then press out the water in a towel. Reshape the leaf, pin it if needed, and let it dry flat.

Final Notes
The measurement chain is short and easy to check:
– Row 5 = 40 sts, 4.5 in (11.4 cm) wide, 2.25 in (5.7 cm) radius
– 7 ribs × 10 surface sl sts
– Round 1 = 64 sc, with 43 on the arc
– Round 2 = 10 shells across two lobes, adding 0.75 in (1.9 cm)
– Finished leaf = 6 in (15.2 cm) wide
– Stem = 1.5 in (3.8 cm), for a total height of 4.5 in (11.4 cm)
If each checkpoint matches, the finished leaf will too.
Happy crocheting!