
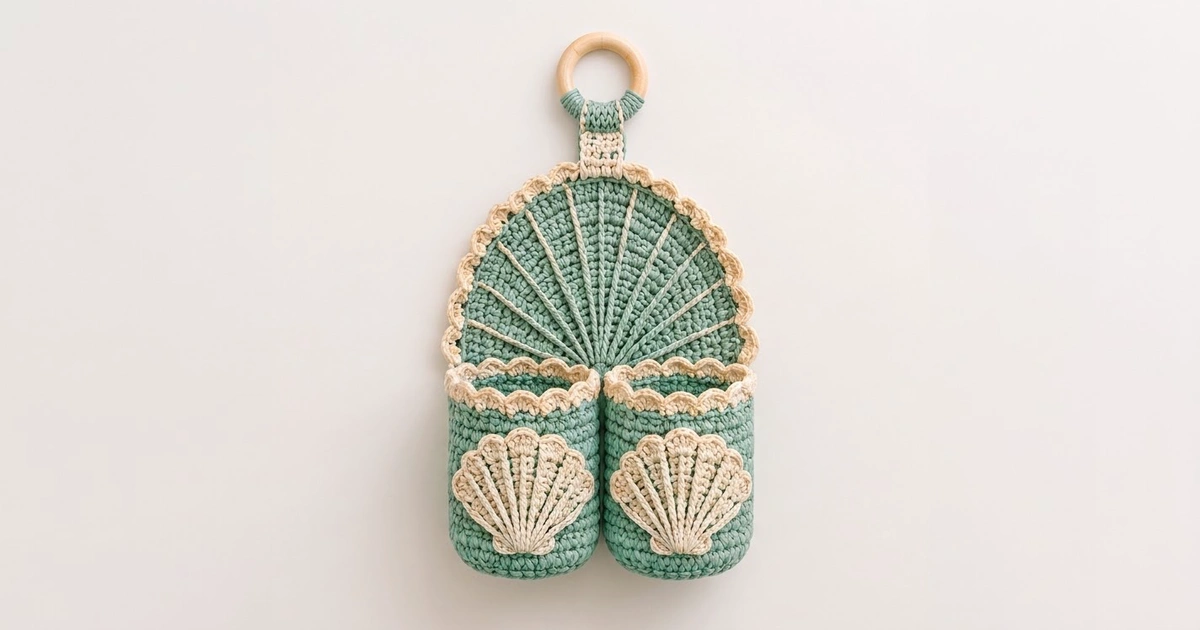
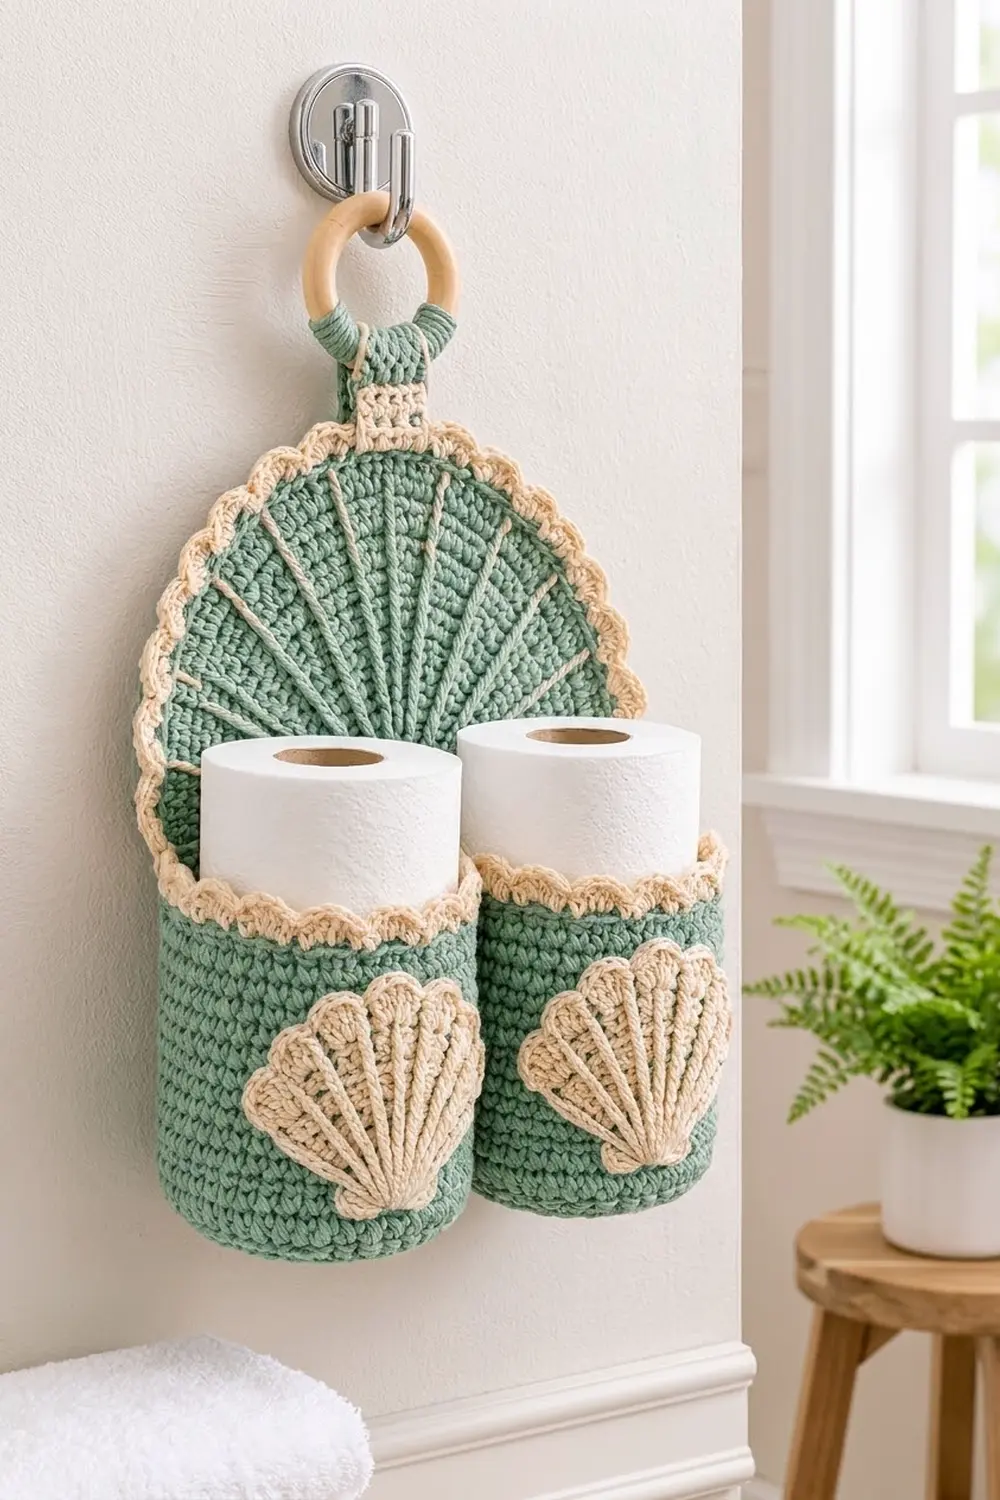
This hanging holder stores two spare toilet rolls in a soft, coastal style. A sage-green arched backboard holds two round pockets, and each pocket has a cream seashell on the front. Cream scallops trim the arch and the pocket rims, and thin cream rays fan across the arch like the ribs of a shell.
You need two colors: sage green for the body and cream for the trims, rays, shells and hanging tab. A natural wooden ring at the top lets the holder hang from a towel hook or door hook.
The pattern uses US crochet terms. The finished holder is 11.2 in (28.4 cm) wide and 10.8 in (27.4 cm) tall without the ring, or about 14.8 in (37.6 cm) tall including the tab and ring. Each pocket holds a standard roll up to 4.5 in (11.4 cm) wide and 4.2 in (10.7 cm) tall.
Construction overview: you work the arch as a flat half circle in turned rows of half double crochet, then pick up stitches along its straight edge to work the rectangle. Next you add the cream rays and border. The pockets are worked from the bottom up in joined rounds. You then make the shells and tab and sew everything together.
Finished Size and Construction
- Finished size: 11.2 in (28.4 cm) wide x 10.8 in (27.4 cm) tall, plus about 4 in (10.2 cm) of tab and ring
- Skill level: Intermediate
- Terminology: US
- Yarn weight: Worsted (#4) cotton
- Hook: 4.5 mm (US 7)
- Number of pieces: 6 crocheted pieces (1 backboard, 2 pockets, 2 shells, 1 tab) plus 1 wooden ring
- Layout: backboard at the back; the 2 pockets sit side by side along its lower edge; the tab and ring are at the top center
- Piece size: pocket 4.8 in (12.2 cm) wide x 5.6 in (14.2 cm) tall; shell 3.5 in (8.9 cm) wide x 2.75 in (7.0 cm) tall
- Backboard size before border: 9.7 in (24.6 cm) wide x 9.8 in (24.9 cm) tall
- Border depth: 0.75 in (1.9 cm) on the arch and sides, 0.25 in (0.6 cm) on the bottom edge
Materials
Use a smooth, firm worsted-weight cotton or cotton blend. Cotton holds its shape well, keeps the pockets upright and copes with bathroom humidity. Avoid fluffy or very stretchy yarns, because the pockets will sag.
- Sage Green: 330 g, about 510 m (558 yd)
- Cream: 85 g, about 131 m (143 yd)
These amounts include a margin of about 15% for your gauge swatch and small differences in tension.
Tools:
– 4.5 mm (US 7) crochet hook
– Wooden ring, 3 in (7.6 cm) across
– Tapestry needle
– Locking stitch markers
– Rust-proof pins
– Scissors
– Blocking mat and spray bottle
– Measuring tape
Abbreviations (US Terms)
- ch – chain
- sl st – slip stitch
- sc – single crochet
- hdc – half double crochet
- dc – double crochet
- BLO – back loop only
- FPdc – front post double crochet
- BPdc – back post double crochet
- MR – magic ring
- sp – space
- st(s) – stitch(es)
- RS / WS – right side / wrong side
Special stitch – Scallop: skip 2 sts, 5 dc in next st, skip 2 sts, sc in next st. Each scallop uses 6 sts.
Surface slip stitch: hold the yarn behind the work. Insert the hook from front to back through the fabric, pull up a loop, then pull it through the loop on your hook. Each new stitch forms a chain-like line on the front.
Gauge and Checkpoints
- Hdc gauge: 14 sts and 9 rows = 4 in (10.2 cm)
- Sc gauge: 16 sts and 18 rounds = 4 in (10.2 cm)
Before you start the backboard, make one pocket base (Rounds 1–10) as your test piece. It should measure about 4.5 in (11.4 cm) across.
Checkpoints:
– Backboard Row 5: 4.4 in (11.2 cm) across the straight edge
– Backboard Row 11: 9.8 in (24.9 cm) across, and the arch is 4.9 in (12.4 cm) tall
– Backboard Row 22: 9.7 in (24.6 cm) wide x 9.8 in (24.9 cm) tall
– Pocket Round 10: 15 in (38.1 cm) around
– Pocket Round 32: walls 4.9 in (12.4 cm) tall
– Shell: 3.5 in (8.9 cm) wide
If your pieces are too big, go down 0.5 mm in hook size. If they are too small, go up 0.5 mm. If only your row height is off, change the way you pull up loops rather than changing the hook. The pockets should fit a roll snugly, so check gauge before you work the pocket walls.
Backboard (Sage Green)
Arch
The turning ch 2 does not count as a stitch.
Row 1 (RS): MR, ch 2, 5 hdc in ring. Pull the ring closed and turn. (5 sts)
Row 2: Ch 2, 2 hdc in each st. Turn. (10 sts)
Row 3: Ch 2, hdc in next st, 2 hdc in next st; repeat from * 5 times. Turn. (15 sts)
Rows 4–11: Ch 2, hdc in each of next (row number minus 2) sts, 2 hdc in next st; repeat from * 5 times. Turn. Each row adds 5 sts, so Row n has 5 x n stitches.
– Row 4: 20 sts
– Row 5: 25 sts
– Row 6: 30 sts
– Row 7: 35 sts
– Row 8: 40 sts
– Row 9: 45 sts
– Row 10: 50 sts
– Row 11: 55 sts
Do not turn after Row 11.
Rectangle
Row 12 (pick-up row): Ch 2, then rotate the piece so you can work along the straight edge. There are 11 row ends on each side of the ring.
- On the first side: 2 hdc in next row end, 1 hdc in next row end; repeat from * 5 times, then 2 hdc in the last row end. (17 hdc)
- Skip the ring center.
- On the second side: 2 hdc in first row end, 1 hdc in next row end, 2 hdc in next row end; repeat from * 5 times. (17 hdc)
Turn. (34 sts)
Rows 13–22: Ch 2, hdc in each st across. Turn. (34 sts)
Fasten off. The backboard should measure 9.7 in (24.6 cm) wide x 9.8 in (24.9 cm) tall.
Rays (Cream)
Number the 55 stitches of Row 11 from right to left. You will work 11 rays, ending at stitches 3, 8, 13, 18, 23, 28, 33, 38, 43, 48 and 53. Stitch 28 is the center ray, and the rays are mirrored on each side of it.
For each ray, start in Row 2 next to the ring. Work 1 surface sl st into each row, following a straight line out to the marked stitch of Row 11. A taut contrast thread stretched from the ring to the marked stitch makes a good guide. Keep the stitches loose so the arch stays flat. Weave in the ends on the WS.
Pockets (Make 2)
Work in joined rounds. Join each round with a sl st to the first sc, then ch 1 to begin the next round. The ch 1 does not count as a stitch.
Base (Sage Green)
Round 1: MR, ch 1, 6 sc in ring, join. (6 sts)
Round 2: 2 sc in each st. (12 sts)
Rounds 3–10: Sc in each of next (round number minus 2) sts, 2 sc in next st; repeat from * 6 times. Each round adds 6 sts, so Round n has 6 x n stitches.
– Round 3: 18 sts
– Round 4: 24 sts
– Round 5: 30 sts
– Round 6: 36 sts
– Round 7: 42 sts
– Round 8: 48 sts
– Round 9: 54 sts
– Round 10: 60 sts
Walls (Sage Green)
Round 11: Sc BLO in each st. (60 sts) This forms the ridge where the walls turn up from the base.
Rounds 12–32: Sc in each st. (60 sts)
On the final join of Round 32, change to cream. The walls should be 4.9 in (12.4 cm) tall.
Scalloped Rim (Cream)
Round 33: Sc in each st. (60 sts)
Round 34: Ch 1, sc in first st, skip 2 sts, 5 dc in next st, skip 2 sts, sc in next st; repeat from * 8 more times. Then skip 2 sts, 5 dc in next st, skip 2 sts, and join with a sl st to the first sc. (10 scallops: 10 sc + 50 dc = 60 sts)
Fasten off. The pocket should be 5.6 in (14.2 cm) tall and 4.8 in (12.2 cm) across.
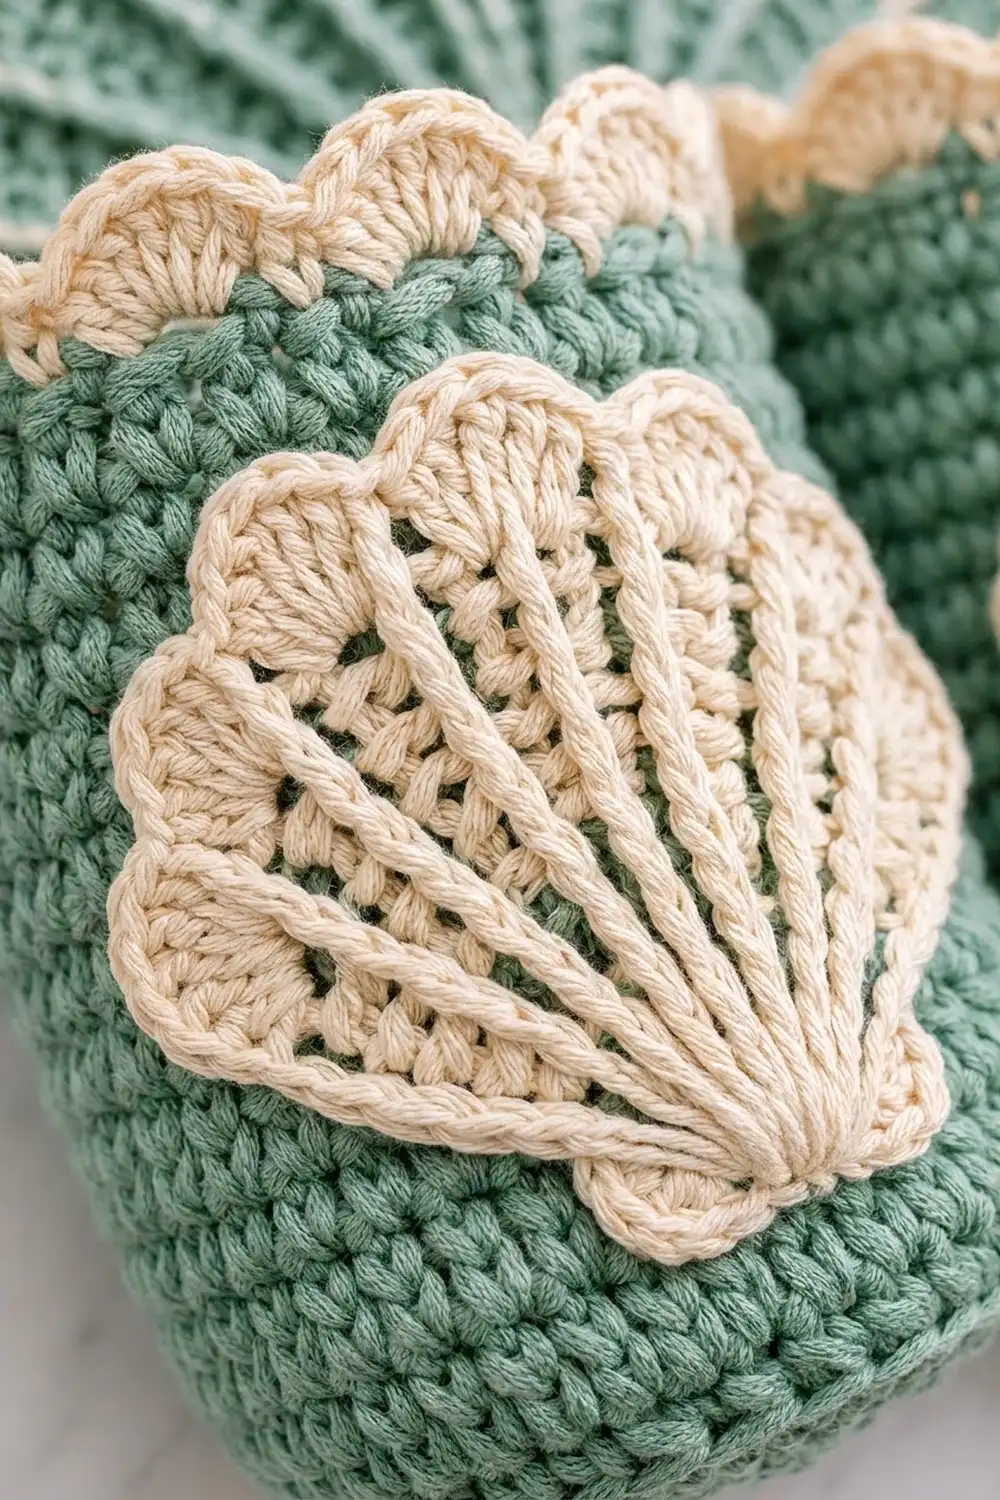
Shell Appliqués (Make 2, Cream)
The turning ch does not count as a stitch.
Row 1 (RS): MR, ch 2, 9 dc in ring. Pull the ring partly closed so it still forms a fan, then turn. (9 sts)
Row 2 (WS): Ch 2, BPdc around first st, dc in sp before next st, BPdc around next st; repeat from * 8 times. Turn. (9 BPdc + 8 dc = 17 sts)
Row 3 (RS): Ch 2, FPdc around first BPdc, 2 dc in next dc, FPdc around next BPdc; repeat from * 8 times. Turn. (9 FPdc + 16 dc = 25 sts)
Row 4 (WS, edging): Ch 1, sl st in first FPdc, (sc, hdc) in next dc, (hdc, sc) in next dc, sl st in next FPdc; repeat from * 8 times. (9 sl st + 32 sts = 41 sts, with 8 lobes)
The 9 post stitches stack into raised ribs on the RS, and the sl sts pull the valleys between lobes in toward the ribs.
Hinge: With the RS facing, join cream to the end of Row 1 on one side of the ring. Ch 5, then sl st into the end of Row 1 on the other side. Turn and work 7 sc into the ch-5 sp. Fasten off and leave a 20 in (50.8 cm) tail for sewing.
Hanging Tab (Cream)
Foundation: Ch 6.
Row 1: Sc in 2nd ch from hook and in each ch across. Turn. (5 sts)
Rows 2–16: Ch 1, sc in each st. Turn. (5 sts)
Fasten off and leave a long tail. The tab should measure 1.25 in (3.2 cm) x 3.6 in (9.1 cm).
Make All Pieces
- Sage Green: 1 backboard and 2 pocket bodies
- Cream: the rays and border on the backboard, 2 pocket rims, 2 shells and 1 tab
Layout:
            [ ring ]
            [ tab  ]
   [   arched backboard w/ rays   ]
   [ pocket + shell ][ pocket + shell ]
Joining
Before you join anything, work the backboard border (see Border) and block the backboard flat.
- Shells to pockets: Lay a pocket flat with its join line at the center back. Pin a shell to the center front, ribs pointing up. The hinge should sit 1 in (2.5 cm) above the base ridge, and the top lobes about 0.5 in (1.3 cm) below the rim. Whipstitch around the edge with the cream tail, catching the outer loops of the lobes and the hinge sc. Keep the stitches snug but not tight so the pocket wall does not pucker.
- Pockets to backboard: On Row 22, mark stitches 9 and 26 (count from either edge, because the positions are mirrored). Line up each pocket’s back join line with one marker, so the base ridge sits level with the bottom of the border. With sage green, backstitch through both layers up the pocket’s back center column from Round 11 to Round 32, which is 22 rounds. Then work a second line of backstitch 3 sts to each side of the first. Go through the backboard fabric only, never through the cream rays.
- Pockets to each other: The pockets touch at the front center line. Tack them together with 3 whipstitches near the base and 3 just below the rims.
- Tab: Fold the tab around the ring. Lay both ends against the back of the backboard at the top center so they overlap the arch by 0.75 in (1.9 cm). Whipstitch the ends to the WS, leaving about 1 in (2.5 cm) of tab showing between the scallops and the ring.
Size checkpoint: The pockets together measure 9.6 in (24.4 cm) across, and the bordered backboard extends just past them on both sides. The pocket rims overlap the base of the arch by about 0.5 in (1.3 cm).
Border
Border gauge: 16 sc = 4 in (10.2 cm). Each scallop covers 6 stitches, which is 1.5 in (3.8 cm).
Round 1 (Cream, conversion round): With the RS facing, join cream in the first stitch of Row 22. Ch 1 and work sc evenly around:
– Bottom: 3 sc in the first corner st, 1 sc in each of the next 32 sts, 3 sc in the last corner st. (34 sts worked 1-per-stitch + 4 extra = 38 sc)
– First side: 2 sc in each of the 11 rectangle row ends. (22 sc)
– Arch: 1 sc in each of the 55 sts of Row 11, adding an extra sc in sts 5, 14, 23, 33, 42 and 51. (55 sts worked 1-per-stitch + 6 extra = 61 sc) The extra stitches are mirrored on each side and let the curve lie flat.
– Second side: 2 sc in each of the 11 row ends. (22 sc)
Join with a sl st to the first sc. (143 sts)
Round 2 (scallops):
1. Sl st into the center sc of the first corner. Ch 1, sc in the same st.
2. Sc in each of the next 35 sts, ending in the center sc of the second corner. (36 sc on the bottom)
3. Skip 2 sts, 5 dc in next st, skip 2 sts, sc in next st; repeat from * 17 times.
4. Skip 2 sts, 5 dc in next st, skip 2 sts, and join with a sl st to the first sc.
(18 scallops; 53 sc + 90 dc = 143 sts)
Why the math works: Between the two bottom corner centers there are 1 corner sc + 22 + 61 + 22 + 1 corner sc + the second corner center = 108 stitches. That is exactly 18 scallops of 6 stitches each (18 x 6 = 108), so the last scallop ends at the corner where you started. The bottom edge stays plain single crochet so the pockets sit flush against it.
Final Blocking
- Block the backboard before joining. Pin it to the mat at 9.7 in (24.6 cm) wide plus the border.
- Spray it until damp. Open each scallop and pin its tip.
- Leave it to dry completely.
- Spray the shells, pin them flat at 3.5 in (8.9 cm) wide, and pin out each lobe.
- Fill each pocket with a toilet roll or a rolled towel, spray it lightly and let it dry upright.
- After joining, steam the scallops lightly if they need it. Do not press the raised rays or ribs flat.
Final Quality-Control Checklist
- [ ] The arch has 55 sts in Row 11 and the rectangle has 34 sts in each row.
- [ ] There are 11 rays, mirrored around the center ray, and none of them puckers the fabric.
- [ ] Border Round 1 has 143 sts and Round 2 has 18 even scallops.
- [ ] Each pocket has 60 sts and 10 rim scallops, and it holds a roll easily.
- [ ] The shells are centered, their ribs point straight up, and they are sewn down all the way around.
- [ ] The pocket bases are level with the bottom edge of the border.
- [ ] The tab is secure and the ring is centered.
- [ ] All ends are woven in on the WS.
Troubleshooting
- The arch ripples: your rows are too short. Loosen your yarn-overs or use a hook 0.5 mm smaller for the arch only.
- The arch cups: your rows are too tall. Pull up shorter loops.
- The rays pull the arch in: take them out and redo them with a larger hook.
- The pocket is too tight for a roll: add one increase round (66 sts). Round 34 then has 11 scallops.
- The pocket walls slant outward: your tension is too loose. Go down 0.5 mm in hook size for the walls.
- The shell curls: pin it while damp and let it dry fully before sewing.
- The scallops won’t come out even: recount Border Round 1. You need 108 stitches between the two corner centers.
Care
Hand wash in cool water, press out the excess water in a towel, and dry flat with the pockets stuffed so they keep their shape. Do not tumble dry.
Final Notes
The measurements build on each other in this order:
– The arch ends at Row 11, which has 55 sts and measures 9.8 in (24.9 cm) across.
– The rectangle is 34 sts, or 9.7 in (24.6 cm) wide.
– Border Round 1 has 143 sts, and Round 2 has 18 scallops that add 0.75 in (1.9 cm).
– The bordered backboard is 11.2 in (28.4 cm) x 10.8 in (27.4 cm).
– The pockets are 60 sts around, which gives 4.8 in (12.2 cm) across and 5.6 in (14.2 cm) tall.
If you check gauge first and confirm each checkpoint as you go, the holder will hang straight and hold two rolls neatly.
Happy crocheting!